Actualizado: 11 de febrero de 2026
 Desde crear tu primera tarea hasta supervisar el progreso y las actividades de tu equipo, esta guía te ayudará a empezar a usar Plaky by CAKE.com y a aumentar tu productividad.
Una vez que hayas configurado tu primer proyecto en Plaky, es hora de explorar el resto de las funciones de esta aplicación.
¡Dejemos de perder el tiempo y descubramos todo lo que Plaky tiene para ofrecer!
- Plaky es un software de gestión de proyectos fácil de usar con un generoso plan gratuito y un amplio centro de conocimiento.
- Utiliza Plaky para organizar tareas, colaborar con compañeros y clientes, ahorrar tiempo y cumplir con los plazos.
- Las funciones avanzadas de Plaky incluyen organización avanzada de espacios, carpetas y tableros, automatización de tableros, permisos de usuario avanzados, rol de lector, registro de actividad, fila de resumen y mucho más.
- Plaky se integra de forma nativa con Clockify by CAKE.com (control del tiempo y facturación) y Pumble by CAKE.com (comunicación en equipo) como parte de un paquete de productividad avanzado.
¿Por qué utilizar Plaky by CAKE.com?
En un mercado saturado de competidores, Plaky destaca como una opción fácil de usar para cualquier equipo. Su interfaz sencilla te permite empezar a gestionar proyectos y la carga de trabajo del equipo de inmediato, sin reglas ni instrucciones complicadas.
Sin embargo, si necesitas ayuda en cualquier momento, puedes visitar nuestro centro de conocimiento, blog, y centro de ayuda.
El generoso plan gratuito te permite organizar tareas y colaborar con equipos, pero los planes de pago de Plaky ofrecen funciones que mejoran tus habilidades de gestión de proyectos.
Usa Plaky para trabajar de forma más eficiente:
- Organizando tu espacio de trabajo,
- Cumpliendo con los plazos,
- Colaborando con compañeros y clientes,
- Manteniéndote siempre al día, y
- Ahorrando tiempo eliminando el trabajo manual.
Ahora, veamos en detalle las funciones de Plaky.
Organiza tu espacio de trabajo
Uno de los principales problemas para cualquier gerente de proyectos es que la información se dispersa en diferentes aplicaciones y documentos ocultos. En Plaky, puedes reunir toda la información necesaria y mantenerla organizada con:
- Espacios,
- Carpetas de tablero, y
- Vistas de tablero múltiples.
Espacios
Si analizas la organización y jerarquía de Plaky, verás que los espacios son el nivel más alto de tu espacio de trabajo. Puedes tener uno o más espacios, según la complejidad de tu organización.
Por ejemplo, una empresa con una docena de empleados que trabaja en un proyecto interno puede necesitar solo un espacio. Por otro lado, los equipos pequeños con más clientes necesitan mantener sus proyectos separados.
Para quienes atienden a diferentes clientes o tienen varios departamentos, usar varios espacios es la mejor opción. Y si tienes dudas sobre la seguridad, no te preocupes. Puedes configurar permisos de espacio para que solo ciertos miembros puedan acceder a los diferentes espacios.
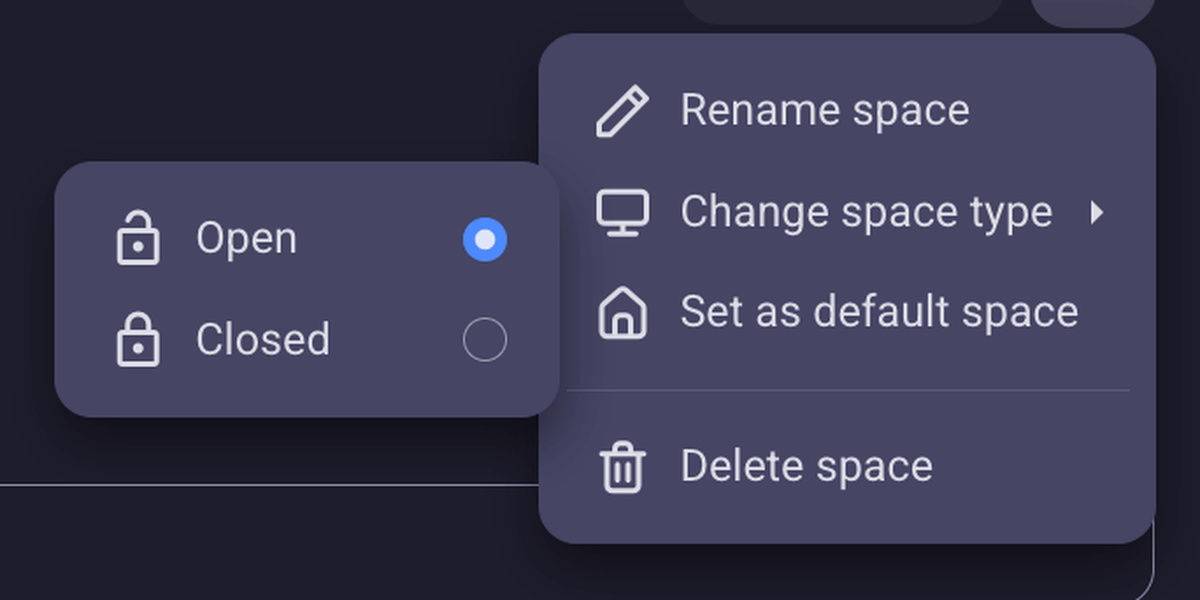
También puedes crear espacios abiertos a los que cualquier usuario de tu cuenta de Plaky pueda acceder. Estos espacios son especialmente importantes para compartir información general de la empresa y conocimientos.
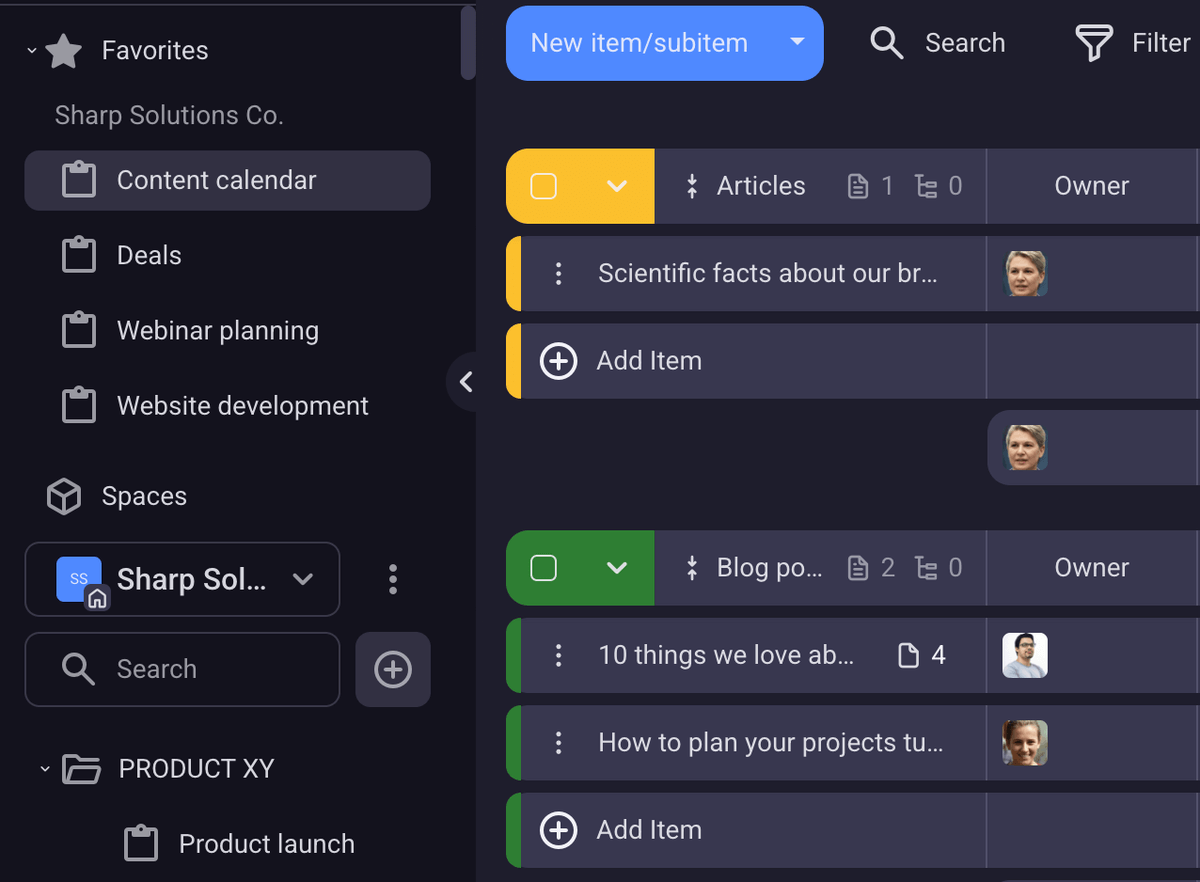
Carpetas
Cada espacio contiene tableros de Plaky, los cuales se pueden organizar en carpetas. Si tienes un espacio con más de 50 tableros, puedes organizarlos en carpetas para facilitar la navegación.
En la barra lateral de Plaky, verás una lista de carpetas que puedes expandir y contraer. De esta forma, podrás encontrar y acceder al tablero que necesitas en cuestión de segundos.

Crea un tablero de proyecto en Plaky ahora
Tableros favoritos
Si lo usas, no lo pierdas. Marca con una estrella tus tableros más utilizados y encuéntralos cada día en la barra lateral de Plaky.
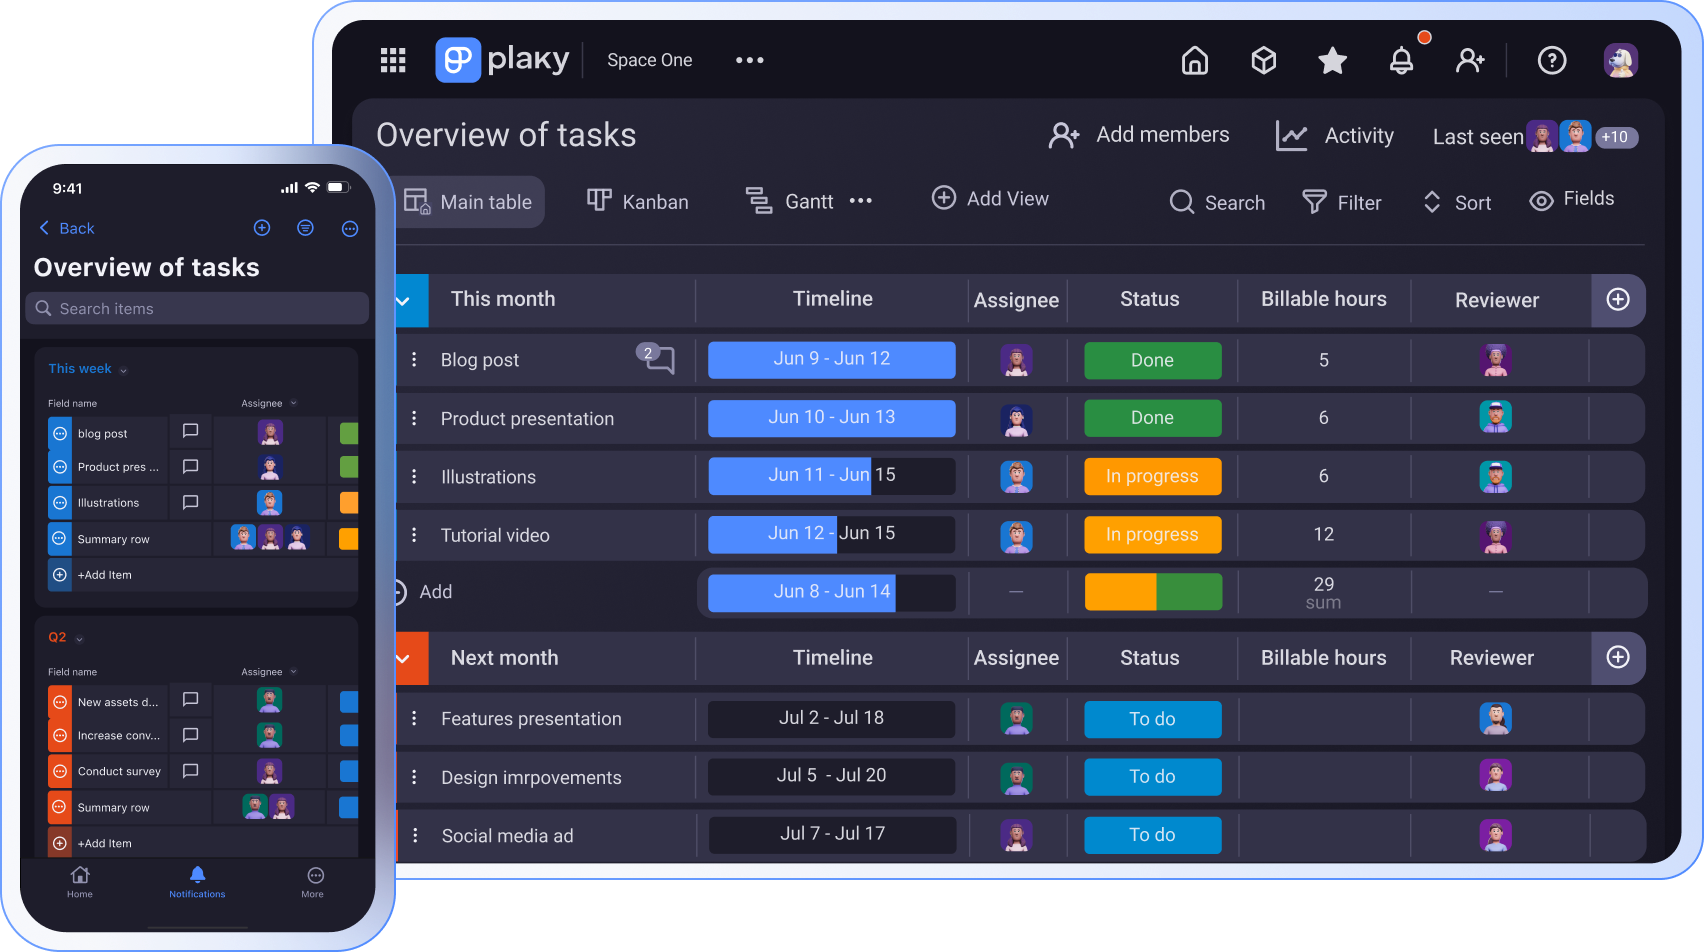
Vistas de tablero
Plaky ofrece 4 vistas de tablero:
- Tabla: Gestiona datos complejos con la vista predeterminada,
- Kanban: Organiza tus tareas en columnas,
- Diagrama de Gantt: Visualiza la línea de tiempo del proyecto, y
- Gráfico: Visualiza los datos del proyecto con gráficos circulares y de barras.
Tus tableros se mostrarán automáticamente en la vista de tabla, mientras que las demás vistas se pueden generar según tus necesidades y preferencias.
Los usuarios pueden filtrar tableros y guardar cada uno como una vista independiente, asignándole un nombre que refleje los datos que muestra, lo que facilita su búsqueda y acceso. Si quieres una versión personal de tu tablero a la que solo tú puedas acceder, también puedes crear una vista privada.
Así es como se crea una nueva vista de tablero en Plaky:
- Haz clic en el icono de engranaje y selecciona Crear nueva vista (Create new view).
- Elige el tipo de vista que quieres crear: Tabla, Kanban, Gantt o Gráfico.
- Añade el nombre del tablero.
- Activa o desactiva la configuración de privacidad.
💡 CONSEJO PRO DE PLAKY
¿Buscas una forma rápida de empezar tus proyectos? Elige una de nuestras plantillas prediseñadas:
Vista de tabla
La vista de tabla está organizada en filas y campos, y es ideal para proyectos con gran cantidad de datos.
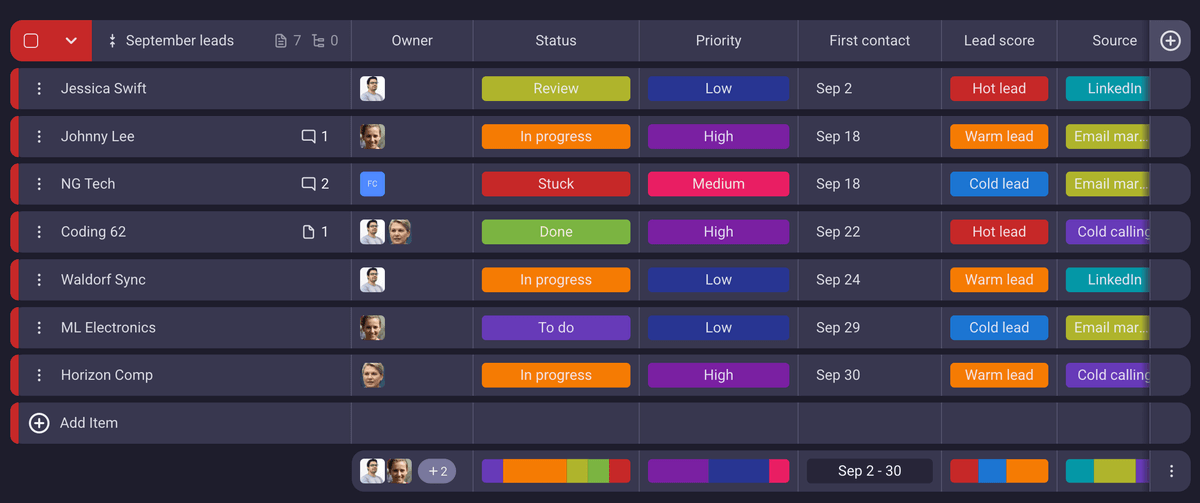
Esta vista te ofrece una visión general de las tareas, fácil de entender y completa, y es la mejor opción para introducir datos detallados. Primero puedes añadir toda la información en la vista de tabla y luego generar otras vistas a partir de ella.
Prueba Plaky by CAKE.com ahora
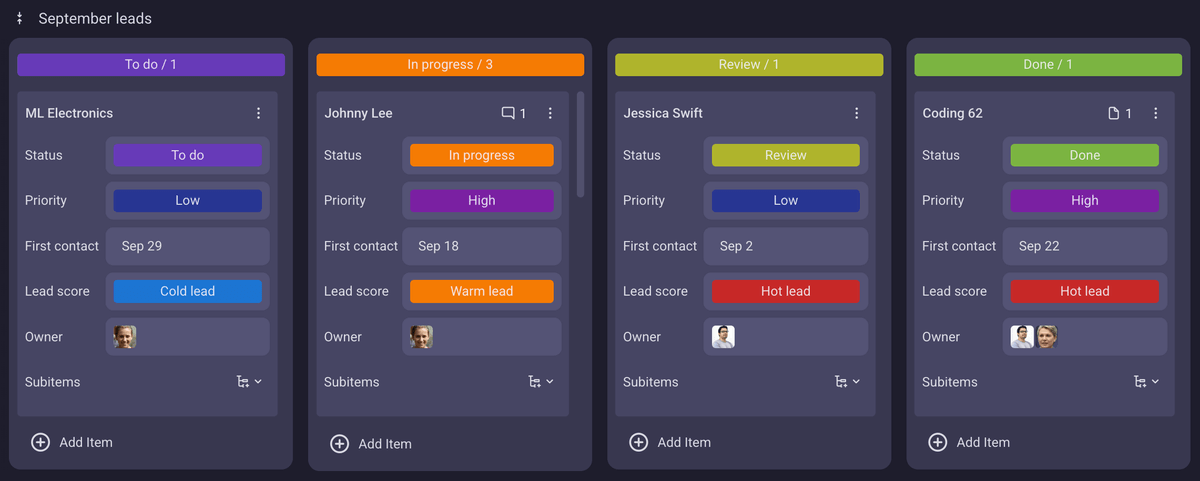
Vista Kanban
La vista Kanban es una opción excelente para equipos ágiles que necesitan saber cómo progresan sus tareas. Se basa en la metodología Kanban, que clasifica las tareas según su estado (Pendiente, En curso, Hecho).
Al generar una nueva vista Kanban, todos tus elementos se agruparán por estado.
Vista de Gantt
En la vista de Gantt, las tareas se representan como barras horizontales en una línea de tiempo, lo que proporciona claridad sobre la duración de las tareas y el cronograma del proyecto en todas sus fases.
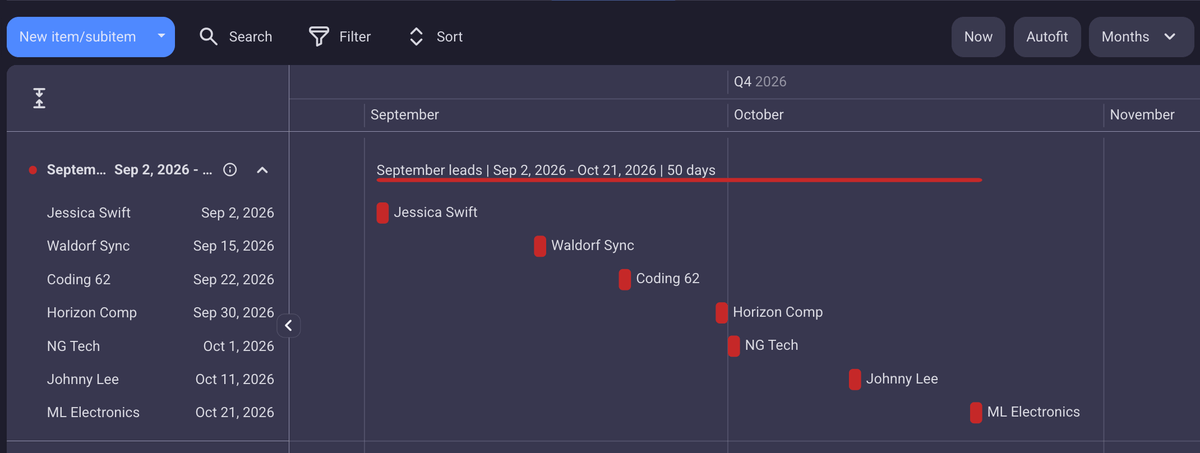
Puedes mover los elementos en la línea de tiempo arrastrándolos y soltándolos; se reorganizarán automáticamente para formar una composición en cascada (Waterfall).
💡 La vista de diagrama de Gantt solo está disponible en los planes Pro y Enterprise de Plaky.
Vista de gráfico
La vista de gráfico facilita la comprensión de datos complejos y te permite analizar la productividad y el rendimiento de tu equipo.

Los gráficos pueden mejorar la claridad de todo el proyecto y la toma de decisiones al proporcionarte información en tiempo real sobre múltiples conjuntos de datos.
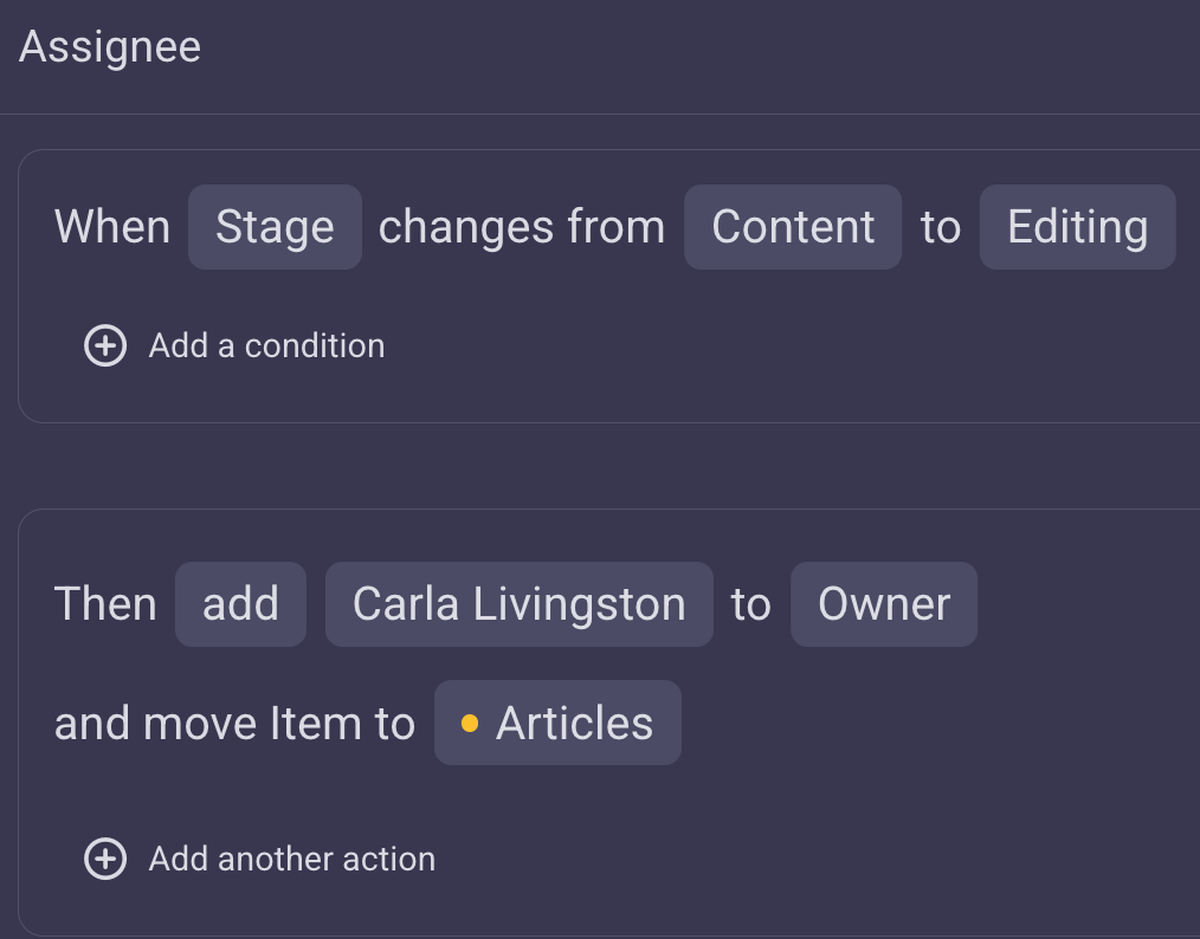
Automatizaciones del tablero
Plaky te permite descansar la mente y los dedos reduciendo el trabajo manual con las automatizaciones del tablero.
Solo tienes que configurar activadores específicos que iniciarán ciertas acciones al activarse. Las automatizaciones siguen una fórmula sencilla:
Cuando ocurre algo (activador) → Realizar una acción automáticamente (acción)
También puedes añadir condiciones a tus automatizaciones para garantizar aún más la precisión de un activador.
💡 CONSEJO PRO DE PLAKY
Aprende a usar las automatizaciones de tablero para crear un flujo de trabajo más eficaz en Plaky:
Tareas recurrentes
La automatización más solicitada consiste en repetir ciertas tareas con regularidad. Puedes definir con qué frecuencia quieres que se cree una tarea en Plaky, a qué hora y cuándo detener la automatización.
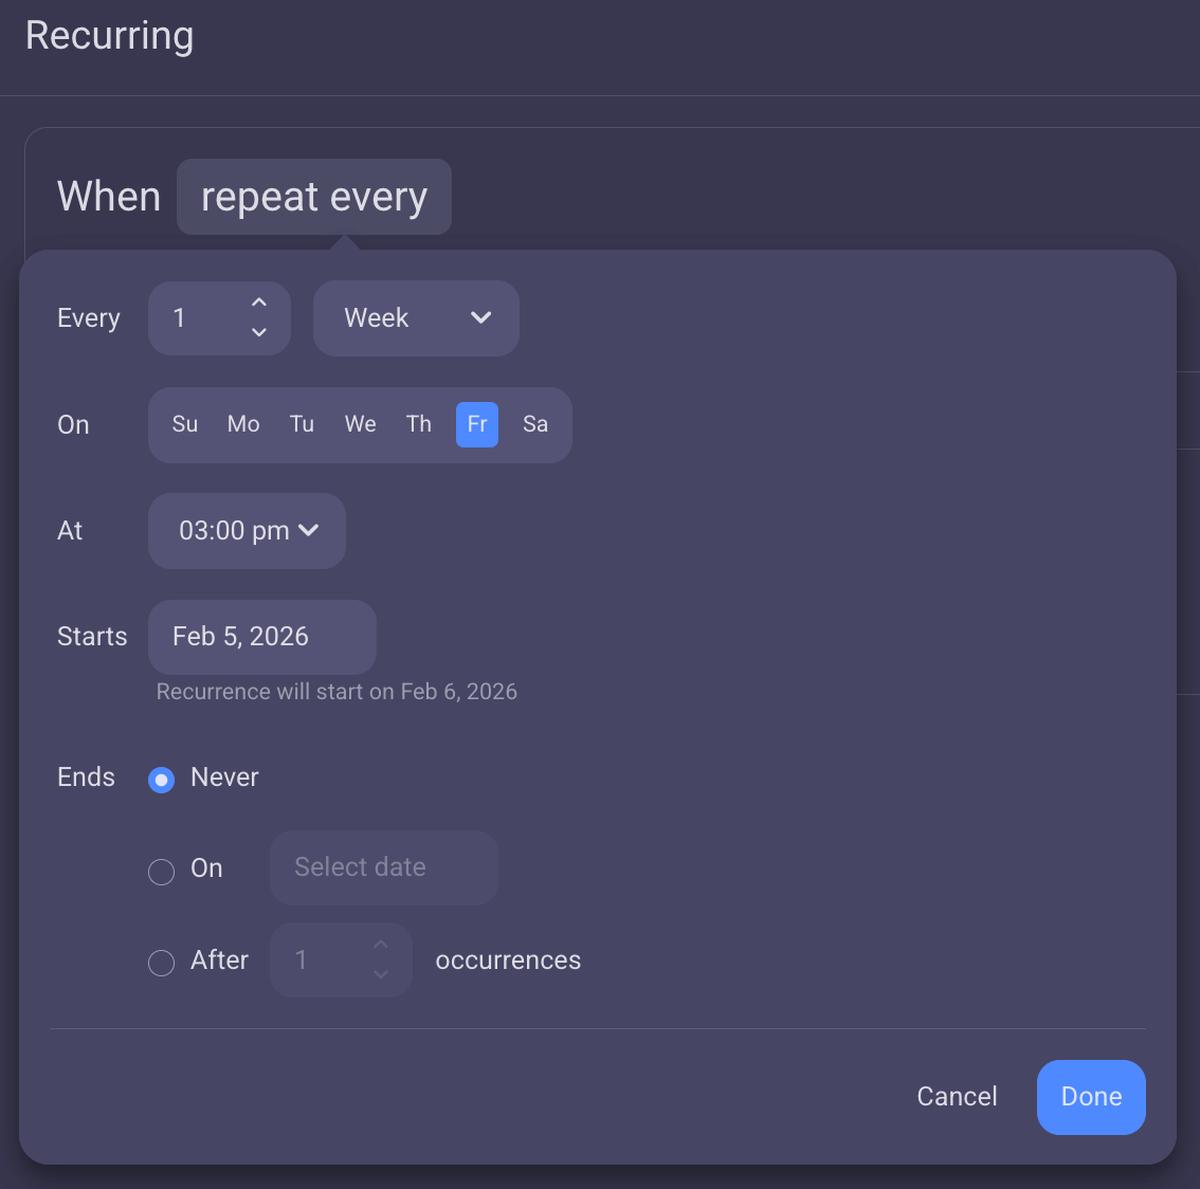
Esta función es especialmente útil para los gerentes que necesitan completar informes cada semana o mes. También puedes usarla como recordatorio para tareas repetitivas.
💡 CONSEJO PRO DE PLAKY
¡Tenemos aún más funciones interesantes próximamente! Descubre las novedades y las últimas actualizaciones:
Cumple con el cronograma
Los equipos de sectores como marketing, construcción y desarrollo de software saben lo importante que es cumplir con los plazos. Plaky te garantiza que nunca te pierdas un plazo y que tus equipos completen las tareas a tiempo.
Establece fechas de vencimiento
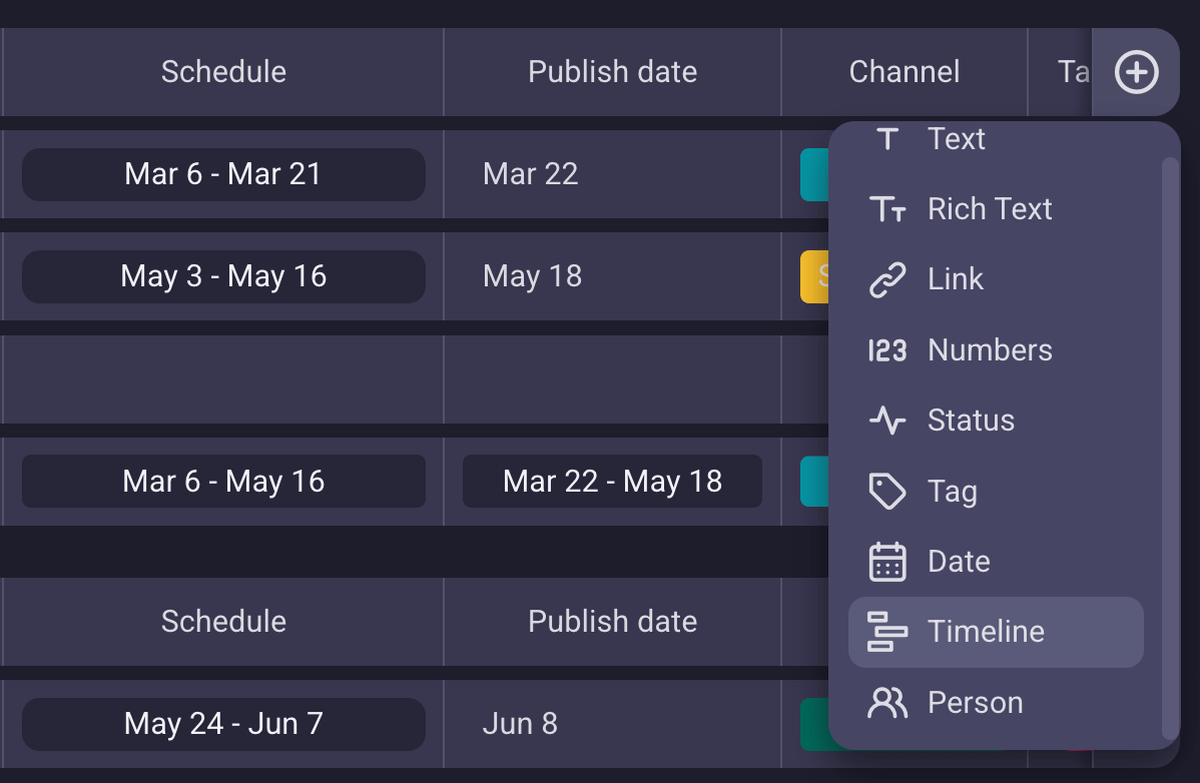
Puedes incluir fechas de vencimiento en tu tablero de Plaky con campos personalizados. Simplemente añade un campo y selecciona su tipo:
- Fecha: solo para fechas de vencimiento, o
- Cronograma: cuando quieras incluir las fechas de inicio y finalización.
Ordenar y filtrar
Al personalizar tu tablero de Plaky con varios campos, también podrás ordenar y filtrar los datos. Por ejemplo, puedes ordenar las tareas por fecha, de modo que las más urgentes aparezcan al principio de la lista. Luego, puedes filtrar el tablero por asignado y listo: tendrás una visión general de la carga de trabajo de cada persona o equipo.
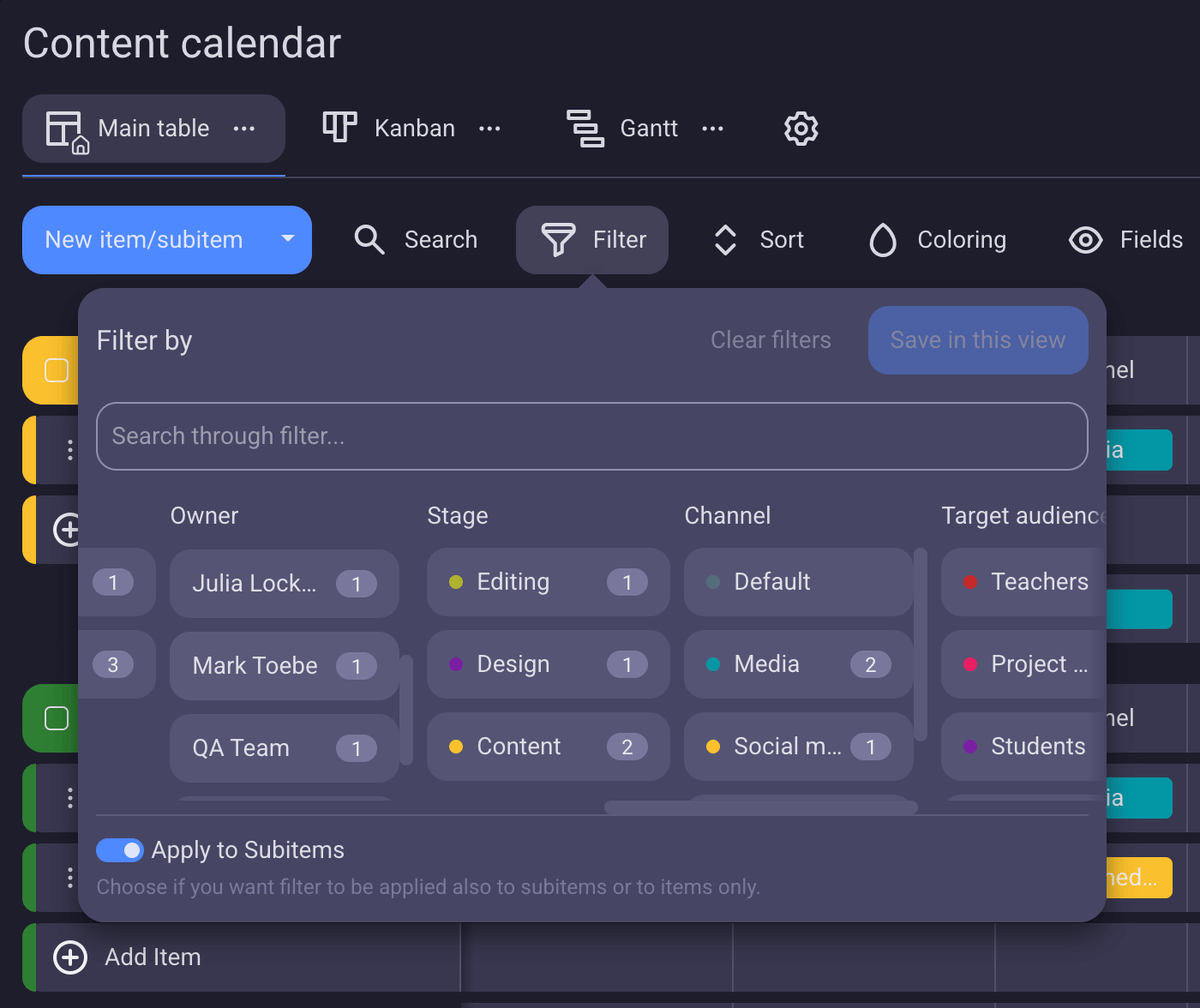
Aquí tienes otro ejemplo: ordena por fecha y filtra por estado. Esta combinación te permitirá ver si hay tareas pendientes que aún no se han completado, pero cuyo estado sigue siendo "Pendiente". Detectar estos retrasos a tiempo te evitará problemas más adelante.
Coloración condicional
A veces, lo mejor es usar señales visuales que llamen la atención. Cuando tienes demasiados tableros, es muy fácil perder de vista las fechas y las prioridades.
En Plaky, puedes definir condiciones para colorear celdas o filas enteras. Así, cuando se acerque una fecha límite, una fila roja llamará la atención del equipo inmediatamente.
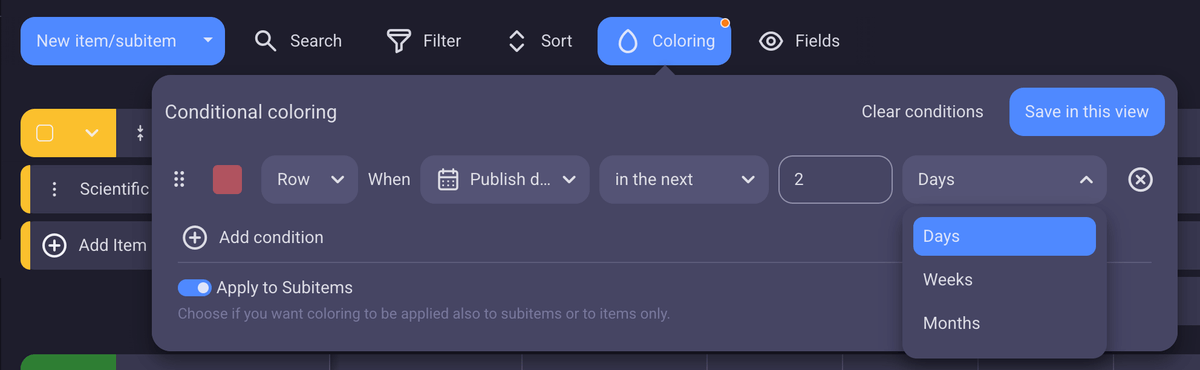
Cada campo que crees en el tablero de Plaky puede usarse para definir una condición de color. Esto significa que una fila puede volverse verde cuando se asigne una persona específica o cuando un enlace contenga ciertas palabras.
Mis tareas
Todas las tareas de Plaky que te han sido asignadas aparecerán en la sección Mis tareas (My tasks), para que nunca te pierdas ninguna y siempre sepas en qué trabajar a continuación.
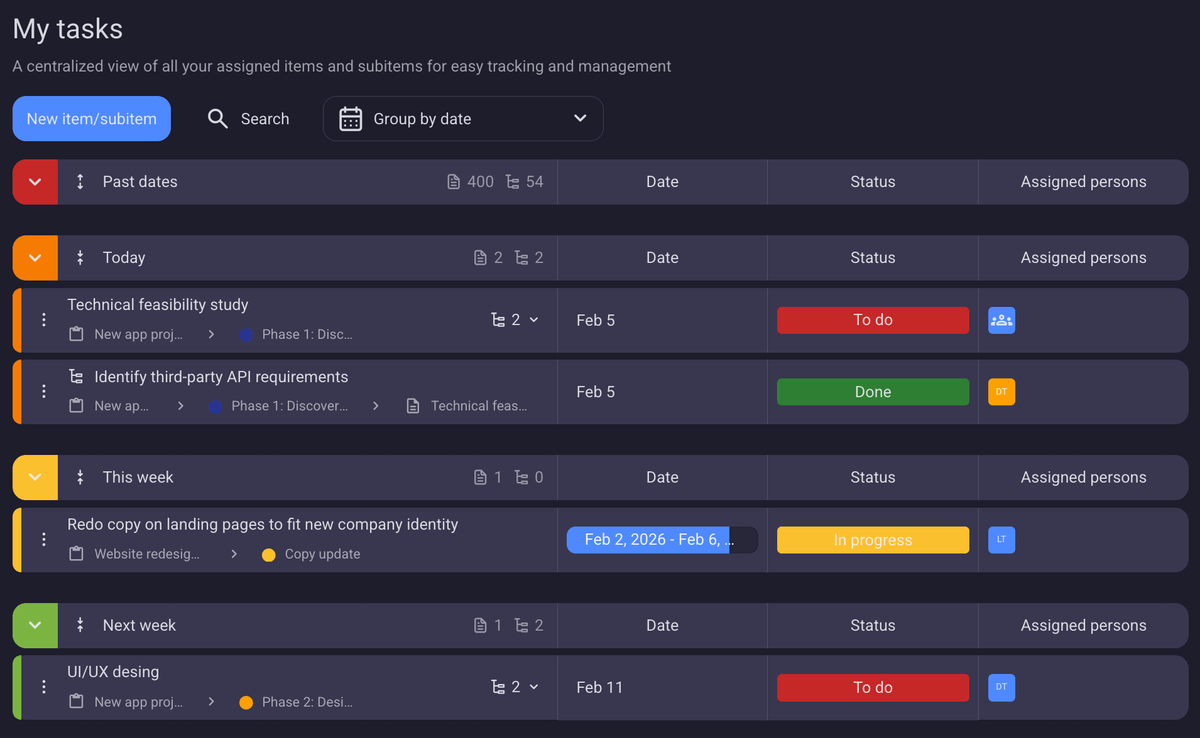
Puedes agrupar tus tareas por fecha, estado o tablero. Si las agrupas por fecha, sabrás cuáles son tus prioridades sin tener que consultarlas dos veces.
Invita a miembros del equipo y clientes
Incluso los freelancers y las microempresas colaboran con clientes o tienen diferentes equipos. La mejor manera de organizar la comunicación y las actualizaciones es mantener a todos en la misma app.
En Plaky, puedes decidir qué permisos y restricciones quieres aplicar a cada persona que incluyas en tu cuenta.
En concreto, estos son los 3 roles de usuario que puedes asignar en Plaky:
- Administrador: tiene acceso a todos los permisos de la cuenta,
- Miembro: puede crear y editar tableros y elementos, añadir comentarios e invitar a usuarios, y
- Lector: puede ver el contenido de los tableros.
💡 El rol de lector solo está disponible en los planes de pago de Plaky.
Además, es posible incluir o excluir personas de ciertos espacios de trabajo asignándoles:
- Permisos de espacio y
- Permisos de tablero.

Colabora con equipos
Los equipos remotos y las empresas multinacionales saben mejor que nadie que necesitan las herramientas adecuadas para que el negocio siga funcionando. Desafortunadamente, muchos equipos se ven abrumados por demasiadas aplicaciones e información dispersa.
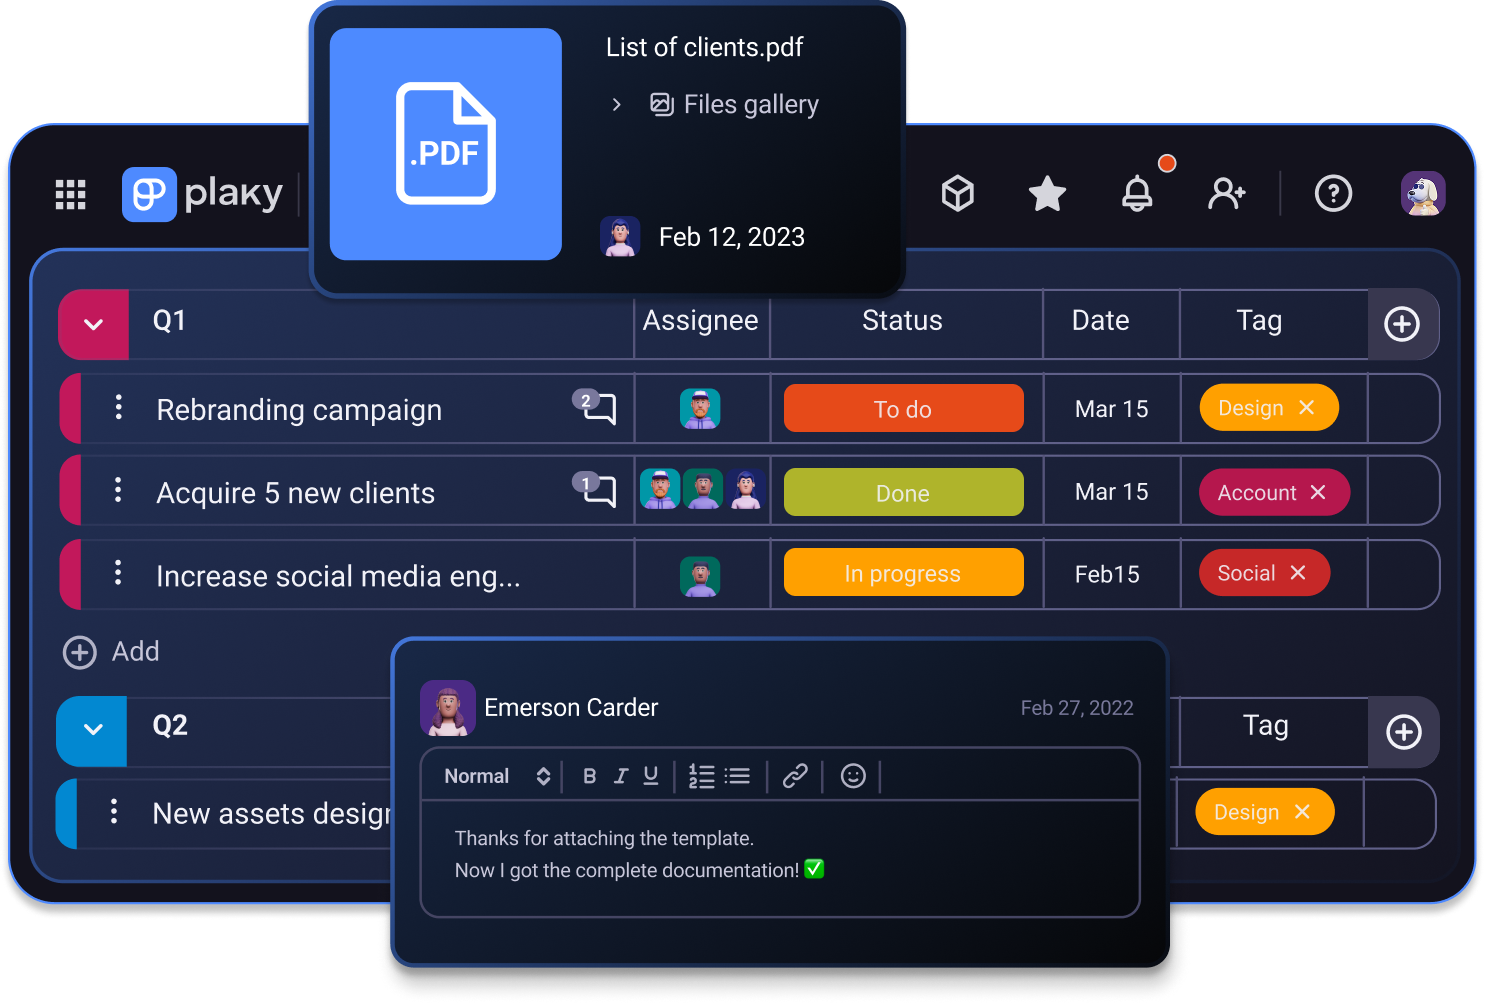
Comentarios
Todos sabemos lo molesto que es redactar correos electrónicos que empiezan con “Sobre el asunto de…” o convocar reuniones con “Recuerda esa tarea…”. Deja de perder el tiempo dando instrucciones y empieza a compartir actualizaciones con tareas bien organizadas y descritas.
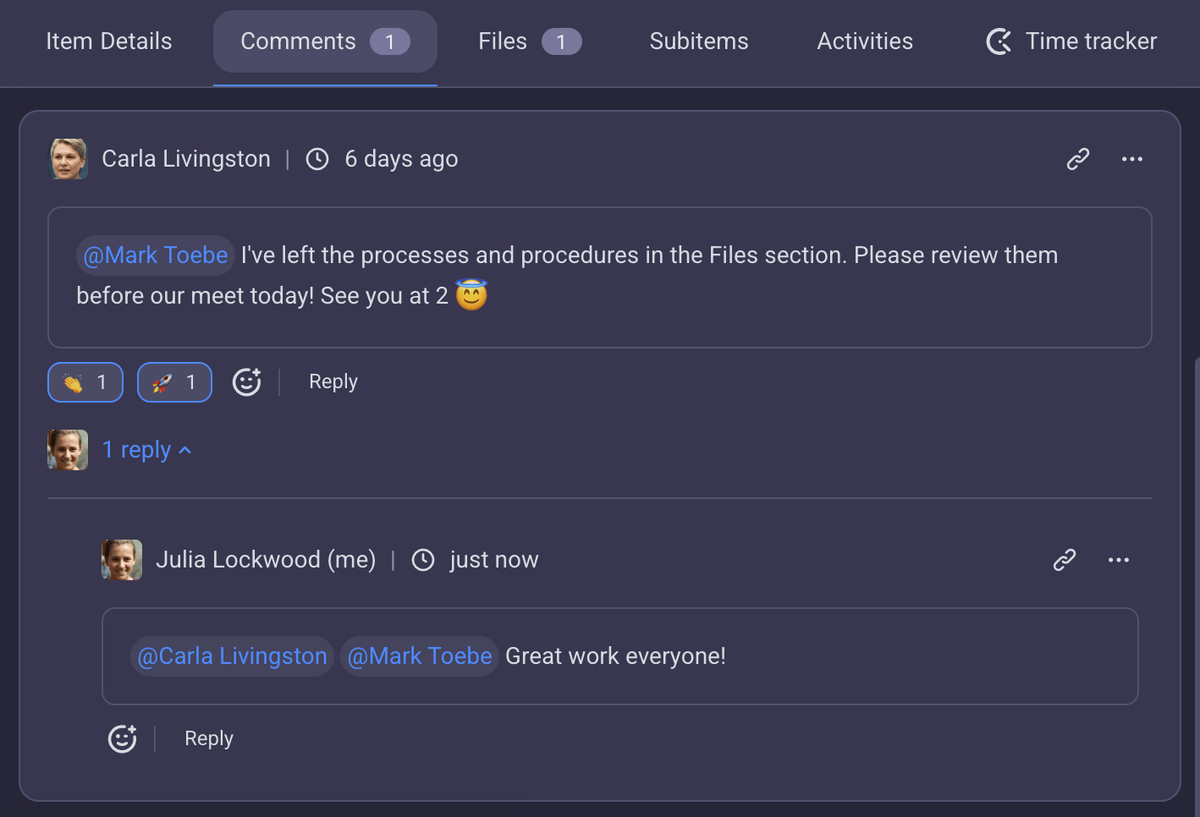
Cada elemento y subelemento en Plaky tiene una sección de comentarios donde puedes mencionar a personas o equipos. Mantén la conversación activa con hilos de comentarios dinámicos donde los miembros del equipo pueden responder a las actualizaciones y reaccionar con emojis.
Además, ya no tendrás que asistir a reuniones que podrían haberse resuelto con un simple comentario o reacción en Plaky.
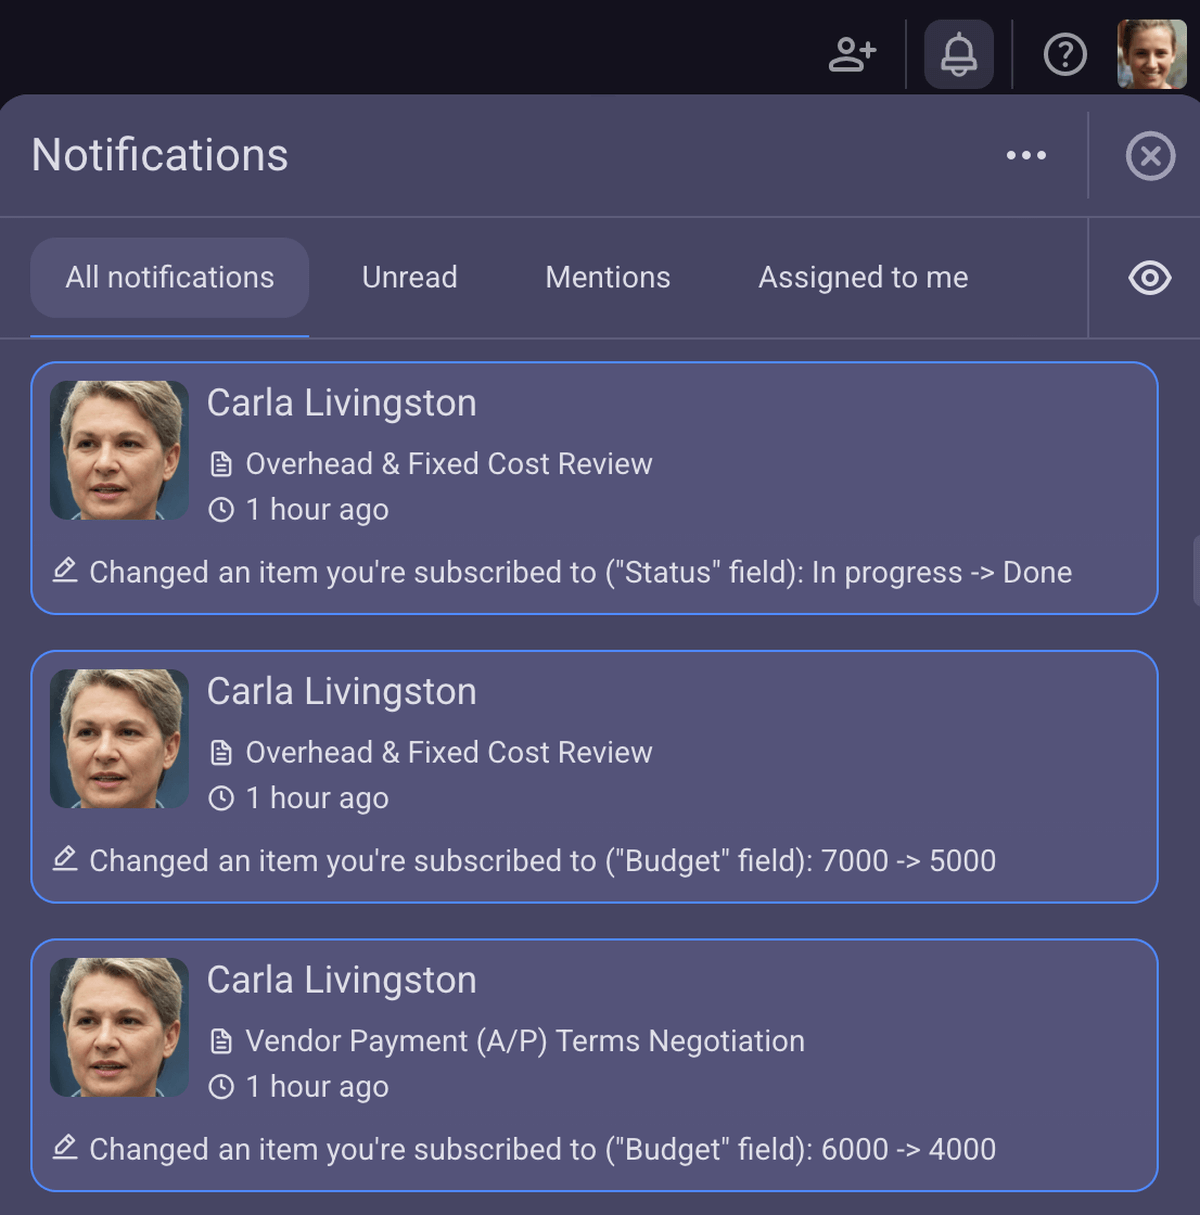
Notificaciones
¿Para qué hacer una llamada rápida si puedes recibir notificaciones en tiempo real en Plaky? Si estás suscrito a un elemento, recibirás una notificación cada vez que haya un cambio en cualquiera de sus elementos.
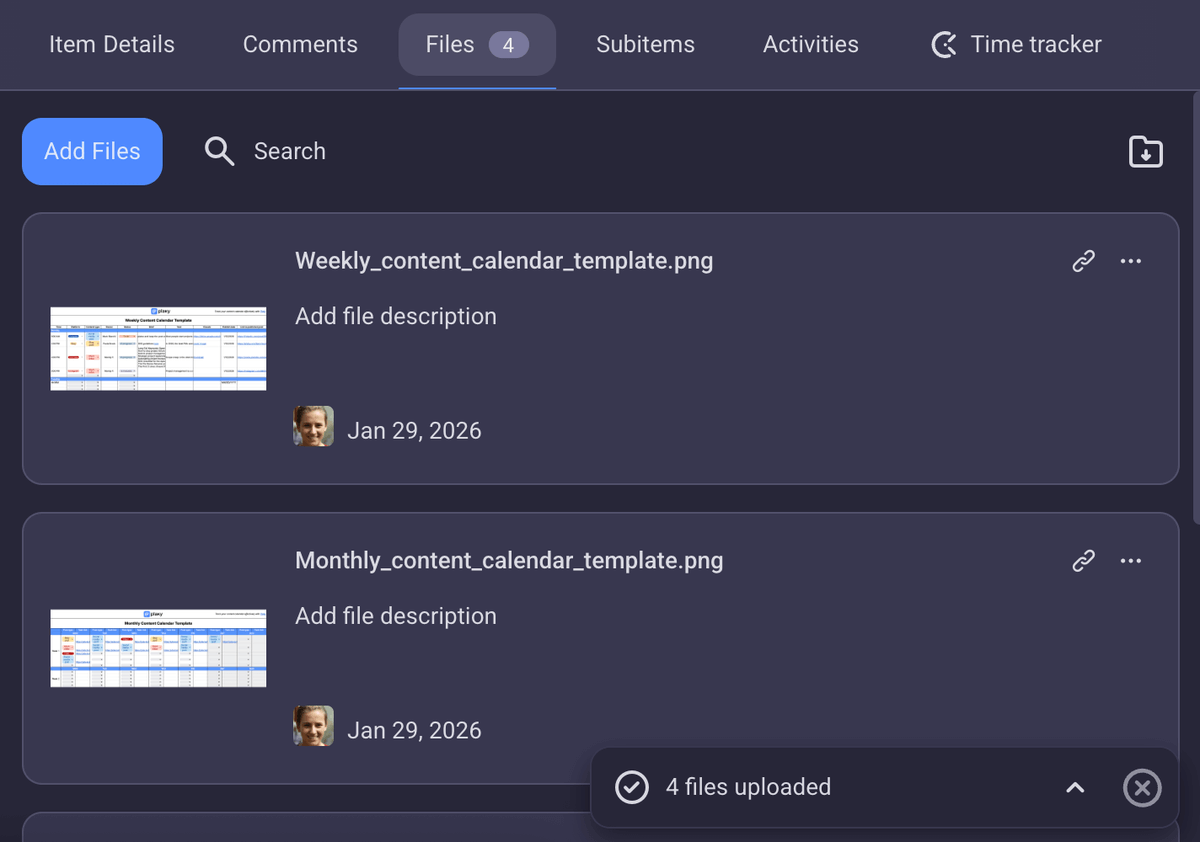
Archivos
Casi todos los sectores dependen de una gran cantidad de documentos, imágenes y archivos, pero estos a menudo se pierden o se extravían.
Plaky te permite adjuntar archivos a cada elemento, convirtiéndose en tu propio centro de información donde nada se pierde y todos los datos están disponibles en cada momento.
Controla el progreso
Cuando varios equipos trabajan en múltiples proyectos, es fácil perder de vista quién hizo qué, cuándo y cuál es el estado general. En Plaky, puedes hacer un seguimiento de cada cambio realizado en tableros y elementos, así como consultar el estado de cada campo.
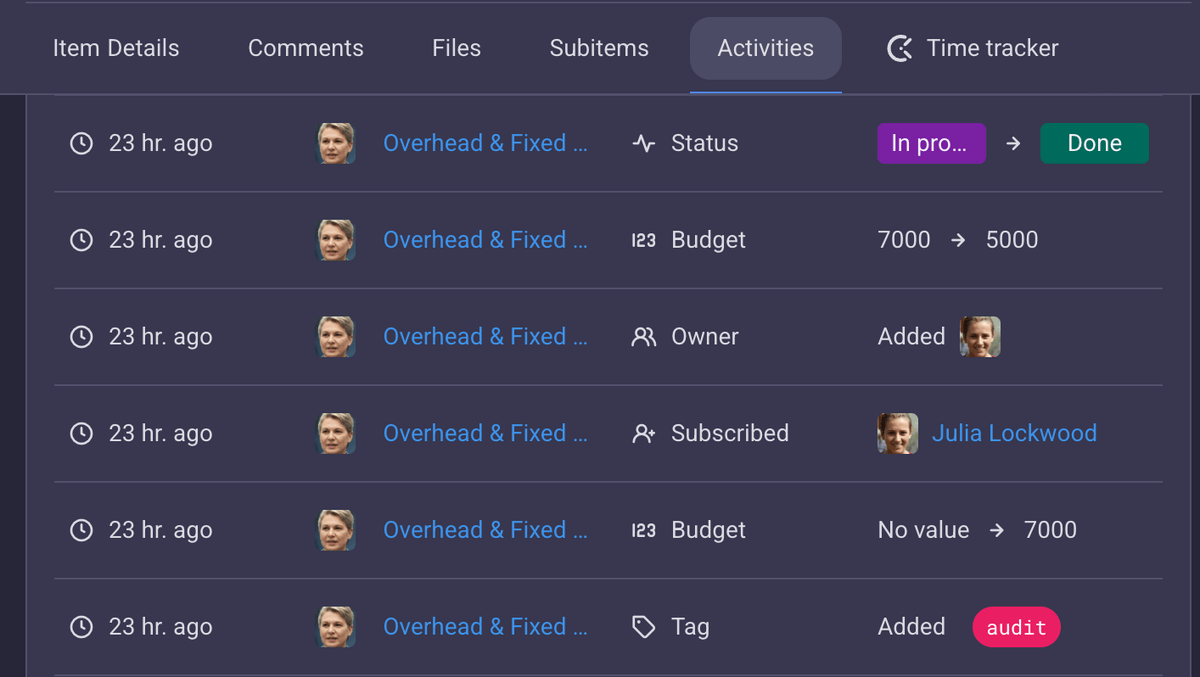
Registro de actividad
Plaky ofrece 3 tipos de registro de actividad:
- Registro de actividad del tablero: muestra los cambios más recientes realizados en un tablero (miembros del equipo suscritos recientemente, elementos eliminados, etc.),
- Registro de actividad del elemento: muestra los cambios recientes en los elementos (cambios de estado, fechas límite, responsables, etc.), y
- Última vez visto: muestra qué miembros del equipo estuvieron activos recientemente y hace cuánto tiempo.
Empieza tu prueba gratuita de Plaky de 7 días
Fila de resumen
Al configurar campos personalizados para tu tablero de Plaky, también puedes personalizar su fila de resumen. Esta función es ideal para datos financieros, pero también te mostrará cuántas tareas de un grupo de elementos están en curso y cuántas están completadas.
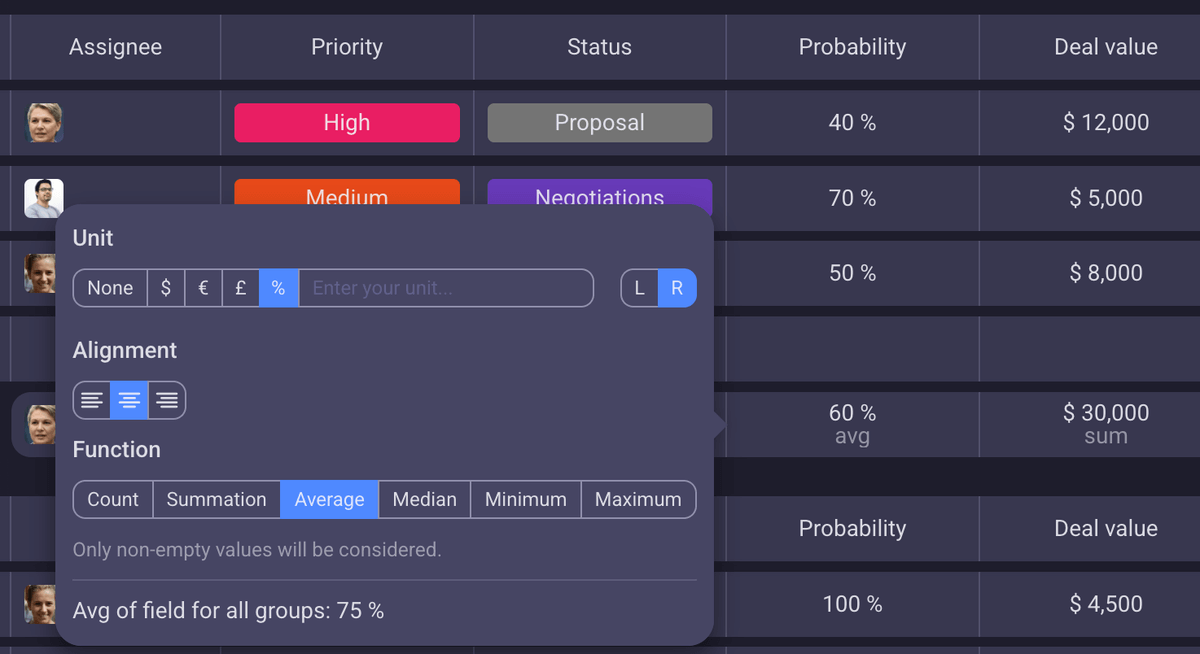
Con un vistazo simple, obtendrás una visión general rápida con totales, promedios y datos clave para que puedas ver al instante cómo van las cosas y tomar decisiones más acertadas sobre la marcha.

Integra Plaky con Clockify y Pumble by CAKE.com
Si necesitas una herramienta de control del tiempo y una app para chatear con tus compañeros, estás de suerte, ya que el paquete de productividad de CAKE.com incluye Plaky, Pumble y Clockify. Las tres apps están integradas y puedes usarlas como un centro digital completo.
Chatea y recibe alertas
Pumble es una app de comunicación que te permite chatear y colaborar con tus equipos a diario. Al activar la integración de Pumble + Plaky, recibirás notificaciones cuando haya cambios en Plaky.
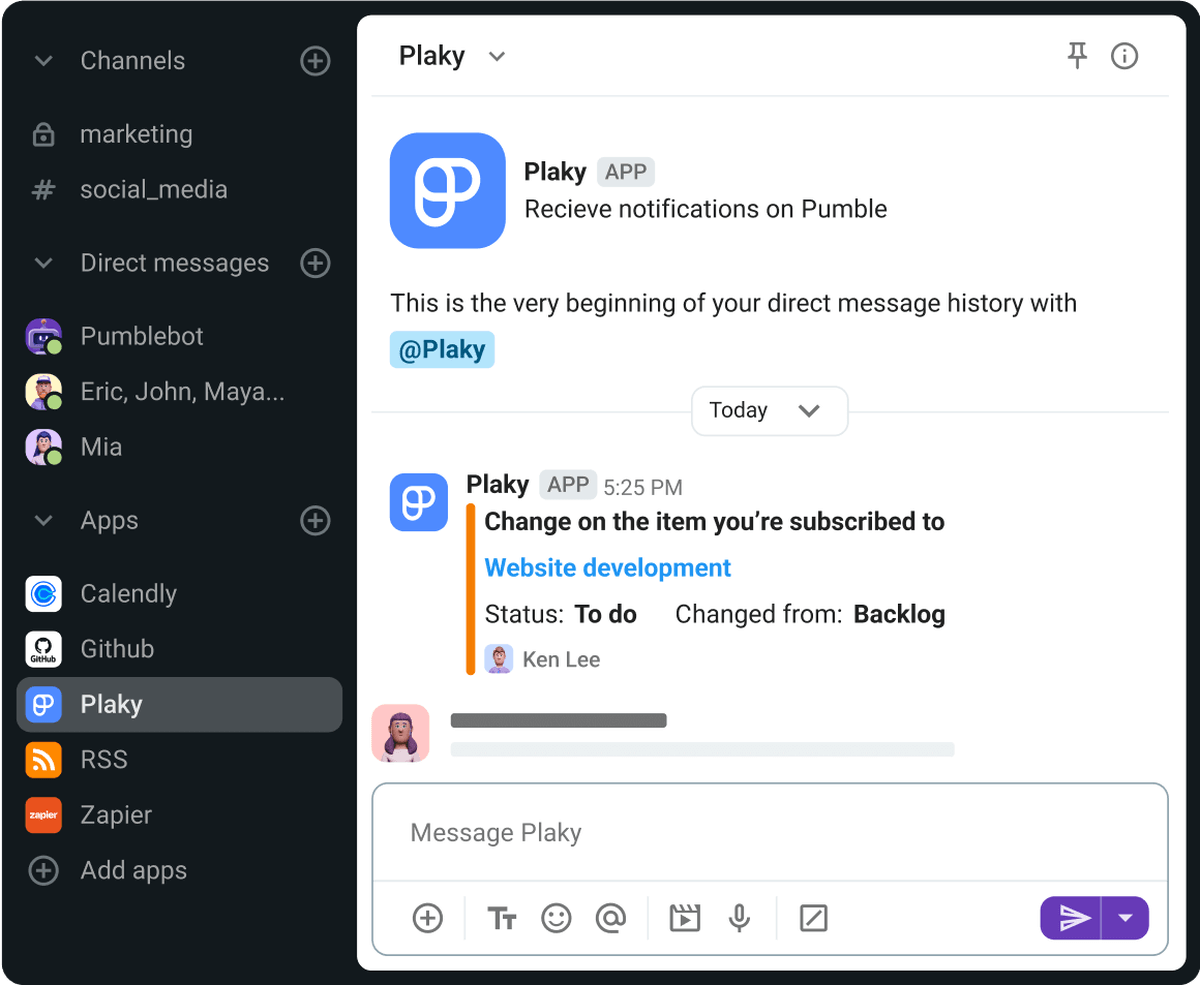
Por supuesto, no tienes por qué recibir un montón de notificaciones, ya que la integración te permite personalizar la configuración. El objetivo es mantenerte al día y en contacto con el equipo.
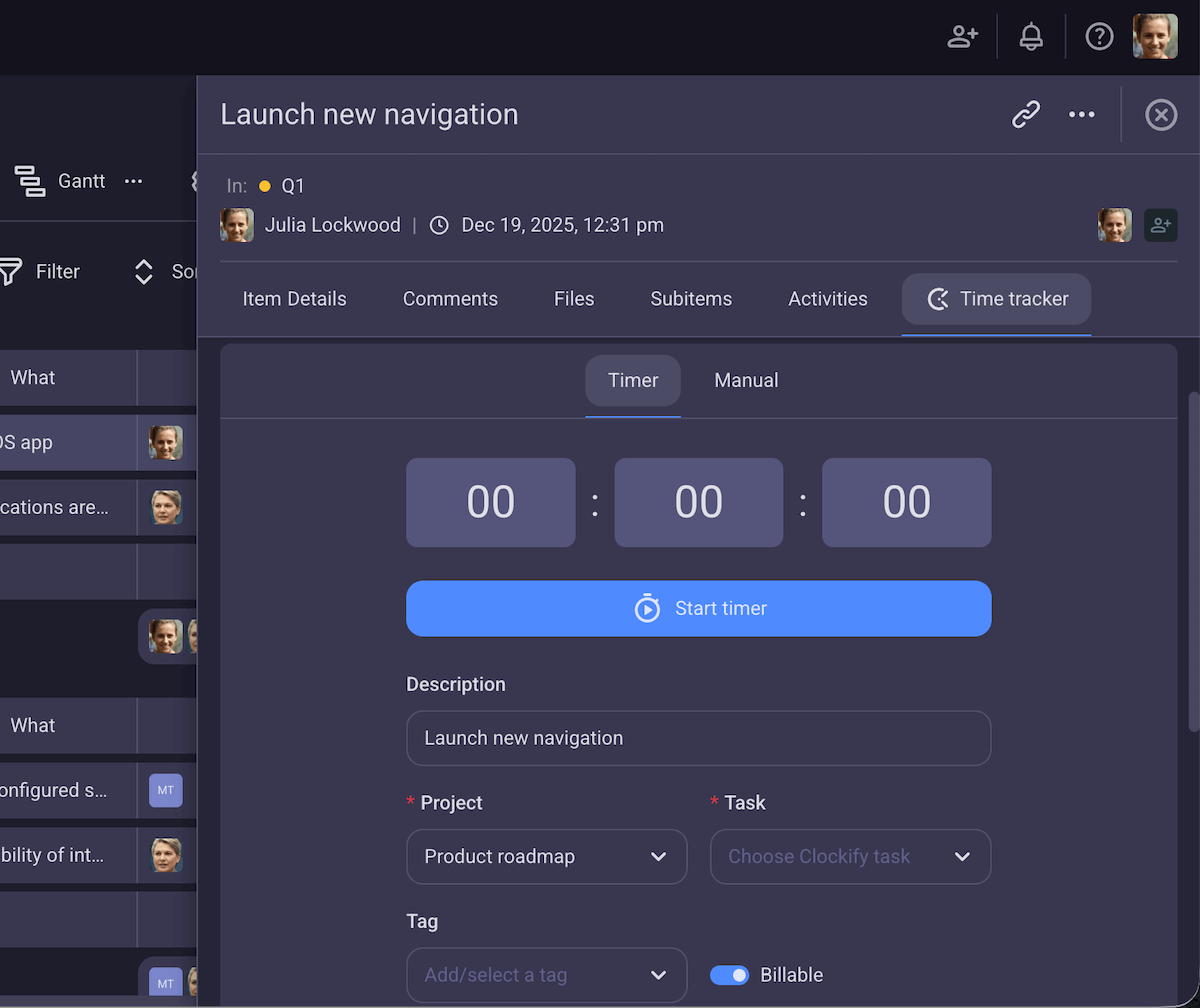
Rastrea el tiempo en tableros y elementos
Olvídate de cronómetros improvisados y aplicaciones de terceros: con la integración de Plaky + Clockify, puedes controlar el tiempo dedicado a tus tareas y cobrar por cada hora facturable que hayas trabajado en un proyecto.
💡 CONSEJO PRO DE PLAKY
Descubre más detalles sobre el control del tiempo en Plaky:

Preguntas frecuentes sobre cómo empezar a usar Plaky by CAKE.com
Esperamos que esta guía te haya sido útil para empezar a gestionar proyectos en Plaky. Si aún tienes preguntas, contáctanos o consulta estas preguntas frecuentes.
¿Es Plaky una buena alternativa gratuita a herramientas de gestión de proyectos como Trello, Asana o monday.com?
Plaky by CAKE.com es una excelente alternativa a todas las herramientas populares de gestión de tareas que conoces. El plan gratuito es muy generoso y los planes de pago son mucho más asequibles. ¿No nos crees? Hemos realizado una investigación exhaustiva que puedes leer aquí:
- Plaky vs. Trello: ¿Cuál elegir?
- Plaky vs. Asana: ¿Qué herramienta es mejor para ti en 2025?
- Plaky vs. monday.com: ¿Cómo se comparan?
¿Cómo empiezo a usar Plaky rápidamente?
Puedes crear un tablero de Plaky en 15 minutos o menos, dependiendo del nivel de detalle que quieras. Para empezar, crea:
- Tu cuenta de Plaky,
- Tu primer espacio,
- Un tablero de proyecto desde cero o con una plantilla, y
- Una lista de elementos.
También puedes invitar a tu equipo al tablero en cualquier momento y empezar a colaborar de inmediato.
¿Es Plaky fácil de aprender para los miembros de mi equipo sin conocimientos técnicos?
La interfaz de Plaky es muy sencilla, y los equipos no necesitan ninguna cualificación específica para empezar a usarla. No hay flujos de trabajo complicados, opciones ocultas ni horas de tutoriales que debas completar antes de empezar a usar Plaky. Pero si quieres ver tutoriales, ¡visita el canal de YouTube de Plaky!
¿Puede Plaky gestionar mi flujo de trabajo específico (por ejemplo, un calendario de contenido, un sprint ágil, un proceso de incorporación de clientes)?
La versatilidad de Plaky permite gestionar fácilmente las necesidades de cualquier sector. De hecho, puedes usar plantillas prediseñadas que ya hemos creado para ahorrar tiempo:
¿En qué se diferencia Plaky de una simple hoja de cálculo compartida?
Las hojas de cálculo compartidas son excelentes para recopilar y organizar datos, pero carecen de las funciones colaborativas de Plaky. Por mucho que intentes organizar una hoja, no te proporcionará una visión general del progreso de tu proyecto ni un espacio para comunicarte con tu equipo.
Las vistas de tablero, los comentarios en los elementos, las opciones para compartir archivos, los campos personalizados y las notificaciones en tiempo real de Plaky van mucho más allá de una simple hoja de cálculo.
Empieza a organizar tus proyectos en Plaky by CAKE.com
Sin importar la complejidad de tus proyectos ni la cantidad de equipos que tengas que gestionar, Plaky transforma una avalancha de tareas estresantes en elementos manejables.
Aquí tienes una guía en vídeo sobre las funciones de Plaky para ayudarte a empezar:
¡Crea tu cuenta de Plaky hoy mismo y comienza una prueba gratuita de 7 días!
Empieza a utilizar Plaky by CAKE.com
Cómo revisamos esta publicación: Nuestros escritores y editores monitorean las publicaciones y las actualizan cuando hay nueva información disponible, para mantenerlas frescas y relevantes.