
In the era of a fast-paced business environment, it’s crucial to have a tool that gives you complete control over your projects and allows you to set up your project board quickly and easily.
And, that’s exactly where Plaky comes in — to make project management feel like a walk in the park.
So, read on, and find out how to build your first project in Plaky in less than 15 minutes.
- It takes less than 15 minutes to plan your first project from scratch in Plaky by CAKE.com.
- Plaky is a cloud-based tool allowing you to create projects on the go.
- There are 6 steps you need to take to set up a project in Plaky: create a space, create your first project board, organize your item group(s), add items, add custom fields, and invite team members to your board.
- Plaky offers you 9 types of custom fields that you can use to add specific information to your project and define who does what, when, and how.
6 steps to your first project in Plaky
Plaky is a cloud-based task management tool, meaning you can create projects on the go, no matter if you’re at the office working on your laptop, or at the beach using your smartphone.
It’s also highly intuitive and easy to use, so you can set up your first project in just 6 simple steps.
💡 You don’t have to start projects from scratch every time. Instead, you can use one of our pre-built templates designed to meet the needs of various industries, businesses, and teams like marketing, IT, sales, and more.
#1 Create a space
Once you sign up for Plaky, you need to set up your space first. This space generally represents a home base for your department, team, or project group.
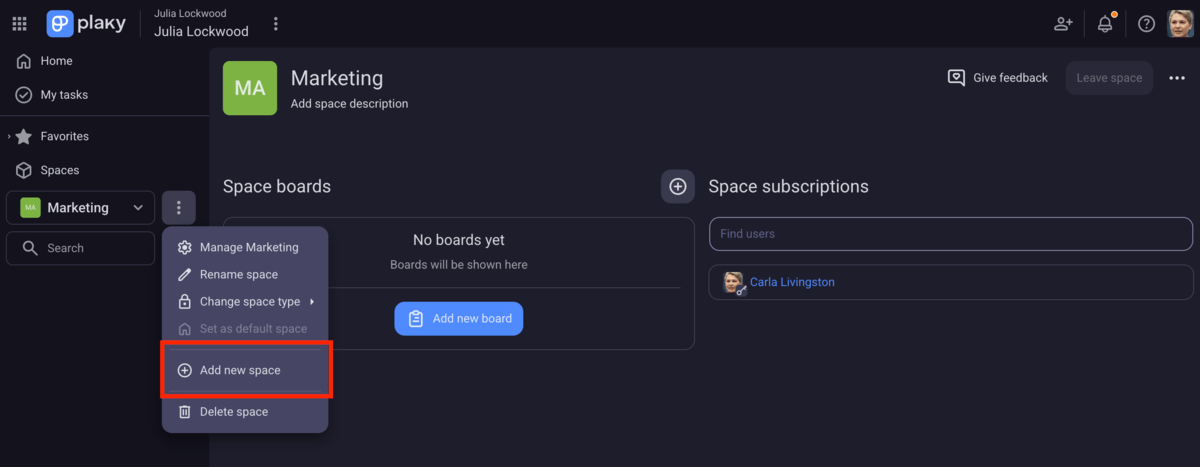
To add a new space, follow these steps:
- Go to Spaces in the sidebar, and find the spaces box located right below.
- Click on the 3 dots to open the menu.
- Choose Add new space from the dropdown.
- Enter space name.
- Click the Create Space tab.
Note: We’ve created a space for a marketing department and will use it to show you how to take all upcoming steps.
💡 Check out Plaky’s Organization & Hierarchy article to find out how Plaky’s structure works.
#2 Create your first project board
In Plaky, project boards are where the real work takes place. Once you build it up, you’ll get a visual representation of your team’s tasks, assignees, dates, and more.
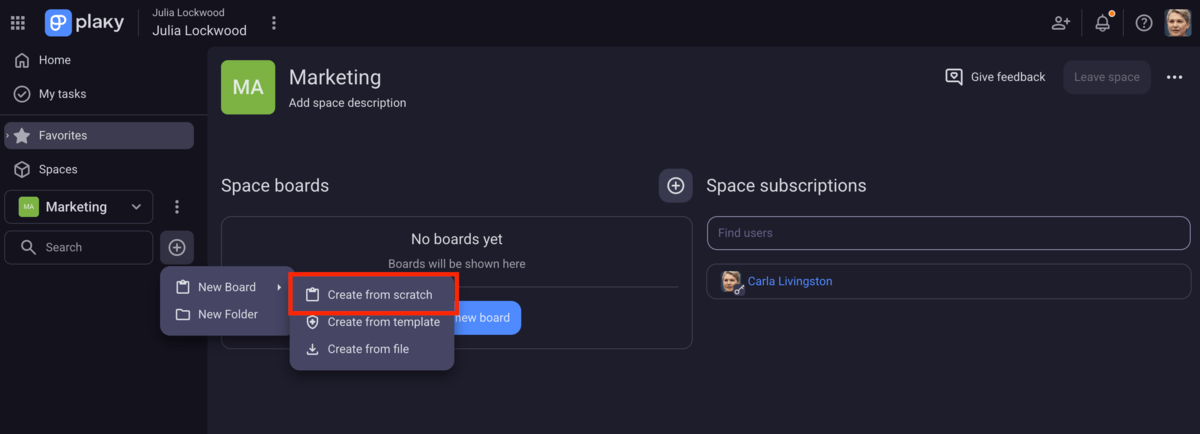
Here’s how to create your first project board from scratch:
- Navigate to the sidebar.
- Click on the “+” button next to the Search box.
- Choose a New Board from the dropdown menu.
- Select Create from scratch.
- Name your new board.
- Click the Create Board tab.
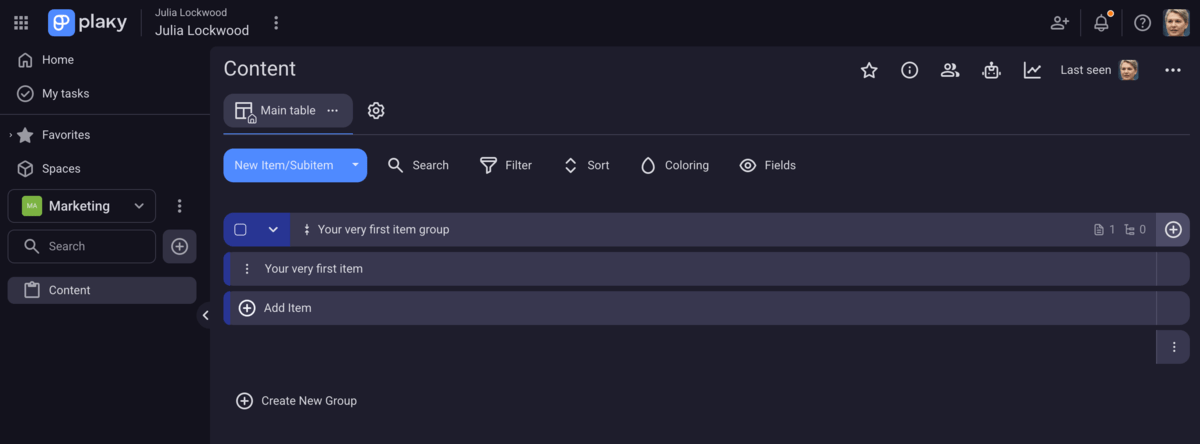
Plaky will automatically generate the first item group for your newly created board. All boards belonging to a particular space will be listed in the sidebar. As you can see below, we created a Content board as an example.
As one of our loyal customers, Matevz Lovko, Production Manager at Lepton Quark, points out:
“You could be a cook in a restaurant or a production manager, and you could create a task management board that suits your needs. The most important thing is that you can always change or add another fixture to it if you need it, it takes just a minute of your time.“
Plan projects in Plaky in no time
💡 PLAKY PRO TIP
Plaky also allows you to create your project board from a CSV file. Check out our detailed guides on how to migrate your data to Plaky from some of the most established platforms:
# 3 Organize your item group(s)
Now that we’ve created our first board, let’s add groups to keep related tasks together.
Fill in Plaky’s default item group first, and if you want to add more groups, you can add them in 2 ways:
- By clicking on Create New Group option below the default item group, in which case the new one appears at the bottom, or
- By clicking the New Item/Subitem option and selecting the New group of items from the menu. If added this way, the new item group appears at the top.
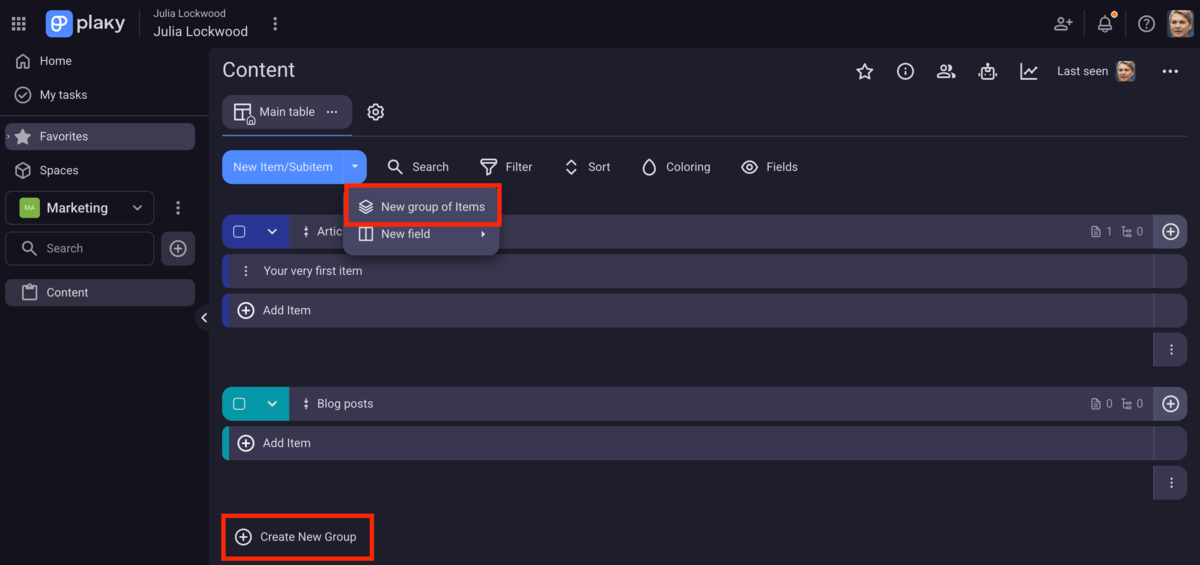
In Plaky, item groups are sections within a board that you can use to group items (single tasks) effectively. A group can represent a time frame (like Q1 or Weekly Sprint), project phase, product category, or any other criteria meaningful to you. Make sure you name your item group according to its purpose. You can even color-code the groups so that it’s easier to distinguish between them.
#4 Add your items
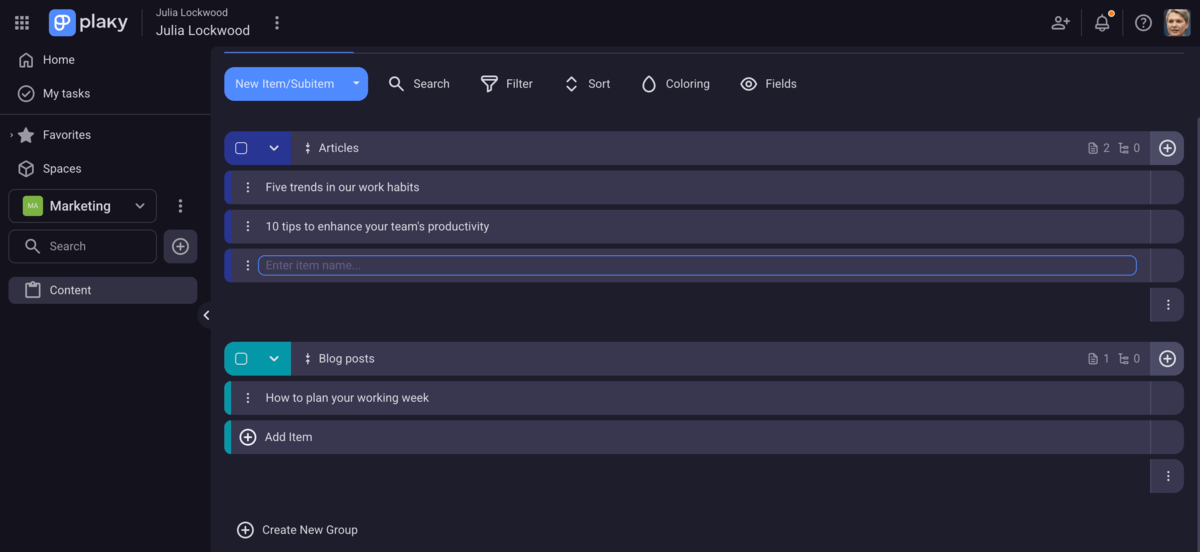
It’s time to add the key ingredients to your project i.e. to add items to your groups. These can be tasks, activities, goals, or simple to-dos that you actually work on and track their progress.
Adding items is a piece of cake as all you need to do is:
- Click on the Add Item in the column where you want to add it.
- Enter the item title in the text field.
- Press Enter to complete the action.
Just keep in mind that item names should be action-oriented and clearly defined.
💡 Your Plaky items can have subitems. As their name suggests, subitems break down bigger items into smaller, more manageable pieces. Subitems help you manage complex tasks step by step so nothing falls through the cracks. You can add them by clicking to the task name, or from the task card.
#5 Add custom fields
By adding items to your board, you plan actionable steps for your project. But, listing your items is only the starting point. With Plaky, you can add more details to your list to make a firm action plan and define who does what, when, and how.
To do this, Plaky offers you 9 different types of custom fields that you can use to add specific information relevant to your project.
To add fields to your board, do the following:
- Click on the “+” button on the far right side of the row with an item group name.
- Select the field you would like to add from the dropdown menu.
Mind you, the chosen fields will be applied to all your item groups within your board.
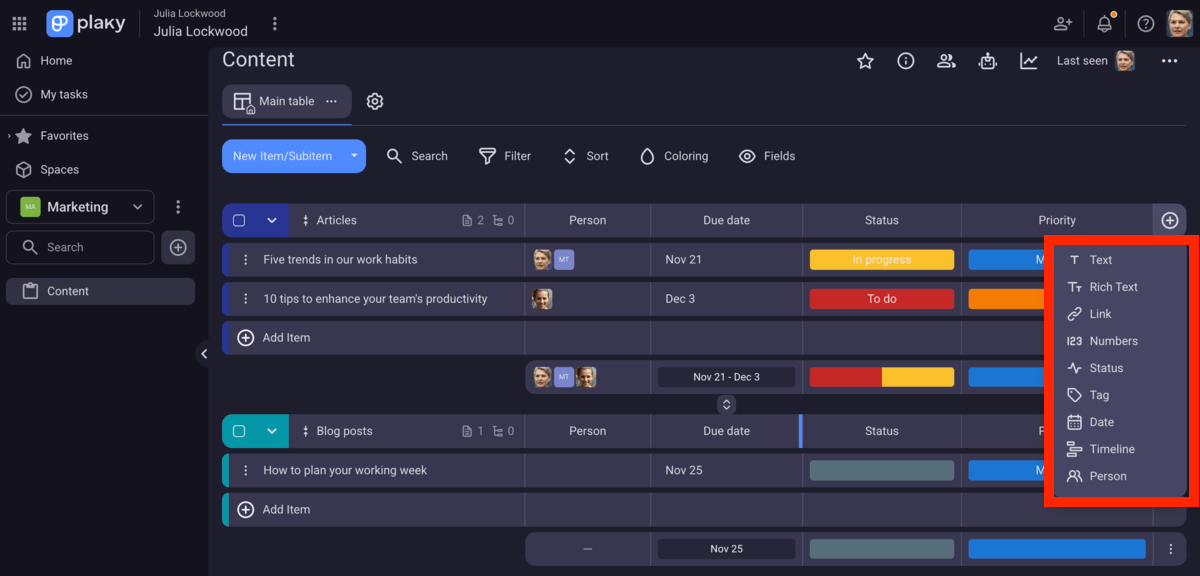
Here’s a brief overview of each custom field’s role in Plaky:
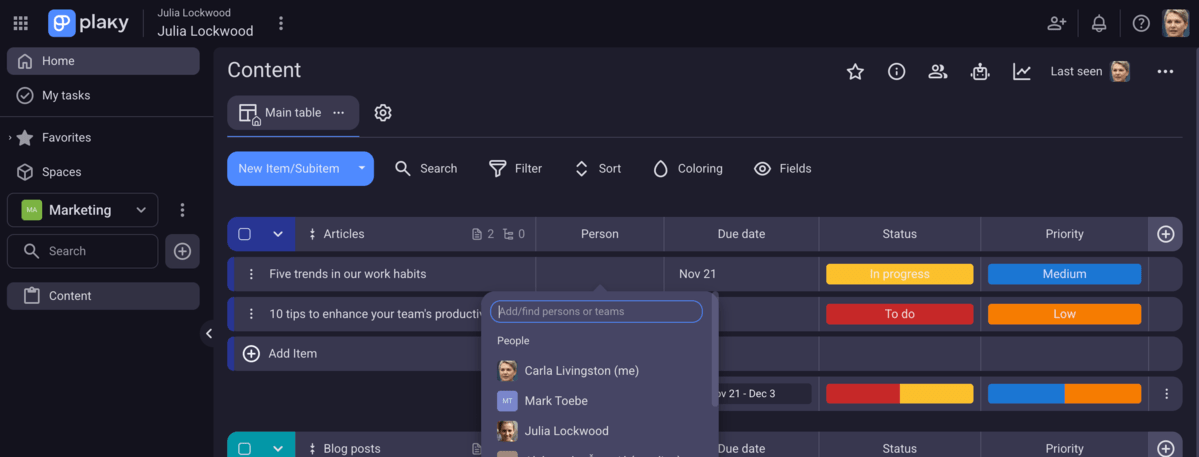
- Person field — This field is used to add assignees and reviewers to your items so that you always know who is responsible for what. You can add more than one team member or even entire teams to work on the same task.
- Date field — This field helps you define when something happens. You can set due dates, completion dates, start dates, review dates, and add any other time-related information.
- Text field — By including this field, you can add additional details relevant to your item to better explain what should be done.
- Rich text field — In case you want to add more context to your task descriptions, this field is perfect. Here you can add links, make checklists, include board lists, and even add emoticons.
- Link field — This field is used to attach URLs directly to items. Those can be files, client websites, social media posts, internal documents, etc.
- Numbers field — With this field you include any countable information relevant for your item like budget costs, number of items in storage, hours worked, etc.
- Status field — A field ideal for tracking progress of your project item. This field provides its color-coded custom labels to easily visualize the state of your task (To do, In progress, Done, Stuck, etc.) or indicate item priority (High, Medium, Low).
- Tag field — By adding this field to your board, you can define keywords for each item. For example, you can tag departments, teams, social platforms, content type, clients, etc. Tags are useful for categorization and allow you to find what you need much faster.
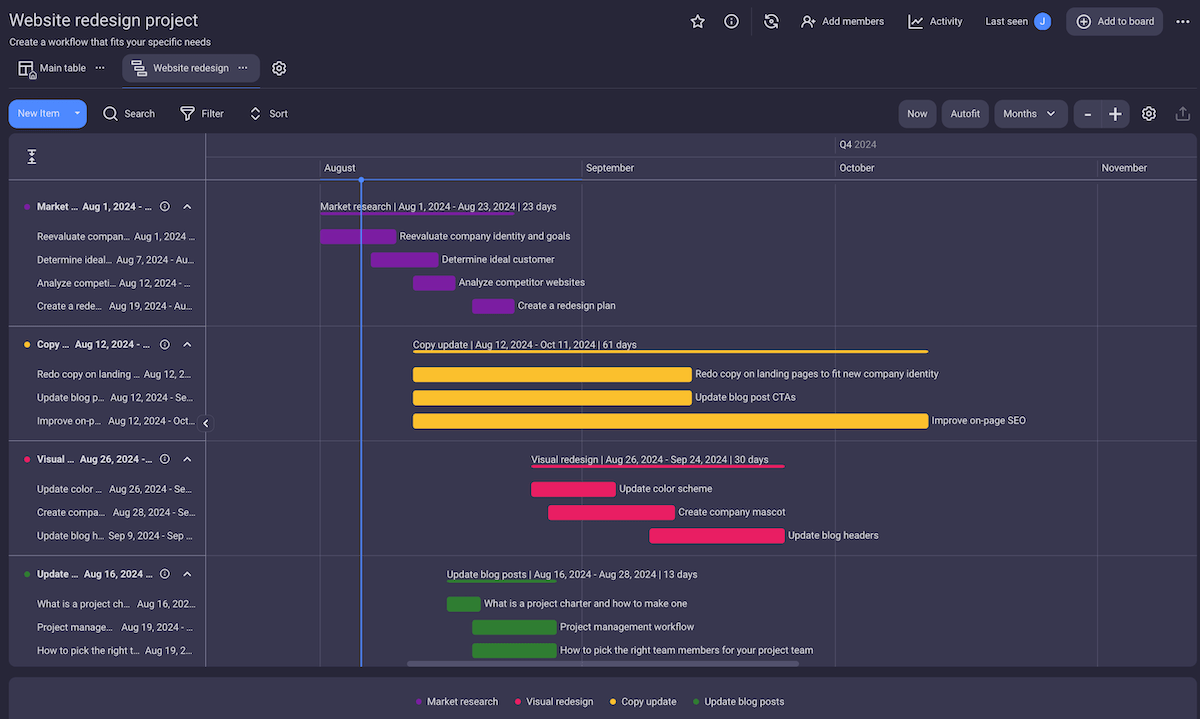
- Timeline field (available on paid plans) — This field helps you track task duration by enabling you to add start and end dates for your tasks.
💡 PLAKY PRO TIP
Plaky’s constantly being improved by our dev team, so if you want to stay in the loop with recent or upcoming features, visit the pages below:
#6 Invite new members to your board
Plaky allows you to add assignees to your tasks through the Person custom field. But, first, you have to invite your team members to a specific board, and this is how to do it:
- Click the Invite members button located on the top right side of your board.
- Enter one or more email addresses of the people you want to invite.
- Mark that you want to invite them as members.
- Click on the Invite button to finish the process.
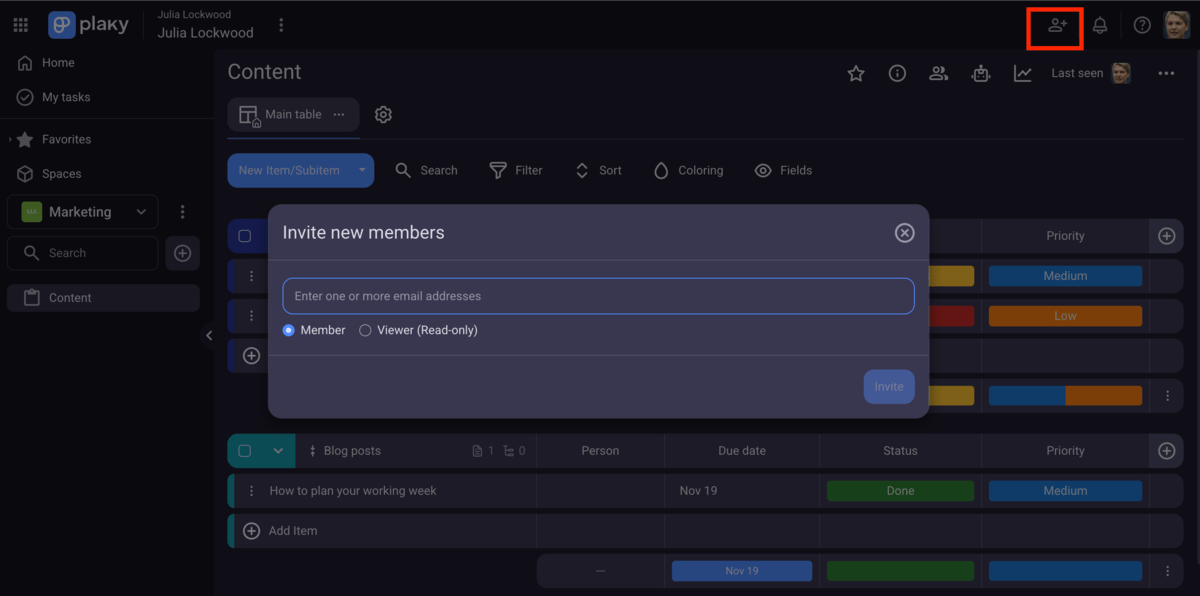
Once your team members accept the invitation, they will appear in the dropdown menu in the Person field of your board.
And that’s it — your board is done. Now you are ready to tackle any project that comes your way!
FAQ
Now that you know how fast you can set up your project in Plaky, check out the answers to some of the questions that might pop up.
What is Plaky? Is it just another Trello/Asana clone?
No, Plaky’s not another clone of Trello or Asana. Plaky is task management software designed to offer simple and visual project planning and management for free or at an affordable price for all you who need advanced features to track and manage projects.
Still, along with Trello and Asana, Plaky belongs to the group of tools that help you plan your projects, align teams and departments, track deadlines, etc.
Keep in mind that each of these apps has its pros and cons — Plaky stands out for its simplicity, generous free plan, and top-notch customer support.
Can I really set up a useful project in 15 minutes, or is this just clickbait?
Yes, you can set up a useful project in Plaky in 15 minutes.
If you’re about to create your first project in Plaky, make sure you follow the steps we listed in this article. The initial setup of the board, item groups, and tasks won’t take long. And, adding dates and assignees takes only a few clicks.
So, 15 minutes is enough to generate the basic project board from scratch in Plaky — even if you’ve never used it before.
Yet, adding task descriptions, files, or numbers will certainly take some more time as you might want to add more value and develop a comprehensive project game plan.
Will this be simpler than the spreadsheet I’m already using?
Definitely yes! Spreadsheets can help you organize data, but are more prone to human error and difficult to collaborate on. Also, they lack automations and activity logs, which are super helpful when you need to reduce repetitive tasks and see who has made changes and when.
That’s exactly why users look for more flexible alternatives like Plaky that can help you:
- Keep track of all updates,
- Share files with team members within the platform,
- Automate tasks and reduce manual work,
- Control access to sensitive information, and more.
Can I save my board as a template? I don’t want to do this set-up for every new project.
For sure! Once you customize your board in Plaky and adapt it to your needs and preferences, you can easily save it as a template and use it over and over again.
How do I see all my tasks from all projects in one place?
You can easily get an insight into all tasks assigned to you via Plaky’s My tasks section. Here, you can see everything that’s relevant to you, easily organize work, and manage priorities.
How Plaky sets your team up for success
Plaky is a versatile tool that you can easily customize from top to bottom to establish a perfect centralized hub for all project activities.
According to the latest Project management software statistics, users consider 3 factors when they choose a PM tool: functionality, price, and ease of use.
You rarely find this trio in one tool, but, with Plaky, you get all of this and more.
Here are some of Plaky’s features that help you boost productivity and cooperation:
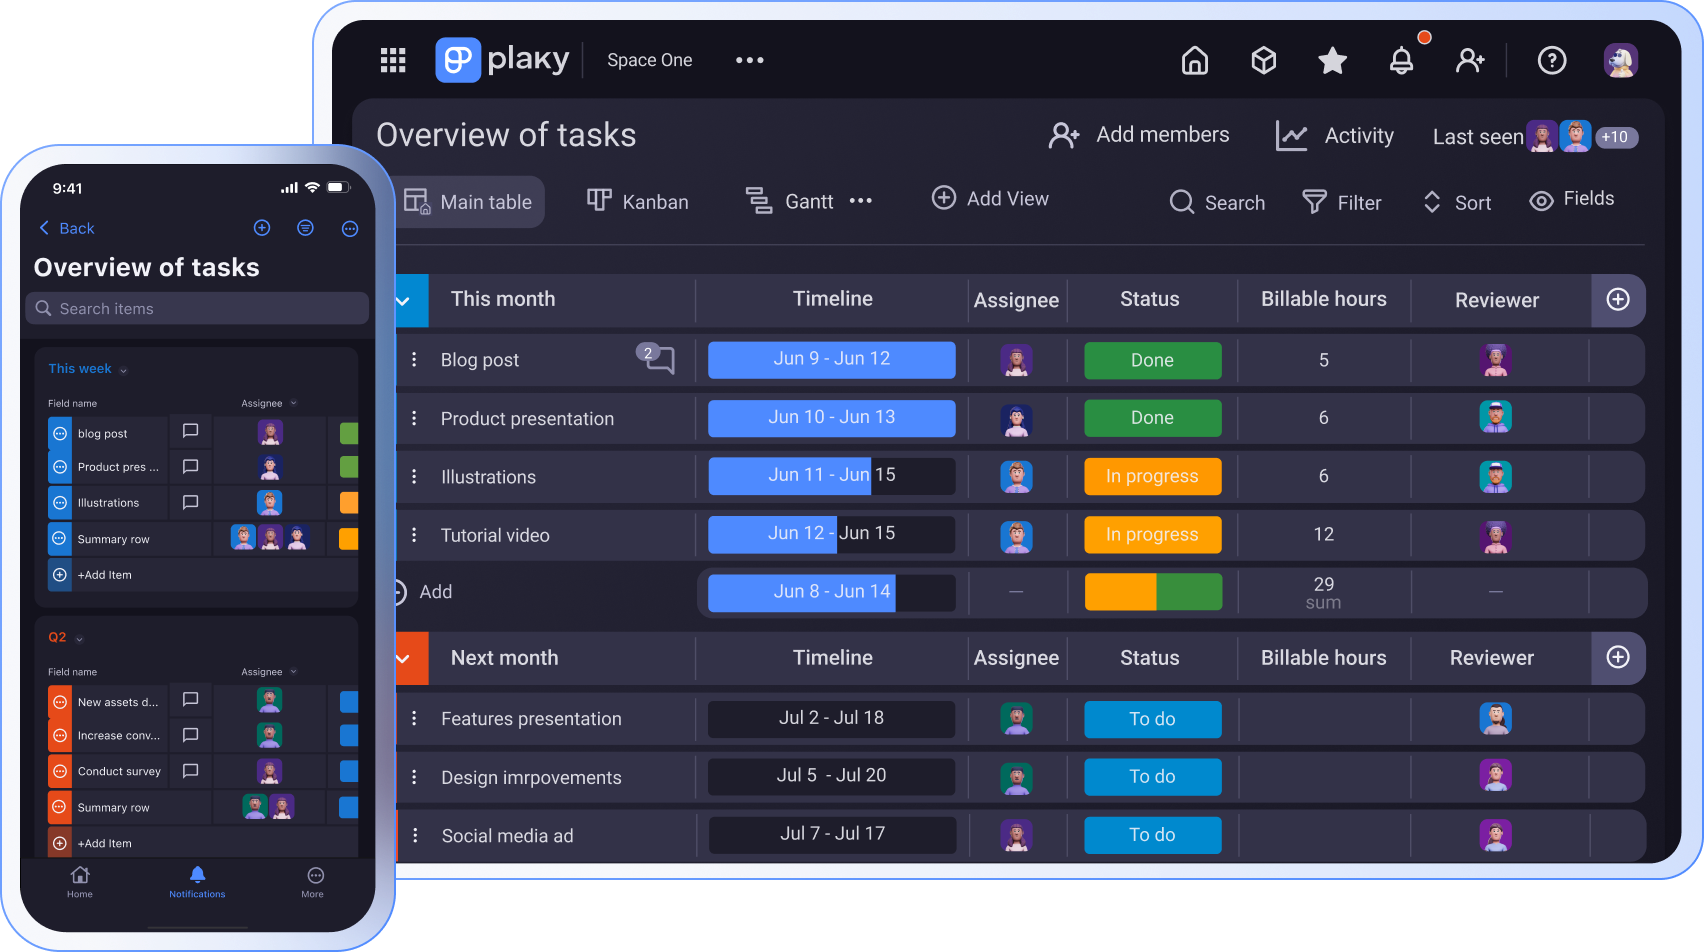
- Multiple board views — Visualize your project workflow the way it suits you best. Choose Table (default), Kanban, Gantt chart, or Chart view to get an overview of your project from different perspectives.
- File sharing — Keep all task-specific files and documents under the Files tab in a task card so you don’t have to lose time digging through emails, chat threads, or folders.
- Board automations — Apply board automations to reduce manual work and say goodbye to repetitive tasks using only a simple “When this happens, then do that” logic.
- Real-time notifications — Stay up to date with all the changes to tasks and projects you’re subscribed to. Plaky’s bell rings in real-time so you’re always up to speed.
- Comments and @mentions — Find all task-related discussions in the comment section of the task. Give feedback, follow updates, and @mention coworkers to get their attention.
- User roles and permissions — Ensure better control over who can do what in your workspace by assigning different user roles and access permissions.
💡 Want to use Plaky like a pro? Check out our detailed guide for total beginners!
Plaky is designed to make project management a breeze, but you should know that you can rely on Plaky’s customer support if any issues pop up. You can get 100% human support via email, phone, or chat. What’s best, support is available 24/7, even on holidays!
And, in case you’re looking for a budget-friendly tool to manage your projects, Plaky won’t let you down as it offers 3 generous plans:
- Free forever plan — This plan offers all basic PM features and allows unlimited users, spaces, boards, and items free of charge.
- Pro plan — With this plan you get all free plan features plus private boards, automations, Gantt chart view, bulk actions, conditional coloring, and more for only $3.99/seat/month.
- Enterprise plan — This is the highest plan with a competitive price of $8.99/seat/month. It includes all Pro plan features along with custom subdomains, SSO, unlimited activity log, board permissions, etc.
Moreover, you can opt for the CAKE.com Bundle, which includes Plaky, Clockify (a time tracking tool), and Pumble (a team communication tool). For only $12.99/seat/month, you get a powerful productivity suite with access to 3 fully upgraded tools.

Set up projects effortlessly and move them forward with ease! Start your 14-day free Plaky trial today!
How we reviewed this post: Our writers & editors monitor the posts and update them when new information becomes available, to keep them fresh and relevant.