A project management checklist is your go-to tool if you want to keep all project components in order and coordinate work properly.
This article offers you the complete project management checklist and explains each step on the way. Plus, there’s a free template you can use immediately.
- A project management checklist is a document that lists all the steps you need to cover during a project lifecycle.
- Project checklists serve as guides that remind project managers to keep track of goals, deadlines, risks, resources, etc.
- There are 9 major elements you can find in every project checklist, including project scope and dependencies, resources, risk management plan, and communication plan.
- What you include in your project checklist depends on the phase your project is in.
- A comprehensive project checklist template helps you manage your project effectively and never miss a thing.
What is a project management checklist?
A project management checklist is a document highlighting the steps you need to take through each of the project phases.
With a comprehensive project checklist, you can stay organized at work and ensure consistency and accountability.
Project checklists serve as easy guides for project managers, reminding them to track project elements such as:
- Goals
- Tasks
- Deadlines
- Milestones
- Risks
- Resources
When structured properly, a checklist for project management helps you improve project collaboration, reduce risks, and ensure nothing gets overlooked.
Create your checklist in Plaky
How to create a project management checklist
An effective project management checklist covers the entire project lifecycle, from initial idea to completion.
However, your ideal checklist will mostly depend on your industry requirements, project type, and even the project methodology you opt for.
Still, there are some elements you’ll find in every project checklist, including:
- Goals and objectives — state project outcomes and its benefits for both the company and/or the clients.
- Project scope and dependencies — set the boundaries at the beginning and identify task dependencies.
- Stakeholders involved — identify stakeholders and define how to report to them.
- Progress tracking and approval process — specify the tools you’ll use to track progress and approval points.
- Milestones — define milestones on your project timeline.
- Resources needed — estimate all the resources required to complete your project.
- Budget and schedule plans — make plans to secure funding and ensure people have enough time to complete the project.
- Risk management plan — consider how to identify and respond to potential bottlenecks and minimize threats.
- Communication plan — define communication channels with your team and stakeholders.
💡PLAKY PRO TIP
If you need a checklist built specifically for shop floors and assembly lines, we have a guide just for you:
Types of project management checklists by phase
If you’re not sure what your checklist needs to include in different project phases, here’s a comparison table breaking down checklist focus items by project phase.
| PROJECT PHASE | CHECKLIST ITEMS/TASKS | WHEN TO USE IT |
|---|---|---|
| Initiation | – Create a business case – Complete a feasibility study – Identify stakeholders – Draw up a project charter – Select a project management tool | Use it once your idea gets the green light. Make sure your project has a stakeholder buy-in and shared understanding of success criteria. These focus items help you set project foundations and clear boundaries. |
| Planning | – Define project goals – Define project scope – Establish a WBS – Prepare project schedule – Plan resources – Plan the budget – Make a risk register – Develop a communication plan – Establish quality standards – Select a project management methodology – Hold a kick-off meeting | Utilize it before your project officially starts. You need to secure the budget and ensure you have the right people. Also, by defining goals and scope, you will prevent scope creep and potential surprises on the road. This is the trickiest phase that can make or break your entire project. |
| Execution | – Assign tasks and due dates – Manage people and review processes – Keep communication open and effective – Manage stakeholder engagement – Hold regular status meetings | Use it the whole time your project is in the active mode and produces deliverables. Everyone knows their responsibilities and is focused on the actual work and reaching milestones as planned. Communication is enhanced enabling full transparency over who did what. Meetings are regular to make sure the project is on track, teams are aligned, and future steps are clear. |
| Monitoring and control | – Track KPIs – Monitor performance – Manage scope creep – Keep stakeholders in the loop – Manage and document change requests – Monitor and mitigate risks – Control budget and quality | Employ in sync with the execution phase. Checklists ensure consistency and proactive project control. By tracking performance regularly, you can spot delays, budget overruns, and risks early enough to course-correct. |
| Closure | – Confirm project acceptance – Transfer final deliverables – Complete paperwork – Release the project team – Run a post-implementation meeting and capture lessons learned – Archive technical and other documentation – Celebrate project success with your team | Use it when all deliverables are handed over and clients are satisfied with the result. Checklists ensure you don’t skip a thing in administrative, financial, or legal documentation. Also, they remind you to capture lessons learned and discuss what to improve for future projects. |
Manage projects with ease in Plaky
Project initiation phase checklist items
The initiation phase is the one where you need to prove the business value of your project.
Its primary target is to document what you want to accomplish and get the go-ahead from project stakeholders. There are 5 steps you need to take.
#1 Define the project
To define a project you need to specify the problem your project solves, what will be delivered, and what success looks like. To do this, you need to:
- Validate the business need — create a business case to show why your project is worth doing.
- Specify business outcomes — show how your company can benefit from the project.
- Define project scope — develop the project scope to set boundaries and state what the project includes and what is considered out of scope.
- Agree on success criteria — establish the standards you need to reach to consider your project successful.
For example, you can’t just show up in a meeting and say: “We need to redesign the landing pages on our website ASAP to make them more engaging and drive sign-ups.” In this scenario, there’s no information on the number of such pages, what “engaging“ actually means, let alone target metrics.
A good project definition for this example would be: “We need to redesign the layout for 10 of our landing pages and change copy and CTAs. This can increase the conversion rate from 3.2% to 4.1% within a month.”
💡 PLAKY PRO TIP
Not sure what to include in your project scope? Read the article below to find out how to structure it and use a free template to help you:
#2 Align stakeholders
When initiating a project, you need to map out all individuals involved and unite them around your project’s vision. Here’s what you need to cover:
- Identify stakeholders — record everyone involved in the project including superiors, sponsors, clients, etc.
- Evaluate stakeholders — get to know your stakeholders and find out more about their interests, views, and influence.
- Define communication preferences — clarify the way the stakeholders want to receive project updates as well as the frequency of sending reports.
- Confirm approval system — agree on the approval workflow and define who needs to evaluate the work before it moves forward.
- Assign roles — name a project manager and team leads and define their responsibilities.
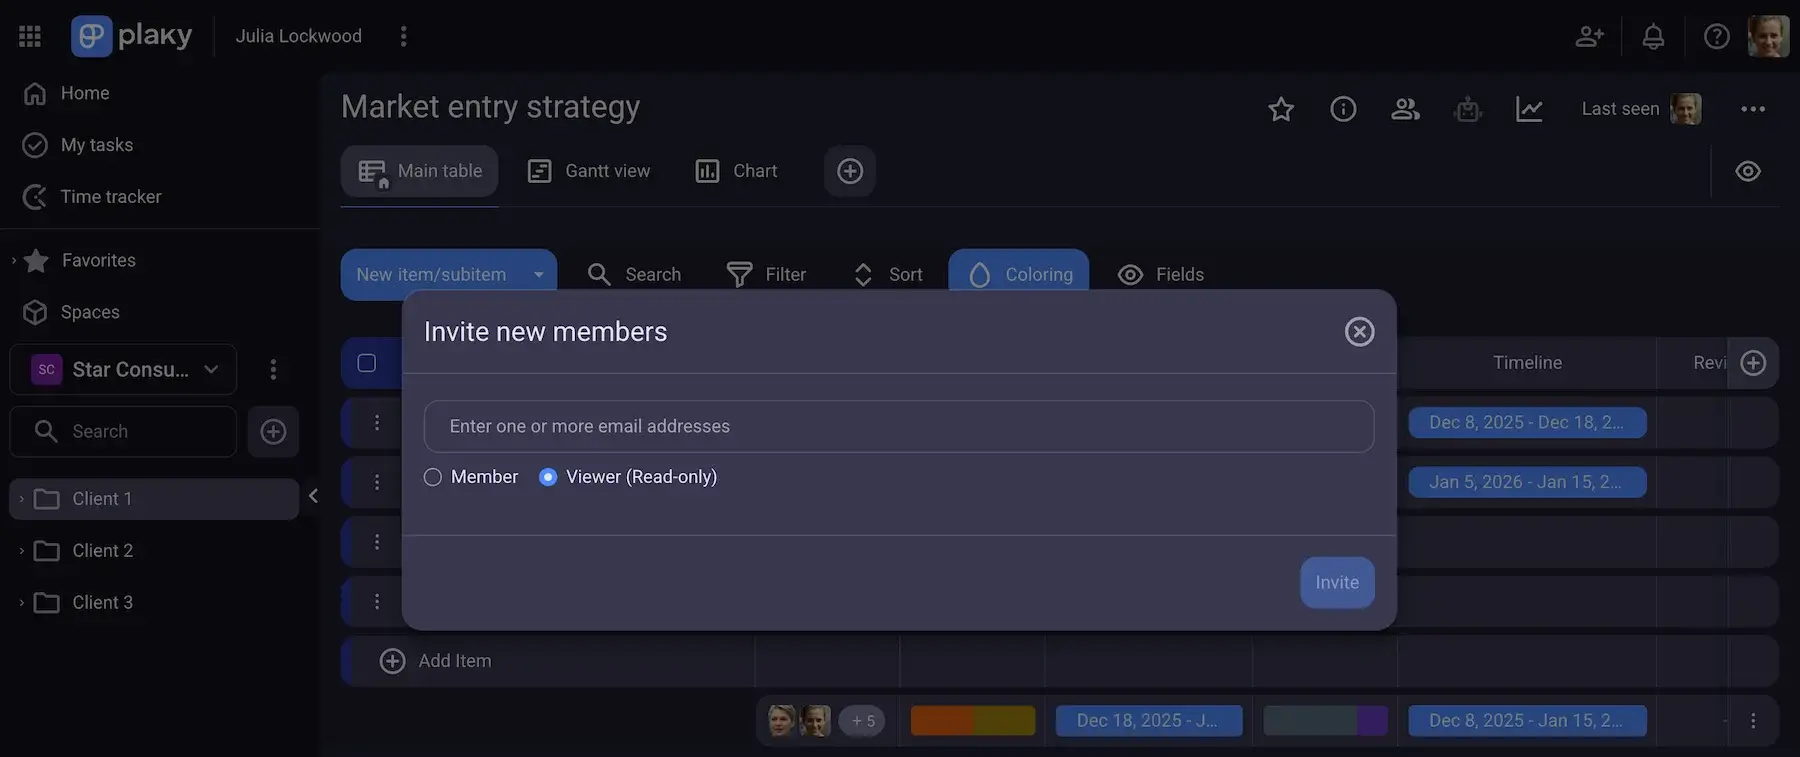
Aligning stakeholders is much easier if you include them as Viewers to your project board in a dedicated tool like Plaky. As viewers, they can keep track of project progress in real-time and see files, documents, and comments, but cannot make any changes.
Consider a scenario where your engineering team is developing a new app feature, and your marketing team is constantly asking when the feature will be live so that they can promote it. It’s best to give the marketing manager viewer access to the sprint board so they can stay in sync.
#3 Assess feasibility and risk
To evaluate the project’s potential before you invest time, labor, and money, you need to:
- Conduct feasibility study — assess economic, technical, time-related, and legal elements of your project to see if it’s likely to be successful.
- Identify risks and dependencies — analyze what could derail your project and spot dependencies early.
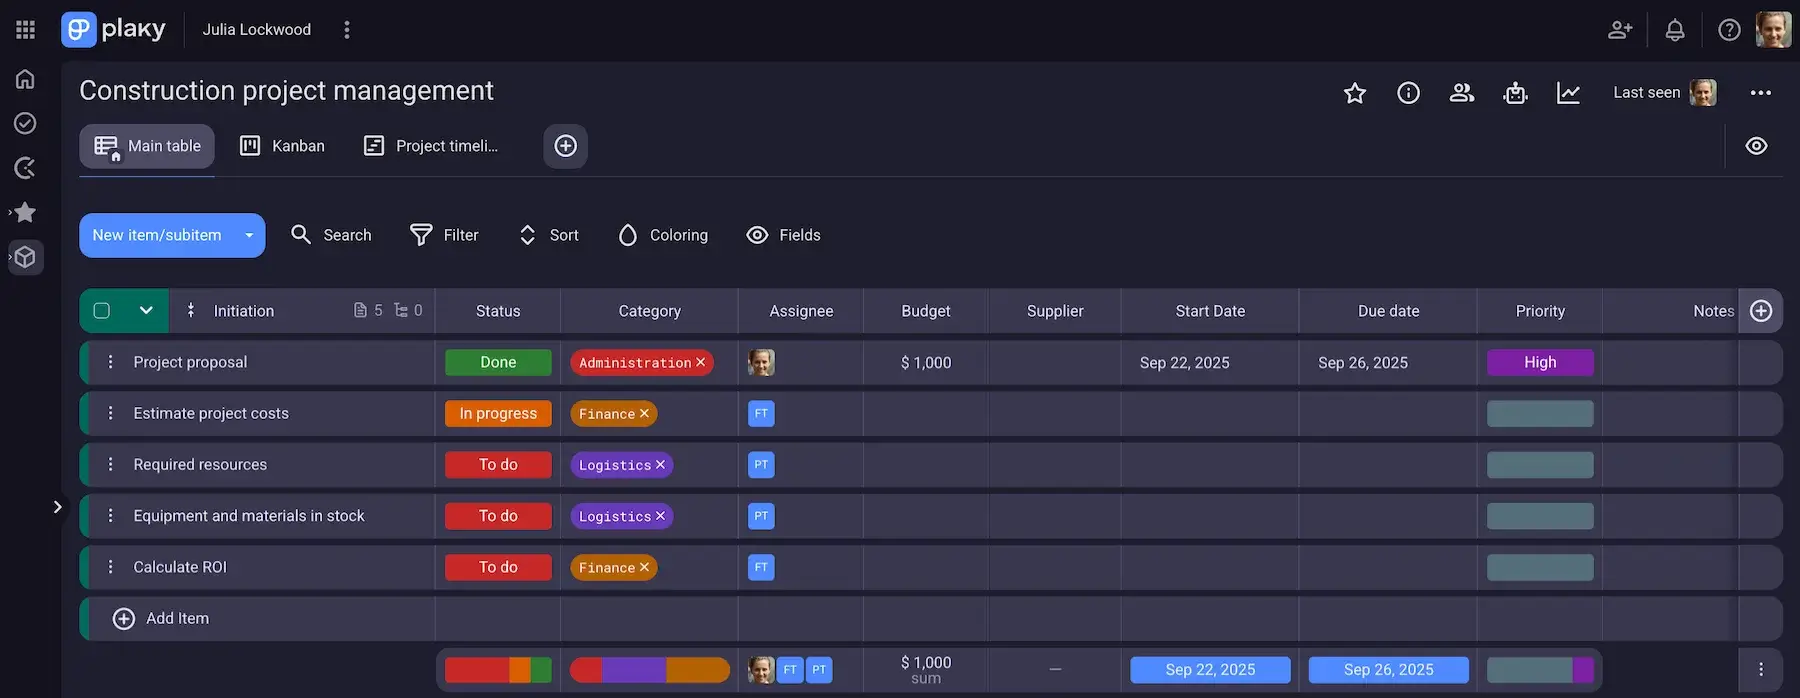
Whether you are in software development, construction management, or marketing, you can use your dedicated tool to list everything you should cover and make things easier.
Say you are working on a feasibility study for a new construction project. You have to analyze lots of factors such as environmental impacts, zoning, supply chain, and more. Listing all your needs within a centralized tool ensures that you don’t overlook important details and keeps relevant documentation in one searchable, shared place.
#4 Confirm resource requirements
Project initiation also includes preparing a resource allocation plan. That’s why you need to:
- Estimate personnel and budget requirements — specify who you need in your project team and determine the budget for people, consultants, equipment, software, etc.
- Confirm the equipment and materials needed — state the type of tools, machinery, and other supplies you need for the project and make sure they are available before the work begins.
- Specify software for project management — choose the software you will use to manage the project, and make sure it has features and functionalities that match your project workflow.
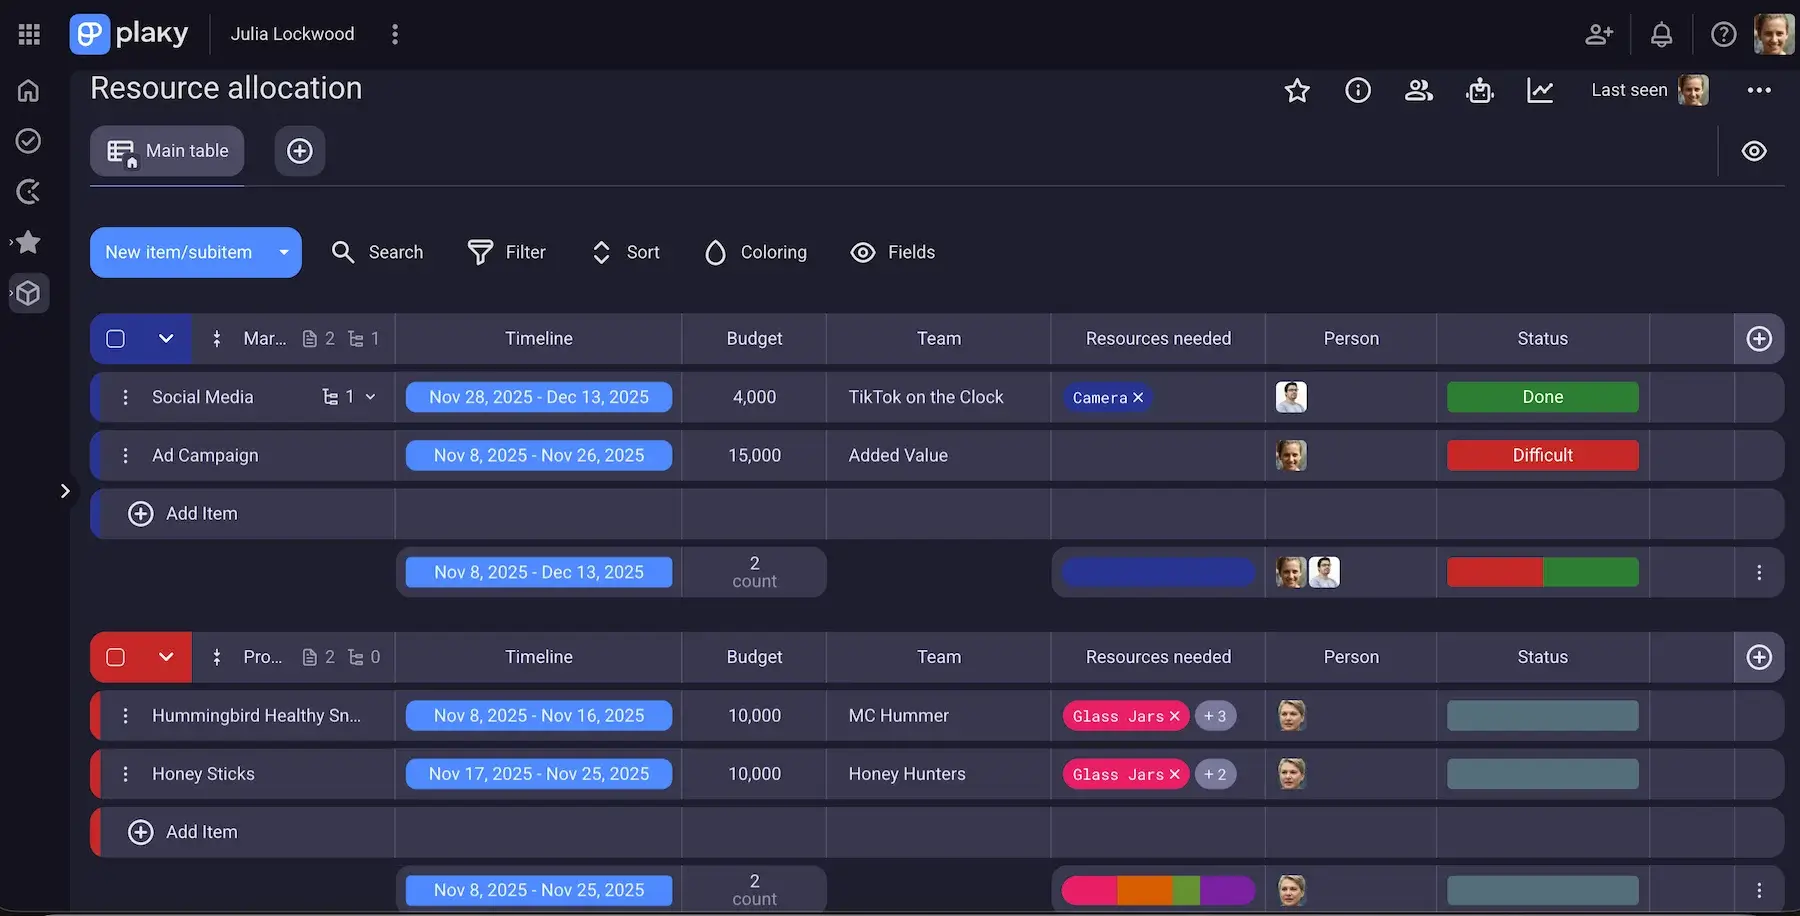
You can easily track your project resources with Plaky as it keeps all resources in one place making it easy to make adjustments. For instance, knowing when your best graphic designer is available or when exactly your video production team needs a studio eases scheduling and resource over- and under-allocation.
#5 Prepare documentation and secure sign-off
At this point, it is critical to document everything that will later serve as a baseline and ensure realistic expectations. Here’s what you need to do:
- Draft the project charter — prepare the charter to confirm the project can move forward and that the project manager has the authority to use resources as agreed.
- Get formal stakeholder sign-off — present the charter to everyone involved in the project for their final approval and sign-off.
- Formalize decision-making process — determine who is responsible for decision-making and in what situations.
Although a mountain of paperwork often seems like an administrative quagmire that slows down project processes, skipping important steps can do more harm than good. Project documentation safeguards projects and prevents situations like “We had to overspend because we needed more people to deliver on time” or “The new manager didn’t know where to find that information”. It’s critical you secure that initial sign-off and get everyone aligned on the scope, budget, and responsibilities from the get-go.
💡 PLAKY PRO TIP
Need an example of a project charter and a template to help you create one? No problem, you’ll find both in the article below:
Project planning phase checklist items
This phase is dedicated to creating a roadmap for the project and setting a solid foundation for execution. Here are the steps you need to take:
#1 Define goals and objectives
Your project needs clear direction so that everyone stays focused on what needs to be done to get the desired outcome. With this in mind, make sure you:
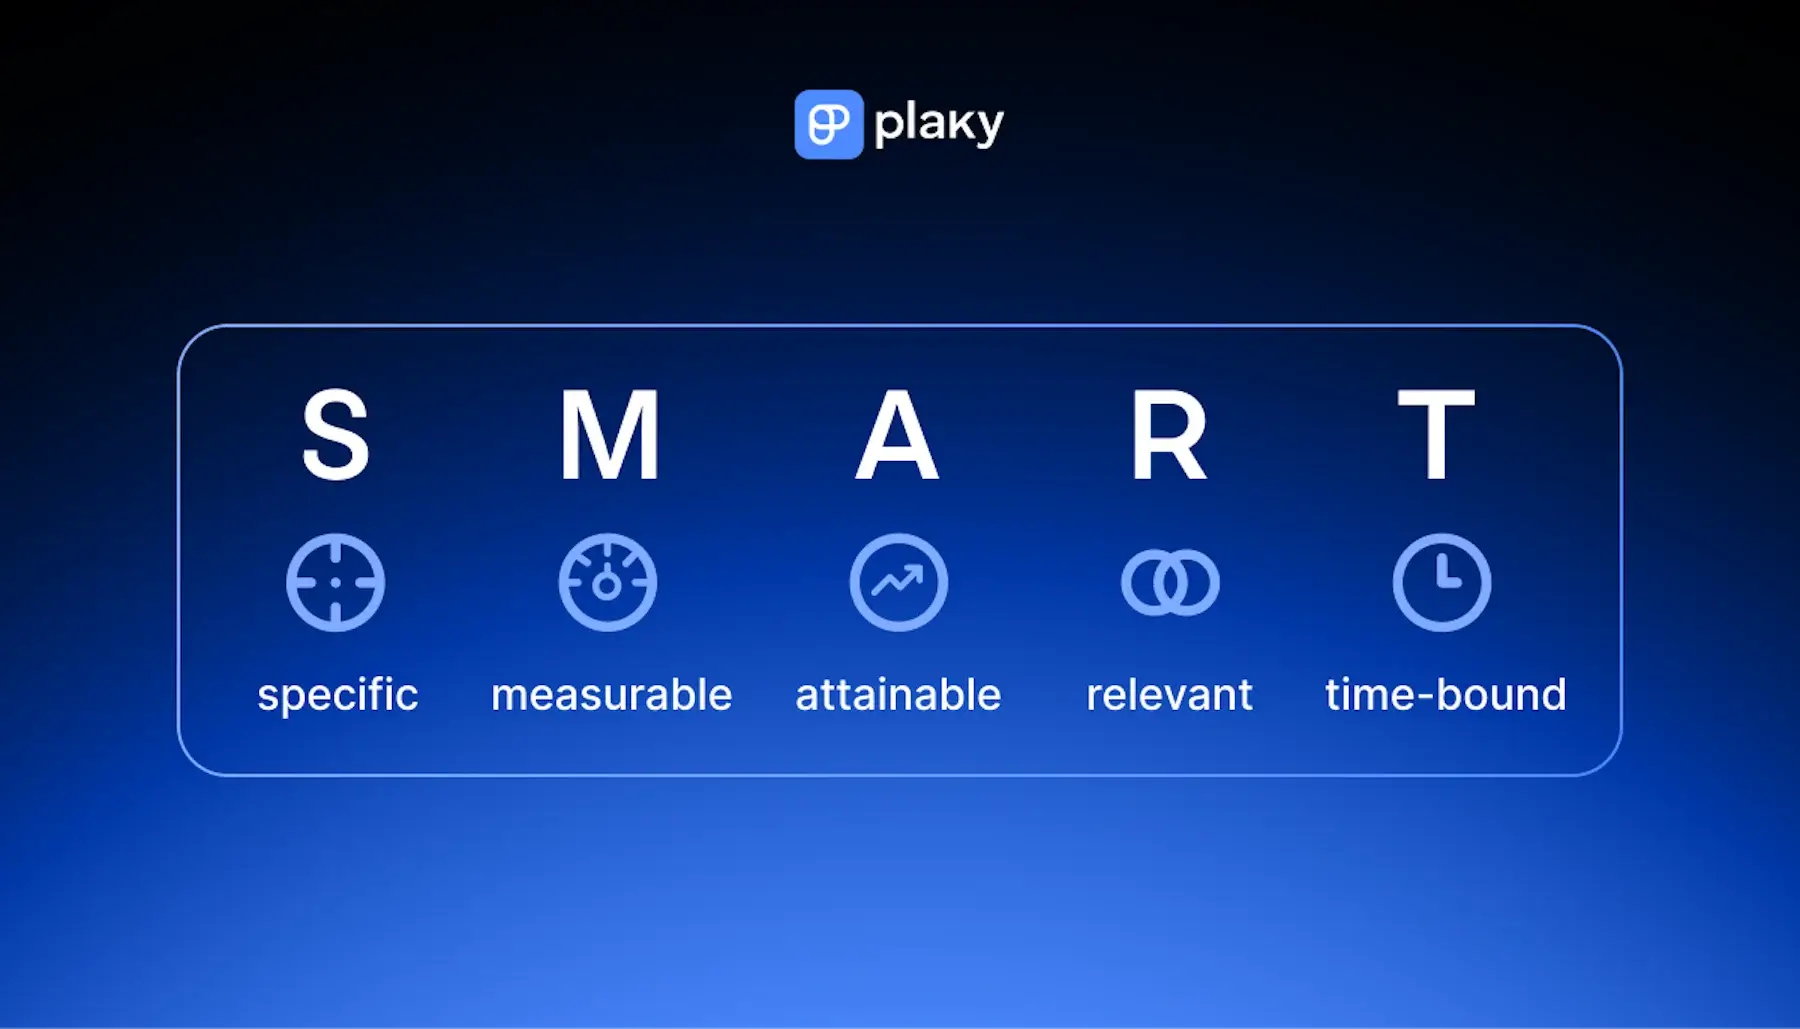
- Set clear goals — establish clear targets your project wants to hit and follow the S.M.A.R.T. criteria to structure goals correctly.
- Determine milestones and deliverables — let your team and stakeholders know the major checkpoints and how you make progress.
- Define key performance indicators (KPIs) — decide how you will measure performance of your project compared to project goals.
Having clear goals helps you remove the guesswork and increases the chances of project success.
So, don’t just say: “Make the app load time faster so users don’t abandon their purchases”. Instead, use the S.M.A.R.T. framework, and define your goal in the following way: “Optimize frontend API caching and database indexing throughout the next 6-week sprint to reduce the load time from 4.5 seconds to the industry standard of 2 seconds.”
#2 Plan project schedule and budget
Well-planned time and budget will save you from costly delays, confusion, and potential project failure. That’s why you need to:
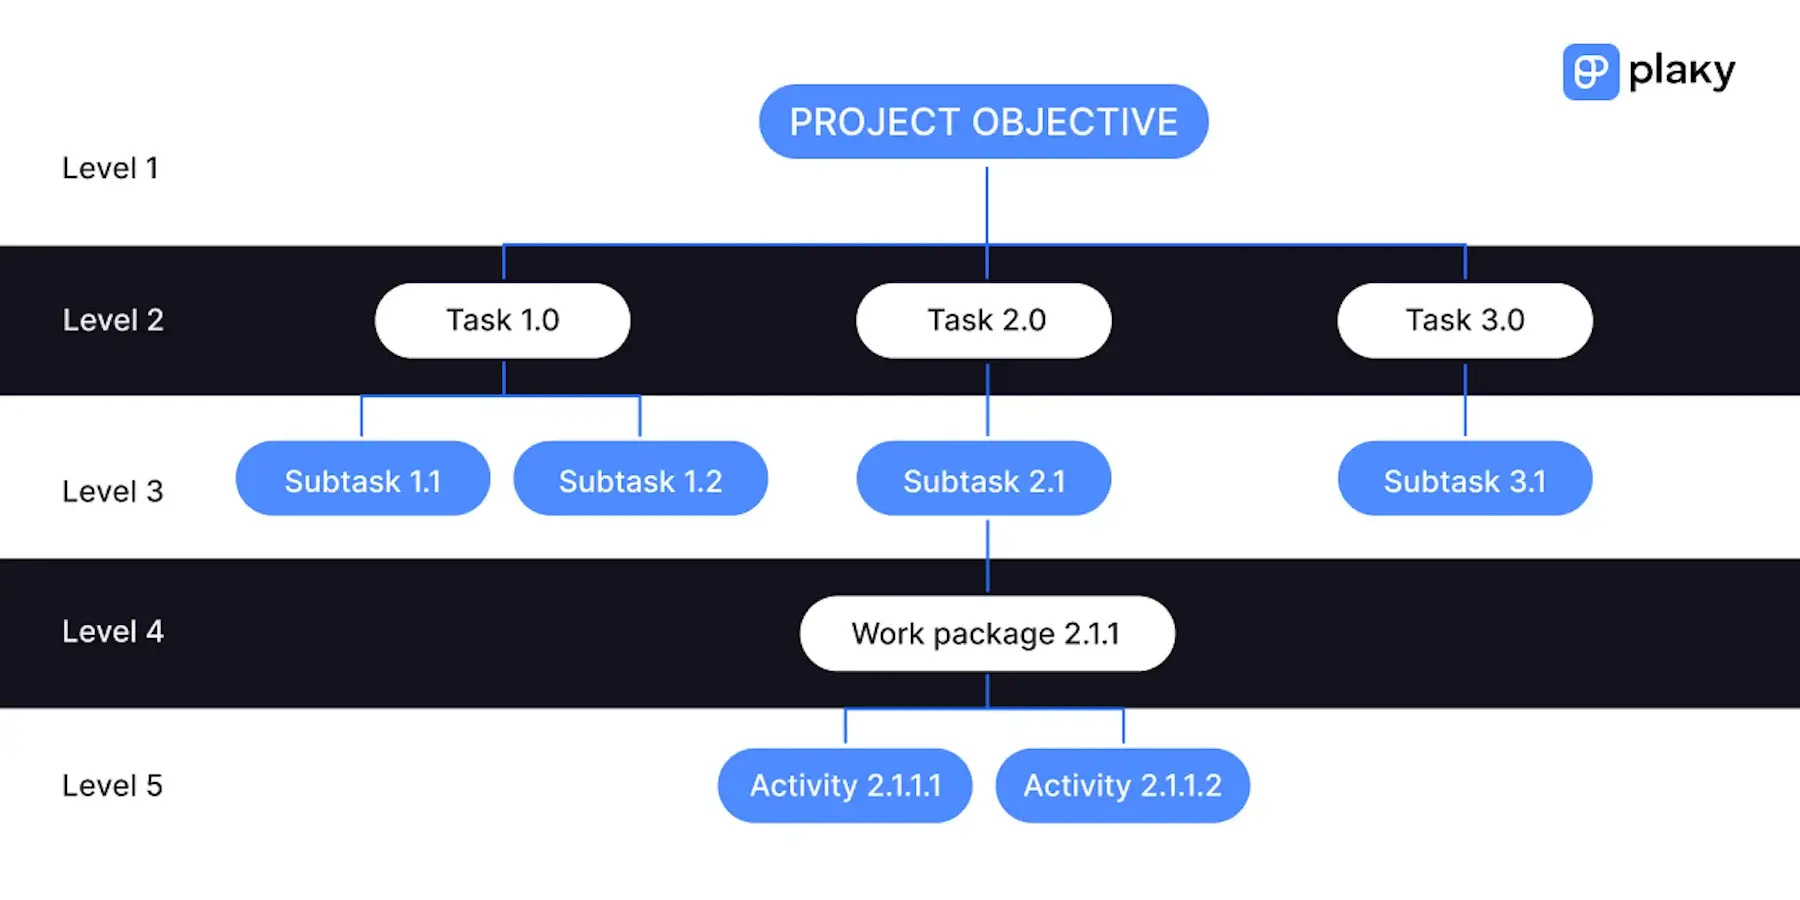
- Create a WBS — Create a Work Breakdown Structure to visualize your project better and break it down into more manageable chunks making it easy to trace dependencies.
- Make time estimates — estimate the time needed to complete tasks to prevent rescheduling and burnout.
- Make budget estimates — try to forecast expenses for the team, tools, vendors, materials, and everything you need for the project as it helps you prevent unexpected costs.
- Allocate budget and get approval — distribute budget properly in agreement with your stakeholders and ensure full control over spending to avoid financial surprises.
- Make a contingency plan — prepare your “plan B” in case any issues emerge to enable fast recovery.
Mind you, the hierarchical structure of a WBS clearly shows the work packages, helping you see what’s in scope and easily make time and budget estimates.
#3 Draw up a communication plan
A clear communication plan creates a bridge between stakeholders and clients on the one hand and project team(s) on the other.
Let’s take a creative agency as an example. In situations when feedback, copy changes, or scope adjustments get scattered across Pumble DMs, email threads, or phone calls, the design team often misses important change requests, or builds assets on old inputs. This leads to a lot of rework and conflicts within the team.
To ensure effective communication on your project, you need to:
- Agree on communication channels — define communication channels with your team members and stakeholders (phone calls, team chats, emails, shared status reports, etc.)
- Define reporting frequency and meeting schedule — agree on the cadence of reporting and meetings to keep work productive and ensure timely decision making.
💡 PLAKY PRO TIP
Don’t let late updates, feedback, and incomplete information spoil your project. Read the article below to find out how Plaky helps you collaborate with ease:
#4 Define quality standards
To deliver what your stakeholders or clients expect, you need to satisfy their standards. And, there’s no better way to fulfill expectations than to define quality standards in advance. Here’s what you need to do:
- Define criteria for functionality, performance, and compliance — clarify what is accepted on a project in terms of deliverable standards and regulatory protocols your team needs to follow.
- Document quality guidelines for the project team — create a document everyone can refer to when they need to check acceptance criteria for a deliverable.
When engineers develop a new feature for a mobile app, they need to define acceptance criteria, and decide on the definition of “done”. The quality standards typically cover the product, project processes, security and compliance, and performance of the feature.

#5 Set up tools and introduce the project
This is the last step before you set the project in motion. It’s vital to:
- Organize a kick-off meeting — use this meeting to introduce the project, align your team and stakeholders, and present them with the plan, timeline, and goals.
- Set up project management software — set your chosen project planning software and establish a centralized space where you can draw up your project plan, assign tasks, track progress, and more.
If you work in a marketing agency, you know the drill: spending half your day in meetings, untangling spreadsheets just to figure out who is doing what.
Having a dedicated tool helps marketing teams get rid of unpractical solutions and manage everything — from subjective deliverables and feedback to tight deadlines and cross-functional teams.
💡 PLAKY PRO TIP
Want to get projects off the ground smoothly? Learn how to organize an effective kick-off meeting and download a free agenda and a checklist template with all steps included:

Project execution phase checklist items
The execution phase is where your team starts the actual work on a project. These are the steps you should follow:
#1 Execute tasks
To finally see how your project plan is being carried out, you need to:
- Assign tasks to team members — delegate tasks to your team members as planned.
- Set project deadlines — define due dates for every task and set the timeline.
- Allocate resources — make sure equipment and office space are available when needed, and keep control of where your money goes.
Leaving tasks unallocated often leads to duplicated efforts and “I thought you had it” trap, especially in large IT or creative teams. That’s why it’s best to stick to the golden rule: every task needs to have the owner and deadline.
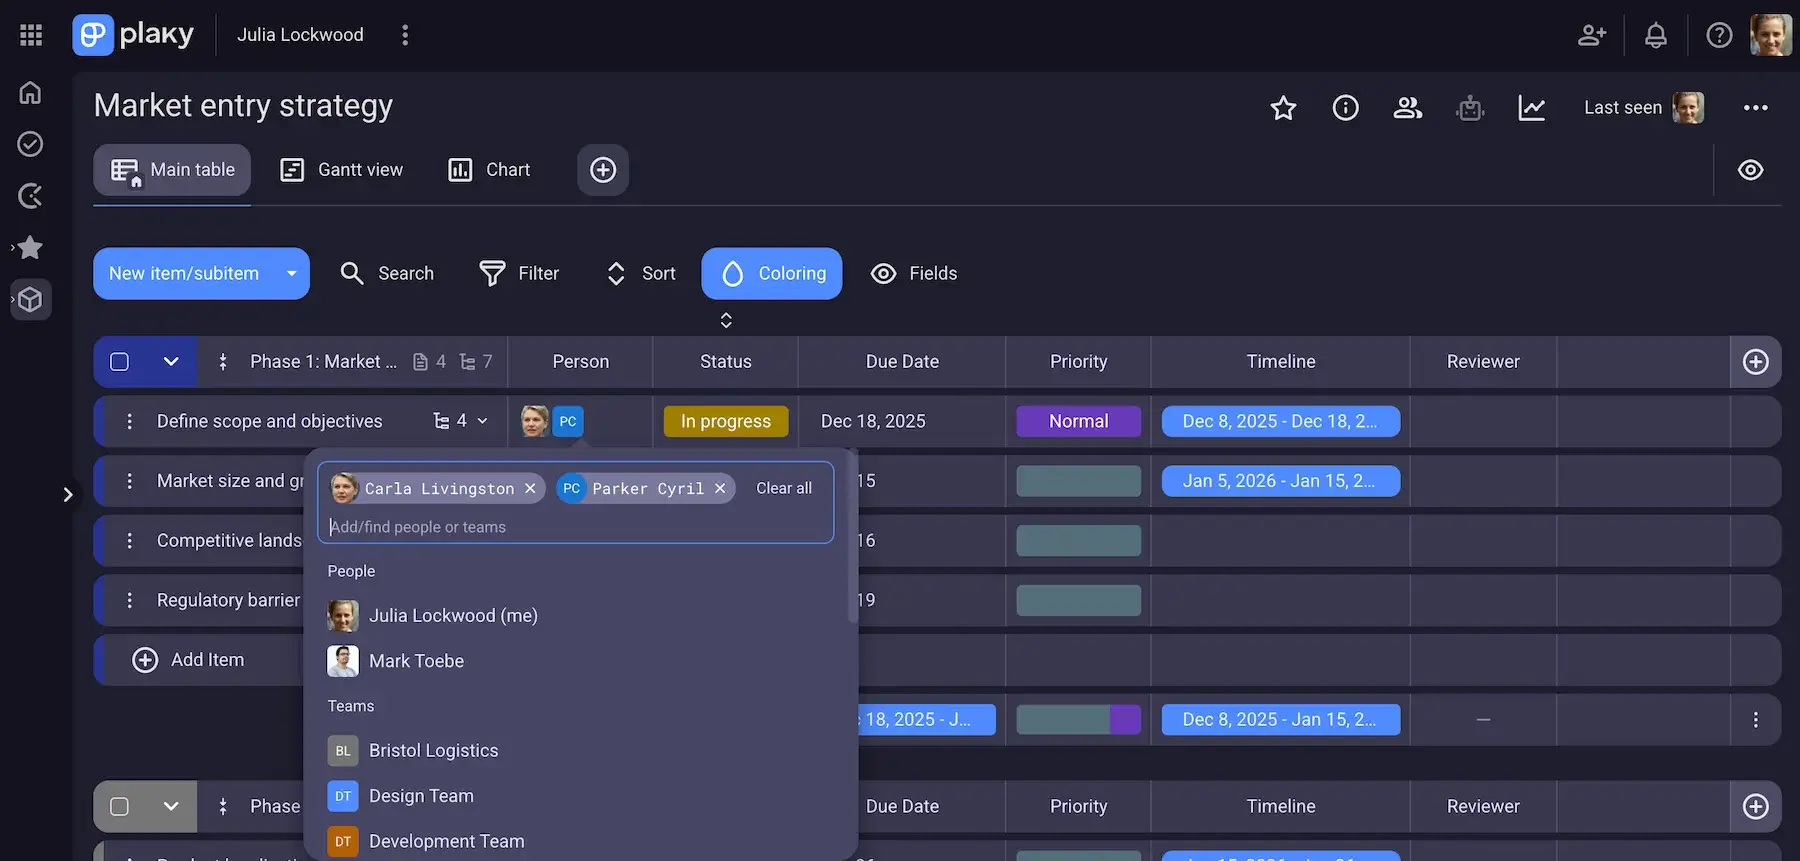
The best way to execute tasks (and stay in the know with what you’re working on in real time) is by using a dedicated tool. In Plaky by CAKE.com, you can list tasks, invite team members to a board, and assign them by choosing their name from the dropdown list. Plus, you can further customize your board and add Fields like date, status, priority, etc.
#2 Manage resources
Resource management in this phase means you need to stay in the loop with the project and make necessary adjustments. To do this, you need to:
- Monitor individual workload — monitor each team member’s workflow to ensure even distribution of work and prevent burnout and potential delays.
- Resolve blockers — pay close attention to blockers, and try to resolve them before they cause more trouble.
- Shift resources when needed — solve burning issues with available slack to keep your project on track.
When work is poorly distributed in a 2-week sprint, your Senior developer ends up drowning. Meanwhile, your junior and mid-level developers are blocked waiting for deployment pipelines. A setup like that can only trigger a series of failures across the sprint.
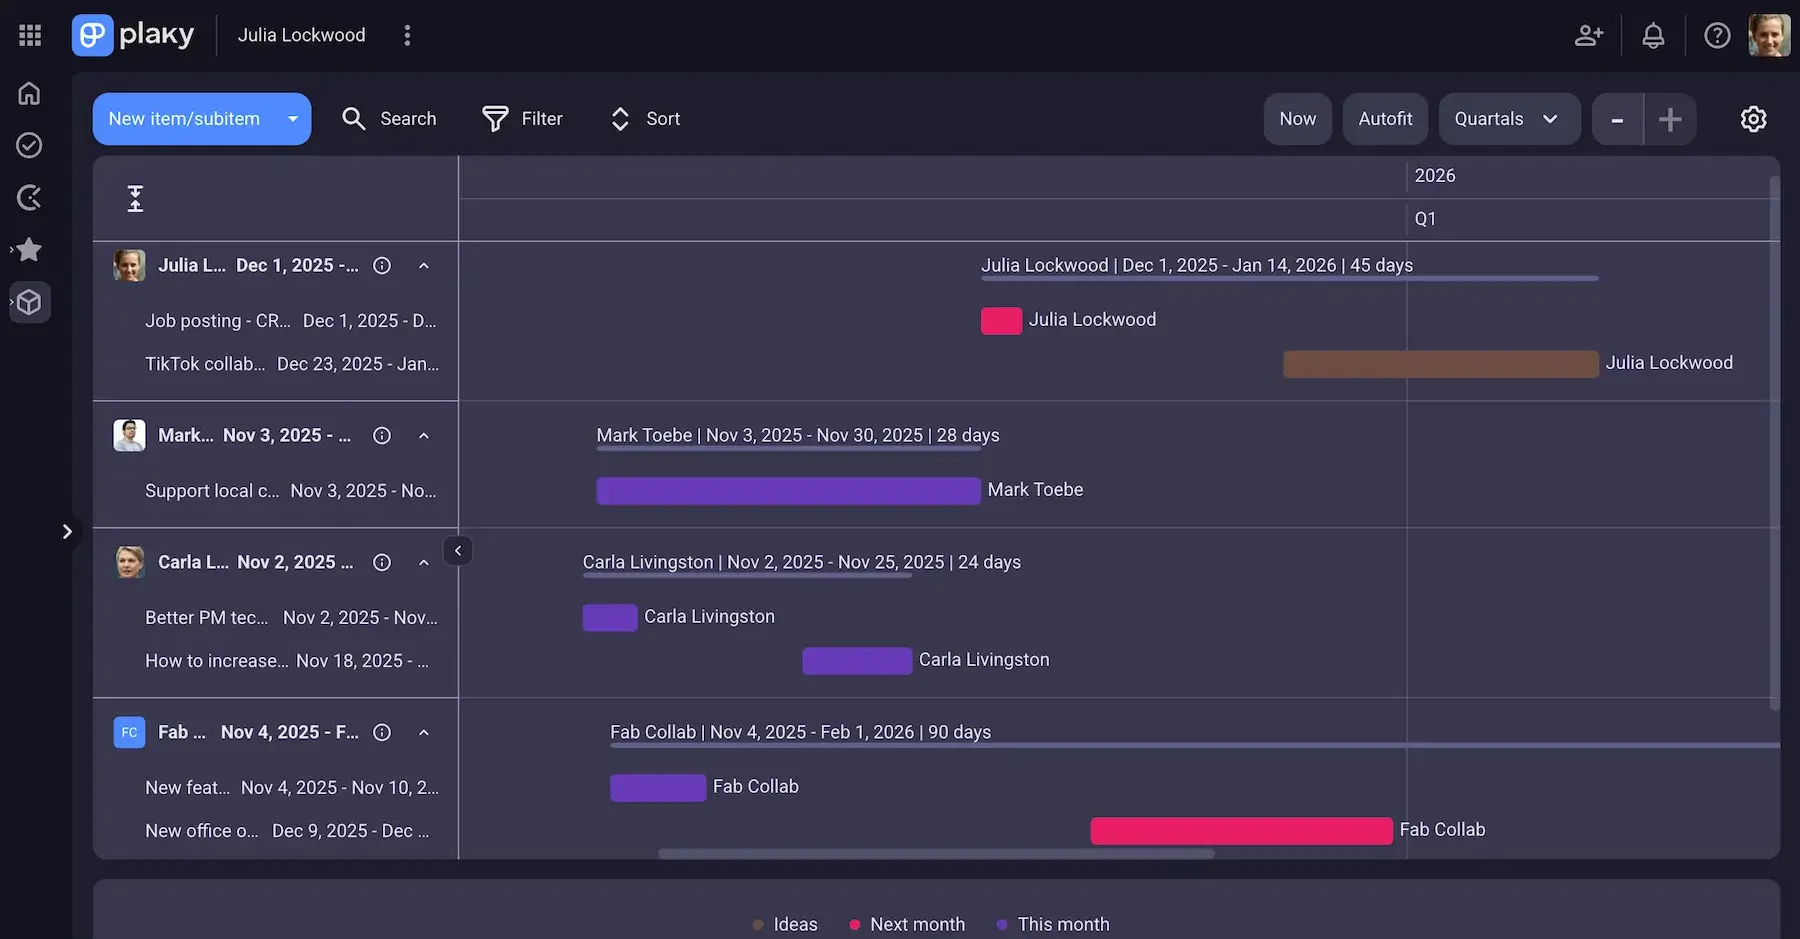
Plaky’s Gantt chart gives you a complete overview of your team members’ workflow helping you prevent over- and underutilizing your human resources.
#3 Monitor progress and quality
A project is like a living thing — you should leave nothing to chance if you want to stay within budget, deliver on time, and avoid rework. Here’s what to do to prevent such outcomes:
- Hold regular status meetings — use status meetings to keep everyone updated on the progress.
- Review if deliverables match quality standards — evaluate the quality before you deliver through QC testing, stakeholder feedback, and peer reviews.
- Track progress against the plan — regularly compare project progress against your project plan to identify deviations and spot new risks.
The construction field depends on sequencing — you can hardly run electrical wires before the roof and windows are watertight. Regular daily site monitoring helps superintendents spot if some teams fall behind or if there will be delays in material delivery.
By keeping track of every step, managers can adjust schedules and reallocate workers to keep the project on budget and on schedule.
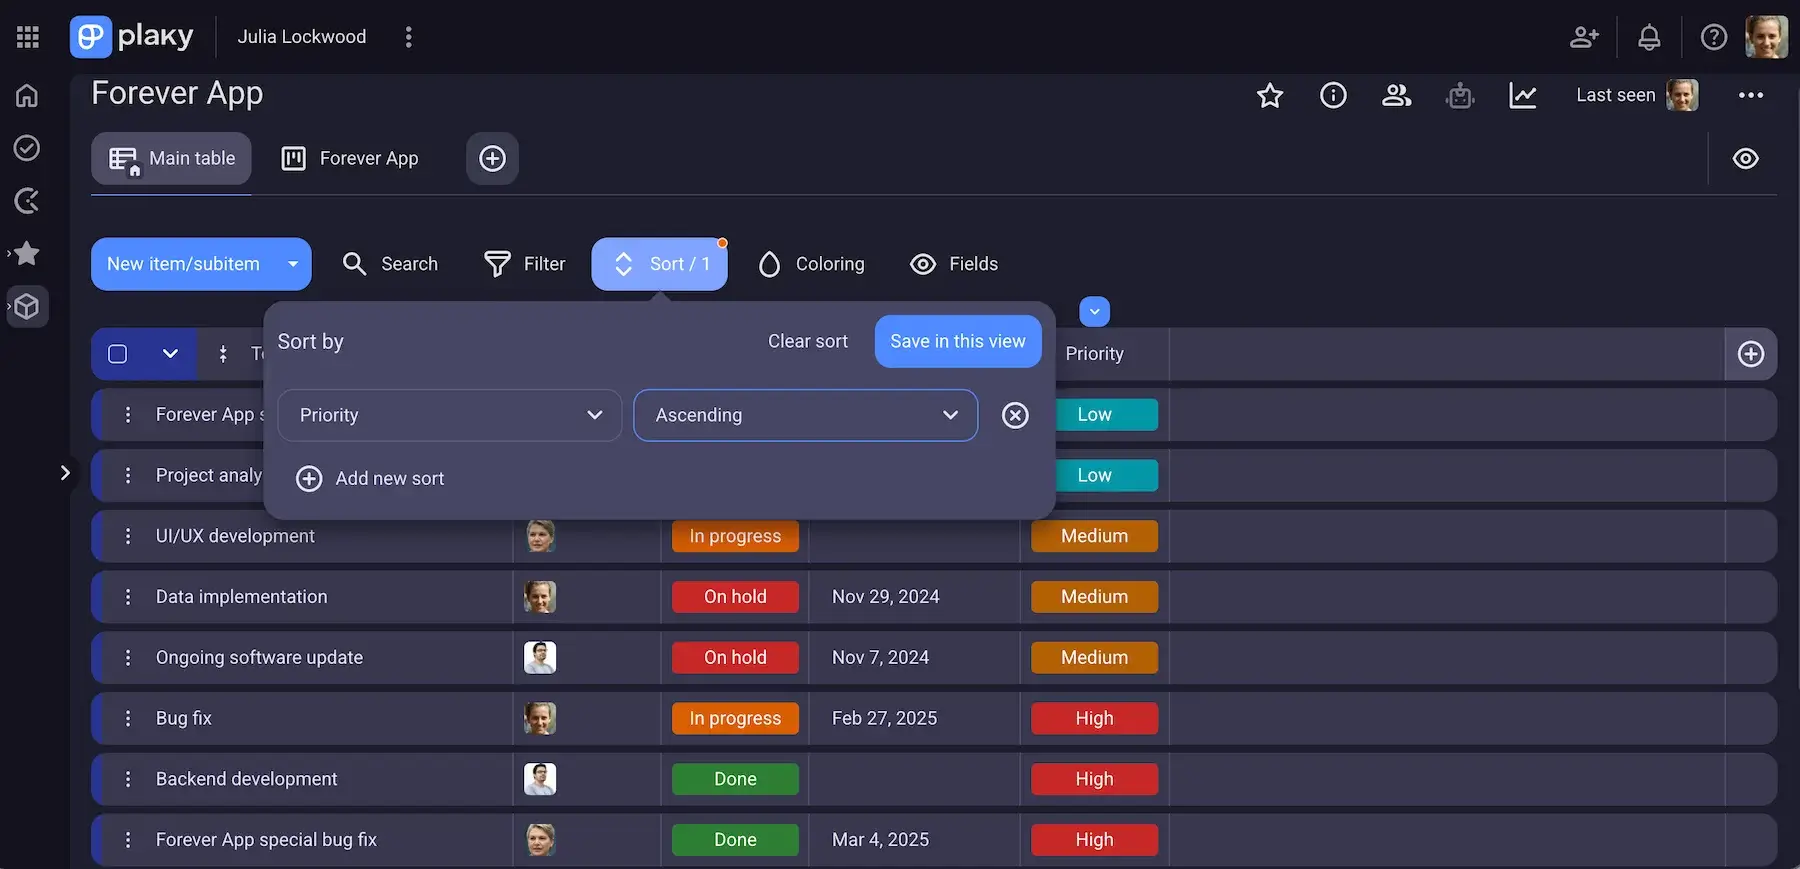
In Plaky, you can track progress in several ways thanks to different board views. While the Gantt chart view shows tasks on a timeline, the Table view works like a spreadsheet with all relevant information, and Kanban board helps you manage tasks through stages.
You can also use sort and filter options to narrow down your focus to specifics that are important to you.
#4 Cooperate with stakeholders
Stakeholders should be actively involved in the project to help with knowledge sharing, decision making, and change management processes. As a project manager, you should:
- Share status updates — send status reports or hold status check-ins to keep stakeholders informed about your project progress.
- Evaluate change requests — involve stakeholders in the evaluation process whenever requests impact scope, budget, and/or schedule.
- Document changes and decisions — make sure you record every change and decision as this helps you control scope and prevents costly misunderstandings.
Make sure you have a paper trail even when your client asks for a change of a headline on your ad campaign. Such “quick edits” also change your project scope, timeline, and budget.
Once you get approval from other stakeholders and make schedule and budget adjustments, share the update so that everyone is in the know.
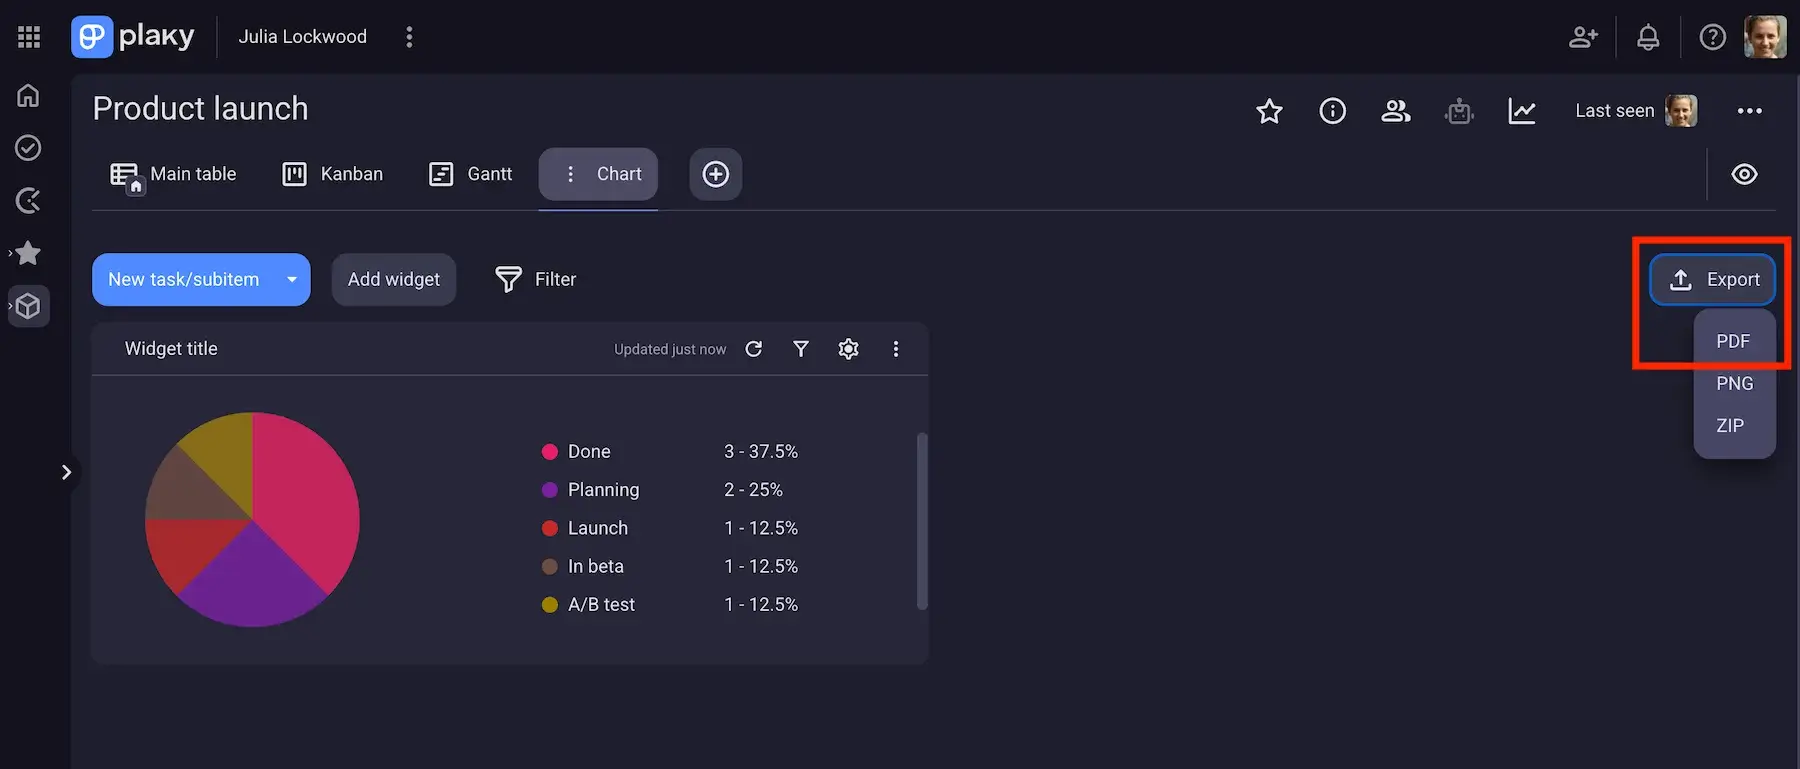
If your stakeholders prefer reports in PDF, you can export project data from Plaky’s Chart view in this format in a few clicks.
Project monitoring and control phase checklist items
This phase supports the execution phase ensuring the project is on track and aligned with its goals and objectives. It includes several steps you should follow:
#1 Track performance and scope changes
Regular checks of your project progress and its expansion are essential to keep the project on track. Here’s what you need to do:
- Track KPIs — prevent guesswork by comparing performance against the baseline and make decisions based on real data.
- Control scope changes — insist on a formal approval process in terms of scope changes to prevent budget overruns, missed deadlines, and team burnout.
Failing to track KPIs leaves you with blind spots — you might think everything is going great, while your client feels your team is moving too slowly. By tracking KPIs, both sides stay aligned on actual performance.
Additionally, every “quick favor” for a client must be approved and formalized to prevent unbilled labor, loss of control, and overtime work.
💡 PLAKY PRO TIP
Find out what scope creep represents and how you can prevent changes that can jeopardize your project:
#2 Evaluate budget and schedule
Staying within financial and schedule boundaries is a challenge that can be met if you:
- Analyze variances — evaluate if there are any deviations in your project by checking variances like cost, schedule, and scope.
- Track expenses and burn rate — control every dollar spent and track burn rate to prevent inefficient spending and cut costs before you run out of money.
- Check critical path — use the critical path method to identify dependent tasks and prevent delays.
- Balance workloads — make sure you assign tasks per expertise and use schedule adjustments to avoid burnout and overtime expenses.
A designer might work overtime to fix a mistake, logging 8 hours on the client’s project sheet but recording extra hours on internal agency sheets. As far as the client is concerned, everything looks good, but the agency ends up paying for unbillable work.
By keeping track of the total logged hours and target billable hours per team member, you can easily compare the 2 and see exactly where your profitability is leaking.
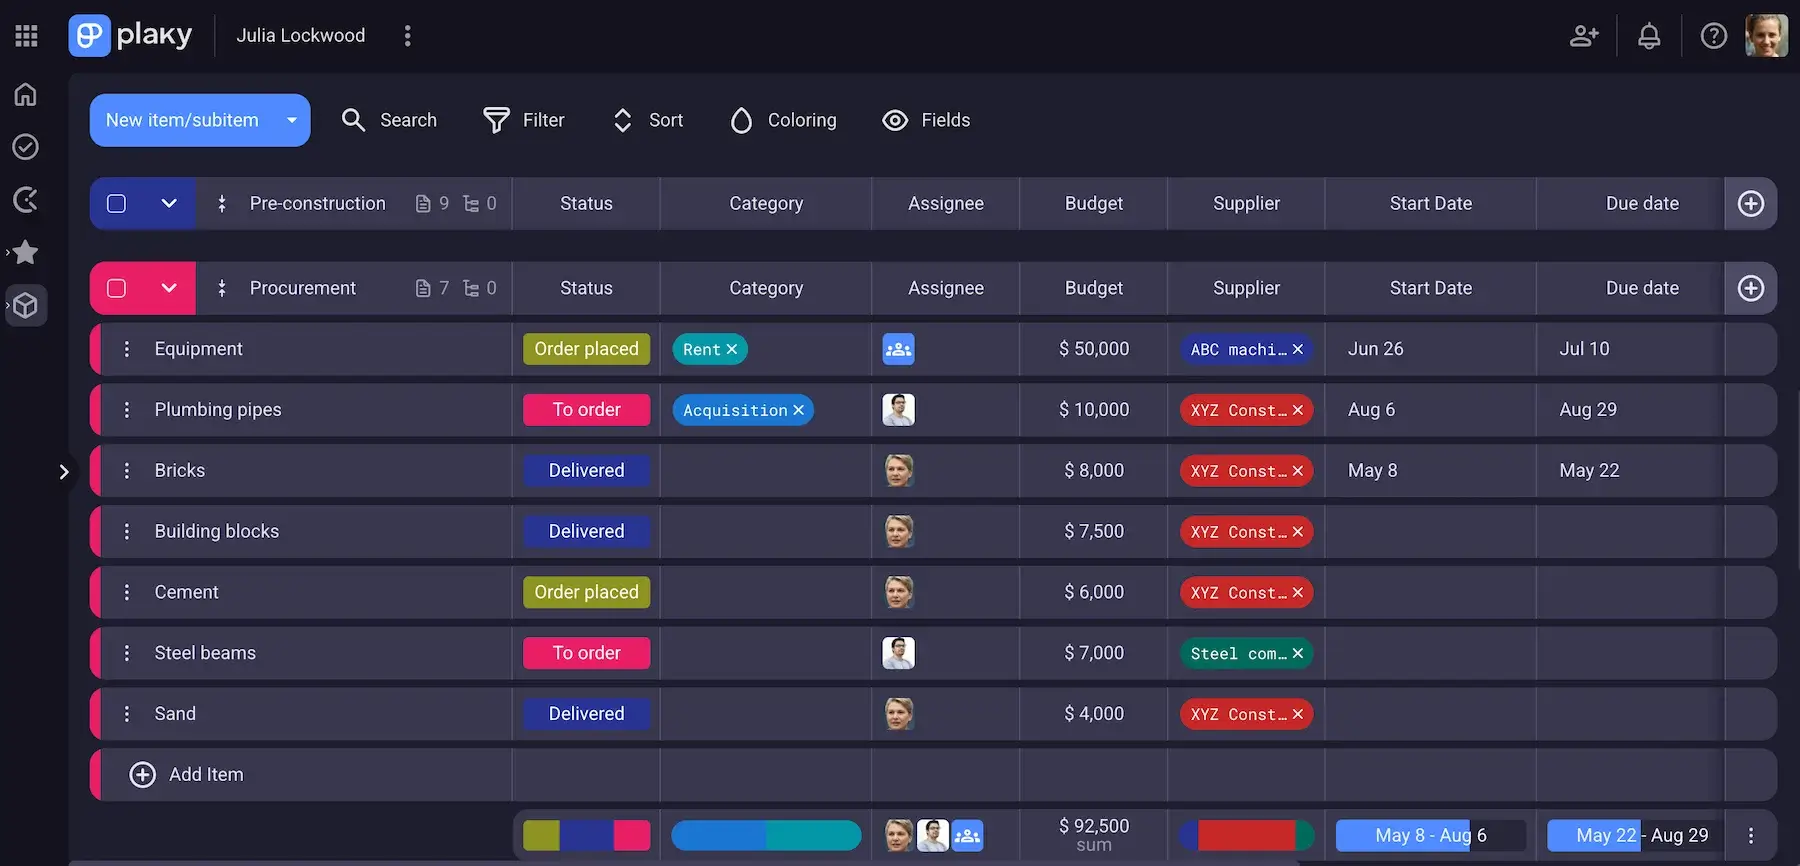
Plaky helps you to allocate project expenses for each task, item, or activity and track how the budget is spent. The Summary row below each item group gives you an insight into total costs.
#3 Manage risks
Identifying potential risks helps you prevent some of the most frequent project pitfalls such as unrealistic deadlines, poor communication, and unclear objectives. To manage risks properly, you need to:
- Keep tabs on the risk register — know what hiccups you can expect so that you can resolve issues before they escalate.
- Draw up a mitigation plan — prepare your action plan for crisis recovery as it will help you respond much faster when the alarm goes off.
- Define escalation criteria — map out a clear strategy for your team members to let them know when they should involve senior management in problem resolution.
If you ever identify a vulnerability in the firewall, knowing who to inform first is essential, as not all issues need to escalate to executive teams. Risk registers help you find solutions quickly and move projects forward.
Also, having predefined escalation criteria lets you easily determine risks’ level and the exact way to treat risks effectively.
💡 PLAKY PRO TIP
A strong risk management plan is a must. Learn how to manage project risks and move your projects forward with no trouble:
#4 Collaborate with the team and stakeholders
Open and transparent communication is key during this phase, as it helps keep everyone involved in the project on the same page. To maintain good cooperation, you should:
- Ensure regular updates — share status reports, or run meetings to let both your project team and stakeholders know the current project status.
- Encourage feedback — keep communication channels open to get feedback, and enable discussions on how to improve and find better solutions.
Creatives know their work is highly subjective and received feedback is precious for improvement. By encouraging the culture of structured feedback throughout the creative project lifecycle, you ensure the final product hits the target.
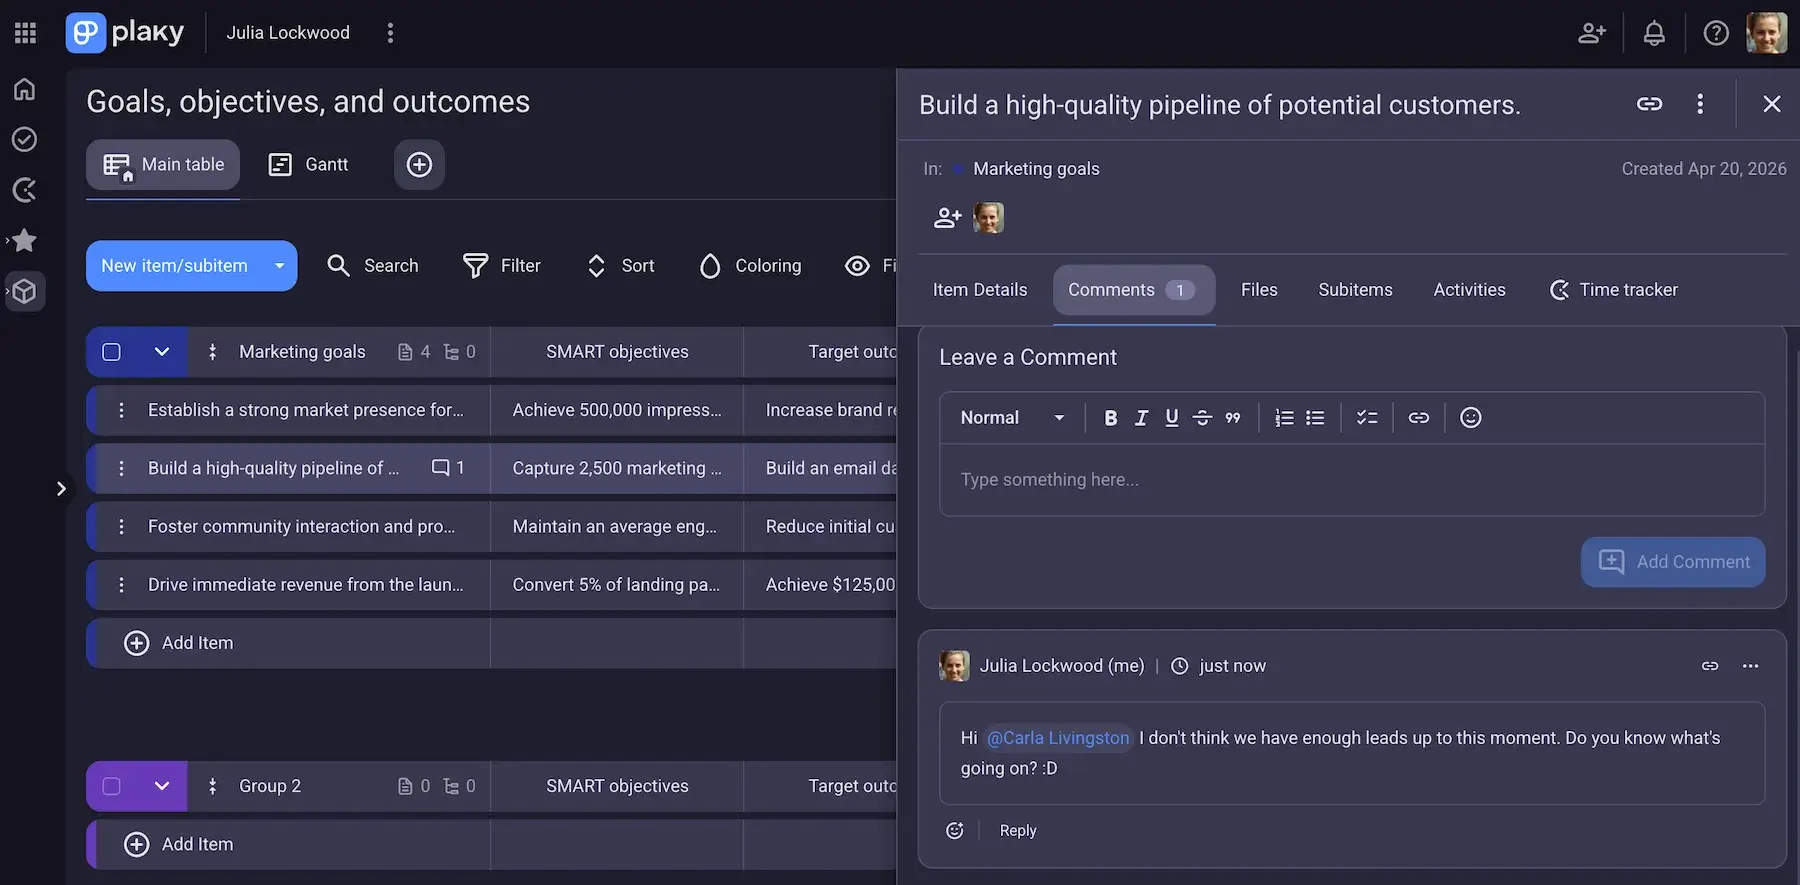
Plaky lets you keep all task-related discussions, updates, and feedback in its Comments section. Here, you can @mention your team members to draw their attention and reply to comments in threads to keep discussions organized.
What’s best, in Plaky, you get real-time Notifications about any updates on tasks you’re involved with leaving no room for information loss.
Project closure phase checklist items
The closure phase is the one where you wrap up all project activities, and make sure everyone is satisfied with the final result. To close your project properly, take the following steps:
#1 Confirm acceptance formally
This step is crucial as it helps you verify compliance and ensure there are no disputed items.
- Ensure all deliverables meet requirements — confirm with stakeholders and third-party contributors that what you delivered meets the agreed scope and satisfies quality standards.
- Obtain sign-off from stakeholders — make sure you get official sign-off from stakeholders that the project is complete, as this protects your company and team from potential legal disputes.
- Transfer the project maintenance responsibility to support teams — allow smooth transfer of your project to a dedicated team specialized for troubleshooting and triage.
Let the client test the new app or website, and make sure all requirements are verified and passed. You also need to hand the system over to the support or operations team and migrate data with zero data loss before you actually close the contract.

#2 Review contracts and finances
- Ensure all invoices are paid — check if all invoices are paid to prevent financial or legal disputes and ensure that your planned budget aligns with what you actually spent.
- Review final budget status and close project accounts — make sure you have no financial obligations left and close project accounts to revoke access to them or simply reallocate unspent funds.
- Send final reports — prepare detailed reports and send them out to interested parties to confirm alignment and financial closure.
- Terminate contracts and agreements — finalize all contracts and agreements to officially release vendors, suppliers, and other contractors and protect your company from lawsuits.
The best way for agencies, consultants, lawyers, and IT companies to ensure pricing accuracy and clean billing is by tracking the time spent on tasks. Time tracking enables you to count in a 10-minute call with a client or a quick bug fix in your actual work.
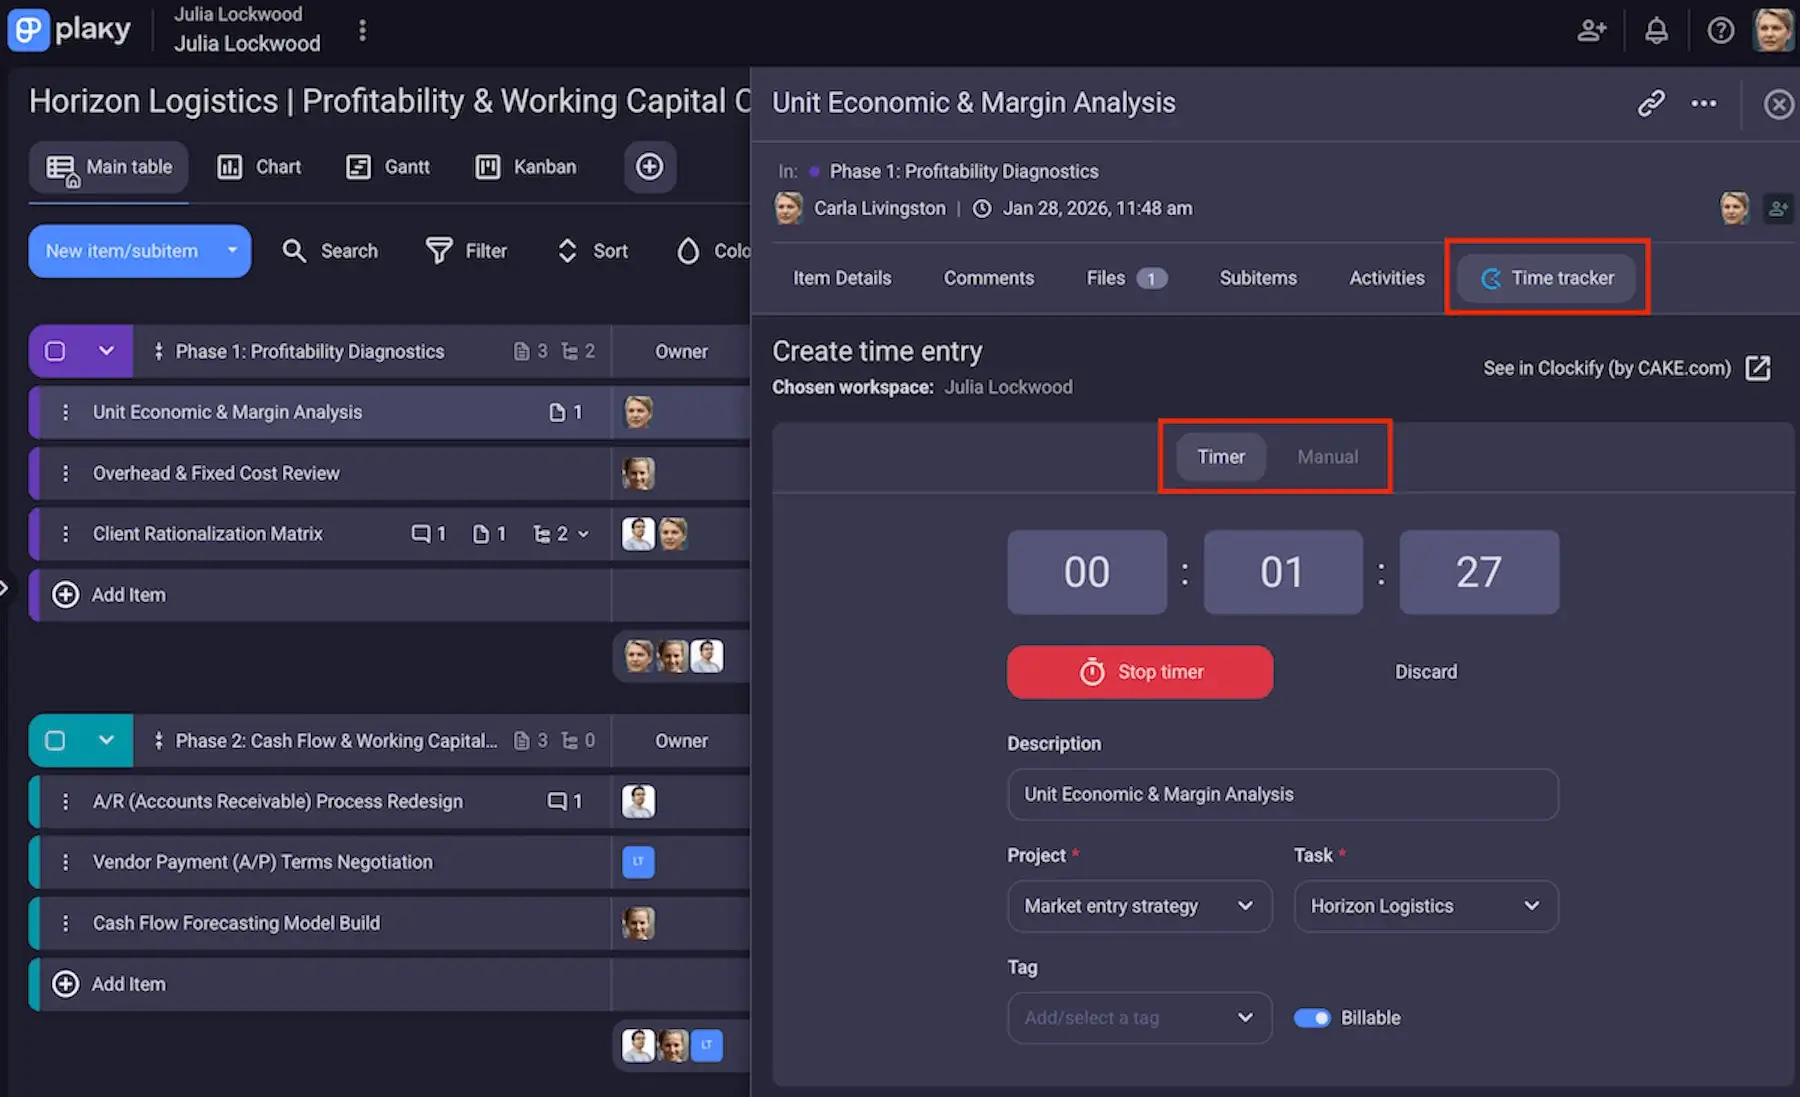
If you want to track the time spent on tasks and enable smarter billing, consider Plaky + Clockify native integration.
With this integration, you can track the time your team members spend on tasks directly in Plaky knowing that all data will be automatically linked to the right project and task in your Clockify account. That said, you can later run time reports in Clockify and prepare invoices for clients.
#3 Transfer knowledge and archive documentation
Using previous experience on future projects minimizes risks of repeating the same mistakes, improves onboarding process, and keeps best practices within the company. The steps you need to take are:
- Hold a post-implementation review and capture lessons learned — gather your team to discuss what went well on a project and what could be improved, and make a record of those insights to get back to in future projects.
- Summarize performance feedback — assess team contribution and their roles and compare project outcome to the original plan and KPIs.
- Archive all files, repositories, and assets — save your contracts, plans, past decisions, and strategies for future reference to enable process improvement.
By storing accumulated knowledge and experience, you prevent future teams from reinventing the wheel and save them time. Also, your company’s strategic history will help you understand why some ideas were accepted and others were discarded.
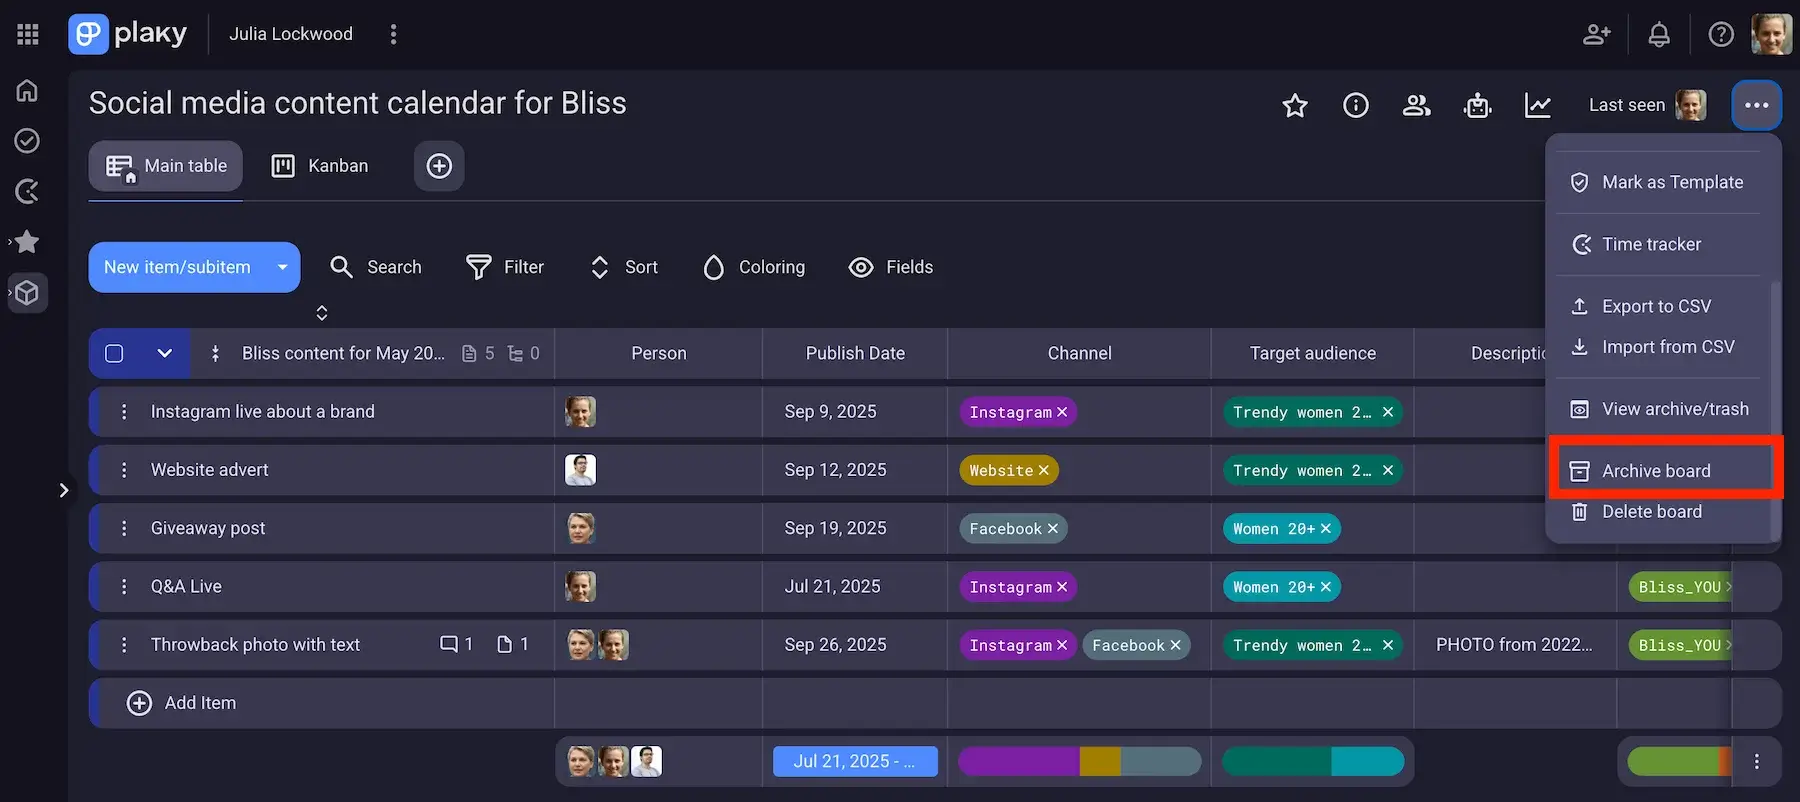
Plaky lets you preserve complete projects no matter whether you put a project on hold or save it for future reference thanks to its Archive feature. You can archive entire Boards, Item groups, Items, and even Subitems.
#4 Release the project team and celebrate project success
Closing resources is the last task project managers have. To do that, you need to:
- Release the team — free up your team members so that they could join other projects without delay.
- Reallocate equipment — put specialized equipment to use again by reallocating it to other teams and projects, and minimize unnecessary spending.
- Revoke licences — inform the security team to remove access to any licences and channels to finalize disbandment.
- Celebrate project success — recognize your team’s efforts to boost their morale and promote a positive work environment.
Once you release your project team, don’t miss the opportunity to organize a gathering and let your team “reset” before the next project venture. Any way you opt for to show how much you appreciate their effort directly impacts their mental health and acts as a great retention tool.
Free project management checklist template
No matter if you are new to the field or an experienced project manager, having a comprehensive project checklist as a sidekick is always smart.
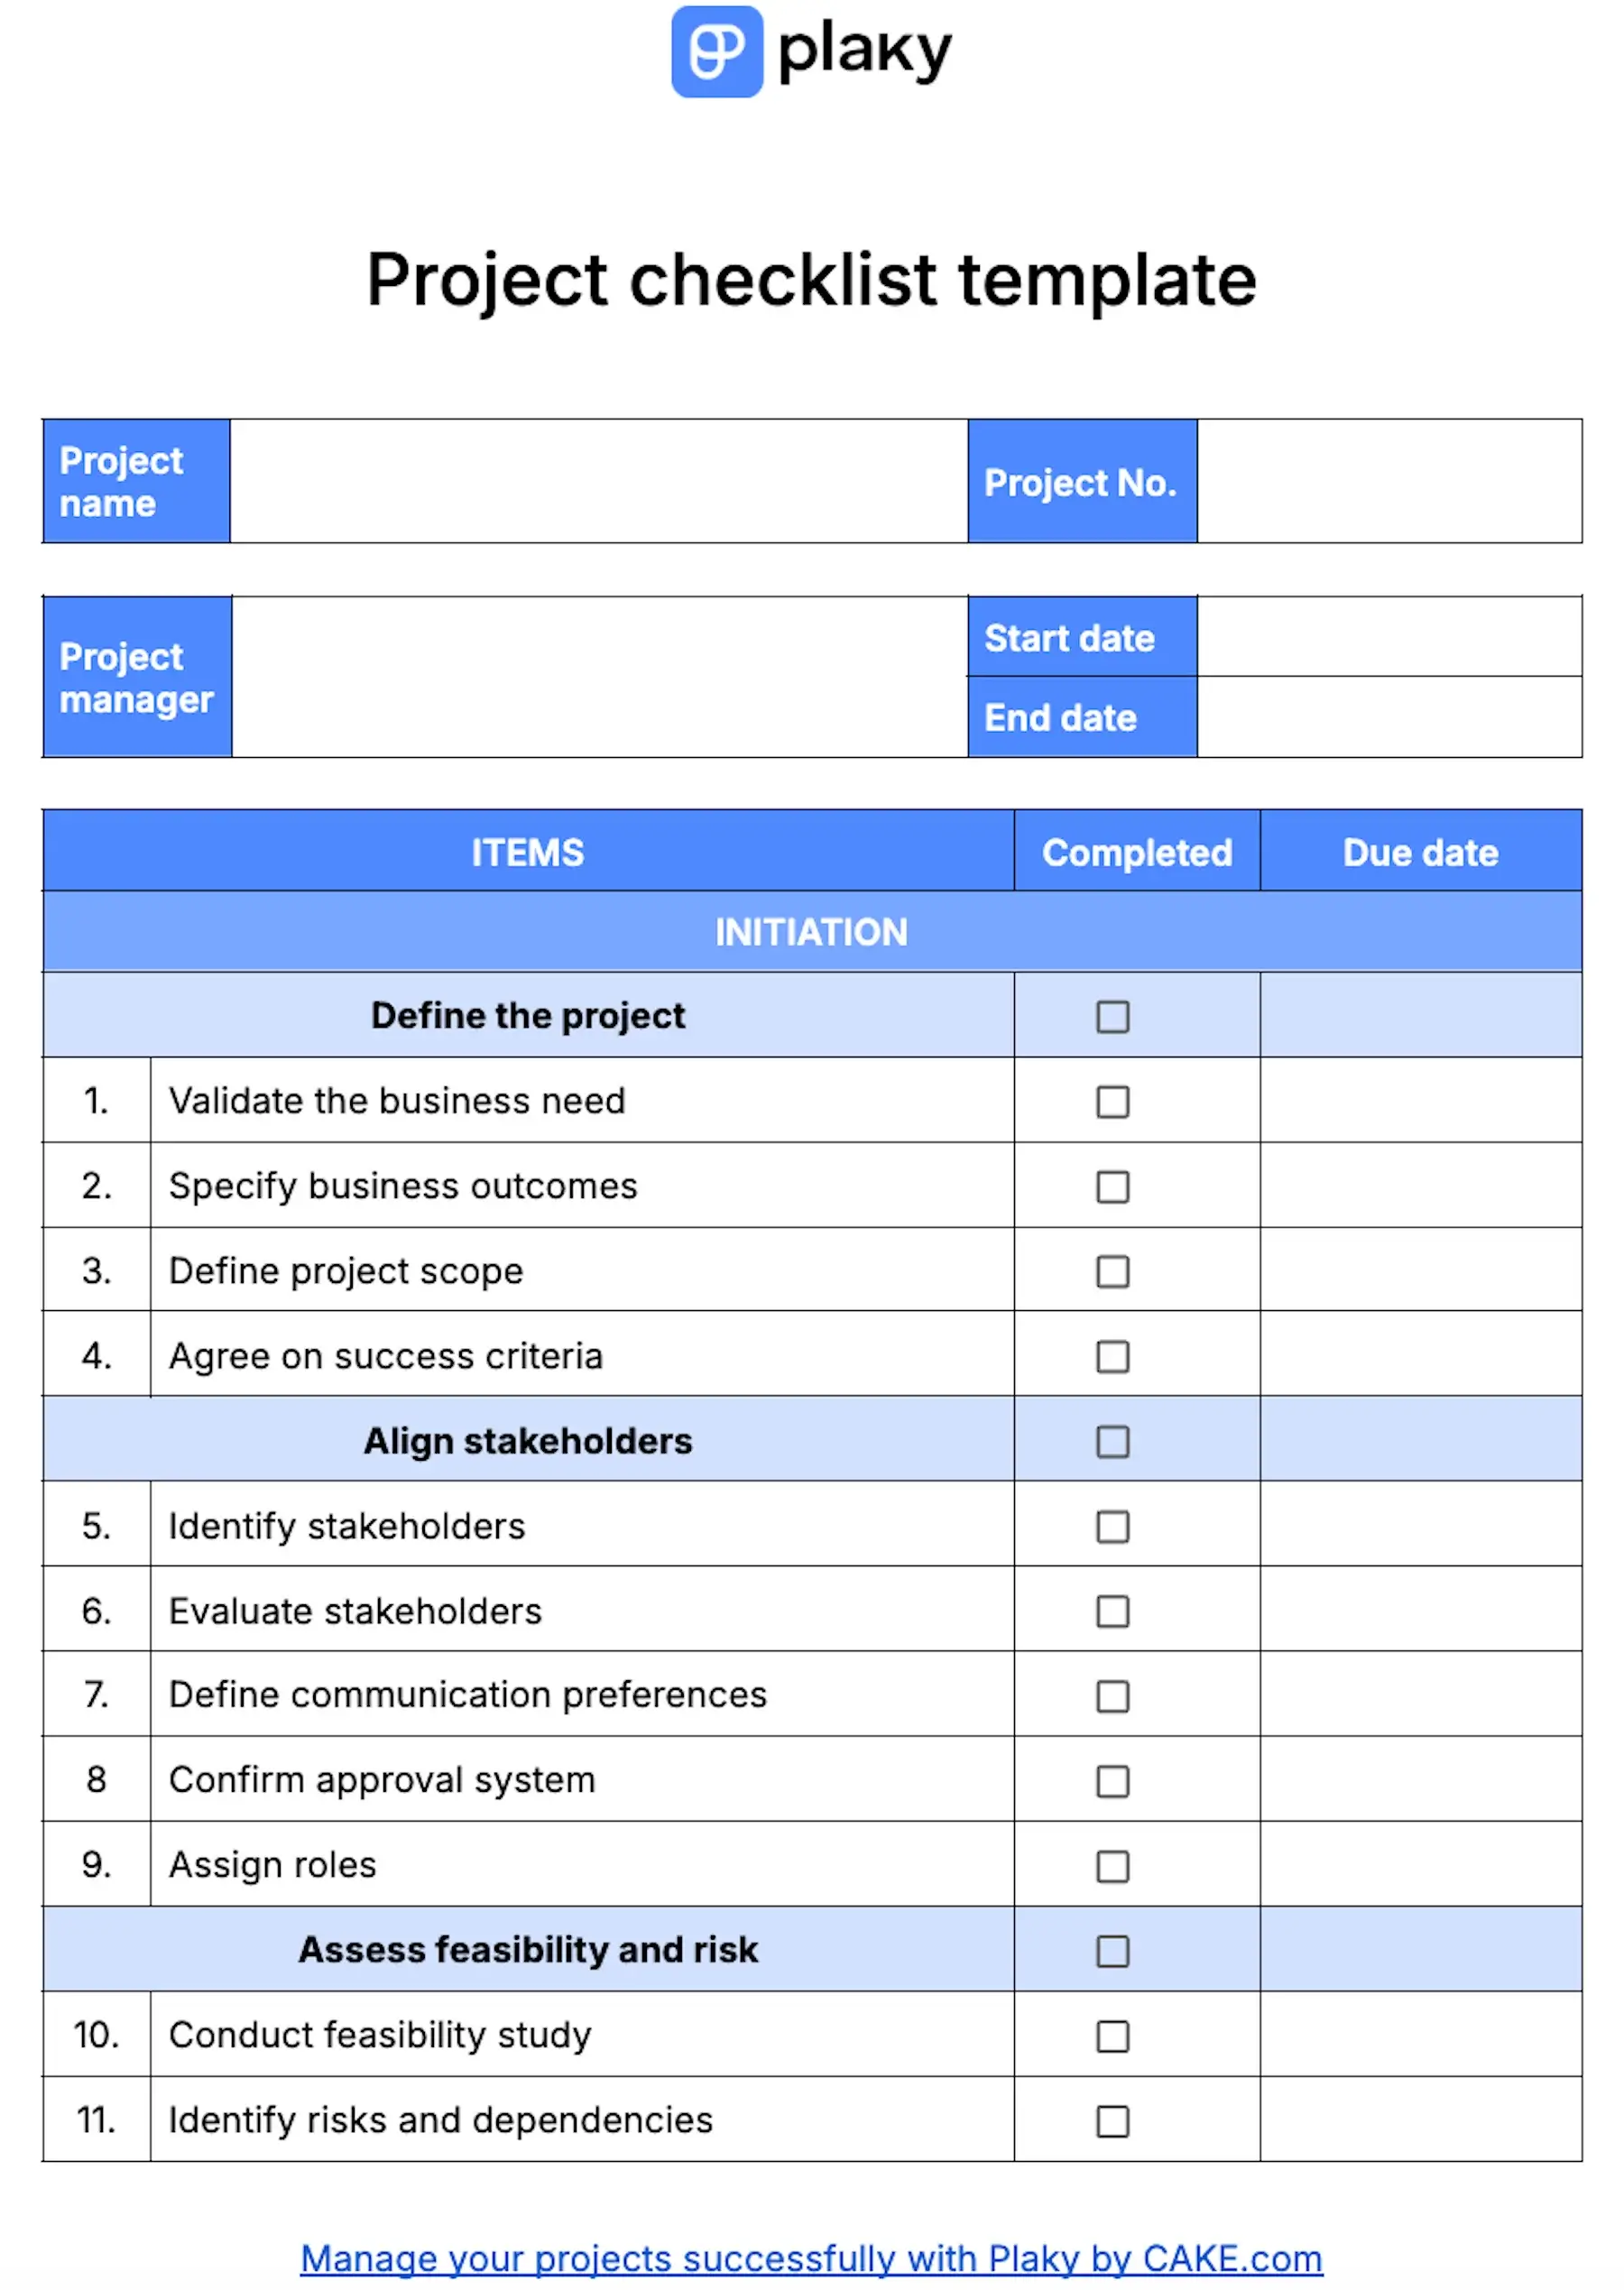
Once you download our project management checklist template, you’ll see it covers all the steps, from initiation to closure.
The template groups tasks and subtasks per project phases, so you’ll never be confused about when you should complete a task.
Also, each task has a dedicated checkbox you can tick off and a due date cell.
What’s best, the template is highly-customizable and free to download!
FAQ about project checklists
Check out the answers to some of the questions you might have about project checklists.
What is a project management checklist?
A project management checklist is a guide you can use to keep track of all the steps you need to follow to successfully complete your projects.
An effective checklist helps you set the basis for your project, align teams and stakeholders, and manage your projects without missing anything important. It minimizes chances for scope creep and keeps the project on track.
How to create a project checklist?
Your ideal checklist for project management will mostly depend on your industry and project type.
Make sure you adapt it to your project workflow and choose a format that suits your working preferences. You can use a dedicated template or a project management tool to track your checklist in real-time.
What is a checklist in project management?
A checklist in project management is a list of tasks or activities you need to complete to finish your project. It prevents you from overlooking important steps that can derail your project workflow.
What are the 7 parts of a project plan?
The 7 parts of a project plan are:
- Goals and objectives
- Project scope
- Timeline estimate
- Deliverables and milestones
- Resource allocation
- Budget breakdown
- Communication framework
Is there a checklist template in Word?
Yes, you can find plenty of checklist templates in Word format, but before you opt for any of them, make sure they are editable and that you can adapt them to your needs.
Also, if you wish, you can easily convert Plaky’s checklist template to a Word document and download it as such in a few simple steps.
How to make a project checklist in Excel?
You don’t need to be an expert for Excel to make a simple project checklist in this format.
If you start from scratch, use any suitable checklist template as a model. Start by creating headers and don’t forget to insert checkboxes.
What is the best format for a checklist?
The best format for a checklist is the one that fits your working preferences.
You can structure your checklist in a dedicated Google Sheets/Excel spreadsheet or Google Docs/Word document.
If you are a fan of pen and paper, you can convert your Google Doc or Word checklist into a PDF format and print it out.
Finally, if you like, you can create your own checklist in the project management software you already use for managing tasks and teams.
Create a dynamic project checklist in Plaky and never miss a thing
A project management checklist helps you manage your projects, organize the work properly, and prevents you from missing something vital for the project’s success.
If you want to save time and avoid creating a checklist from scratch, don’t hesitate to download Plaky’s checklist for project management template — completely free of charge.
Alternatively, you can give a chance to Plaky by CAKE.com and try it for free for 7 days to see how it works.
From resource allocation to archiving project data, Plaky won’t disappoint you in any way. With Plaky to help you, you can simply plan, track, and execute projects and never lose control of a situation.
Your project checklist in Plaky becomes a living tool that provides you with real-time progress updates, enables in-task collaboration, and reduces manual work via board automations.
What’s more, you’ll be glad to know that Plaky is:
- Easy to use — with no learning curve, Plaky won’t take you much time to learn the ropes.
- Affordable — users get a generous free plan and pay reasonable prices for Plaky’s paid plans.
- Secure — your project data is completely safe with Plaky thanks to its 24/7 security audits and penetration tests.
Ready to put your checklist to work? Set up your first project in Plaky in under 2 minutes.
How we reviewed this post: Our writers & editors monitor the posts and update them when new information becomes available, to keep them fresh and relevant.