Security issues, resource depletion, logistic difficulties, machinery malfunctions — project issues come in many shapes and sizes, and each of them can spiral out of control without proper issue management.
As a project manager, it’s your responsibility to establish an issue management process that will help identify and resolve such hiccups as quickly as possible.
But, how do you prepare for something you don’t know is going to happen?
This is exactly what we’ll be discussing in this article, so keep reading.

Defining issue management
Issue management is the process of identifying, prioritizing, and resolving problems that arise over the course of the project. Issues include resource shortages, environmental challenges, legal problems, shipment delays, machinery, software, and product malfunctions, or similar problems that have a negative impact on project success.
Issues vs risks
Risks are potential events that — if they occur — can impact the project in a positive or negative way. Risks can be predicted based on previous experiences with similar projects and are commonly recorded in a risk register along with a list of possible solutions.
In contrast, issues are events that have occurred and are actively impacting the project in a negative way.
Risk management is a vital precursor to issue management. By recording all potential problems you can think of and preparing strategies for their mitigation ahead of time, you inevitably create a plan for resolving issues that grow out of negative project risks.
💡 PLAKY PRO TIP
Learn more about managing risks and preparing for project issues that may occur:
The key 5 steps of the issue management process
If you want to manage issues effectively, you need to set up a clear issue management process that everyone in your team will be familiar with.
Generally speaking, the issue management process consists of these 5 steps in this order:
- Identify issues,
- Assess and log issues,
- Prioritize and assign issues,
- Resolve issues, and
- Monitor and review issues.
1. Identify issues
The first stage of effective issue management is identifying the issue.
There are 2 types of project issues — those that evolve from negative risks and unpredictable ones that catch you unawares.
If you already have a good risk management system in place and are conscientious about regularly monitoring your risks, the former shouldn’t be difficult to notice.
The unpredictable issues, however, can come from any direction, so it’s important to constantly be on the lookout for them. This can include things like:
- Holding regular report meetings where teams can alert you of any emerging problems,
- Performing regular testing,
- Creating a transparent issue reporting system, etc.
As a project manager, you will naturally be more aware of project-related issues, while product-related ones might slip through the cracks. So, for continuous projects such as software development projects, user bug reports are an invaluable source of information.
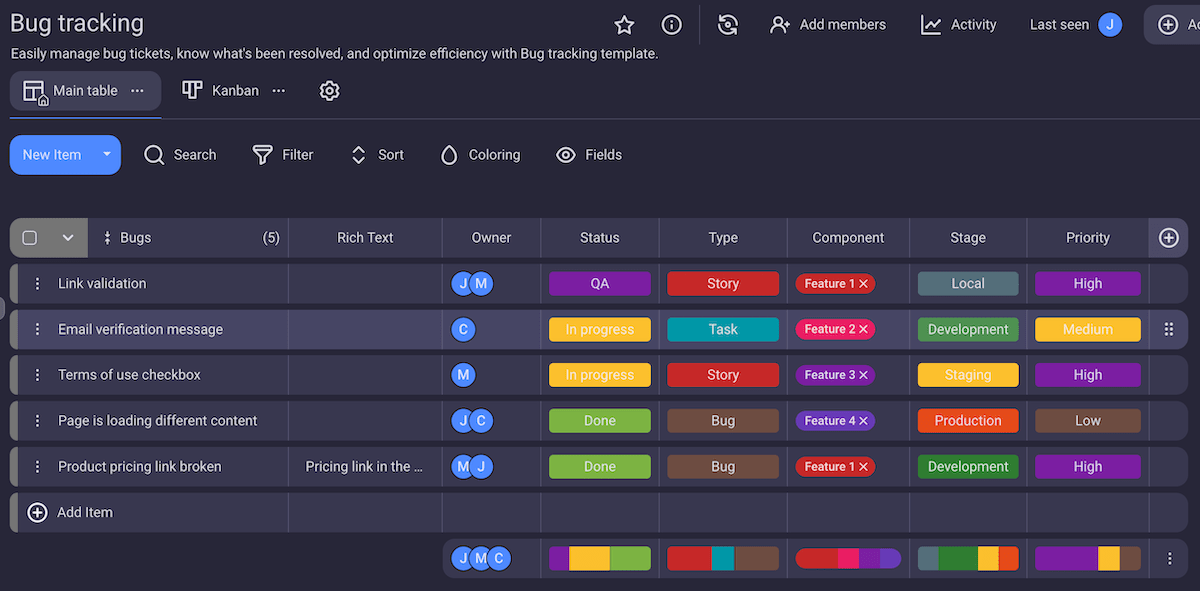
Gather all your user feedback in one place as you receive it. You can then easily categorize it, prioritize it, and assign people to fix the issues, all in the same place, without worrying that you’ll miss something important.
Using task management software is particularly suitable for bug tracking since it lets you set up permissions so that anyone in your team can report new problems without your involvement — but you’ll still get a notification for each new item and stay in the loop.
Essentially, this is an efficient way to “divide and conquer” but still retain a good deal of control over the project.
Get our free bug tracking template
2. Assess and log issues
At this point, it’s time to investigate where the issue originated and its potential impact on the project — and then assign it an impact score.
When we asked Eva Ryan, Senior Client Account Manager at Flying Cat Marketing, for advice on how she addresses and investigates issues at her workplace, she stressed the importance of speed:

“Speed is key. By ignoring [issues], they will not go away — they’ll come back. Tackle them straight away, and you’ll be able to solve them in half the time.
Also first, try and find the root cause of the issue, then document it so that it can be avoided in the future. Remember to loop in the internal team.”
When it comes to dealing with client issues, the most important thing is to maintain open communication. They are the ones who can best describe the issue, so make sure none of the information is lost through asynchronous communication.

“Answer quickly and try to get them on a call. Addressing the issue during a video call is the best way because you can get on the same level with that person.
Do not undervalue the power of speaking to someone face to face. A lot of the work in marketing and project management is asynchronous. But for solving conflicts or an issue, the best way to understand how everyone is perceiving the issue is to speak face to face.”
Once you understand the issue, add it to the issue log — a list where you’ll record all known issues along with all the relevant information such as:
- Issue type,
- Identification date,
- Impact score,
- Priority,
- Assignee, etc.
Create your issue log in Plaky
At a glance, all this information can be kept in a neat spreadsheet. That said, accuracy and speed are crucial here, so using a project management tool is the best option for consistent issue tracking.
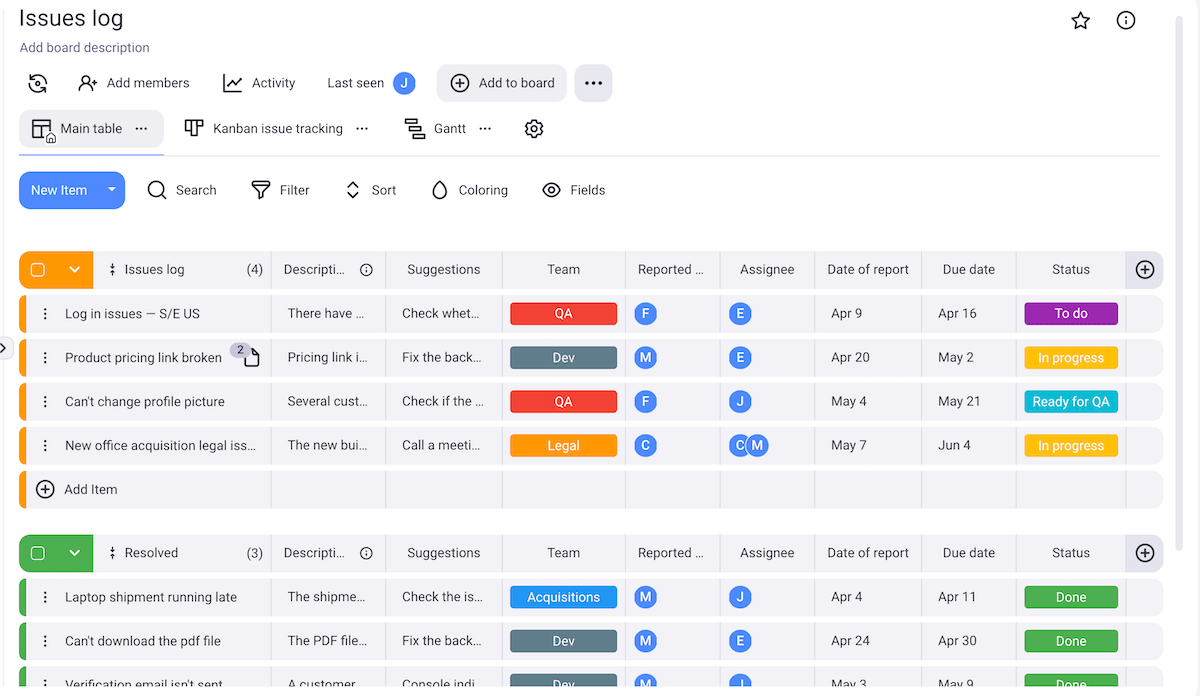
Tip: To avoid assigning arbitrary impact scores, create a consistent issue scoring system you’ll use throughout all your projects (e.g. 1–10).
3. Prioritize and assign issues
Not all issues will be equally severe, so rather than tackling them as they emerge, it’s better to prioritize them and address them in order of importance.
The impact scores you assigned to every issue in the previous step are what will help you determine the priority of the issues.
Once issues are prioritized, you can immediately assign the most critical ones to the right people and begin solving them.
If you’ve been using project management software to log and track your issues, this should be easy. Simply add the relevant person to the Assignee field, and they will receive a notification and begin working.
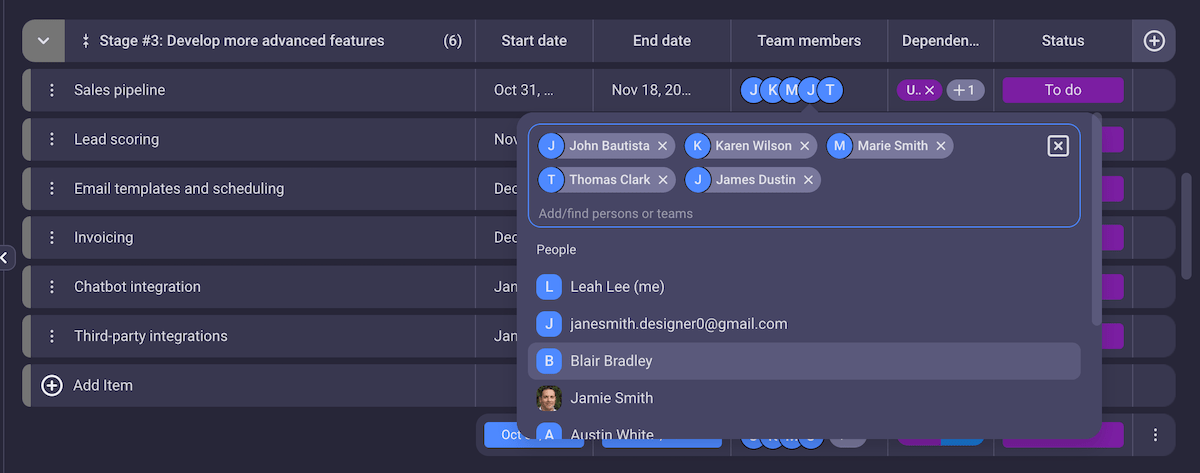
Improve your team’s accountability with Plaky
4. Resolve issues
At this point, it’s important to keep all lines of communication open and transparent so that both you and the rest of the team can give advice, feedback, and suggestions on how to best close the issue at hand.
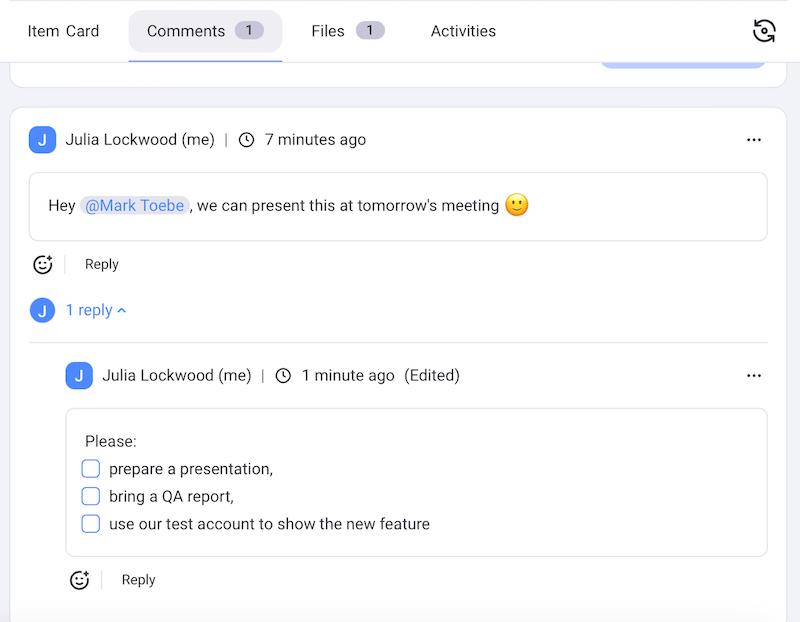
Since every issue is different, there is no one-size-fits-all formula for this step of the process. But, as a project manager, you should have access to documentation from previous projects that explains how similar problems were resolved — so you can copy their homework.
Still, sometimes you’ll have to find the solution yourself. For instance, client issues are much more sensitive than software malfunctions or shipment delays, and each issue is unique.
Eva Ryan highlights that, in such cases, it’s important to keep in mind that you’re dealing with a real person who is counting on you to solve their problem:

“An absolute must is to come up with action steps on the call. And if you can’t find a solution on the spot, tell them you’ll get back to them by a specific deadline. Always give them a deadline by which they can expect a solution.
Another good tip is to involve the client in the plan because the solution involves them. Don’t exclude them from this. You will be surprised how quickly an issue can be overcome by getting on a call and saying ‘I acknowledge there is an issue here, and I want to listen to your point of view and what you have to say.’”
5. Monitor and review issues
Finally, while project managers are usually not actively involved in issue resolution, you should still continue to monitor the issue until it is resolved.
Staying on top of new developments will allow you to submit accurate reports to stakeholders and determine whether it’s necessary to escalate the issue to higher management.
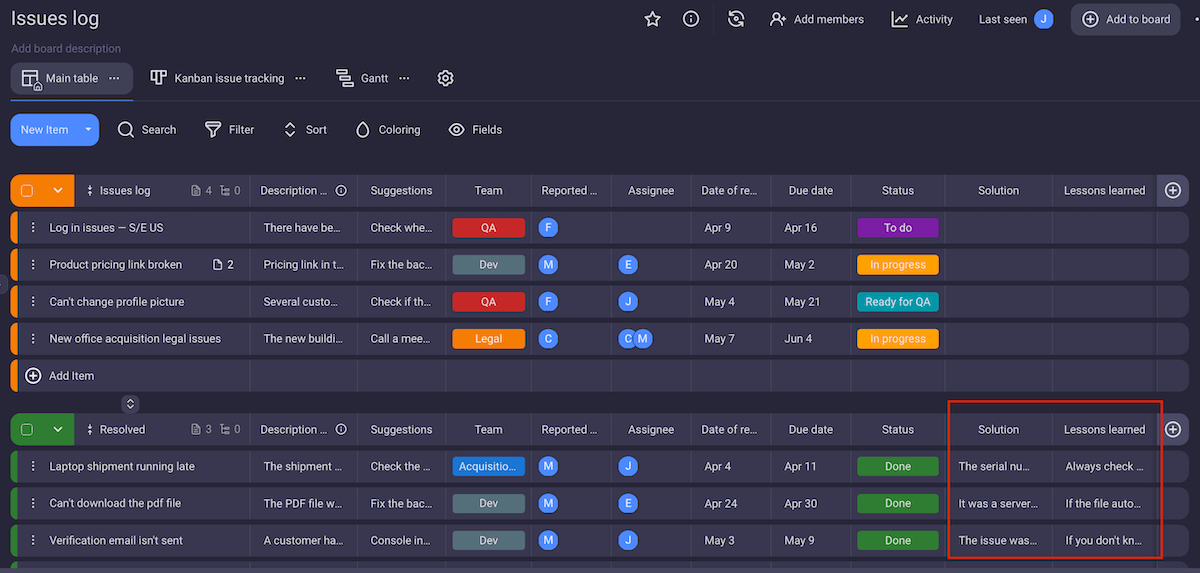
You can track the overall progress of issues using a simple table in project management software. Alternatively, you can get a more detailed task overview for each item when you expand the item card, along with any comments, files, activity history, and more.
When the issue has been resolved, mark it as closed in the issue log, write down how it was resolved, and record the lessons learned.
This information will serve as either a helpful guide or a cautionary note if a similar issue happens again.
Issue management examples
To illustrate how the issue management process might work in practice, here are some examples.
Project issue management example
You’re a project manager leading a design software development project for a high-profile client. The deadline is in 3 months, but suddenly, your offices flood due to severe weather conditions.
Your assessment results are devastating — 60% of office electronic equipment destroyed, significant data losses, and unusable office space. The issue will have a high impact on the project and cause major setbacks.
After a meeting with your team, you conclude that there is no way to meet the current deadline. The only way to continue is to respond quickly by relocating, getting new equipment, working on recovering as much data as possible, and continuing with the project.
Due to the severity and scale of the issue, you assign multiple teams to deal with the various aspects of the solution — equipment and office space acquisition, data recovery, accounting, legal and insurance issues, etc., — and continue monitoring the process until the issue is resolved.
Stay ahead of your project issues with Plaky
Product issue management example
Say you’ve been working on an online multiplayer game that has already launched and has a solid player base. One day, your support team is flooded with complaints — players are having trouble logging in.
The issue has been identified without any active engagement on your part, but now it’s time to get to the bottom of things. Is this a product issue, a server issue, or a security issue? Whatever it is, it needs to be solved ASAP because it’s causing trouble for thousands of your active players. So, the issue jumps to the top of your priority list.
The analysis reveals that your servers were overloaded and crashed due to a huge number of players trying to log in at the same time.
You quickly realize that your game is becoming more popular than you had anticipated and the problem doesn’t seem to be going away — the only viable solution is to increase server capacity. Therefore, you have a meeting to discuss the issue and assign a team to fix it.
However, the process of increasing server capacity will take a while, so your next move is to — first and foremost — talk to your clients (in this case, players) to let them know what’s going on, what you plan to do about it, and by when they can expect the issue to be resolved.
Then, you continue to monitor the team’s work, provide support where needed, and record the outcome once the issue is resolved.
💡 PLAKY PRO TIP
If you’re interested in game development or would like to get advice on some of the best game development software to use on a budget, we recommend these resources:
Use Plaky to identify, manage, and resolve issues quickly
Logging and tracking project issues is a simple matter if you use project management software that can support all your project teams and allows you to customize your workspace.
With Plaky, you can do all this and much more.
In Plaky, we recommend creating a separate board for issue reporting and management and setting your permissions so that anyone can add new items to the list. With your entire project team on board, everyone will know where to go and what to do when it’s time to report a problem.
Next, customize your issue management board to fit your project team by:
- Adding customizable fields to structure the data to your liking,
- Creating custom statuses and labels for a more organized overview of information, as well as expanded filtering and sorting options,
- Setting up conditional coloring to highlight the issues you wish to draw attention to,
- Organizing issues into separate item groups for improved organization, and more.
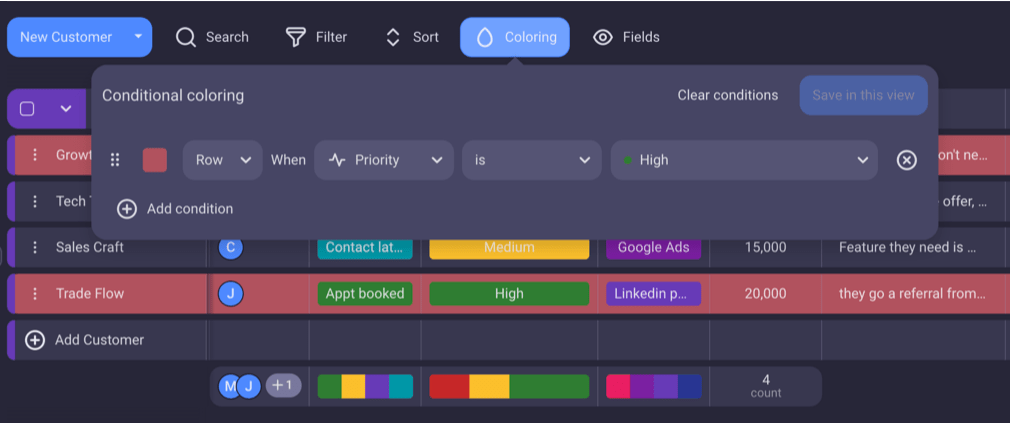
Once your board is set up the way you want, it’s time to assign issues to team members — but make sure you distribute tasks evenly to avoid overburdening a select few.
Plaky lets you see at a glance who can take on a new task and who has too much on their plate with the Gantt chart sorting feature.
For example, you can sort the information in the Gantt chart by person. This will show you an overview of all the tasks an individual is working on and where they fall on the project timeline.
If one person has too many tasks that overlap on the timeline, it not only means that they probably need a break, but also that there might be an indication of a bottleneck in the making — something you definitely want to avoid as it can put a break on your project’s progress.
Check out a demo of this and other useful Gantt chart features in Plaky in the video below.
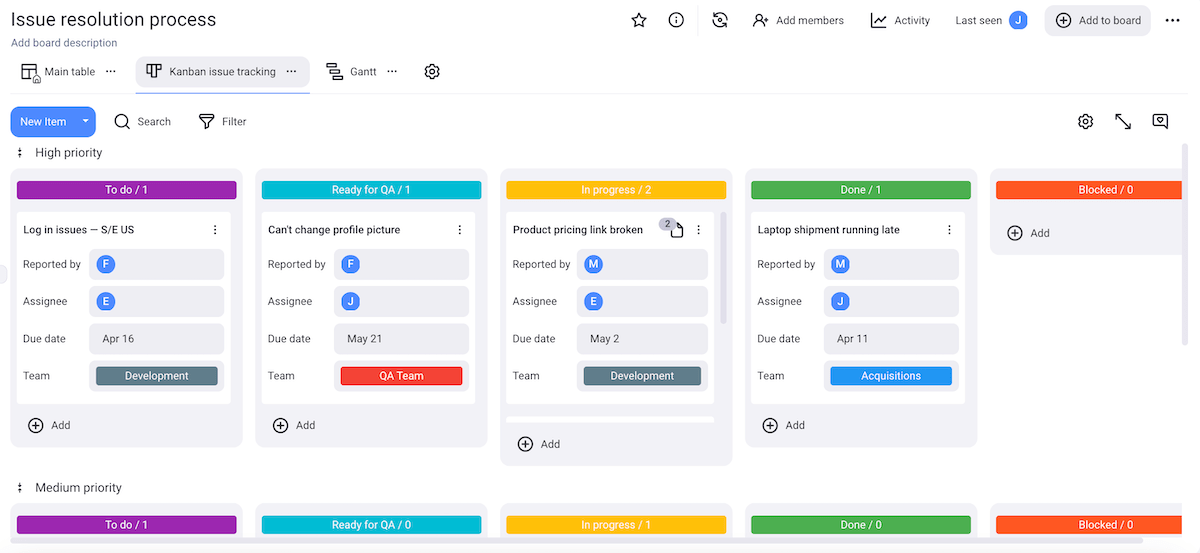
Once the right person is assigned to the issue, you can track the resolution process using the Kanban view.
With item cards neatly organized into columns, Kanban is the ideal visual tool for tracking the progress of an issue through the resolution pipeline — from backlog to completion.
A simple glance at the Kanban board lets you see:
- Where the issue is in the pipeline,
- How many issues are in which stage of the process,
- Who is working on what, and
- Where the bottlenecks are forming (if any).
Better yet, Kanban also works great when performing small tasks in small batches, with quick turnaround times.
Stop settling for basic project management software — tailor your workspace to fit you instead. Try Plaky today!

