Organizing the creative process from start to finish can be a major challenge for both creative teams and their managers.
Creatives are naturally focused on producing high-quality work, not analyzing internal processes — and that’s completely understandable.
But constantly worrying about due dates and technicalities can distract them from what they do best — creating.
The good news is that the creative workflow can almost always be improved to include:
- Fewer edits and revisions,
- Smoother communication among the team members,
- Better alignment with stakeholders’ expectations, and
- Fewer missed tasks and deadlines.
If this sounds good, keep reading to learn how to design an efficient workflow in just 7 simple steps!

What is a creative workflow?
A creative workflow is a set of activities you follow to take a creative project from start to finish, including the review and approval process along the way.
As the name suggests, a creative workflow should have a clear and logical flow of steps to keep the creative process organized and structured.
This implies that the person accountable for the workflow should:
- Coordinate all tasks and processes effectively,
- Clearly define roles and responsibilities,
- Ensure that the team completes tasks on time, and
- Keep stakeholders informed and involved at every stage.
Typically, a creative workflow consists of 3 main stages:
- Pre-production — This includes project definition, research, and planning.
- Production — The focus here is on the actual creative output, task management, and the review and approval process.
- Post-production — This stage involves gathering feedback, optimizing creative operations, and analyzing performance to improve future projects.
Most often, by breaking down your creative process into these stages, you’ll create a successful creative workflow.

Why is the creative workflow process important?
It’s not just creativity that makes a great creative team — efficiency plays a huge role too.
The creative workflow process is important as it combines both creativity and efficiency to deliver top-notch results.
To help your team stay focused on their creative tasks, you need to cut down on time wasted due to disorganized workflows as soon as possible.
Some of the benefits you’ll enjoy with a well-structured workflow include:
- Fewer misunderstandings about priorities,
- Faster approval processes, and
- More time to focus on creating.
Also, an organized workflow gives you greater control as it enables you to:
- Align work more effectively with client requests,
- Maintain higher quality standards,
- Stay on top of deadlines,
- Introduce standardized work procedures,
- Manage multiple tasks more efficiently,
- Streamline revision processes,
- Improve time management, and
- Enhance cross-functional collaboration.
For creative agencies, a well-organized workflow is especially important as they usually juggle multiple creative requests at the same time.
So, to unlock your team’s true potential and improve your creative agency workflow, you need to invest time into optimizing it.
7 steps to building a creative workflow process
Designing and implementing a creative workflow doesn’t have to be complicated.
There are plenty of ways to streamline the process and make your team more efficient — one of them is to onboard creative workflow management software.
Other concrete steps you can take are:
- Define the project and its scope,
- Break down the workflow into phases,
- Assign roles and responsibilities,
- Set timelines and deadlines,
- Execute the workflow,
- Define which metrics you’ll track, and
- Review and adapt on the go.
#1 Define the project and its scope
Whether you’re working on an internal project or a creative project for a client, the first step is to clearly define the project scope.
So, make it clear what you are doing and what you are not doing within this creative project. Also, figure out what you’re trying to achieve and what your goals are.
It’s best to document all these details in the form of a creative brief, which includes information such as:
- Goals,
- Milestones,
- Budget,
- Timeline,
- Target audience,
- Style or tone of voice,
- Metrics, and
- Distribution channels.
Once you have a clear project brief and approval from stakeholders, you can move on to building your workflow to align with it.
The in-depth brief will serve as a guideline or a reference point for your workflow creation.
Pro tip: You can use pre-made templates to save time when creating a creative brief.

#2 Break down the workflow into phases
Once you’re done with the creative brief, it’s time to move on to the more concrete part of workflow creation — you can now make a draft of your workflow.
It’s best to use creative workflow tools for this purpose, as it’s the fastest and easiest way to do it.
Workflow management tools also improve workflow transparency, as everyone on the team, along with stakeholders, can access the workspace at any time. This also makes it easy to check progress and see exactly where you’re at.
Here’s an example of how you can organize your workflow in Plaky project management software:
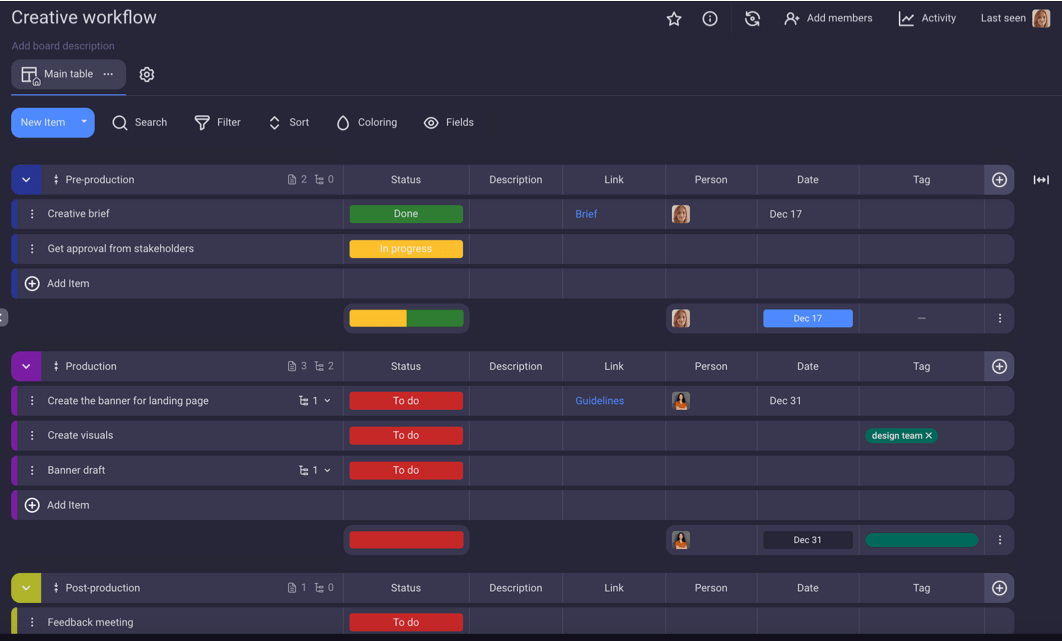
A great place to start is to divide your workflow into phases, such as:
- Pre-production,
- Production, and
- Post-production.
This clear structure is especially helpful during the more challenging early stages of your project. You’ll know precisely what you need to do in each stage, and you’ll reduce the risk of missing any important details.
This example of a work breakdown structure functions well with most creative teams, but you can always customize it to suit your team’s specific style. Consider holding a team meeting to get input and advice from your teammates.
Overall, the use of specialized tools for workflow management allows you to tailor your processes however you like.
Plus, these tools are an ideal solution for collaborating with other teams since they’re cloud-based, which ensures all information is updated and accessible in real time.
#3 Assign roles and responsibilities
To prevent misunderstandings, clarify each of the team member’s roles and responsibilities first so that everyone knows what they’re accountable for.
This creates a smooth, well-functioning workflow that flows seamlessly from ideation to the final result.
To make things easier, ensure that each task has an appointed person responsible for its completion. You can also assign someone to review the task and another person to give the final approval.
For added clarity, consider using task statuses to track where each task is in the review and approval process.
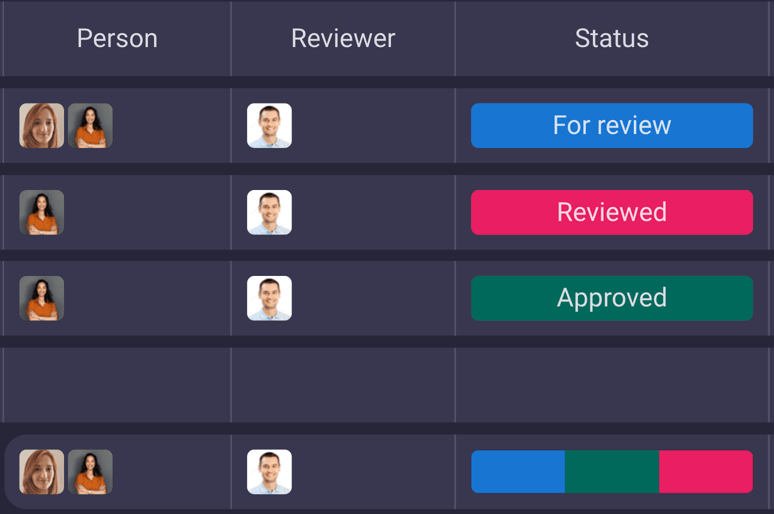
Here’s how you can simplify the creative approval workflow with project management tools like Plaky:
- When Person 1, who’s responsible for a task, finishes their work, they change the task status to “For review.”
- Person 2, in charge of reviewing and approving, then reviews the work and updates the status to “Reviewed.”
- If edits are needed, Person 1 makes the changes and updates the task accordingly.
- Once all rounds of edits are complete and the final work is ready, Person 2 changes the status to “Approved.”
Our tip is to limit the number of review rounds to prevent the neverending back-and-forth.
Each time the status on a Plaky card changes, the person tagged will receive a notification, so there’s no need to worry anyone responsible will miss any updates.
This process keeps everything transparent, organized, and on track, with no deadlines missed.
#4 Set timelines and deadlines
Defining a timeline is essential as it provides a framework to guide your team and helps you better understand and manage your time.
To create a realistic timeline and set deadlines well, look at similar projects your creative team has completed in the past. Previous experiences with creative projects can serve as a reference to estimate the time needed for each phase.
However, if it’s your first project, here are some tips to help you set up a timeline:
- Research how long similar projects typically take within your industry.
- Consult industry experts with experience on similar projects to help you set more realistic expectations.
- Account for unexpected delays by adding buffer time to each stage.
- Refine your timeline as you progress and gain a better sense of how long tasks actually take.
A few practical ways to manage time on your creative project workflow include:
- Assigning clear deadlines,
- Setting flexible timelines, and
- Creating detailed Gantt charts.
Deadlines
The most common approach is to assign specific deadlines — giving each task a clear end date.
With the Plaky workflow management tool, you can add a date field and input deadlines directly through the calendar.
This option ensures you stay on track as the deadlines are visible to everyone.
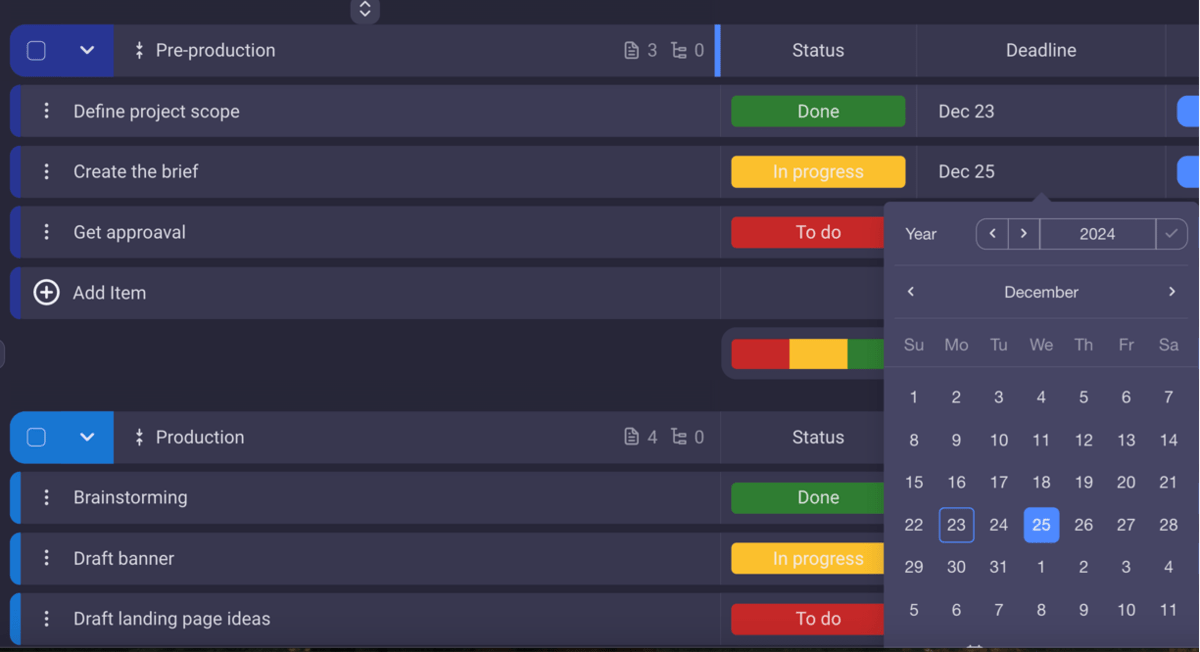
Manage deadlines transparently with Plaky
Timelines
Another option is to set flexible timelines that span a couple of days and represent the expected duration of a task. This approach is especially useful in the creative industry where you often need flexibility.
Thanks to Plaky’s timeline field, each task is assigned a duration rather than a fixed date.
This gives your team the necessary flexibility, without the pressure of fixed deadlines, and provides you, as the manager, with a transparent overview of where you’re at with each task. You’ll always be informed whether the task is nearing the end or is yet to be started.
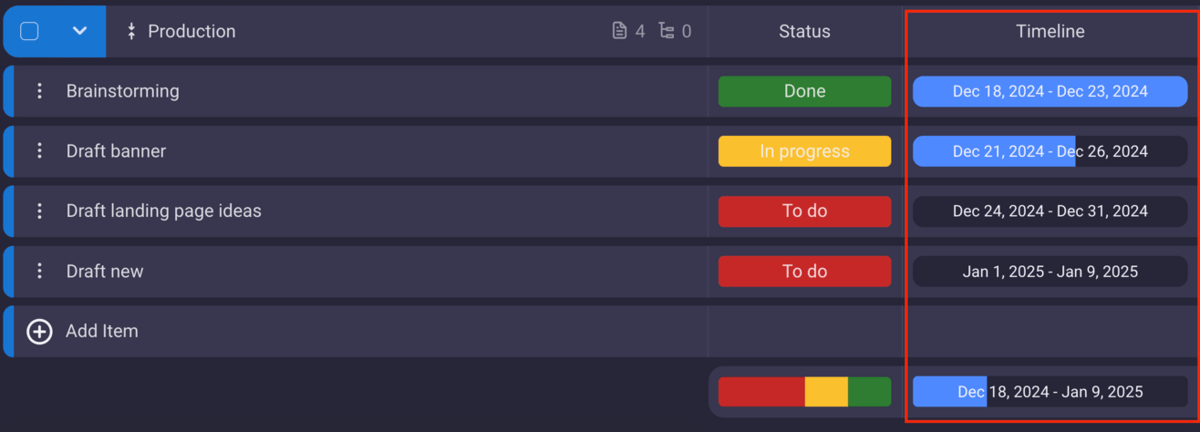
Manage flexible timelines with Plaky
Gantt charts
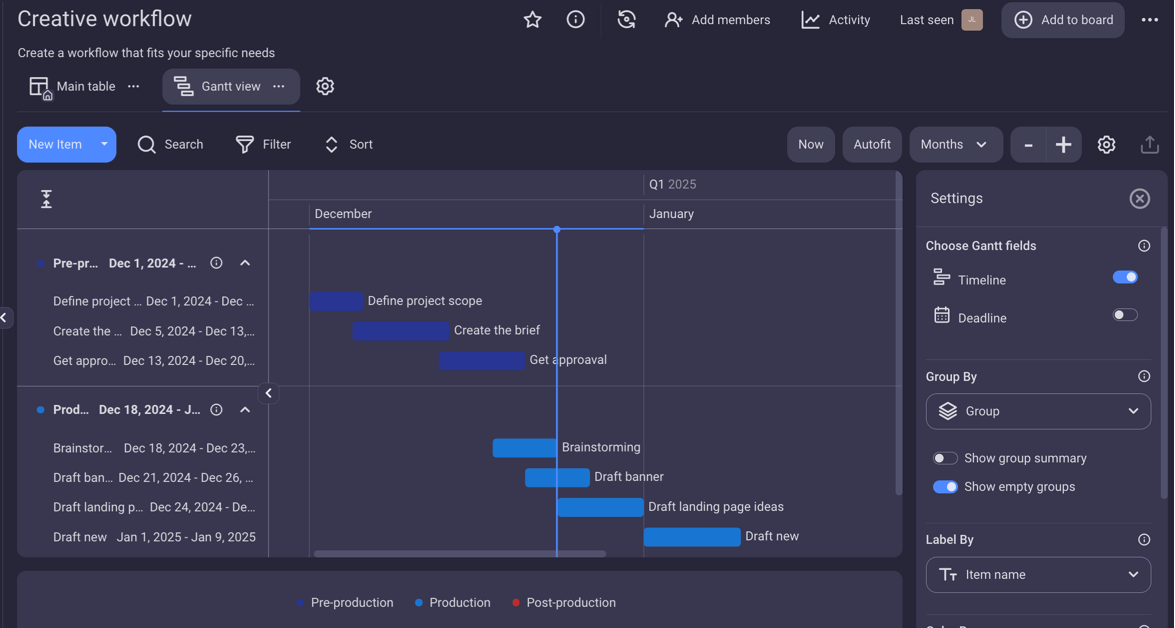
Another widely used time management tool is a Gantt chart. This tool gives you a visual representation of tasks and timelines in a horizontal bar format.
Plaky is an excellent Gantt chart software as it lets you:
- Monitor progress by tracking start and end dates,
- View task durations, and
- Get a bird’s-eye view of the entire project.
You can customize Plaky’s Gantt chart to fit your specific needs based on what you’re aiming for, e.g.,:
- Monitoring individual tasks,
- Identifying potential overlaps or delays, or
- Addressing bottlenecks before they become major issues.
#5 Execute the workflow
At this point, it’s time to start working on the outlined tasks.
In the creative production process, organization is key. It’s crucial to allocate tasks to the right team members and define requirements clearly.
Often, important details can be forgotten or overlooked, which is why it’s essential to have a centralized location to store all the information.
A good task management system lets you keep all information in one place, where it’s transparent and easily accessible.
For example, in Plaky, you can just hover over the task description, and all the details are right there — there’s no chance you’ll miss anything.

It’s also good to prioritize tasks when executing them, as multitasking is unproductive and should be out of the picture.
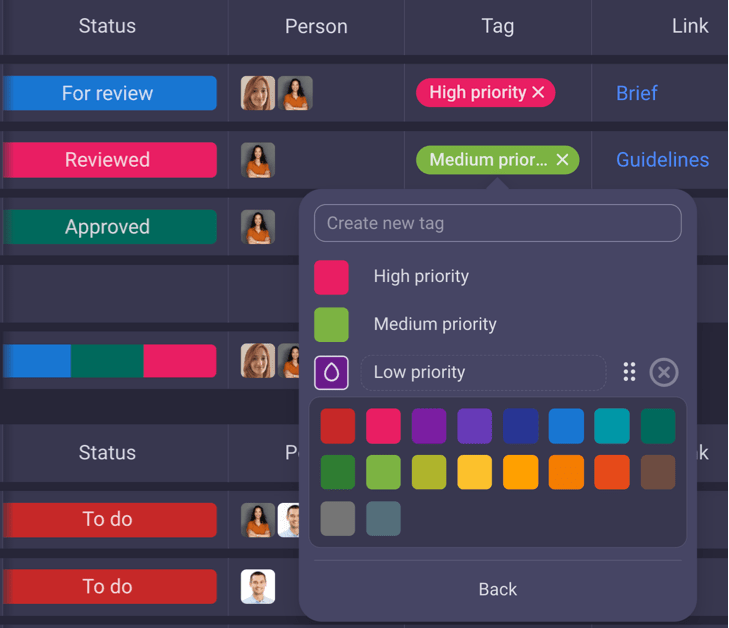
You can also mark high-priority tasks clearly so that everyone knows what should be done first.
In Plaky, you can use color-coded tags to highlight important tasks. If there are multiple high-priority tasks, you can assign them to different team members to avoid delays and prevent anyone from becoming overburdened.
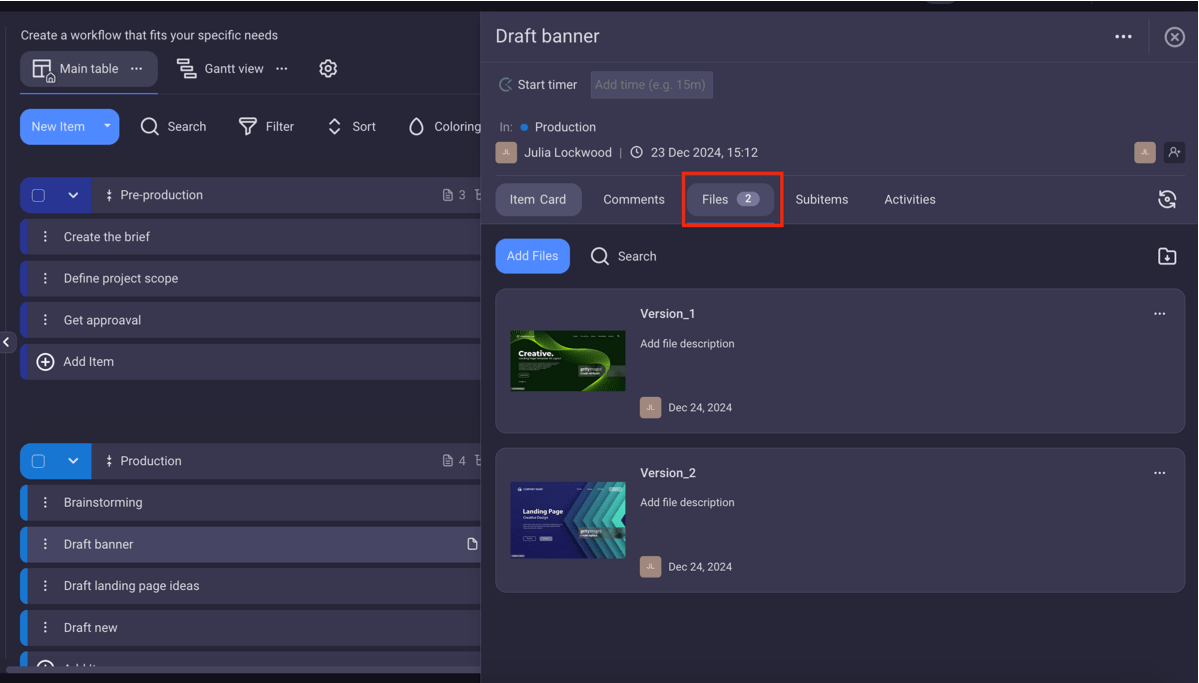
Once the creative work is done, you’ll need a place to share it. Most creative agencies and teams use a centralized platform for this purpose.
For example, creative teams using Plaky find quick access to files a useful and time-saving perk.
You can attach files directly within the relevant task card in the Files section, so there’s no need to search through other apps for the files you need. There’s also an option to attach links and ensure they’re never again lost within some lengthy chat.
Use Plaky fields to better organize your workflow
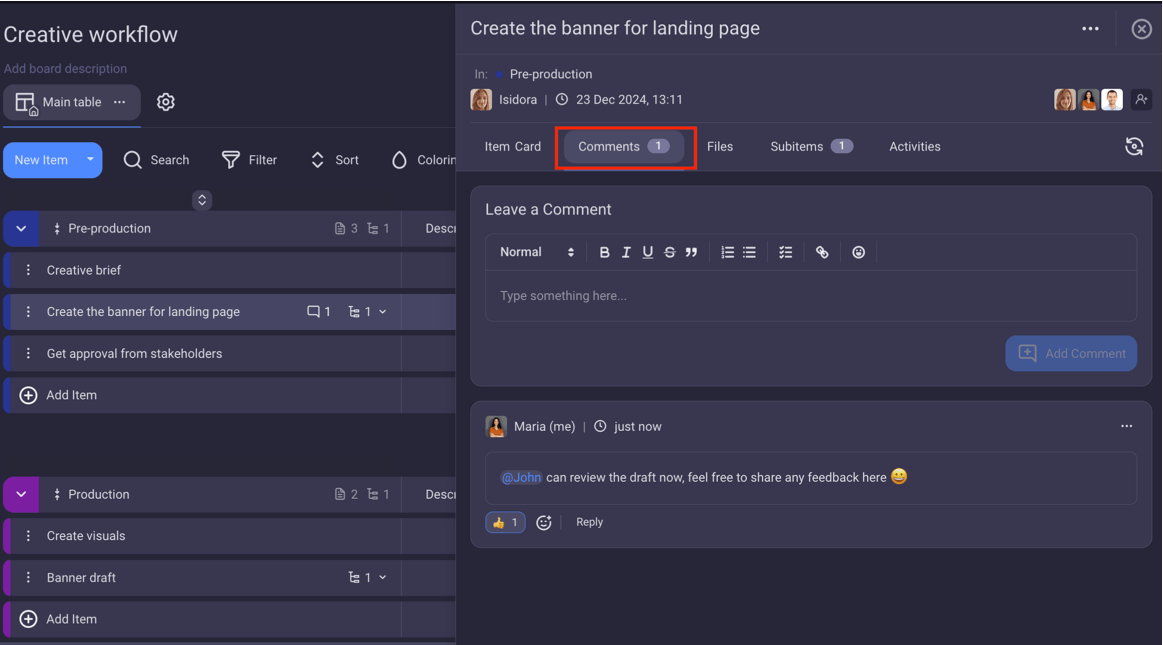
Effective communication is another key element of successful workflow execution. The better the communication within your team, the more efficient your workflow and the greater the results.
Establishing a clear communication routine ensures everyone knows where to share feedback or updates. With a dedicated communication channel, team members will naturally communicate more and better.
Luckily, in Plaky, team members can keep their conversations task-focused by communicating directly through the comments section within each task card.

💡 PLAKY PRO TIP
Learn how you can leverage the CAKE.com Bundle to work smarter, not harder:
#6 Define which metrics you’ll track
Tracking metrics throughout your project is key to keeping your workflow running smoothly and spotting areas for improvement.
The metrics you track will depend on the type of creative work you’re doing, but here are a few key performance indicators (KPIs) to keep in mind:
- How long each phase of the workflow takes.
- The overall project timeline.
- The time spent on individual tasks.
Additionally, make sure to track:
- The number of creative assets you made,
- The number of revisions or change requests,
- How long it takes to get approvals, and
- The amount of resources used during the process.
Don’t forget to gather feedback from your team and stakeholders regularly — it’s invaluable for fine-tuning your workflow and improving for future projects.
Also, summarize all the data at the end to ensure you have a clear picture to guide you in future projects.
Plaky makes it easy to get summaries on different aspects of your project. For example, if you’ve labeled task statuses as “To Do”, “In Progress” and “Done”, you can quickly view a summary of the number of tasks in each category in the summary row.
To track each team member’s workload too, use the summary feature to gather data from multiple fields, displayed as numbers or percentages.
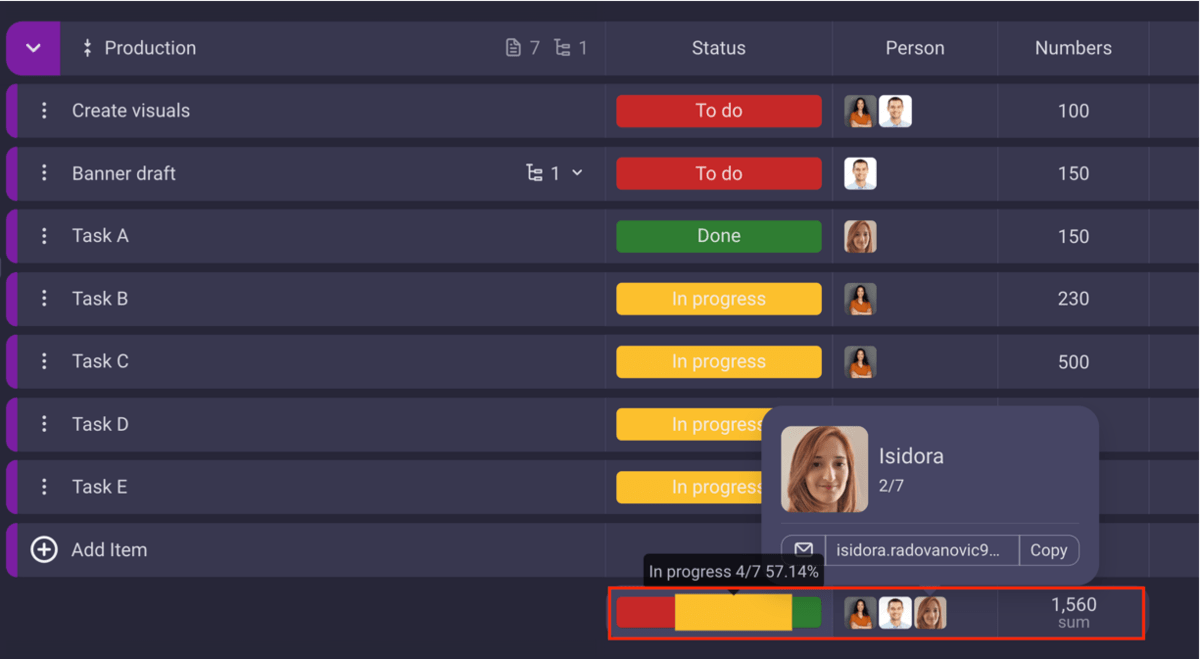
Overall, Plaky’s summary row feature provides you with:
- A quick overview of task progress, which lets you make more informed decisions,
- The ability to track how tasks are distributed across the team to ensure a balanced workload,
- The ability to analyze task durations to see how long each phase or task type is taking, and
- Summarized data for stakeholder reports.

#7 Review and adapt on the go
The last step of any good creative workflow process is to strive for continuous improvement. This means — always ask for as much feedback as possible even after the project is done.
Also, try to include creative project management techniques in your review processes, such as:
- Preparing a lessons learned report, and
- Creating a post-implementation review.
On top of that, always analyze the metrics gathered during the project and compare results with similar or past projects. Then, copy what’s good and dismiss what’s bad for future projects.
The key to an effective creative workflow is to be able to adapt it as the project progresses. In creative jobs, changes are inevitable, so make sure to embrace and accept them.
Optimize your creative workflow with Plaky
Creative workflow management can be quite challenging, but it’s absolutely achievable with the right approach.
A bit of research, some hands-on experience, and reliable creative workflow solutions are all you need to elevate your creative process.
If you’re looking to build a workflow that delivers real results, Plaky is a great solution for creative agencies.
Plaky essentially makes it super easy to manage all your creative projects from start to finish.
Forget juggling multiple creative collaboration tools — Plaky combines several aspects of managing a creative workflow into one seamless platform, including:
- Task management,
- Communication,
- Project tracking,
- File sharing and storage,
- Workload management, and
- Budget tracking.
💡 PLAKY PRO TIP
Find out how you can use Plaky to streamline creative project management in the post below:
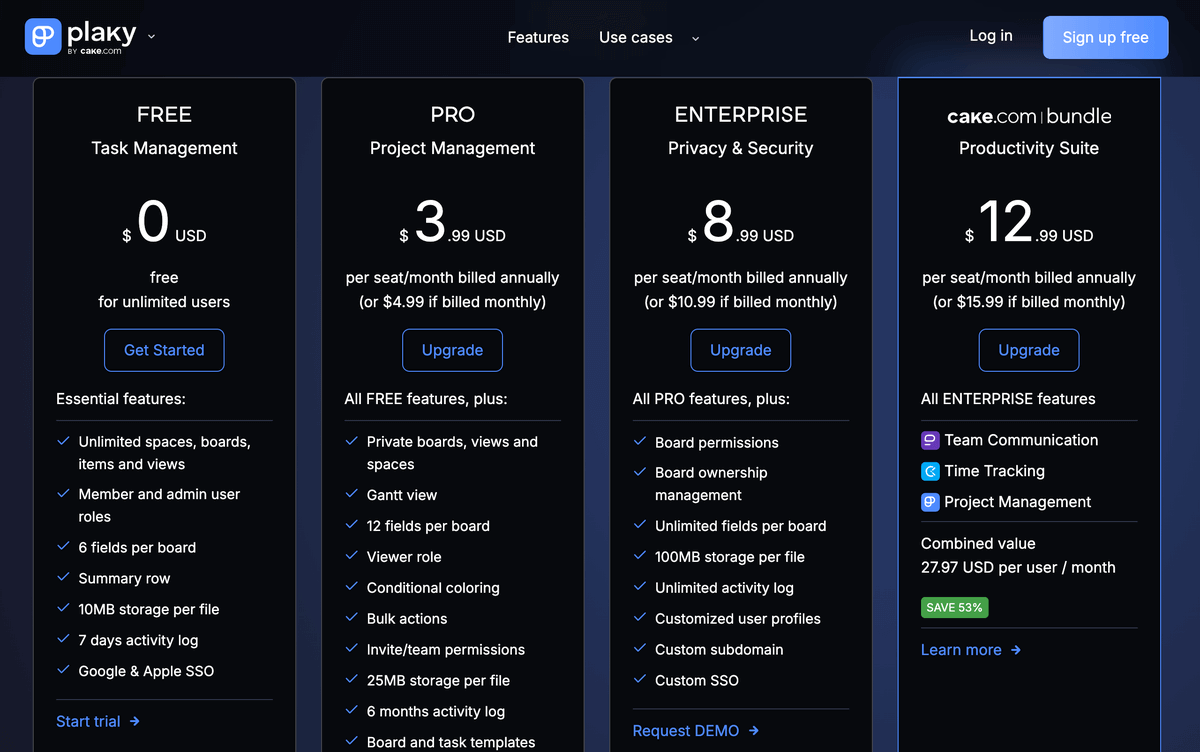
Best of all, you get all these features at an unbeatable price — or no price at all — since Plaky comes with both free and paid plans available.
Plaky’s PRO plan starts at only $3.99 per seat/month, which makes it one of the most cost-effective project management tools in the market.
No need to worry about adapting to a new tool, either.
Plaky is tailor-made for creatives. It’s fully customizable, visually appealing with color-coded options (which is a bonus for creative minds), and designed to save you time on repetitive tasks.
Also, Plaky is perfect for a variety of creative professionals, including:
- Videographers,
- Designers,
- Content writers,
- Copywriters,
- Animators, and
- Illustrators.
And guess what? You can start transforming your creative workflow right away!
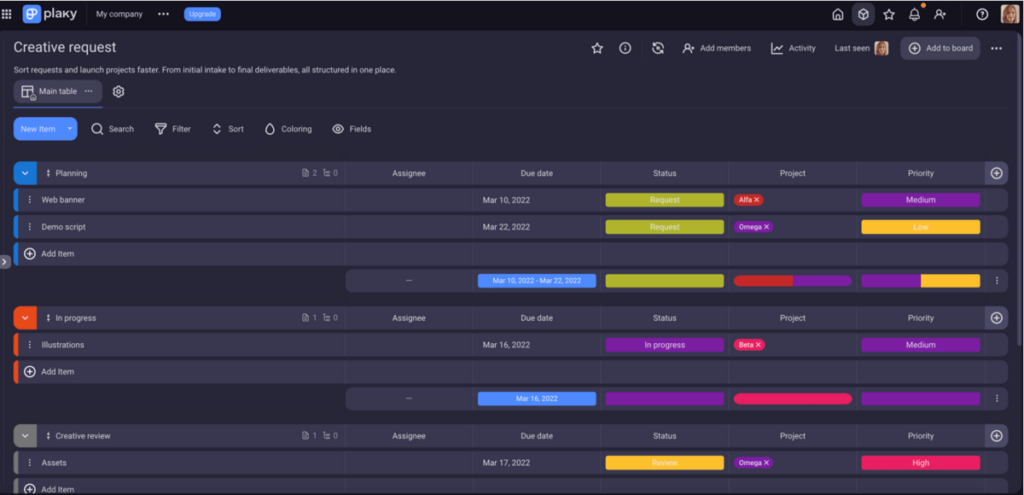
Plaky’s creative request template is the perfect place to start if you’re managing multiple creative design requests.
Try our creative request template
This template is designed to simplify team coordination and centralize all your creative work in one streamlined system.
The key benefits of Plaky’s creative request template are that you can:
- Easily prioritize requests,
- Assign tasks to the right team members,
- Keep everyone informed about what’s expected of them,
- Ensure the whole team stays in the loop with real-time updates,
- Attach files and share images and links,
- Provide feedback, and
- Speed up the approval and review cycles.
So, what are you waiting for? Simplify your creative workflow with Plaky — sign up now!
