What Is a RAID Log? Benefits, Examples & Free Template
How can you rise to a challenge if you’re not sure what the challenge is?
That’s precisely where the RAID log comes in. This project management tool keeps a precise tally of crucial project information, such as risks and issues, and helps you and your team stay organized, focused, and confident in your success.
Read on to learn how you can use the RAID log in project management, the tool’s pros and cons, and what the log should look like.
A bit further below, we’ll also provide you with a free RAID log template to use in your future projects.

- A RAID log is an effective project management tool used to keep track of key information that influences the project’s performance and health.
- Project managers use this log to document and evaluate project risks, assumptions or actions, issues, and decisions or dependencies.
- Some of the main benefits of using this log in project management include better project organization and control, easier communication, and enhanced decision-making.
- Using the RAID log can be problematic because the tool has to be updated regularly, takes a lot of time to maintain, and can get too detailed and thus too overwhelming to use.
Table of Contents
What is a RAID log?
A RAID log is a project management tool for documenting and assessing project risks, actions or assumptions, issues, and dependencies or decisions.
The RAID log is created in the project’s planning phase. The log is then used throughout the project to track and control key project information and ensure its successful delivery and performance.
What does the RAID acronym stand for?
The RAID log acronym stands for the main project elements tracked with this tool:
- Risks,
- Actions or assumptions,
- Issues, and
- Decisions or dependencies.
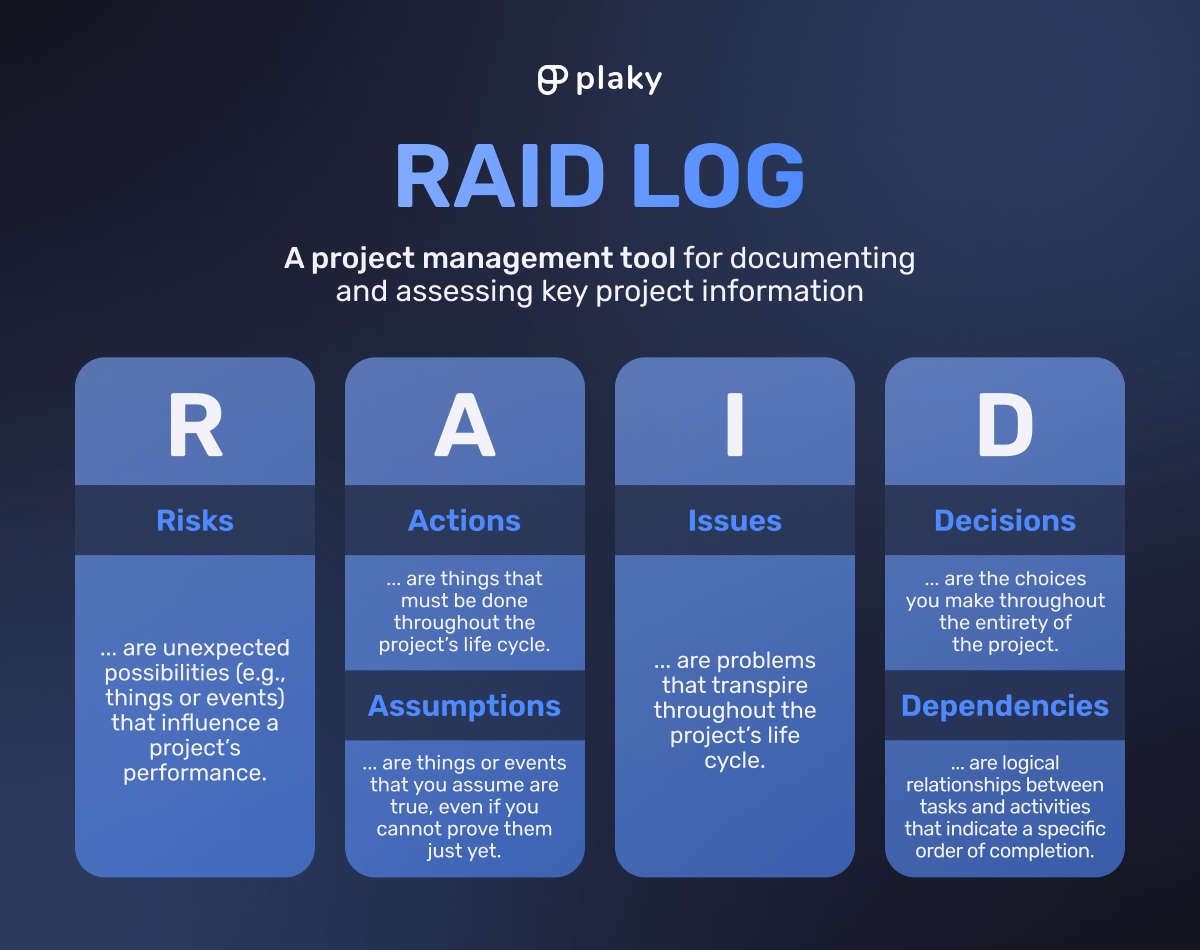
Notice that the “A” and the “D” in the acronym have dual components.
Some project managers prefer to use a slightly different version of the RAID model that switches out actions and decisions for assumptions and dependencies.
The project manager can choose between these versions based on the project itself and their tracking requirements.
Other PMs also track 5 or all 6 of the components. The choice mainly depends on their needs and the level of detail and assurance they’re looking for.
Now let’s go through each of these components in more detail.
RAID component #1: Risks
Risks are potential problems or opportunities that can heavily influence a project if they occur.
Risks can be both positive and negative.
For example, if equipment potentially arrives late and prevents the team from completing their project task list, that’s a negative risk (problem) the project manager should pay close attention to.
On the other hand, if there’s a sudden drop in the price of necessary project materials, that’s a positive risk (opportunity) the project manager may want to use to their advantage.
This part of the log is used to identify, organize, and analyze problems and opportunities. To do that, the project manager and their team aim to:
- Identify and document all project risks,
- Categorize them,
- Prioritize them based on probability and impact, and
- Think of action plans and mitigation strategies.
💡 Plaky Pro Tip
Learn more about project management risks and how they’re categorized in the guide below:
RAID component #2: Actions
In the context of a RAID log, actions are steps you should take to complete a specific project goal. Alternatively, they can be necessary actions that must be taken as a response to a problem.
For example, if your project goal is to reduce the number of bugs in your product, a specific action would be contacting the product team to get data on the bugs, their severity, and their volume.
Some of the information you should note in your action log include:
- Who is responsible for the action (owner),
- When the action will be completed, and
- The action’s status.
Tracking and monitoring action items makes the most sense during dynamic projects where a lot happens each day.
This ongoing to-do list can change frequently, often on a daily basis, so tracking actions should give you a fairly accurate picture of the project’s performance.
💡 Plaky Pro Tip
Actions shouldn’t be confused with project activities, which are more elaborate and guide you toward achieving a project deliverable. Learn more about them in the guide below:
RAID component #3: Assumptions
Project assumptions are things or events that you assume are true, even if you cannot prove them just yet.
An example of this would be thinking the whole project team can work on the project 5 days a week for the next 2 months. That is a fair assumption — and probably one based on your experience in managing projects.
If you’re dealing with long-term projects, it’s good to track and review assumptions occasionally to see if they are still true. If they’re proven to be false, you can make the necessary changes to avoid potential roadblocks.
A key difference between assumptions and actions is that you capture assumptions during the planning phase and then monitor them throughout the project’s life cycle.
To compare, actions are constantly updated since their nature is overall more dynamic.
Some project managers prefer to log assumptions instead of actions, whereas others log both. You can also log assumptions as risks to simplify the log.
💡 Plaky Pro Tip
Check out our in-depth guide on project assumptions, the types that exist, and how to communicate them properly:
RAID component #4: Issues
While risks were only possibilities, issues are the real problems that have occurred and now have to be urgently handled.
For example, a rather sensitive and urgent issue would be a security breach that threatens your customers’ data.
The main purpose of the issue log is to help you identify, communicate, and fix issues as fast as possible. So, you should log not only the details of the issue, such as its severity and impact but also how you respond to it.
The log also serves as a learning tool and a historical record for project issues. By maintaining this log, you may be able to avoid similar problems in the future or at least know how to resolve them quickly and without much disruption.
Plus, by recording each issue, you can explain any project plan deviations that may occur throughout the project.
RAID component #5: Decisions
Decisions are the choices stakeholders agree on while trying to avoid risks and resolve problems.
In this section of your log, you record all decisions you make throughout the entirety of the project. This includes both planned decisions as well as ad-hoc ones.
For example, if you’re looking to add 2 more developers to your software development project, details about the decision’s proposal and approval should be found in the decision log.
Among other things, each recorded decision should contain information about:
- Who made it,
- When they made it, and
- The reasoning behind it.
By capturing this level of detail about each decision, you improve your decision-making process and reduce the chances of making mistakes later on. Since this log acts as a mighty reference for any other similar project, it could potentially save you from disastrous mistakes in the future.
RAID component #6: Dependencies
Dependencies are relationships between tasks that indicate in which order they’ll be completed.
In the context of the RAID log, a dependency log shows tasks or activities you must start or finish before starting or finishing another task or activity.
For example, you cannot start building a comprehensive HR management system without consulting your HR team and figuring out their needs.
Likewise, you cannot start constructing your new headquarters without first getting the necessary licenses (among other things).
In case there are some major dependencies that could hinder the project’s progress or performance, they should be listed in the RAID log.
Much like assumptions, you capture dependencies in the planning phase and then keep track of them throughout the project to ensure they don’t become risks or issues.
Some project managers prefer listing dependencies rather than decisions, especially if the project tasks are complex and intertwined.
You can also track both at the same time to essentially cover all the bases.
💡 Plaky Pro Tip
Learn more about dependencies, the types that exist, and how to manage them in this in-depth guide:
How to create and use a RAID log
Creating and using the RAID log is fairly simple — just follow these 4 steps:
- Choose the format,
- Create and fill out your log,
- Update and review the log, and
- Analyze the log after closing the project.
Let’s go through these steps in more detail.
Step #1: Choose the format
Format-wise, RAID logs are most commonly kept in spreadsheets, like Google Sheets or Microsoft Excel. For most people, this is the most convenient option overall.
Google Sheets is a better option than Excel because it’s easily accessible and shareable. Best of all, it automatically saves your changes, so there’s no need to worry about losing your data.
An expert we consulted, Dr. Michael Shick, PMP, CSM, Owner/Founder of ROSEMET LLC, and Assistant Professor of Project Management at Western Carolina University, also suggested using a project management tool for your RAID log:

“The RAID log should be integrated with project management software whenever possible. This is so it does not exist in isolation. [It also makes it] easier to use and track along the project lifecycle, particularly when it is an integrated part of the plan and schedule.”
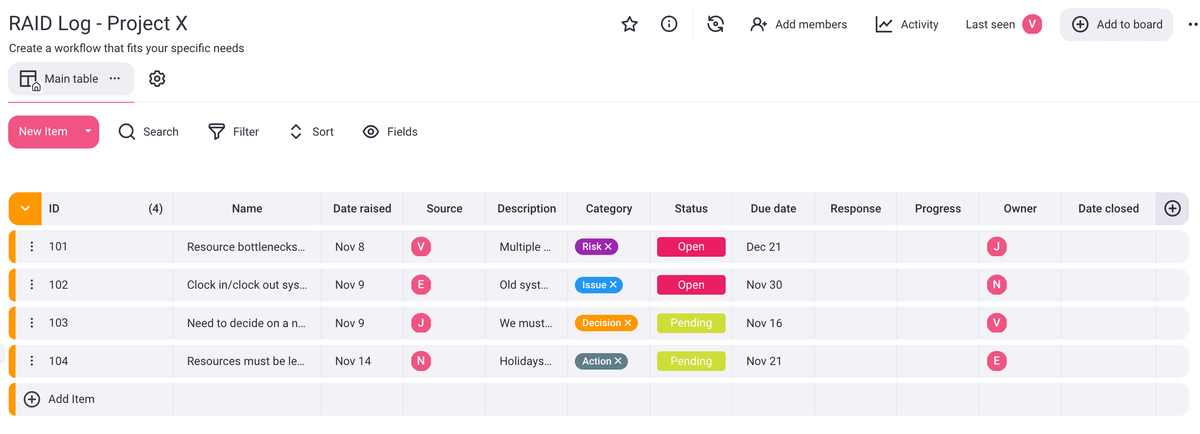
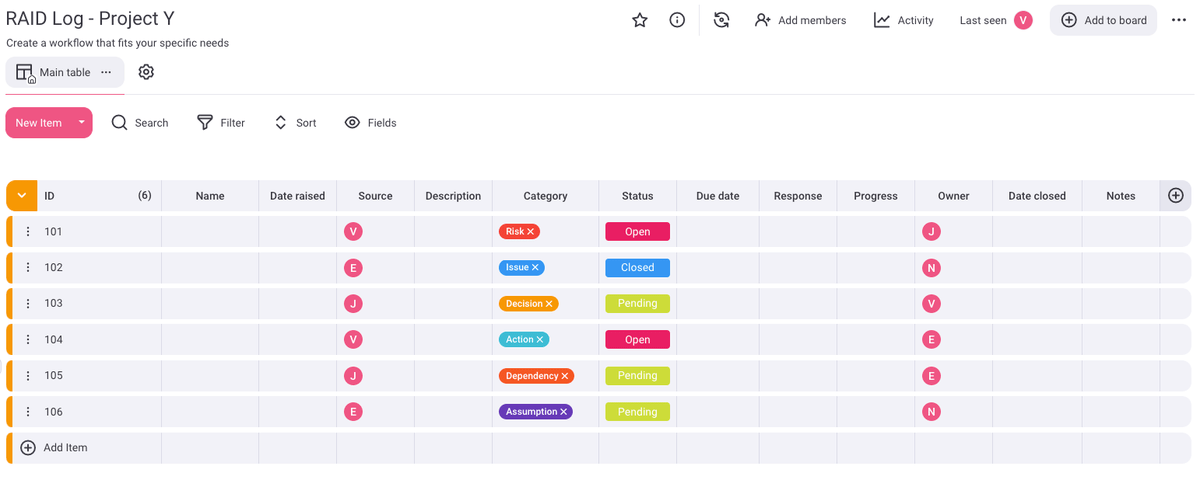
For example, in Plaky, you can make a board for each project, have separate tables for each of the categories, and use the fields feature to define the columns in your log. Updating the logs is easy and happens in real time, so everyone who has access to the project board can stay informed.
Alternatively, you can create an all-encompassing RAID log in Plaky in case you want to have all the data in one place. Here’s how that might look:
Step #2: Create and fill out your log
One of the best parts about RAID logs is that they’re highly customizable, so however you create yours is fine — it just has to work to your project’s advantage.
Still, to get a better idea of the columns you might want to consider adding to your log, we’ve created a list for each component.
These suggestions detail the columns you could include in each separate log:
- Risk log,
- Action log,
- Assumption log,
- Issue log,
- Decision log, and
- Dependency log.
If you want to keep all of the data in one place, you may have to nix some columns and adjust the format accordingly to avoid cluttering the log.
Now let’s see what each log should comprise.
Log #1: Risks
Some typical columns you may find in the risk log include:
- ID — unique identifier for each risk item,
- Date raised — when you added the risk to the log,
- Source — who added the risk to the log,
- Risk — what the risk is, why it may occur, and what its impact would be,
- Description — a detailed description of the risk,
- Likelihood — how likely the risk is, expressed via a numerical scale or in a percentage,
- Impact — the risk’s impact if it happens, again expressed via a numerical scale,
- Severity — the risk score, which you get by multiplying likelihood and impact,
- Priority — low, medium, or high priority,
- Trigger date — when the risk may become an issue,
- Response plan — the strategy you can use to prepare for the risk and lessen its impact,
- Response — how you respond to the risk,
- Updates — timestamped entries or the latest updates on a particular risk item,
- Owner — who’s in charge of handling the risk,
- Status — e.g., raised (waiting to be managed), open (response plan exists), closed (the risk doesn’t exist anymore or no longer applies to the project), and issue (the risk has become an issue), and
- Date closed — when you neutralized or closed the risk.
Dr. Michael Shick explained that risks should be prioritized based on their severity and when they are expected to occur.

“For example, suppose a high risk with a high probability of occurrence is expected but not for another three weeks, and there is a moderate risk with a low chance of occurring tomorrow. In that case, the moderate risk item should be a higher priority in the short term until the potential for the risk to occur has passed.”
Log #2: Actions
In the action log, you may encounter the following columns:
- ID — unique identifier for each action item,
- Date opened — when you added the action to the log,
- Source — who added the action to the log,
- Action — what the action is, what you have to do, and why,
- Description — a detailed description of the action item,
- Due date — when you should complete the action,
- Priority — low, medium, or high priority,
- Comments and notes — a field for keeping the status log for the action item and other details,
- Owner — who’s responsible for completing the action,
- Progress — e.g., open, pending (in progress), blocked (problem), and closed (completed), and
- Date closed — when you completed the action.
When talking about the RAID log, expert Molly Beran, PMP-certified president and founder of Projects By Molly, LLC, mentioned her stance on using the action log:

“I use RAID logs on pretty much every project I manage. Although, I will say I don’t tend to use the A (Actions) very much. I tend to keep the tasks/actions in my project plan only so that I’m not double-documenting. But, for folks that like to use them, it makes perfect sense to keep them in the same place.”
💡 Plaky Pro Tip
Need a way to easily track all the action items that come up during your projects? Get one of our free action item templates:
Log #3: Assumptions
The columns you can add to your assumption log include:
- ID — unique identifier for each assumption,
- Date raised — when you added the assumption to the log,
- Source — who raised the assumption,
- Assumption — what the assumption is,
- Description — a detailed description of the assumption,
- Reason — why you made the assumption,
- Priority — low, medium, or high priority,
- Action to validate — action needed to confirm the assumption’s validity,
- Impact if incorrect — what happens if the assumption is not valid,
- Validation due date — deadline for assumption confirmation,
- Owner — who’s responsible for validating the assumption, and
- Status — valid, not valid, or open (in the process of validation).
Log #4: Issues
Your issue log may comprise the following columns:
- ID — unique identifier for each issue,
- Date reported — when you added the issue to the log,
- Source — who reported the issue,
- Issue — what the issue is, what’s wrong, and what kind of an effect it has,
- Description — a detailed description of the issue and what caused it,
- Impact — a detailed description of the issue’s impact and its reach,
- Cause — the root cause of the issue,
- Priority — low, medium, or high priority,
- Response plan — how you want to respond to the issue,
- Response actions — a log of everything you’ll do to respond to the issue,
- Updates — timestamped entries or the latest updates on each issue,
- Status — e.g., raised (waiting to be managed), active (response plan in action), resolved cause (root cause was sorted out), and closed (the issue has been resolved),
- Owner — who’s responsible for handling the issue,
- Date resolved — when you resolved the issue,
- Resolution — what the resolution for this issue was,
- Remediation — strategy and actions for remediating the issue’s impact, and
- Lessons learned — what you can learn from this issue and how you could apply those lessons in future projects.
Molly Beran adds that you could also keep your risks and issues in one big master list of potential and current challenges:

“Ultimately, I recommend that PMs do whatever makes the most sense in their brains. Using the RAID log and acting on its content is what matters, not so much the setup of each category of item. And for issues and risks, the important thing to note is what are you going to do about them as they are happening (issues) or planning when they do happen (risks).”
Log #5: Decisions
If you decide to have a decision log, consider adding these columns:
- ID — unique identifier for each decision,
- Date proposed — when you put forward the decision,
- Source — who proposed the decision,
- Decision to be made — what has to be decided and why,
- Description — a detailed description of the decision to be made,
- Status — e.g., proposed (yet to be agreed to), pending (in process of approval), and agreed (decided),
- Impact — the impact of making and not making the said decision, as well as the impact’s reach,
- Due date — when you need to make the decision to avoid the impact,
- Priority — low, medium, or high priority,
- Proposed by — who suggested the decision,
- Owner — who’s responsible for getting the parties to make the decision,
- Agreed by — the parties responsible for making the decision,
- Impacted stakeholders — a log of everyone the decision will impact and how it will affect them,
- Final decision — the decision that was reached,
- Decision date — when the parties reached the decision,
- Rationale — insight into why a specific decision was made, and
- Required actions — actions resulting from making the decision.
Molly Beran explained how easy it is to change your mind throughout your project:

“Teams lose a lot of time when they go back and forth (and then back and forth again) on decisions. I’m seeing that right now with a client project — we are doing a software implementation, and one week they decide they want a certain feature turned on, and the next week, they ask to have it turned off again.”
One way of keeping track of your decisions is to record them in your RAID log. However, remember to log your project decisions in detail:

“Too many decision logs I’ve seen just list the decision, without a summary of how you got there and how the conversation unfolded. If you don’t record a summary like that, it’s really easy to change your mind later or to forget why a decision was made in the first place. Ideally, once you’ve made a decision, it’s done.”
Log #6: Dependencies
In case you want a dependency log as well, consider adding some of these columns:
- ID — unique identifier for each dependency,
- Date added — when you added the dependency to the log,
- Source — who introduced the dependency,
- Dependency — what the dependency is, what must occur for something else to happen,
- Description — a detailed description of the dependency,
- Type — internal or external dependency (inside or outside of your organization),
- Priority/importance — low, medium, or high priority,
- Impact if not delivered — what happens if you don’t deliver the dependency,
- Status — e.g., open, monitoring, and closed,
- Owner — who’s responsible for meeting the dependency,
- Due date — when you must deliver the dependency to avoid negative impact, and
- Updates — updates and progress on delivering the dependency.
Once you format your log, brainstorm with other stakeholders to get their input and capture all pertinent information.
Keep in mind, though, that issue, action, and decision logs don’t have to be filled out just yet. They come into focus once the project starts.
Step #3: Update and review your log
The next step is to put your RAID log to good use by referring to it throughout the project and making sure you keep it up to date.
According to Dr. Michael Shick, you should keep updating the log as new information pops up:

“Start early in the project planning phase and update the log as required. As the project team progresses through planning, execution, and closing, risks will present themselves. The RAID log allows one to account for those risks and articulate the associated assumptions, issues, and connecting variables. This understanding is necessary to reduce the probability of the project being derailed by project-associated challenges.”
The easiest way to make updating and reviewing the log a habit is to dedicate a portion of your daily or weekly meetings to it.
Alternatively, you can add the changes on a monthly basis during a meeting where you’ll get the essential input from your project team on everything that has been happening.
Another expert we talked to, Molly Beran, mentioned that you could also get RAID log updates via team calls:

“To get your team involved in the RAID log, I think it’s as simple as reviewing it during your team calls. You may not need to review every tab every week. For example, while reviewing issues regularly is important to make sure they get closed, reviewing decisions probably only needs to be done when/if there is a question about something that was previously decided.”
💡 Plaky Pro Tip
Maintaining the RAID log is a group effort, but that means nothing if your team doesn’t know how to collaborate properly. But how can you tell whether your project collaboration needs improvement? Check out this guide to learn more about it:
Step #4: Analyze the log once you complete the project
All done with your project? You can now use the log to learn from your wins and losses and implement that knowledge in future projects.
Analyze the log during a post-mortem review meeting, for example. You can use it to show examples of what was done well, what wasn’t, and what you can improve in the future.
Reflecting on the use of RAID logs in future projects, Molly Beran had this to say:

“Ideally, everyone would sit down, give their past RAID log a thorough reading, glean what you can from it, and build a new project that will help you avoid the pitfalls and issues from the last one.”
And yet, Molly believes this practice of learning from your past RAID logs “is a bit overblown.”

“Practically speaking, I don’t think folks have much time for that. Usually, we’re caught up in the momentum of a new project, or something is so critically different from the last project that it makes it seem almost irrelevant to a new one. Whether that’s good or bad, I will let others judge, but that’s what my lived experience has been.”
Nevertheless, Molly shared the typical ways she has used a past RAID log:

“I will say having access to historical RAID logs is handy when you are running a new project, and an old issue rears its head. Provided you have someone on the team who remembers that something similar happened last time, then you can go back, look it up, and see how the issue was resolved. Or if you need to remember a past decision to help provide a rationale for something currently under debate — that can also be a great time to dive back into the archives.”
Free RAID log template
If you want to use this log in your upcoming projects, we’ve prepared a free RAID log template you can customize to your own needs.

In the document, you’ll find a basic RAID log template that covers all 6 components mentioned above.
However, if you want a more detailed overview of your project, we’ve also included separate logs for the same 6 RAID elements.
Pros of using a RAID log
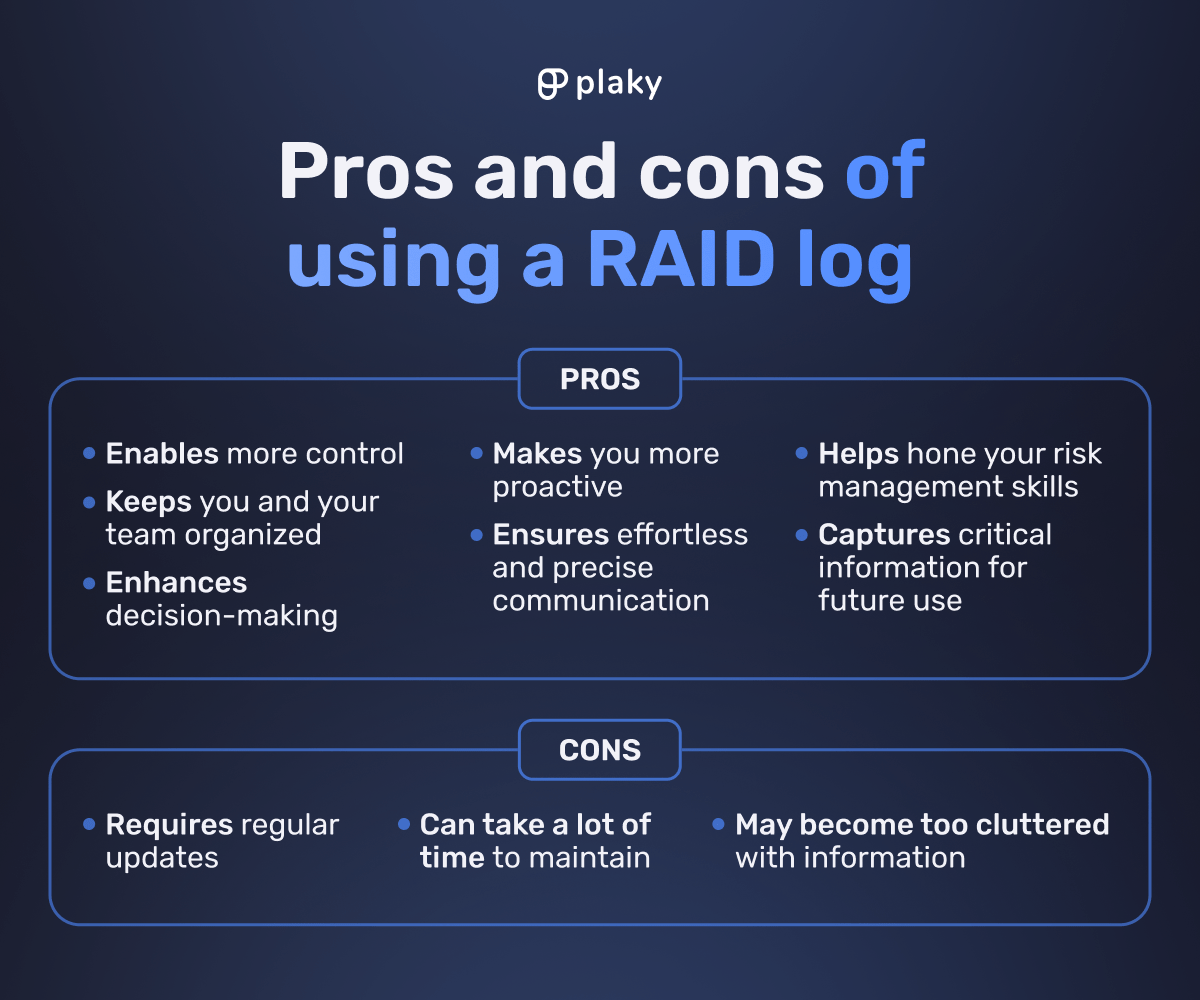
The major benefits of using a RAID log are that it:
- Gives you more control over your project, as it lists not only everything you have to worry about but also the resolutions for any problems you encounter,
- Keeps you and your team organized throughout each project by capturing essential information in one central repository,
- Enhances your decision-making, as it captures not just the decisions you make throughout the project but also the reasoning behind them,
- Makes you more proactive, urging you to consider and handle risks and issues before they become bigger problems,
- Enables effortless and precise communication, allowing you to easily recount all your project wins and losses,
- Helps hone your risk management skills by letting you compare your risk management strategies and mitigation tactics, and
- Captures critical information for future use, making each past RAID log a potentially powerful reference.
💡 Plaky Pro Tip
Wondering if there are other ways to organize your work better to make every work day as efficient as possible? Get expert tips in the guide below:
Cons of using a RAID log
The drawbacks of using the RAID log in project management are that it:
- Requires regular updates to ensure it’s actually useful,
- Takes a lot of time to maintain, especially if you split the log into 4 to 6 separate ones,
- Can easily become too cluttered with information, making it challenging to use.
An expert we consulted, Jeff Mains, an entrepreneur and the CEO of Champion Leadership Group LLC, warned us of the potential consequences of poorly managed RAID logs:

“There’s a risk of the RAID log becoming a bureaucratic exercise rather than a dynamic risk mitigation tool. If not managed efficiently, the log can turn into a documentation burden, diverting focus from proactive risk management to administrative upkeep.”
Jeff also explained the consequences of making the log too detailed:

“Maintaining a comprehensive RAID log demands vigilance in updating and reviewing, which can become cumbersome, especially in large-scale projects. This overload may lead to important details being overlooked or lost in the sheer volume of data.”
FAQs about the RAID log
We’ve gone through our guide to using the RAID log as well as all the reasons you should and shouldn’t rely on this tool when managing your projects.
Now, let’s go through some of the most frequently asked questions about this log.
Who creates and maintains the RAID log?
Typically, the project manager creates and maintains the RAID log. Still, they should get input from other key project stakeholders.
All project team members should take part in maintaining the log by providing their input on the RAID components. The project manager, however, is the one responsible for keeping the log current throughout the project’s life cycle.
Some project managers may want to acquire input from others but remain the sole authors of the log. Others, though, may want everyone to chip in and make sure the log is updated regularly.
Naturally, maintaining a RAID log is much easier to do in project management software. In that case, the RAID item owners could update the log themselves, and all changes would be reflected in the tool’s activity log.
Here’s how tracking project activity looks in Plaky’s activity log:

When should you update your RAID log?
Since the RAID log is a living document, you should update it on a regular basis throughout the project.
A good rule of thumb is to review and update the log at least once a month so that you know what to focus on in the next month. You could hold a monthly meeting with other team members to update the existing items, close them if necessary, and add new ones to the log.
That said, you could also commit to weekly or daily updates to stay on top of everything.
Generally speaking, only an up-to-date RAID log is useful for managing your projects. So, it’s usually better to make the updates more frequent than wait for too long to add new information.
What are the best practices for using a RAID log?
The best practices for using a RAID log include:
- Brainstorming each RAID category separately. While creating your log, it’s a good idea to hold separate brainstorming sessions for each component to avoid overwhelming your team — and make sure you don’t miss out on anything.
- Using real data to fill out your log. Don’t make guesstimates if you can access real data from previous projects. Use that data to capture information in your log as accurately as possible. Remember to fill out all of the columns too.
- Avoiding vagueness. The log should provide clear information almost instantly. Make sure to describe each log item in detail using clear and accurate language and style. Above all, the log should be easy to comprehend by any member of your team.
- Scheduling update sessions in advance. Whether you do it weekly or monthly, make sure you schedule an update session ahead of time, rather than scheduling it at the last minute.
- Asking for detailed input. Be proactive about getting input from your team to keep your RAID current. Ask lots of questions to get accurate feedback on each item your team works on.
- Making the log accessible to your teammates. Your team should be able to access the log whenever they need to and stay informed about the project’s progress and performance.
What is a RAAIDD log?
A RAAIDD log is just a more elaborate version of the basic RAID log.
This log is a combination of all 6 of the components you can track with the RAID log. Instead of choosing between actions and assumptions or decisions and dependencies, the project manager can track all of them to get a more optimal insight into a project’s health and performance.
What is the difference between a risk register and a RAID log?
The main difference between a risk register and a RAID log is that the RAID log is a more extensive document that tracks additional components, along with risks.
The RAID log contains additional sections (or separate logs) where you can keep track of risks, actions or assumptions, issues, and decisions or dependencies.
In contrast, the risk register is a risk management tool that identifies, tracks, and analyzes potential project risks, as well as provides information on how best to mitigate them.
Given the structure, the equivalent to this tool would be RAID’s risk log, as it usually contains the same common risk register components.
What is the difference between an issue log and a RAID log?
The main difference between an issue log and a RAID log is that the RAID log is a more comprehensive project management tool.
The issue log typically contains information about project issues, who’s responsible for them, their priority, resolutions, and similar.
To compare, the RAID log usually comprises typical issue log elements, often in a separate issue log.
However, it can also capture other crucial project information, such as risks, assumptions, actions, dependencies, and decisions.
Can you use the RAID log in Agile project management?
You can use the RAID log in Agile project management to ensure faster communication and transparency.
Though Agile mostly shuns documentation, it could benefit from a more structured approach to managing key project elements.
The RAID log doesn’t only chronicle potential problems — it also logs mitigation methods and plans all in one place. Because of that, it’s a great tool to have on hand, especially since Agile puts emphasis on efficient project communication and collaboration.
The log also plays into the idea of continuous improvement in Agile. When reviewed and updated during regular Agile meetings, such as daily stand-ups, it keeps the team committed to improving their work.
All the usual activities, such as Sprint and release planning and Product Backlog refinement, could be easier to organize thanks to the RAID log. And if there are issues or major risks pending, the log can serve as a source of truth during check-in meetings for conveying potential concerns to stakeholders.
The RAID log could also prove useful for scaling Agile across larger teams, as it provides an in-depth but comprehensive overview of the components that drive projects forward.
Conclusion: Stay in control with the RAID log
By creating a RAID log for your project, you’re giving yourself the best shot at not only understanding it better but steering it toward success.
Offering you a clear overview of the key aspects of your project, this tool aims to:
- Dispel doubts,
- Improve decision-making,
- Inspire better team collaboration and communication, and
- Give you more control over your project and its performance.
Some caveats apply, of course. As Jeff Mains puts it:

“It’s imperative to strike a balance between thoroughness and practicality in utilizing RAID logs to ensure they genuinely contribute to project success rather than impede it.”
Fortunately, you can always customize the log to your needs, no matter how big or small your projects are. Since it’s also easy to create and maintain in project management software, the RAID log could be a rather positive addition to your PM toolkit.
📖 The RAID log is only one of the many project management tools that could help you improve your chances of delivering a successful project. If you’re interested in learning more about project management, browse our Project Management Glossary of Terms to further explore basic and advanced PM terminology.
References:
- What is a risk register? (11 common components and tips). Indeed.com. (n.d.). Retrieved November 20, 2023 from https://www.indeed.com/career-advice/career-development/risk-register
 Project Management Hub

