
We’ve all had setbacks in projects due to key stakeholders not knowing what they should do. This always leads to delays, insufficient resources — and way too much explaining just to get on the same page.
Most of the time, this happens because the bigger picture is not clear enough.
Before even starting a project, you need to paint this bigger picture — what you expect from the project, your goals, the constraints, and how you’ll get to that finish line. All of this information is packed into the business requirements document.
So how do you write one? And what should it look like? Keep reading to learn more about it and get access to some useful templates too.
What is a business requirements document?
A business requirements document (BRD) is an outline of a project’s business objectives and everything needed to deliver them successfully.
It’s important to create and distribute the BRD before the project even kicks off. Otherwise, you’ll just start a project where none of the important stakeholders know what they should do. It’d be like starting an NBA finals without the coach!
You should share this document with key project stakeholders so that they have an insight into the project’s details — and even their own responsibilities.
However, keep in mind that the BRD is not used to approve the project, although it can serve as an attached document to help. For that purpose, it’s best to use a project proposal.
💡 PLAKY PRO TIP
The BRD is also often accompanied by a business case — after all, both serve a similar purpose. Learn more about writing a business case in this article:
What is the difference between business requirements and functional requirements?
As you write your BRD, you might come across another term — functional requirements. The main difference between these 2 is that business requirements determine what needs to be done, while functional requirements outline how it should be done.
Naturally, just like the BRD, there’s also a functional requirements document (FRD) that you can — and might even need to — write.
The BRD outlines the project objectives and the steps you need to take to achieve them. On the other hand, the FRD takes a look at those steps in detail, outlining exactly how you should perform each task.
It’s the difference between knowing that you need to solve a video game puzzle to level up and looking up a specific cheat sheet online when you finally give up.
So, who prepares which document?
In general, the BRD is prepared by a project manager or business analyst. Meanwhile, the FRD is usually prepared by a competent team member who can connect the business objectives of the BRD and the requirements of specific tasks needed to achieve them.
Of course, in smaller projects, it’s possible for the project manager to create both documents — but generally, you’ll increase team engagement if you delegate effectively.

Why are BRDs important?
Like we said, if you don’t create a BRD, you risk your project falling apart pretty early on.
But, this document doesn’t just eliminate risk — it also brings lots of other benefits to your project, like:
- Clear objectives and goals — A BRD increases the overall clarity in the project. It helps the whole team understand objectives, what needs to be done, who needs to do it, and who’s leading the project. There’s hardly anything worse than starting a project only for everyone to twiddle their thumbs from the get-go.
- Aligned project and business goals — The needs statement section of the BRD explains how your project’s objectives align with the overall business goals. This ensures that the project has long-term benefits to your organization and locks in support from the top brass.
- Bottleneck prevention— If your requirements are clearly set, you can spot issues from a mile away. So, if anything in your project workflow is lacking, the BRD will help you get back on track.
- Improved progress tracking — Since the BRD defines your project objectives, you can track their completion to keep an eye on your project’s success.
- Faster project completion — When your team knows what they need to do, who needs to do it, and why, they’re free to just focus on the work they have.
- Better resource allocation — Once you set clear requirements, it’s easy to figure out the project resources needed to complete them. You’ll also know which resources need to go where, so you’ll never under- or overallocate.
Ensure project success with Plaky
How to write a business requirements document
While a high-quality BRD can help increase clarity in your project, a poorly written one will just confuse everyone further — and you’ll cause more problems instead of solving them.
To write an incredible BRD, you need to properly analyze and clearly define each of its elements. And, to do this right, you first need to understand them.
Here are the 9 elements you must include in your BRD.
#1 Executive summary
An executive summary is an overview of what your project is all about, like:
- How you came to the project idea,
- What research you did to validate it,
- Why you’re doing it,
- What you need,
- Which challenges you might face, and
- A watered-down version of the other elements in the document.
All this needs to be clear and concise.
Anyone reading your document should get a clear understanding of your project after just reading the executive summary.
So, it’s best to write this element last — after all, you can’t summarize a blank document.
#2 Project objectives
What do you want to achieve with this project? Are you looking to change, improve, or fix something? And, how exactly will you track your success?
For example, increase customer retention is a goal. But, it’s not clear enough. How many customers retained is necessary to reach the goal — just one, or a bajillion? We’ll never know.
To avoid confusion, set S.M.A.R.T. goals. These kinds of goals are:
- Specific,
- Measurable,
- Attainable,
- Relevant, and
- Time-bound.
Using this framework, you’d say: Increase customer retention by 15% over the course of 6 months. Of course, you should set up a system to measure this, make sure it’s possible, and that it aligns with your overall business goals.
#3 Needs statement
The needs statement connects your project objectives with the overall business goals. In essence, it’s the reason you’re doing your project — but in the context of the whole company. How will the project’s result benefit your organization? Which goal does it align with, and how?
This will not only secure support from your higher-ups — but also give a sense of purpose to your team. They’ll know exactly how their work on the project contributes to the overall health of your business.
#4 Project scope
By defining the project scope, you answer the question — how much work do we need to do to complete this project?
In essence, the project scope includes all the work that needs to be done, influenced by goals, constraints, and deliverables. For example, you can’t set “Open 3 brick-and-mortar stores in 3 different cities” as a scope item if you only have the budget for one.
Setting the scope early helps you avoid scope creep too. This nasty phenomenon happens when you underestimate the amount of work, resources, or budget it takes to complete a deliverable.
Overall, scope creep can cause devastating effects on your project — missed deadlines, wasted budget, work overload, etc. So, better plan ahead!
#5 Current and proposed process
You should detail how your organization is currently tackling the issue or opportunity your project is focusing on. Then, explain how your project will improve that system.
For example, say your project aims to improve customer retention by introducing loyalty programs. In this element, you’d outline how your organization currently tries — or doesn’t try — to retain customers. Then, propose how your project will change this process and reaffirm the impact you think it’ll have.
By showing the change you want to see in your organization, you can get everyone on the same page — and do a service to your project objectives.
#6 Project requirements
Project requirements illustrate what needs to happen to complete the objectives. Essentially, they’re the results of your work on the project — and yes, this includes project deliverables.
The requirements section will make up for most of your document, and the more work you need to complete, the bigger this element will be.
You’ll also need to sort these requirements by priority.
Yes, that brick-and-mortar store your project aims to open needs workers — but that’s all irrelevant if you don’t get a deal with a construction company to build it in the first place. Then, you need a supply chain for the products you’ll sell. And only then can you think about workers. So — prioritize.
💡PLAKY PRO TIP
If you want to improve your prioritization skills, you can check out this useful article:
#7 Project stakeholders
Your key stakeholders will have a massive impact on the result of your project. So, you need to identify them and outline their role and impact.
Your stakeholders include:
- Key decision makers,
- Team members, and
- End users.
If you’re doing an in-house project, the end users will be your own workforce, but you still need to conduct research and outline their needs.
In the end, you should have a clear understanding of how each stakeholder will impact the project — from the freelance graphic designer and lead managers to the user who downloaded your app.
Afterward, by sharing the BRD, you can get all the project stakeholders on the same page when it comes to their roles and responsibilities.
#8 Project constraints
Project constraints include all factors that limit your project work and determine what you can or can’t do in the project.
The main constraints in a project are:
- Project scope — We already covered the scope as another element because it requires you to go a lot more in-depth. So, you shouldn’t include it in this part of the BRD — we’ve just listed it here since it’s the main constraint.
- Project budget — This constraint refers to the cost of your project, i.e., how much you can spend on the project and how you’ll spend the money.
- Project timeline — This refers to how much time you have to complete the project. Knowing your timeline is crucial when setting project deadlines for individual tasks.
It’s important to note that these 3 constraints are co-dependent — you can’t change one without changing the other. E.g., if you decrease the budget, you’ll probably need to shave away some work. Or, if you increase the scope, you’ll need more time to complete the project.
There are also other constraints that can affect your project, including:
- Project risks,
- Resources,
- Project team skills,
- Legislation,
- Economic constraints,
- Target audience,
- Security, etc.
Research these as you’re writing the BRD and determine which are important enough to include.
#9 Cost-benefit analysis
In the end, you need to show your project will bring more than it’ll take away. So, for this last element, compare how your project’s benefits outweigh its costs.
First, list all costs of your project. Be mindful, there are 2 types of costs — explicit and implicit.
Explicit costs are direct, e.g., creating 100 flyers that cost $50.
But, implicit costs are trickier. They essentially mean this thing isn’t used for something else, so that’s a cost. The best example of implicit costs is resources that your organization already has.
Then, include all the benefits — both explicit and implicit.
The best example of an explicit benefit is direct sales. An implicit benefit can be increasing brand awareness (it doesn’t directly increase profit, but in time, it will).
Business requirements document example + templates
Actually writing a BRD is a scary task, though — and it requires a lot of prep work. And even after all that, you’re met with a blank document.
Well, we don’t want that to happen, so we made a few business requirements templates to help you get started.
We also filled out the templates with examples, so you’ll have a better idea of the kind of information you should include.
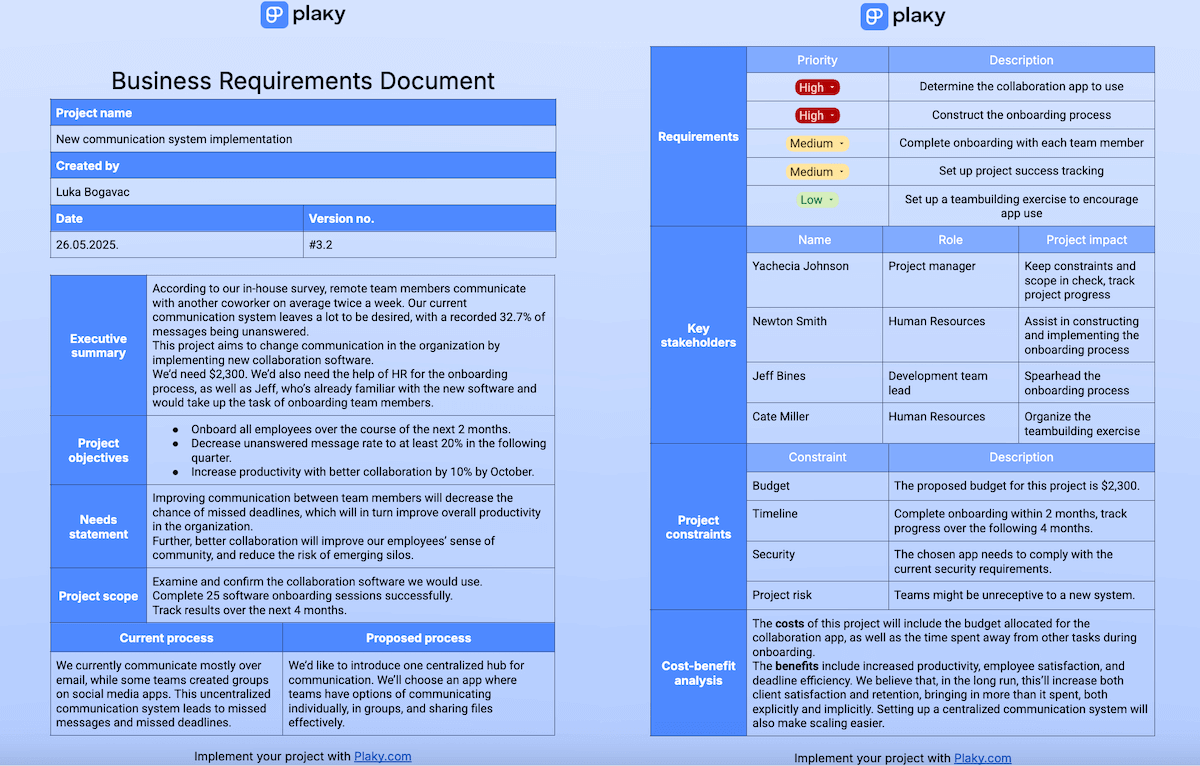
This example shows the clearest and simplest information in the template — it applies all the tips listed above for each element.
If you want to try this template, you can download it in the form of Google Docs, Word, Google Sheets, and Excel.
On the other hand, if you’re writing a BRD for a short, simple project, you don’t need to overcomplicate things for your stakeholders. So, we’ve also created a simple version of the BRD template, for when you just need to share the most basic information.
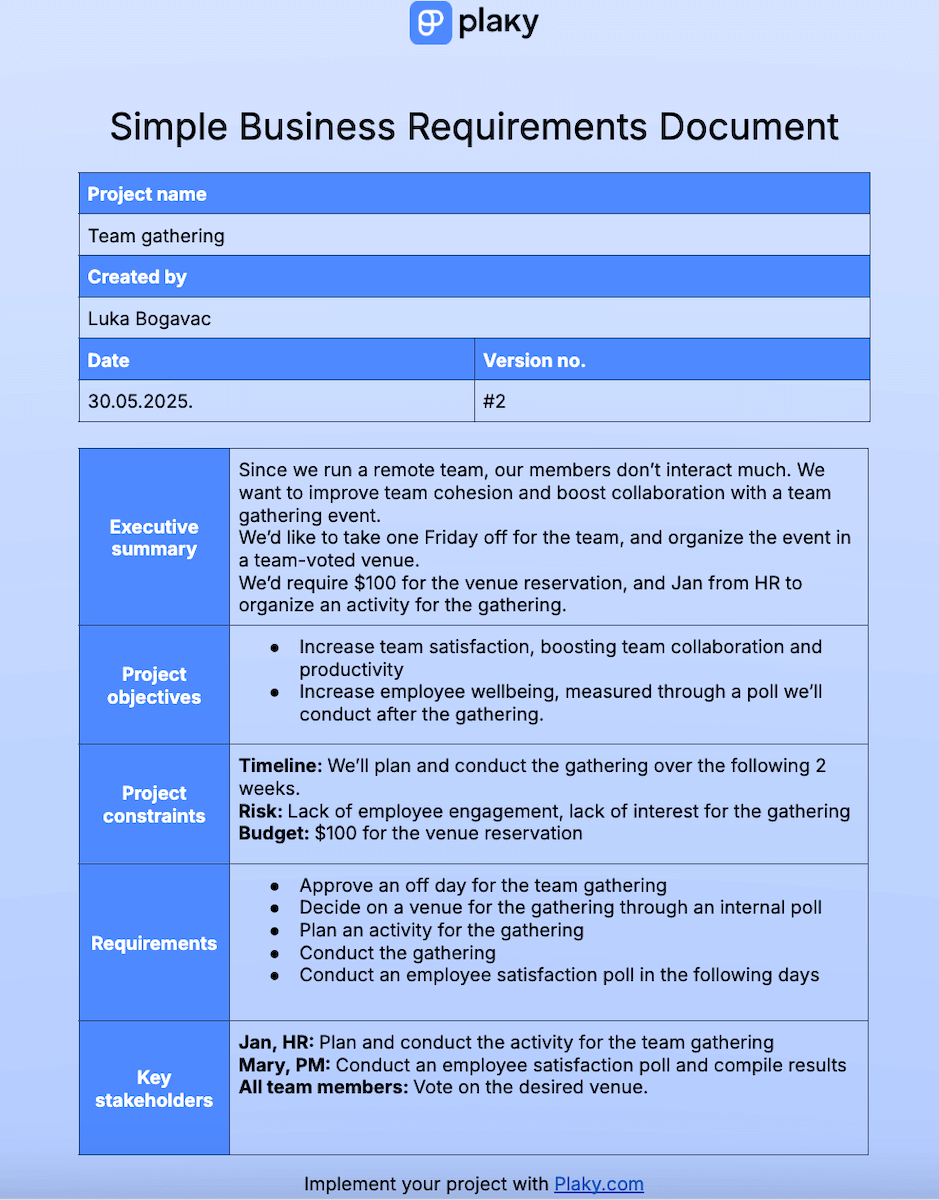
Download the template: Google Docs, Word
Exceed your project objectives with Plaky by CAKE.com
Once you have a completed business requirements doc, it’s time to work on implementing your project.
You’ll need to distribute tasks based on your document, set up timelines based on the outlined constraints, and even share the BRD itself.
For this purpose, a traditional method like a spreadsheet just won’t do. Instead, use project management software — like our tool, Plaky by CAKE.com.
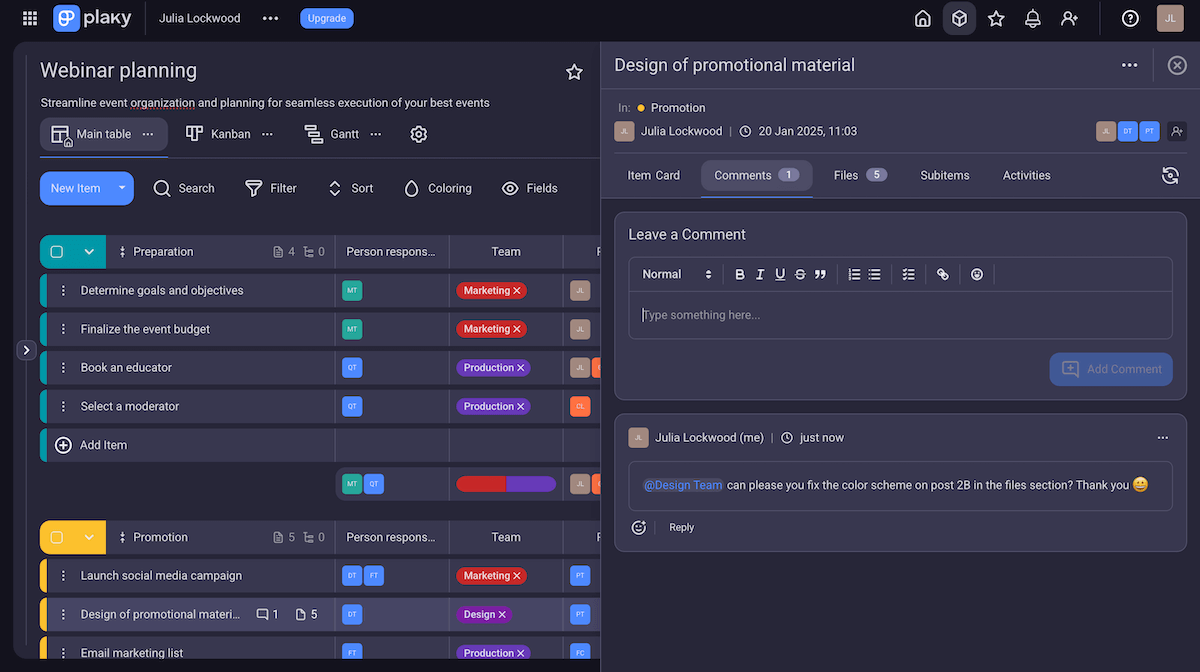
Let’s start with the basics — you’ll need to share the BRD with your team so that everyone’s on the same page.
In Plaky, this is done in 2 steps — just click on the Files tab within an item and drag-and-drop the document in there. Now, it’s organized and easily accessible to your whole team.
Your team can also use this, as well as other collaboration features, like notifications and comments, to boost collaboration on the project — and with it, productivity. Real-time notifications and @mentions in comments keep your team members up-to-date and engaged with the task at hand.
Next, you’ll need to set up the tasks based on your business requirements.
With custom fields, you’ll be able to configure any type of project for your (or your client’s) needs.
The transition from spreadsheet-listed requirements to Plaky items is seamless. This is due to its easy-to-use interface and intuitive feature design — as well as the table view, which is sure to make any spreadsheet user feel right at home.
On the other hand, the Gantt view will let you get a grip on the project timeline. With a visual task overview, you’ll make sure every deadline (and eventually, every objective) is met or even surpassed.
As a project lead, you’ll also need to keep a keen eye on project constraints to ensure your project doesn’t spiral out of control.
Plaky helps you do this with:
- Tags — Clearly label and track risk, resource, legislative, or similar constraints.
- Numbers field — Track the project budget and share it with the whole team to avoid cost overruns.
- Date or timeline fields — Track deadlines, spot bottlenecks, and avoid delays with ease.
And best of all, you can get an overview of all this information in one place — the summary row. Instead of scrolling through the whole board to check the status of your constraints, just one glance at the summary row tells you everything you need to know.
All of these features will help you stick to your BRD and achieve those business objectives in record time.

A successful project needs 2 things — a great BRD and an even better tool to implement it. So, give Plaky a go and sign up for free today.
Try Plaky by CAKE.com for free
How we reviewed this post: Our writers & editors monitor the posts and update them when new information becomes available, to keep them fresh and relevant.