Imagine you’re just starting on a project. You have a vague idea of how you’ll approach it, but you don’t have a specific project management technique in mind.
Because of this, at the first issue or challenge, or even just the first specific organizational question, you’re unsure of what to do.
Not having a clear system for running a project can lead to its downfall. So, let’s take a look at some project management techniques and how you can best implement them in your project.

- Project management techniques are used to organize and execute the specifics of a project.
- You should choose the techniques you’ll implement based on your project scope and objectives, as well as your project management style.
- The 10 essential project management techniques are: Work Breakdown Structure (WBS), Scrum, Kanban, project briefs, Gantt charts, PERT, Stakeholder Importance-Influence Matrix, the Critical Path Method (CPM), PESTEL analysis, and creating a priority to-do list.
What are project management techniques?
Project management techniques are specific tools and frameworks you can use to effectively organize and execute a project. They are like roadmaps you outline to create a clear path towards your project goal.
There are many project management techniques to choose from, and most can be applied to almost any industry. Choosing the right technique depends on many factors, some of which are:
- Your project management style,
- Project scope,
- Project objectives, etc.
And what’s the difference between project management methodologies and techniques? Randi Mays, Project Development Manager at Oii.ai, explains it best:

“A methodology is a process that delivers a well-defined result or a product. Methodologies provide the big picture. They’re the roadmap that ensures you get to your destination.
On the other hand, techniques are the tools that help you with the ‘how’ of specific tasks. You can think of a technique as a tool to help you accomplish something.
So if we were to build a house, the methodology would be the blueprint. A technique would be the hammer.”
Top 10 key project management techniques
Read on to learn about the top 10 essential PM techniques, their benefits, and how to use them in your projects!
#1 Work Breakdown Structure (WBS)
You can apply the Work Breakdown Structure — whose essence is to fragment a project into more manageable chunks — to almost any project. Randi told us of its benefits:

“Often when we’re taking on a big project, it can feel overwhelming.
The key is to break it down into smaller components. One way to tackle that is through what’s called a Work Breakdown Structure (WBS). The overarching concept is fairly simple, and I like that it applies not just to project management, but many things in day-to-day life.”
Here’s how Randi tends to use a WBS:

“At Oii.ai, when deciding to create a new product feature, I will create a WBS. I start with creating a project scope. Then I need to allocate resources for the scope and identify potential risks. Next, I gather requirements from stakeholders, identify key performance identifiers (KPIs), etc.”
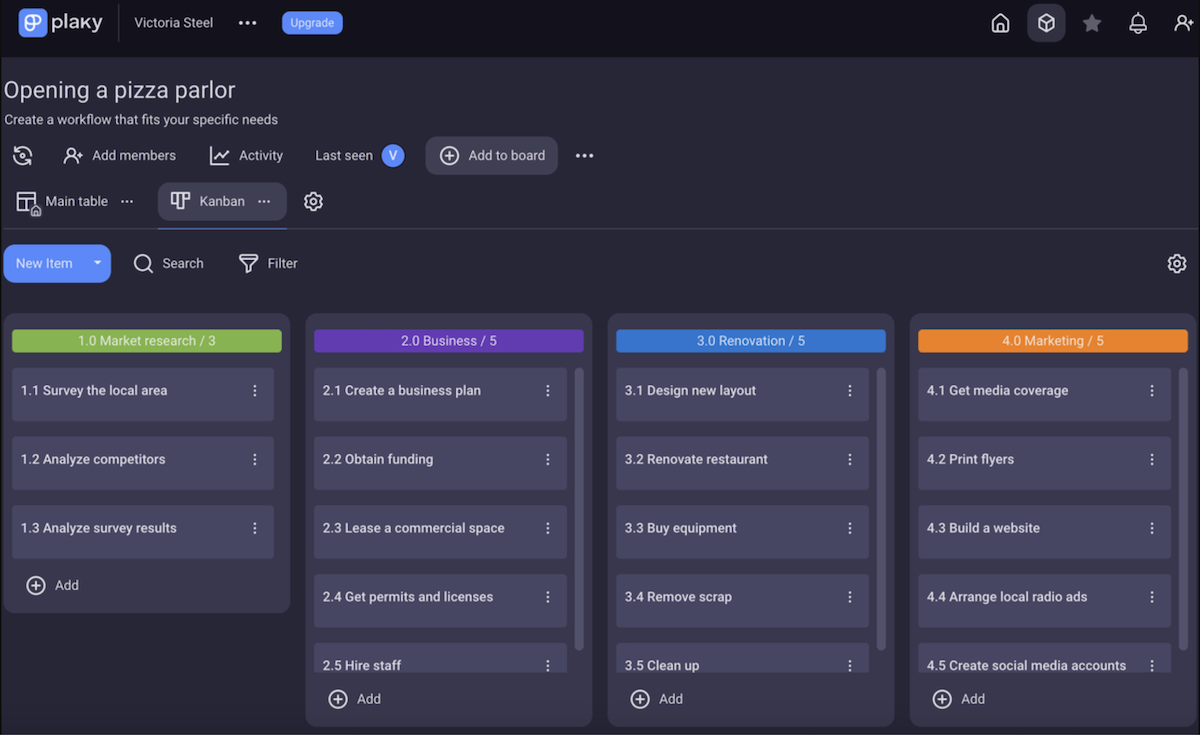
A crucial part of creating a WBS is identifying task dependencies — the tasks that must be completed for another to move forward.
You can later divide dependencies into sub-dependencies, or more accurately, tasks into subtasks. Here’s what a WBS would look like in project management software like Plaky.
#2 Scrum
Scrum is an Agile project management technique that uses a cyclic approach to improve the efficiency of your team. Vit Koval, Co-Founder of Globy and Venture Cella, told us about his experience with Scrum:

“In a previous project, we implemented Scrum by organizing work into short, iterative cycles called Sprints, with daily stand-up meetings to track progress and address any impediments.”
Much like WBS, Scrum helps you break the project into smaller, more manageable tasks. Each Sprint is dedicated to completing a set of tasks in order to complete the Sprint Goal.
However, his use of this technique wasn’t without issues:

“One challenge we faced was ensuring clear communication and collaboration among team members, especially when working remotely.
However, by leveraging tools like virtual Kanban boards and maintaining regular communication channels, we were able to mitigate these challenges and enhance our project’s performance. The iterative nature of Scrum allowed us to adapt to changing requirements efficiently and deliver high-quality results within tight deadlines.”
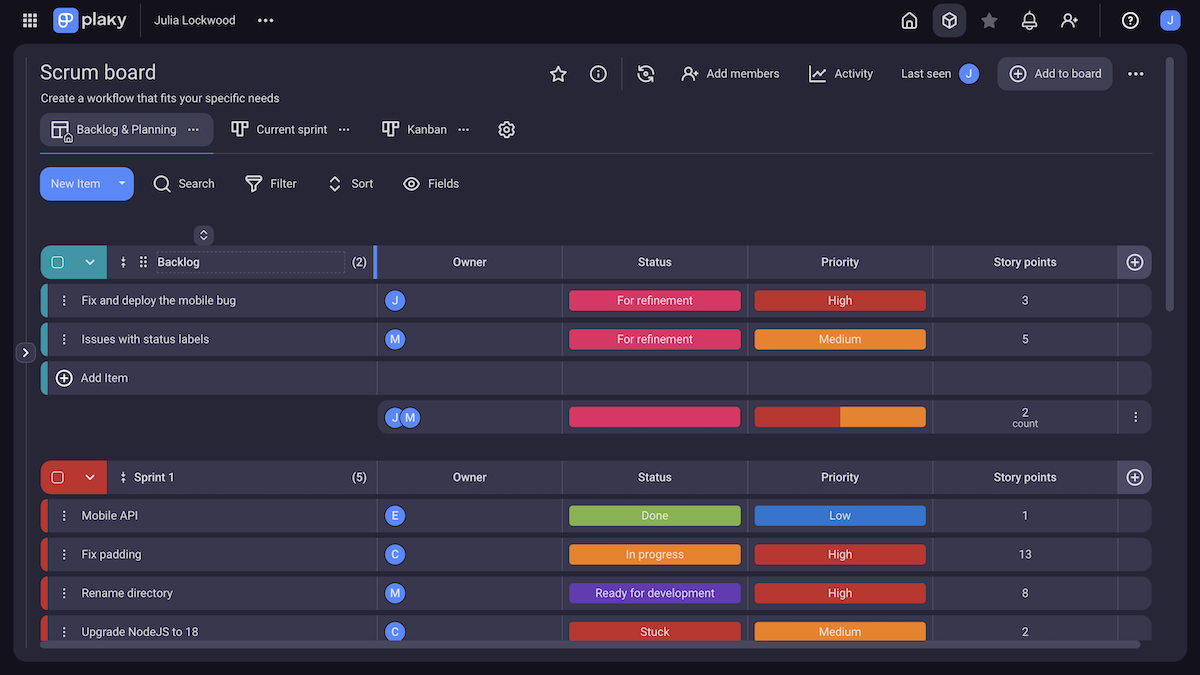
PM tools like Plaky can be used to simplify and visually represent Scrum Sprints, so every team member is clear on their tasks and the project as a whole.
As we can see from Vit’s experience, using project management tools can solve some issues that you can run into when dealing with the challenges of Scrum. Plaky enables easy project collaboration, which makes team coordination during Sprints much easier.
#3 Kanban
Another useful project management tool is the Kanban framework. Uku Tomikas, CEO and Founder of Messente, sums up its benefits:

“A straightforward board and card approach helps us visualize work, reduce work-in-process, and increase efficiency.”
Kanban centers around a clear visual overview of tasks, typically separated into 3 categories:
- To-do,
- Doing, and
- Done.
Here’s how the framework helped Uku’s team:

“We implemented Kanban by mapping out project workflows on our digital board. We categorized tasks into columns like “To Do,” “In Progress,” and “Done.” This visual approach allowed our team to monitor progress and find bottlenecks easily.”
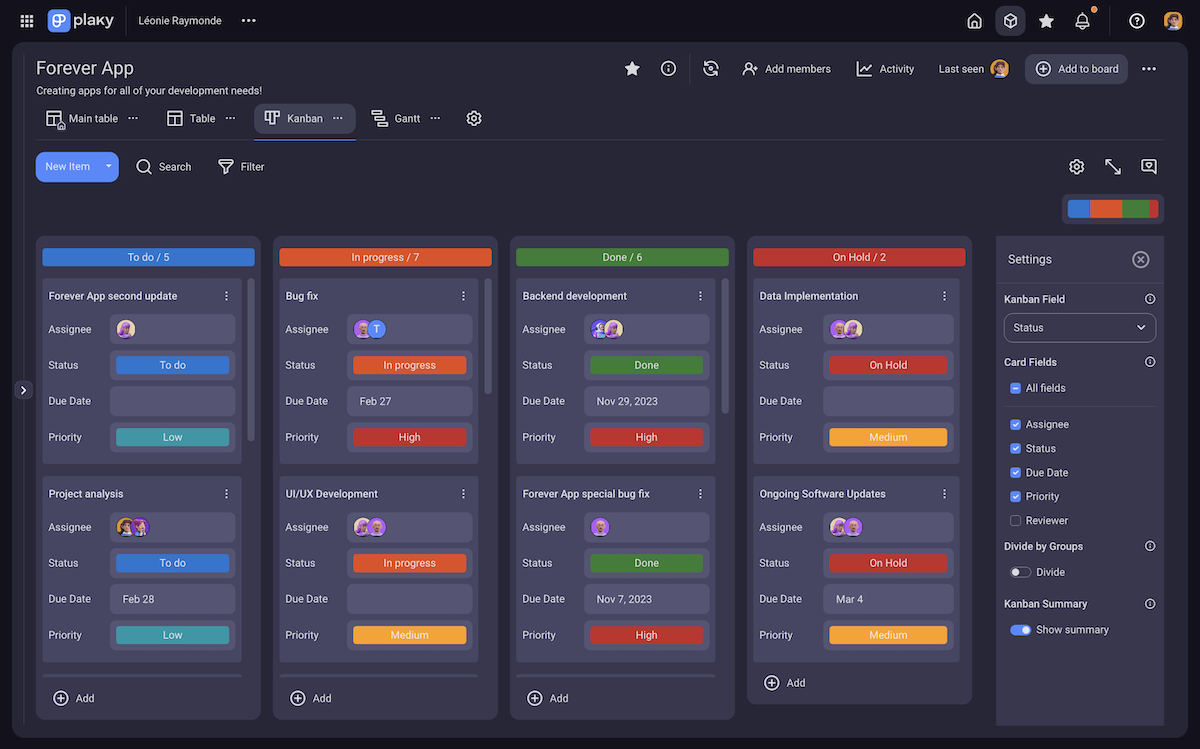
Kanban is especially useful when using a project management tool, as it can give the clearest visual overview of your tasks without the clutter of sticky notes and office whiteboards.
Here’s an example of a Kanban board view in Plaky:
💡 Plaky Pro Tip
See how Plaky stacks up against other Kanban tools and what you should consider before choosing your Kanban software:
Still, Kanban wasn’t without issues for Uku:

“Kanban wasn’t always easy to implement. At first, our team encountered issues with overloading the “In Progress” column, which caused delays. To address this issue, we implemented WIP limits to ensure that tasks are completed before new ones are started, significantly improving our project flow and productivity.”
The workaround they found is great, and a similar one is often used in Kanban — by adding a fourth “on hold” category. It allows you to prioritize tasks better and reduce clutter on your “to-do” list.
💡Plaky Pro Tip
Find out how to identify and solve project bottlenecks with Kanban in the post below:
#4 Project briefs
When starting a project, you need to be aware of the key elements that come into play with its execution. This is done in a project brief — a document that both you and your project stakeholders can use for reference on the key elements of your project.
The Editor and Spokesperson at Digital Project Manager, Nuala Turner, has a clever way of avoiding struggles with her project briefs:

“One technique I recommend is creating a detailed project brief, which I’ve implemented on many website design and development projects. Rather than creating one from scratch, I duplicated a brief from a past website development project and modified details like the list of deliverables, the timeline, the names of my team members, and client information (e.g. email addresses, where to find brand style guides, etc.).”
So, essentially, she’s created a project brief template, which she can modify for each new project. When dealing with similar projects, using past ones for guidance in creating a brief saves plenty of time.
Still, dealing with project briefs isn’t without issues, as Nuala noted:

“One challenge I faced with briefs was not having all the exact details about the website project at the start (e.g. how many web pages would be involved, whether wireframes were required).
Bypassing this challenge took a little creativity in the form of looking at what information I did have to fill in the gaps: the statement of work, kickoff notes, and other sales documents and contracts. These documents gave me more info that let me determine which internal team members to include in the brief.”
When you can’t get a hold of the information for your project brief — the best place to look is almost always another project document, for example:
- The project plan,
- Project charter,
- Business case, etc.
You need to analyze which type of information you need to refer to the right document. For example, if you need to find specific costs, you should look at the project budget.
#5 Gantt charts
Gantt charts are a visual representation of a project timeline. Usually, it is in the form of a bar graph, with the Y axis being dedicated to tasks, and the X axis representing the timeline.
It can be used to represent task deadlines, sequences, and dependencies in a clear, visual manner. At any specific time, you can refer back to the Gantt chart to see how your project tasks are progressing.
You usually arrive at a Gantt chart through the following steps:
- Determine the WBS,
- Identify the timeline of each task,
- Pick out dependencies,
- Define task sequences, and
- Use a visual medium to show the graph of your Gantt chart.
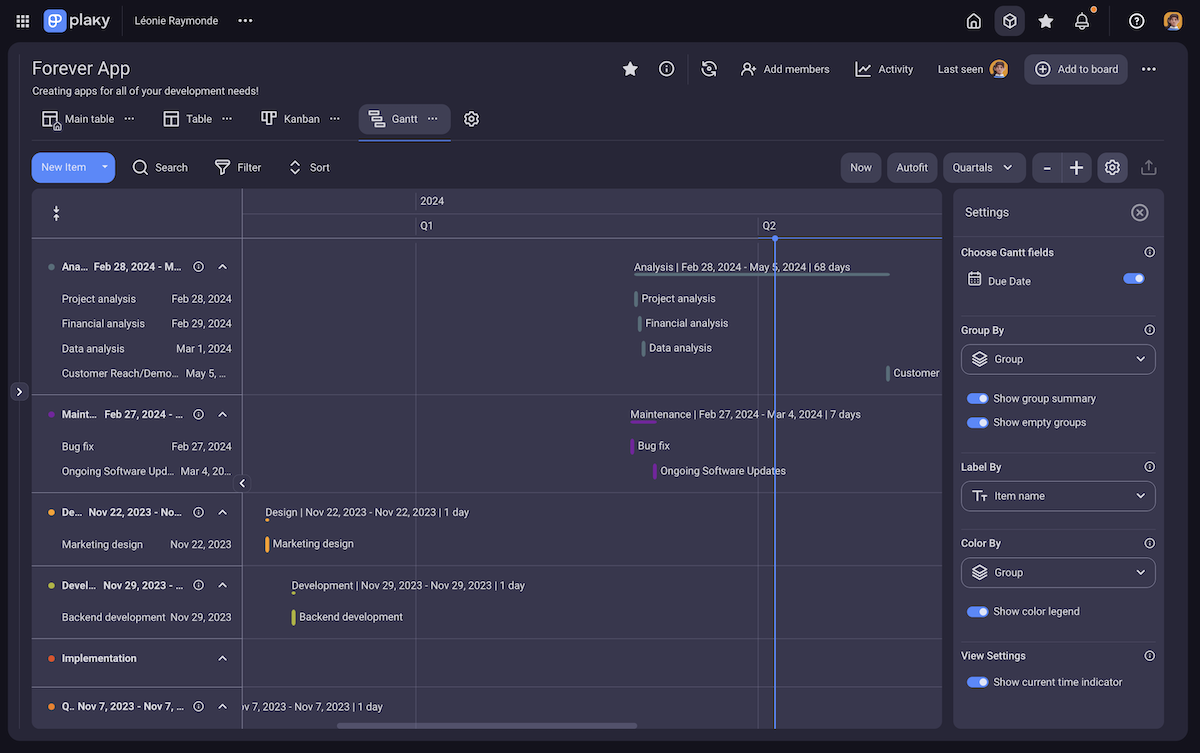
In addition to the table and Kanban views, in Plaky, you can see your tasks in a Gantt chart view as well. As its Gantt view is highly customizable, with a drag-and-drop feature, you’ll improve efficiency in your project, as well as in the process of creating the chart itself.
#6 PERT
The program evaluation and review technique (PERT) is used to help with timeline estimates. Creating a solid project schedule is essential to your project, which is where PERT comes into play.
The most common way to implement PERT is the three-point estimate — where you calculate a project’s expected duration and its standard deviation.
To do so, you use the following 3 points:
- a — the optimistic value — the minimum effort estimated to complete the activity. It should be noted that the probability of this value being true should be higher than 1%.
- m — the most likely value — the most probable effort that the most qualified person would estimate. You should consult the most qualified member of your team for that activity to determine this value.
- b — the pessimistic value — the opposite of the maximum effort estimated to complete the activity. Again, the probability of this value being true shouldn’t exceed 1%.
Now that you’ve determined these 3 points, you can calculate the expected duration (E) and standard deviation (SD) of an activity:
E = (a + 4m + b)/6
SD = (b – a)/6
This technique is used to improve the certainty of project estimates, not to forecast or change conditions in a project.
For example, let’s say you’ve assumed you’ll need 3 months to create a simple app. In a miracle case — the 1% chance one — your team could finish the app in 2 months. But, in the absolute worst-case scenario, it can even take 6. Now, with those numbers, we can calculate E and SD:
E = (2 + 4 x 3 + 6)/6 = 3.333
SD = (6 – 2)/6 = 0.667
Now we see that a more realistic estimate of the time it’d take would be 3.3 months, with a deviation of 0.7 months.
#7 Stakeholder Importance-Influence Matrix
All stakeholders can affect your project, but keeping track of everyone can be difficult. So, this 5-step technique helps you determine how to manage your stakeholder relations:
- Make a list of all your stakeholders,
- Assess the importance of each stakeholder,
- Assess the influence of each stakeholder,
- Place them in the importance-influence matrix, and
- Determine how to handle each one in relation to their position.
This stakeholder matrix should consist of 4 cells. When viewing the stakeholders in each cell, you should refer to them by these categories:
- High importance, high influence — good relation — work closely with these stakeholders. Use more frequent communication, updates, or even meetings to keep them involved in the project.
- High importance, low influence — protect — these stakeholders don’t have enough influence to protect their interest in the project. Since they’re of high importance, you need to be the one who protects their interests.
- Low importance, high influence — monitor — these stakeholders aren’t as important, but don’t let that deceive you — their high influence means you want them happy with the project. At worst, they can become a blocking factor.
- Low importance, low influence — low priority — you don’t need to devote much time or energy to these stakeholders. However, it’s important not to completely neglect them.
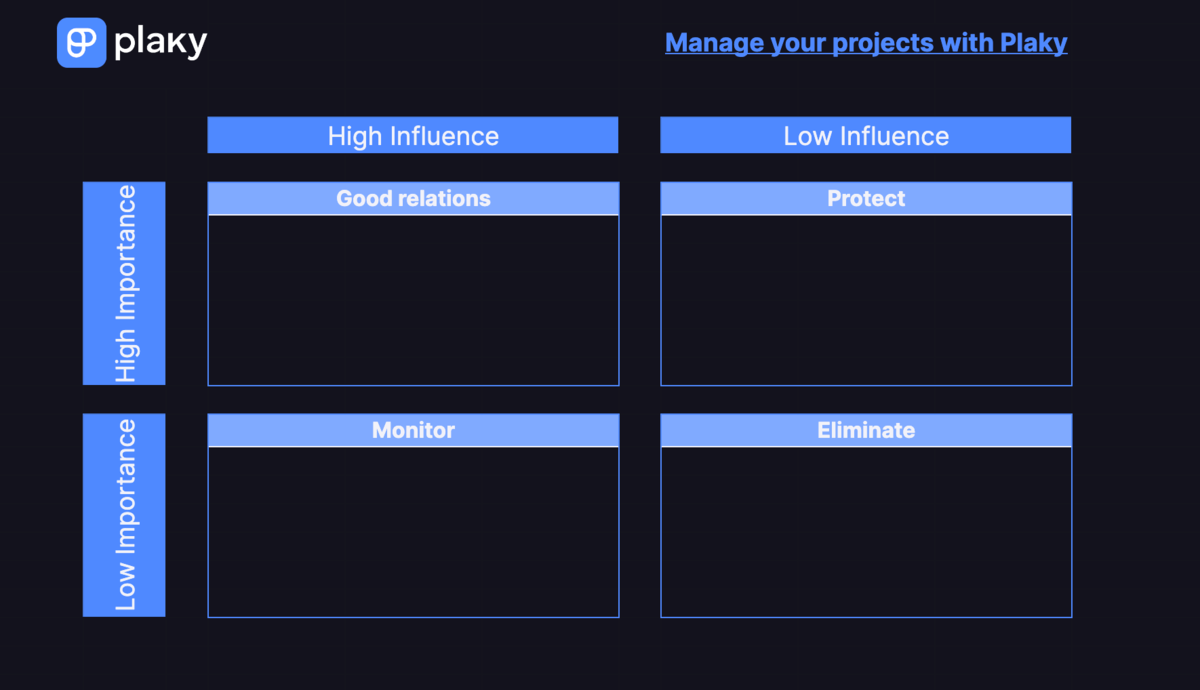
If you need help getting started, here’s a great Excel Stakeholder Matrix Template you can use.
#8 Critical Path Method (CPM)
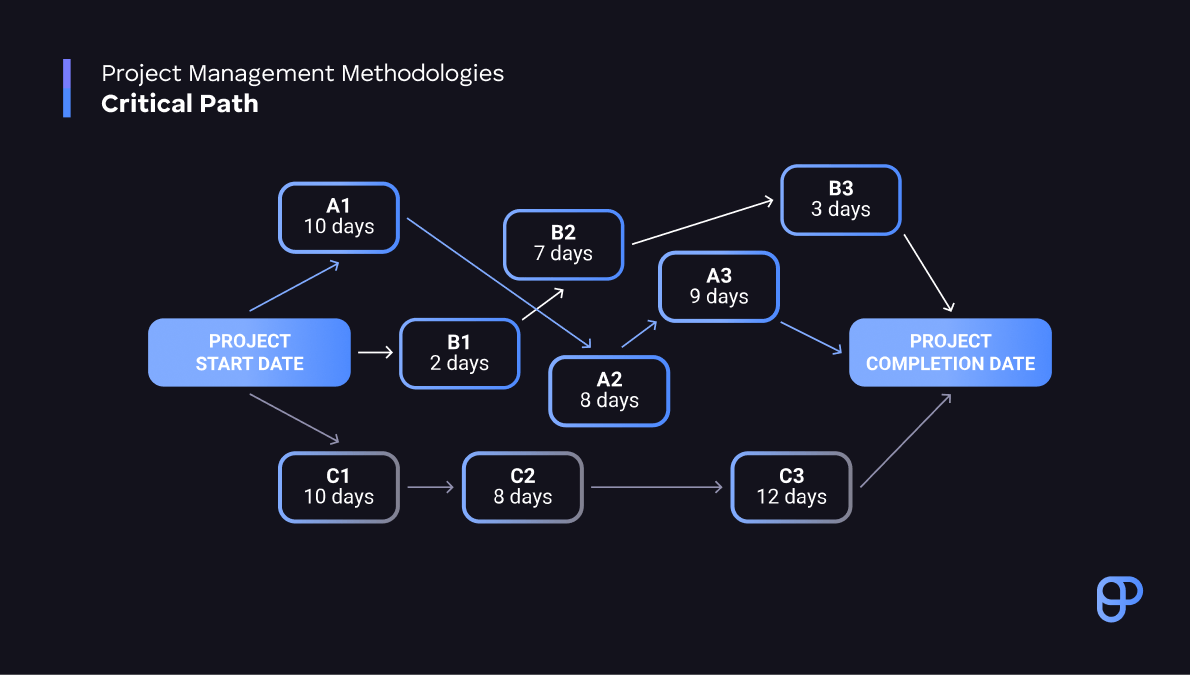
The Critical Path Method is an algorithm used to calculate the duration of your project. It uses task dependencies to calculate the longest path — also known as the critical path — that is required to finish the project.
This technique revolves around drawing up a task diagram. First, you need to create a project task list — to determine all tasks that need to be completed, using the WBS. You should draw a node for each task, outlining at first the name and duration of each task.
After that, you can connect those nodes to show task dependencies. For example, to complete a marketing post, you’ll need to determine the idea, then design it, think of an engaging caption, etc.
Then, you can calculate a forward pass — the total time needed to complete the project. Finally, you need to determine the backward pass — the amount of extra time you have to complete the set tasks.
#9 PESTEL analysis
The PESTEL analysis is used to determine how the project environment interacts with and influences your project goals and objectives.
It looks at specifically external environment factors and places them into 6 categories:
- Political — the policies and taxes that influence your project. For example, an increase in tax rate on freelance payments can increase your costs.
- Economic — how your chosen market influences your project. The demand, inflation rates, interest rates, etc.
- Social — the social culture, attitudes, lifestyle, or age distribution of a population can influence your project. For example, it’s difficult to market a technology-centered project to the older population.
- Technological — the advancements and limitations of current technology. This factor can determine anything from opportunities to how your project needs to adapt to survive in an environment of constant development.
- Environmental — the climate, changes in weather, tourism, farming, etc.
- Legal — laws such as consumer laws, employment laws, health policies, etc.
A well-performed PESTEL analysis will help your project position itself in the market and help you make accurate forecasts for the future of your project.
#10 Creating a priority to-do list
If you need to improve your project time management, creating a good priority to-do list is a must.
The first step to this is to determine how you will prioritize — for this example, we’ll go with a personal favorite — the Eisenhower matrix.
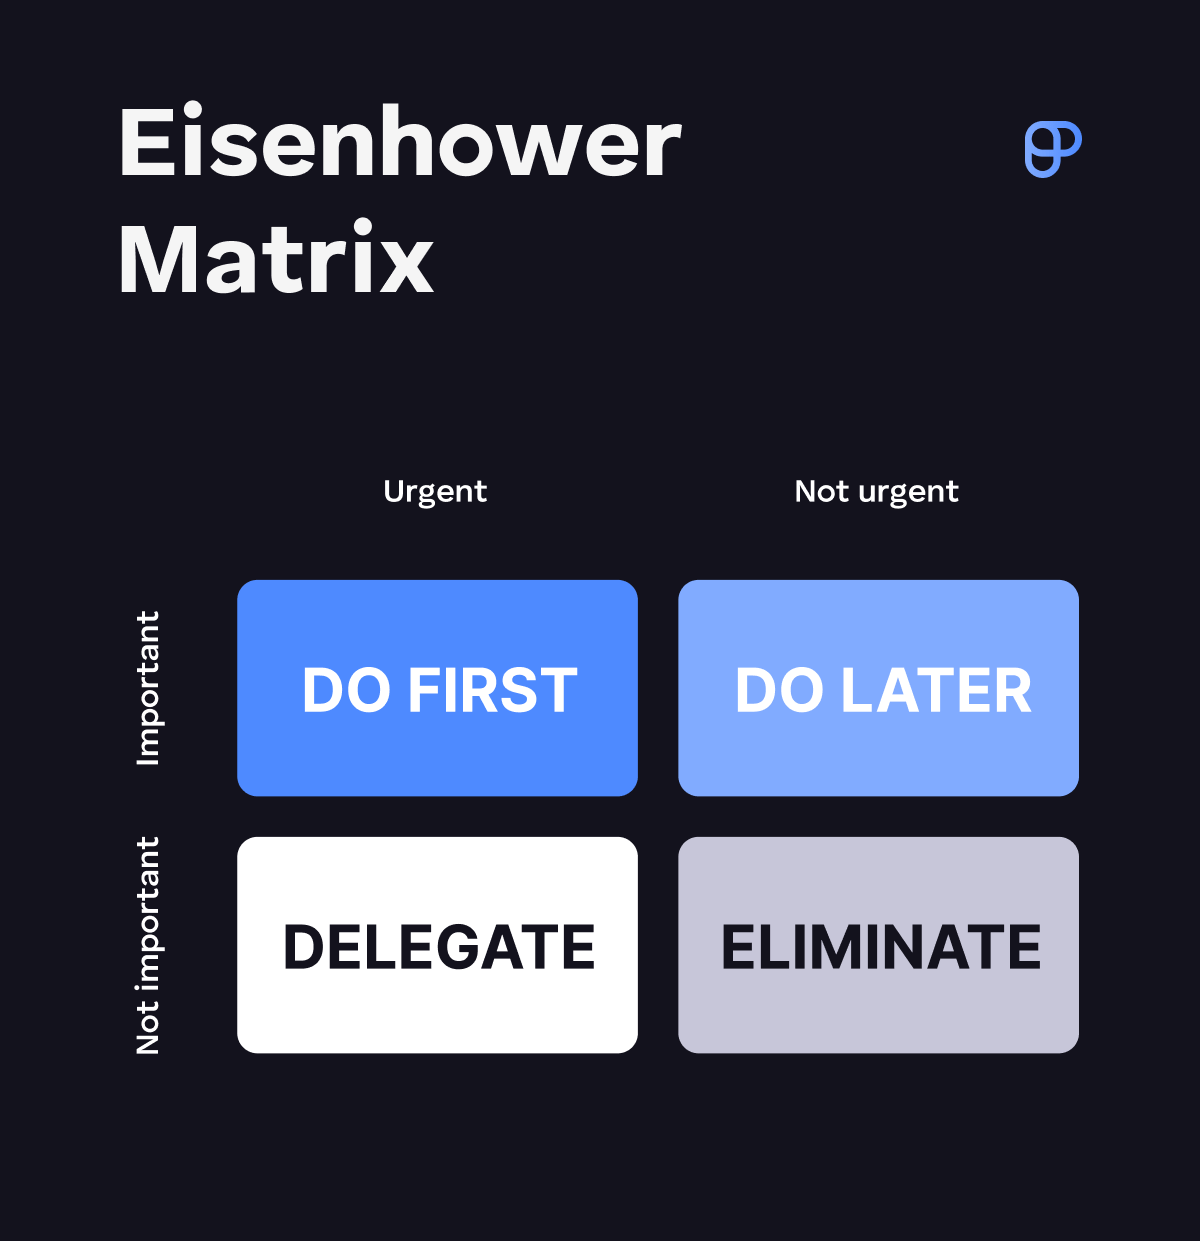
The Eisenhower matrix consists of 4 quadrants — determined by the importance and urgency of your tasks. After determining each task that you need to perform, you can start dividing them by quadrants, and using that to decide how to best create a to-do list for them:
- Do now — these are the urgent and important tasks that you need to achieve. They need to be at the top of your list, and you should get to them as soon as you can — they are crucial to your project.
- Schedule for later — these tasks are important, but not urgent. Reschedule them for an appropriate time, to avoid overbearing your workload.
- Delegate — these are urgent, but not important. Find an appropriate team member to delegate these to, as they still need to be completed as soon as possible.
- Do not do — the non-important, non-urgent tasks are a distraction in your project. The project can likely be successfully completed without even starting one of them.
💡Plaky Pro Tip
If you want more help with organizing your to-do list, check out these amazing templates:
Use Plaky to implement any project management technique
There’s one thing all techniques we mentioned have in common — they benefit greatly from the use of project management software.
Plaky is a versatile, highly customizable tool — a trait that lends itself well to using many different project management techniques. Whether you’re using the status field and Kanban view to best implement — well, Kanban or Scrum — or creating detailed Gantt charts, Plaky will prove to be the right tool for you.
How we reviewed this post: Our writers & editors monitor the posts and update them when new information becomes available, to keep them fresh and relevant.
 Published: April 9, 2024
