Updated: February 11, 2026
 From setting up your first task to monitoring your team’s progress and activities, this guide will help you get started with Plaky by CAKE.com and boost your work productivity.
Once you set up your first Plaky project, it’s time to start exploring the rest of the feature-packed app.
Let’s stop wasting time and start discovering what Plaky has to offer!

Why Plaky by CAKE.com?
In a crowded pool of competitors, Plaky stands out as an easy-to-use option for any team. The simple interface lets you start managing projects and the team’s workload right away, without complicated rules or instructions.
Nevertheless, if you’d like to get some guidance at any point, you can visit our knowledge hub, blog, and help center.
The generous free plan will let you organize tasks and collaborate with teams, but Plaky’s paid plans offer features that elevate your project management skills.
Use Plaky to work more efficiently by:
- Organizing your workspace,
- Staying on schedule,
- Collaborating with colleagues and clients,
- Always staying in the loop, and
- Saving time by cutting manual work.
Now, let’s dive into the details of Plaky’s features.
Organize your workspace
One of the main pain points of every project manager is that information gets scattered across different apps and hidden documents. In Plaky, you can gather all the necessary information while keeping it organized with:
- Spaces,
- Board Folders, and
- Multiple board views.
Spaces
If you look at Plaky’s organization and hierarchy, you’ll see that Spaces are the highest layer of your workspace. You can have 1 or more Spaces depending on the complexity of your organization.
For example, a company with a dozen employees that works on 1 internal project may need only 1 Space. On the other hand, small teams that have more clients need to keep their projects separate.
For those that cater to different clients or have more departments, multiple Spaces are the way to go. And if you’re worried about security, don’t waste another thought. You can set up space permissions that allow only certain members to access different Spaces.
It’s also possible to create open Spaces that anyone on your Plaky account can access. These Spaces are especially important for general company information and knowledge sharing.
Folders
Every Space contains Plaky boards and boards can be organized into Folders. So, if you have a Space that includes over 50 boards, you can organize them into Folders and make them easier to navigate.
In Plaky’s sidebar, you’ll see a list of Folders that you can expand and collapse. This way, you’ll be able to find and access the board you need within seconds.

Create a project board in Plaky now
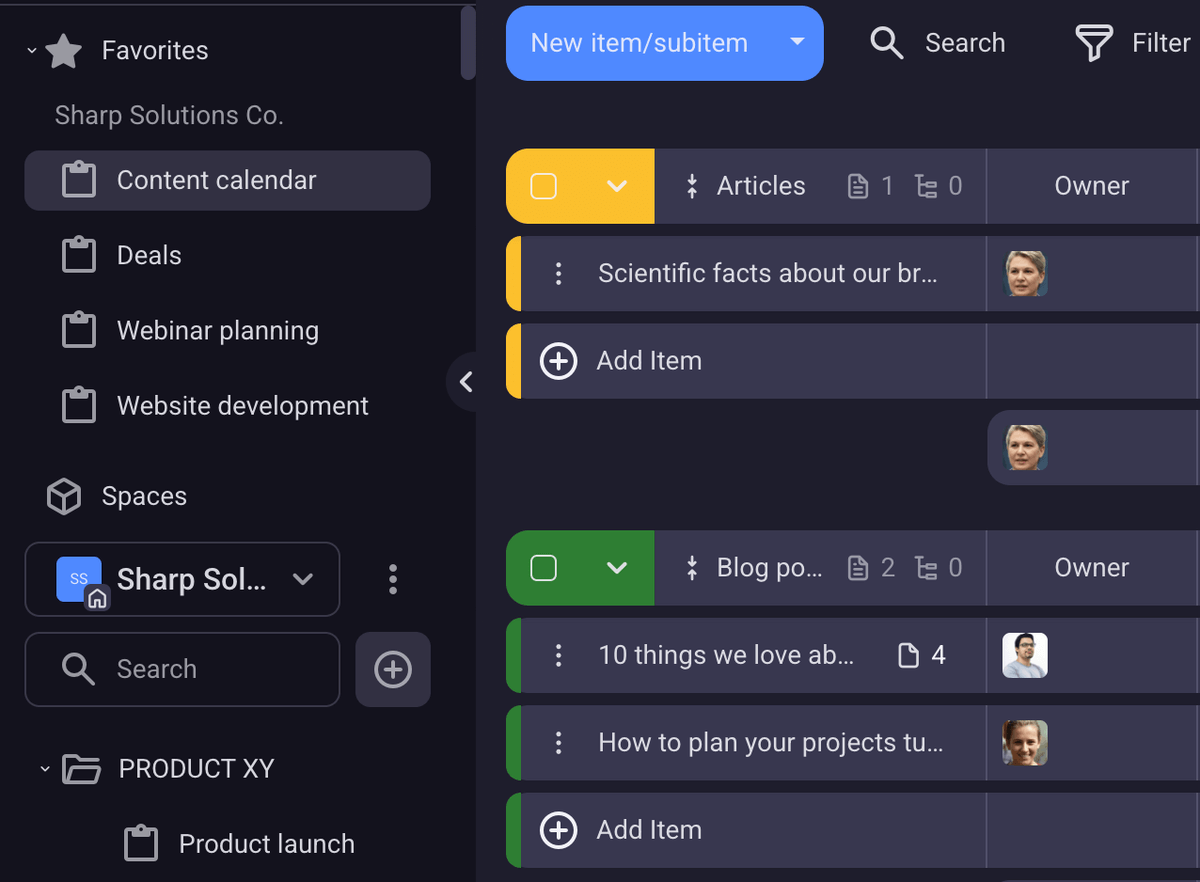
Favorite boards
If you use it — don’t lose it. Put a star on your frequently used boards and find them every day waiting for you in the Plaky sidebar.
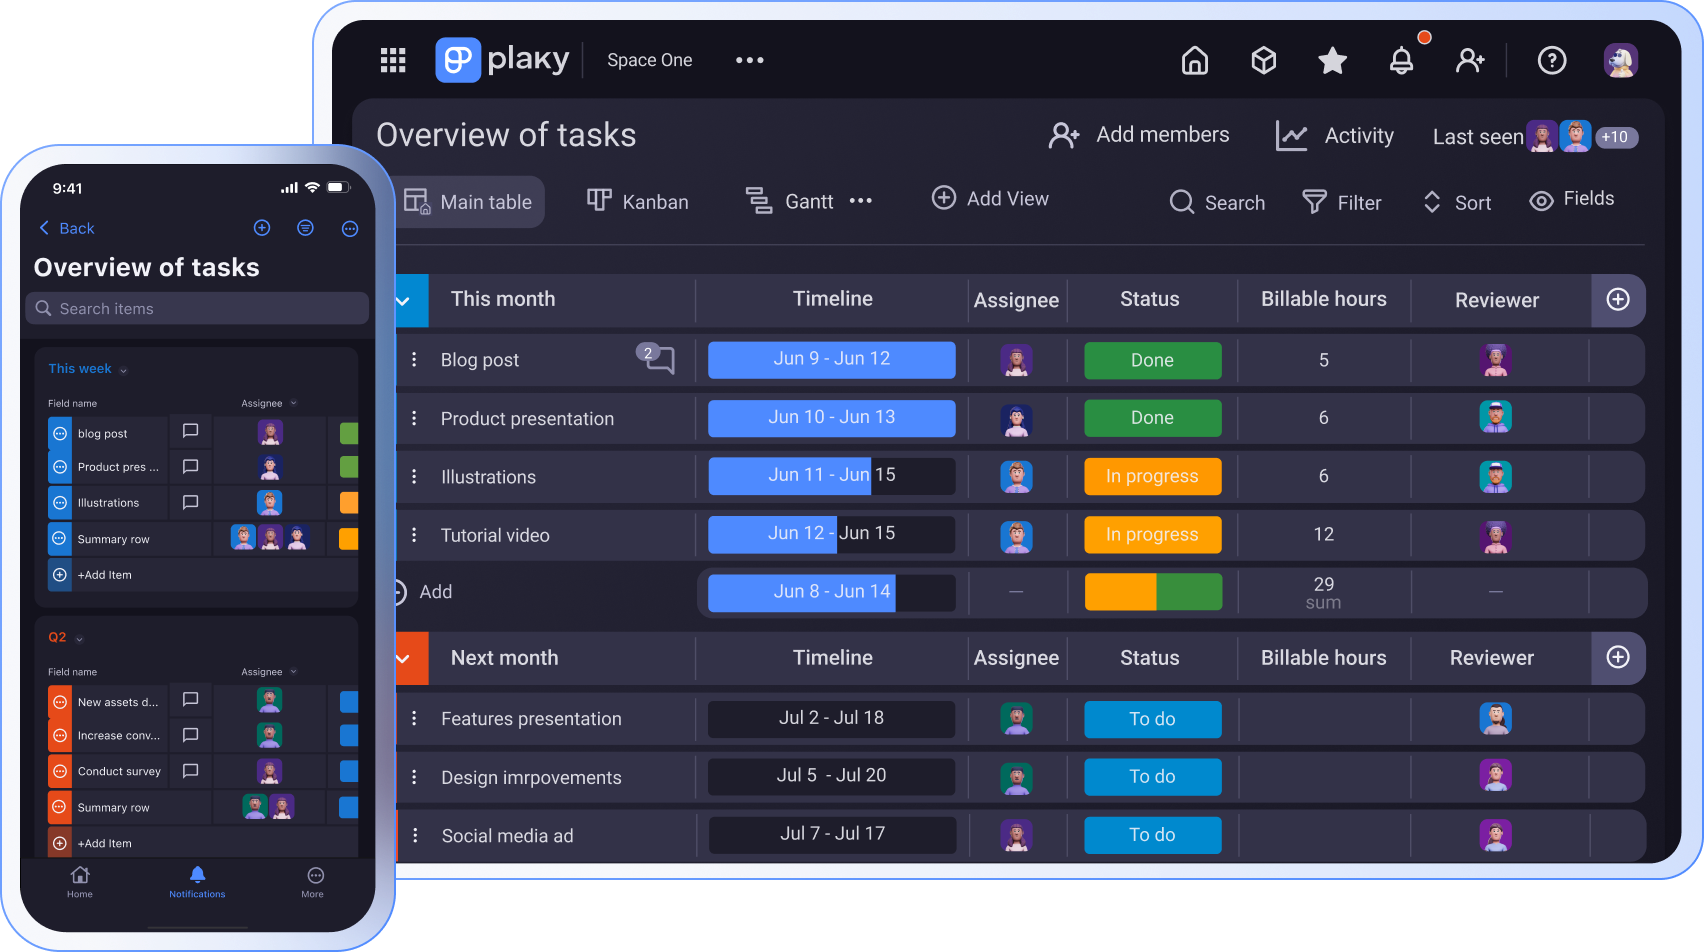
Board views
Plaky offers 4 board views:
- Table — Manage complex data with the default view,
- Kanban — Organize your tasks in columns,
- Gantt chart — Display the project timeline visually, and
- Chart — Visualize project data with pie and bar charts.
Your boards will automatically be displayed in the Table view, while all the other views can be generated based on your needs and preferences.
Users can filter boards and save each as a separate view and give it a name that reflects the data it displays, making it easy to find and access. If you want a personal version of your board that only you can access, you can also create a private view.
Here’s how to create a new board view in Plaky:
- Click on the gear icon, and choose Create new view.
- Choose the type of view you want to create: Table, Kanban, Gantt, or Chart view.
- Add the board name.
- Toggle the private or public setting.
💡 Plaky Pro Tip
Looking for a quick way to kick-start your projects? Choose one of our pre-made templates:
Table view
The table view is organized into rows and fields and is ideal for projects with lots of data.
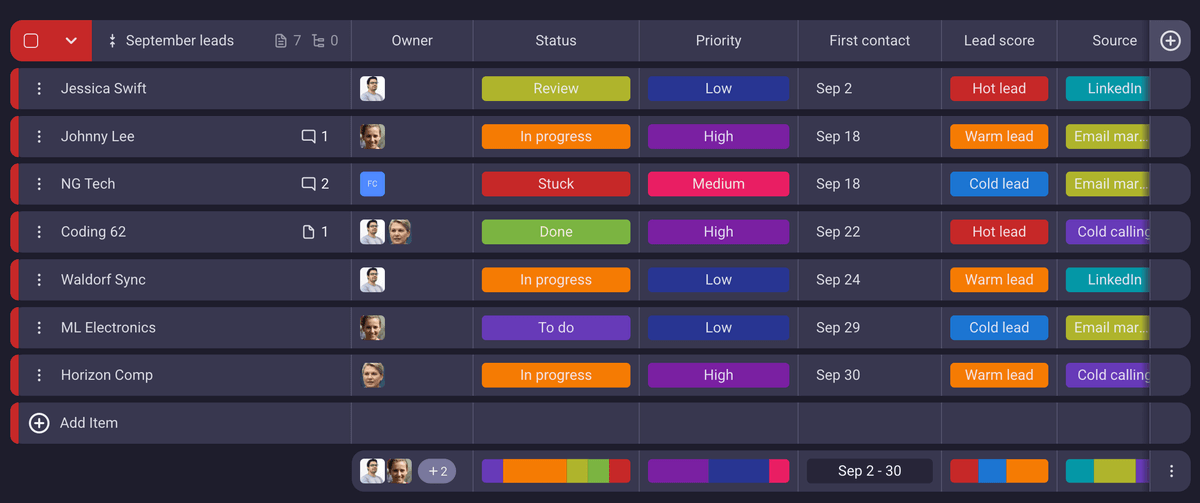
This view provides you with an easy-to-digest but comprehensive overview of tasks, and it’s the best option for detailed data entry. You can first add all the information in the table view and then generate other views based on it.
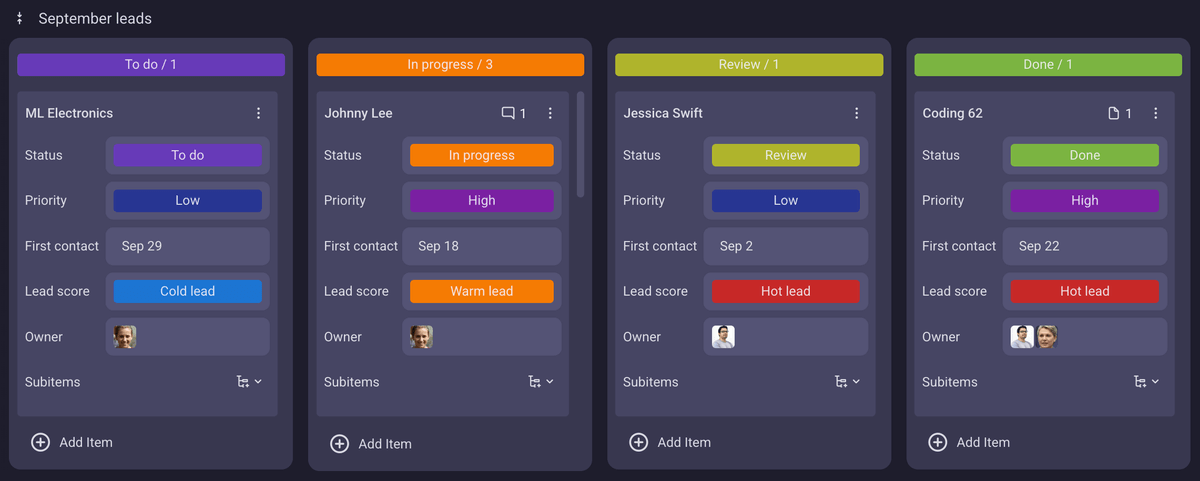
Kanban view
The Kanban view is a great option for Agile teams that need an insight into how their tasks are progressing. It’s based on the Kanban methodology, which categorizes tasks depending on their status (To do, In progress, Done).
When you generate a new Kanban view, all your items will be grouped by status.
Gantt chart view
In the Gantt view, tasks are depicted as horizontal bars on a timeline, providing clarity on task durations and the project schedule across all project phases.
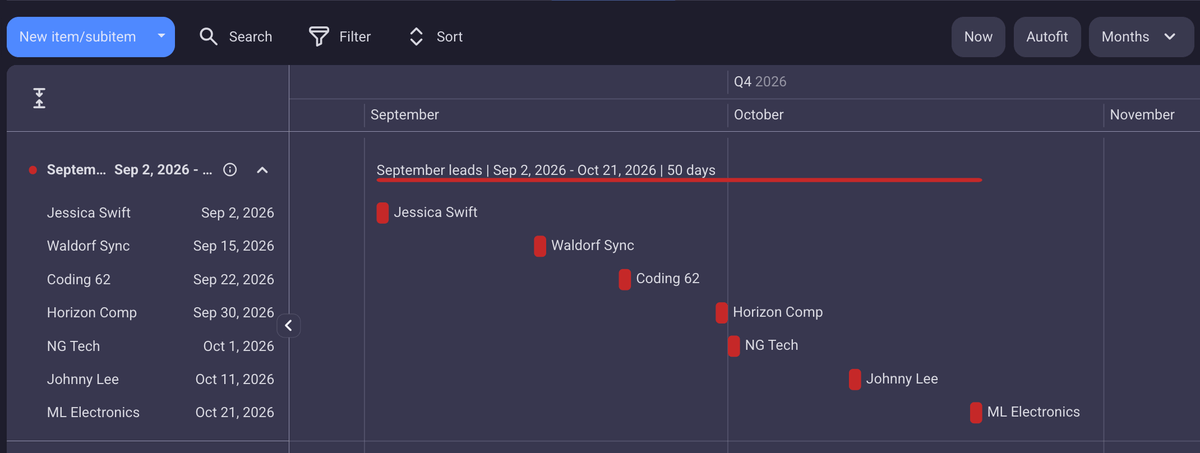
You can move the items on the timeline by drag-and-dropping them, and they will automatically rearrange to form a Waterfall composition.
💡 The Gantt chart view is available only on Plaky’s Pro and Enterprise plans.
Chart view
The Chart view makes confusing data more digestible and allows you to analyze your team’s productivity and performance.

Charts can help enhance clarity across the entire project and improve decision-making by giving you real-time insights into multiple sets of data.
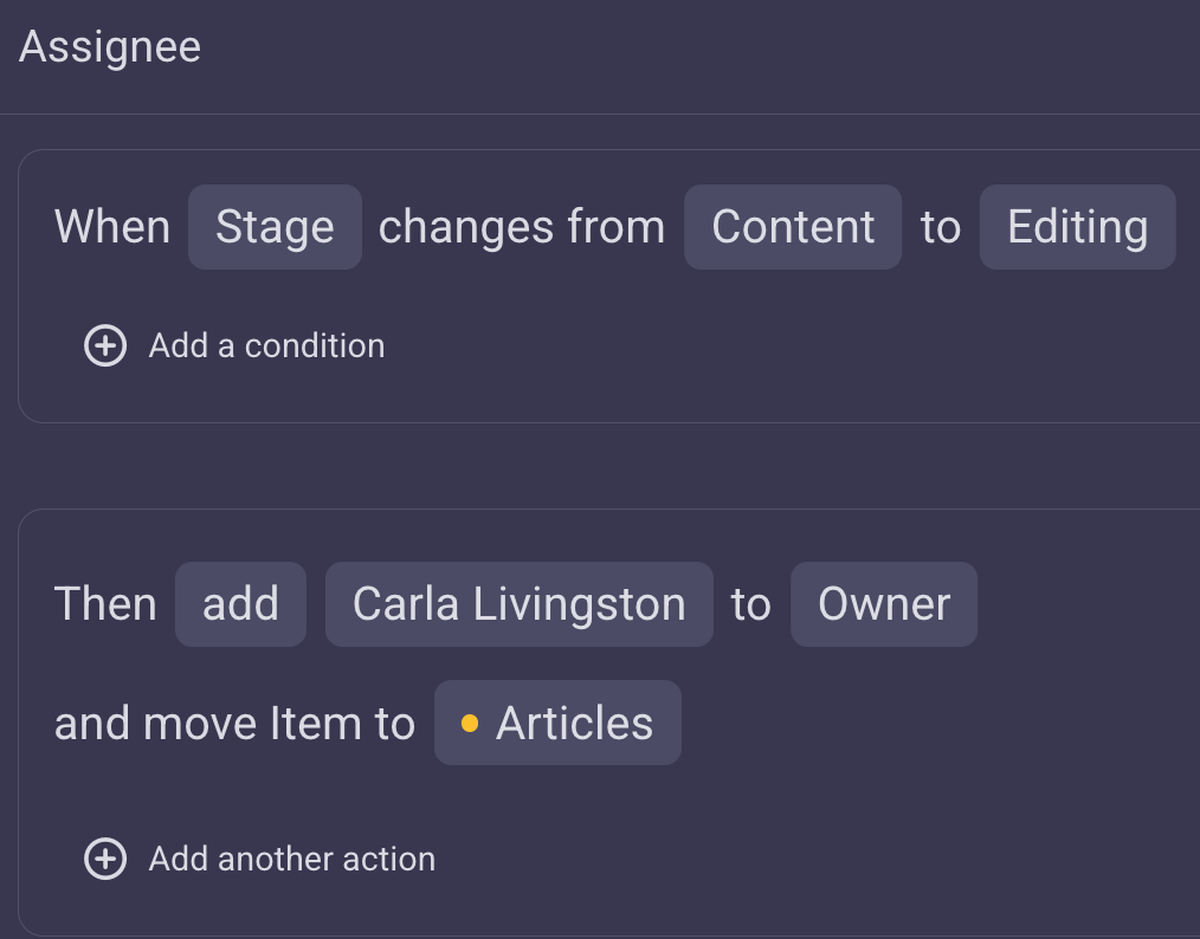
Board automations
Plaky lets your mind and fingers rest by cutting on manual work with board automations.
All you have to do is set specific triggers that will initiate certain actions once they are activated. The automations follow a simple formula:
When something happens (trigger) → Then do something automatically (action)
You can also add conditions to your automations to further ensure a trigger’s accuracy.
💡 Plaky Pro Tip
Learn how you can use board automations to build a more efficient workflow in Plaky:
Recurring tasks
The most sought after automation involves repeating certain tasks regularly. You can define how often you’d like a task to be created in Plaky, at what time, and when to stop the automation.
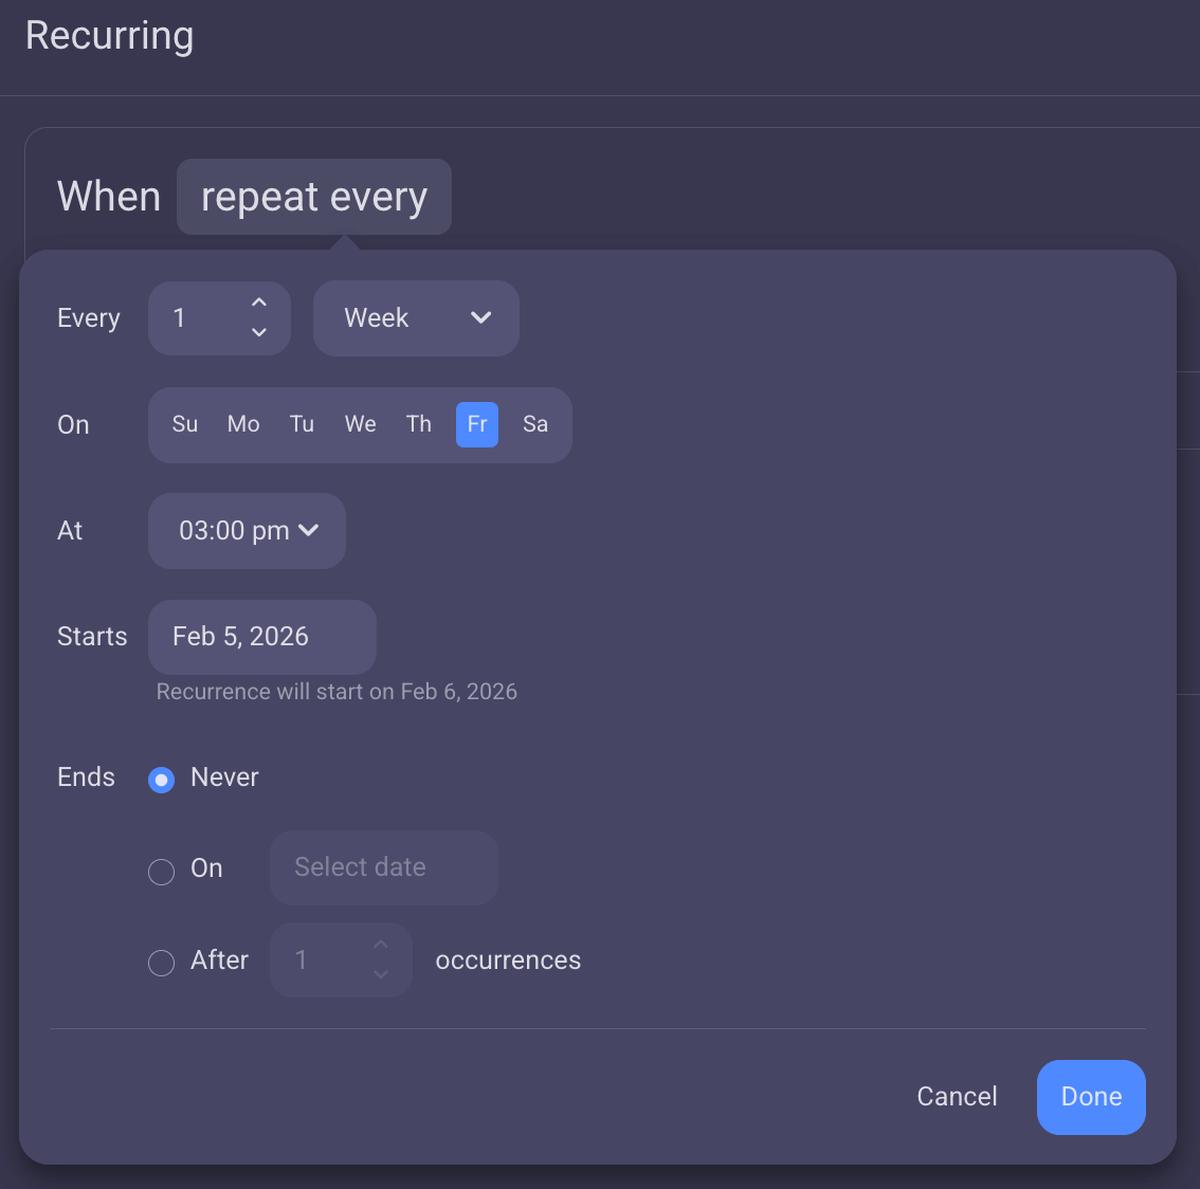
This feature is especially useful to managers who need to fill out reports every week or month. You can also use it as a sort of reminder for repetitive tasks.
💡 Plaky Pro Tip
We have even more exciting features coming up! Check out what’s in store and what the latest updates are:
Stay on schedule
Teams from industries like marketing, construction, and software development know how important it is to keep an eye on deadlines. Plaky makes sure you never miss a deadline and that your teams complete tasks on time.
Set due dates
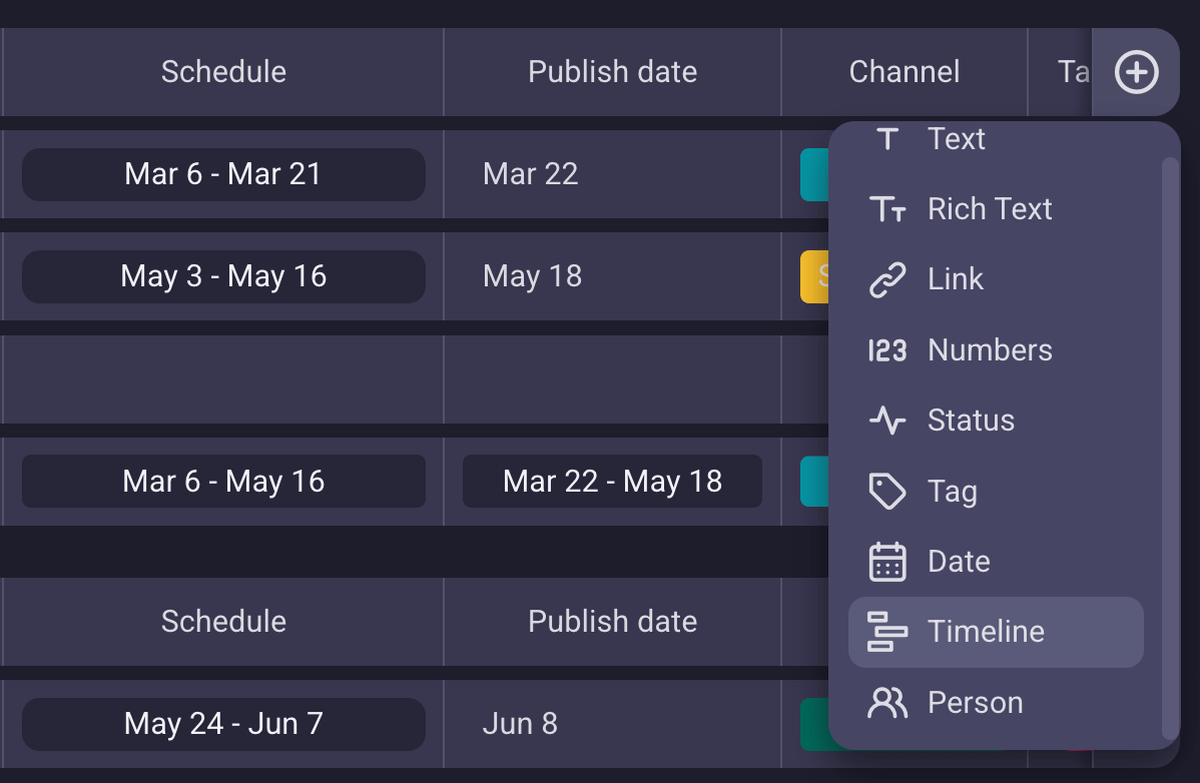
You can include deadlines in your Plaky board with custom Fields. Simply add a field and select its type:
- Date — for due dates only, or
- Timeline — when you want to include the start and end dates.
Sort & filter
When you customize your Plaky board with various fields, you’ll also be able to sort and filter data. For example, you can sort tasks by date, so that the most imminent ones are at the top of the list. Then, you can filter the board by assignee et voilà — you’ll have an overview of the workload of every individual or team.
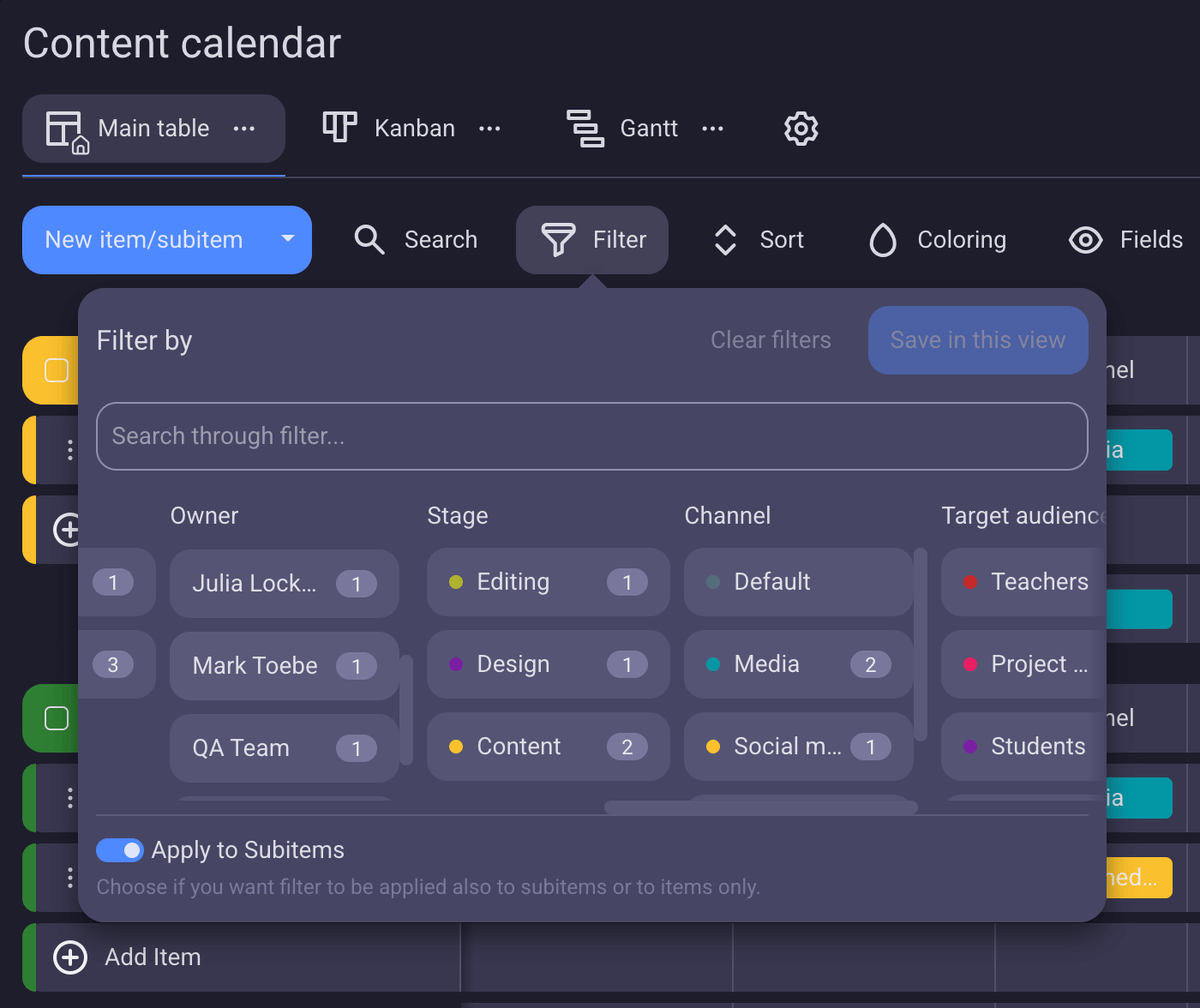
Here’s an alternate example: sort by date and filter by status. This combination will let you see if there are any assignments that should be completed soon, but their status is still “To do”. Catching delays like these early will save you from headaches later!
Conditional coloring
Sometimes, it’s best to just have visual cues that will draw your attention. When you have too many boards to manage, losing track of dates and priorities becomes almost too easy.
In Plaky, you can define conditions that will color cells or entire rows. So, when a deadline approaches, a red-colored row would immediately catch the team’s eye.
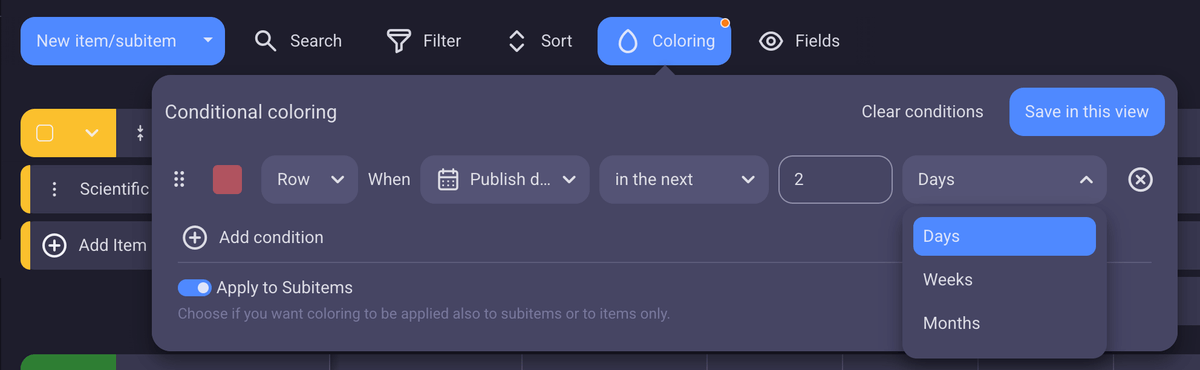
Every field you create on the Plaky board can be used to create a coloring condition. This means a row can become green when a certain person is assigned or when a link contains certain words.
Start personalizing your Plaky board today
My tasks
All the Plaky items assigned to you will appear in the My tasks section, so you never miss a task and always know what to work on next.
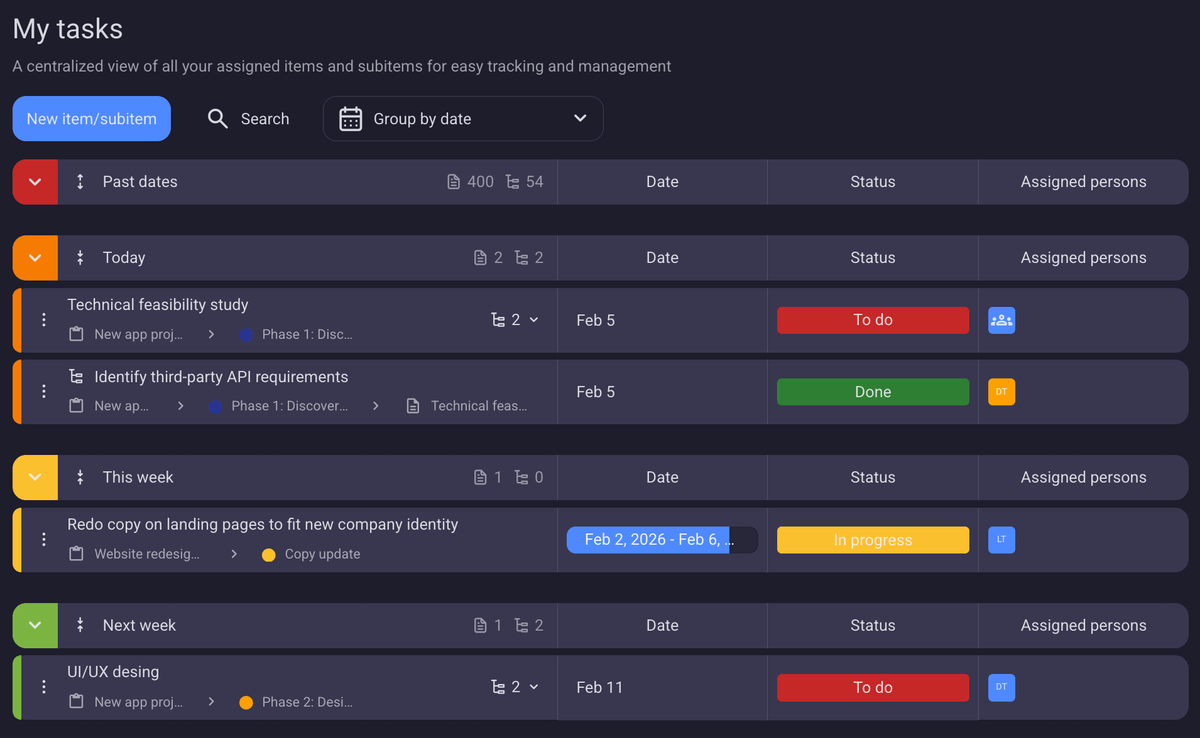
You can group your tasks by date, status, or board. If you group assignments by date, you’ll know what your priorities are without having to check twice.
Invite team members and clients
Even freelancers and micro companies collaborate with clients or have different teams on board. The best way to organize communication and updates is to keep everyone in the same app.
In Plaky, you can decide which permissions and restrictions you’d like to apply to each person that you include in your account.
Specifically, these are the 3 user roles you can assign in Plaky:
- Admin — has all account permissions available,
- Member — can create and edit boards and items, add comments, and invite users, and
- Viewer — can view board contents.
💡 Viewer roles are only available on Plaky’s paid plans.
Additionally, it’s possible to include or exclude people from certain workspaces by assigning:
- Space permissions, and
- Board permissions.
Collaborate with teams
Remote teams and multinational companies know best that you need the right tools if you want to keep the business running. Unfortunately, many teams get caught up in too many apps and scattered information.
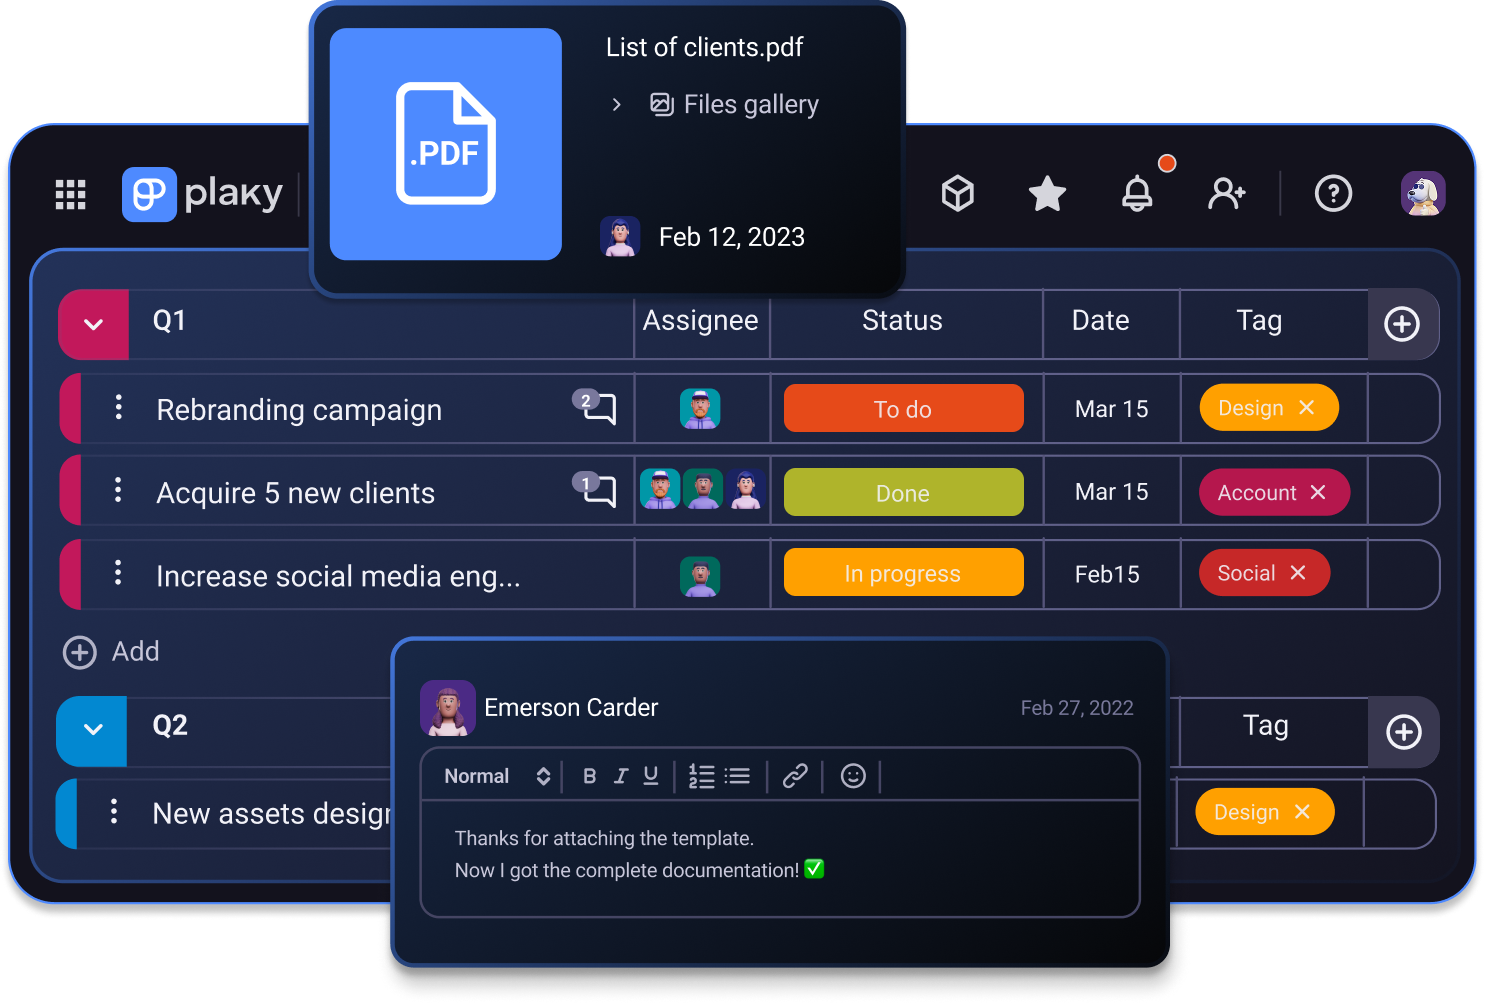
Comments
We all know how annoying it is to compose emails that start with “Regarding the matter of…” or summon meetings with “Remember that task…”. You can stop wasting time on briefing people and start sharing updates where tasks are neatly split and described.
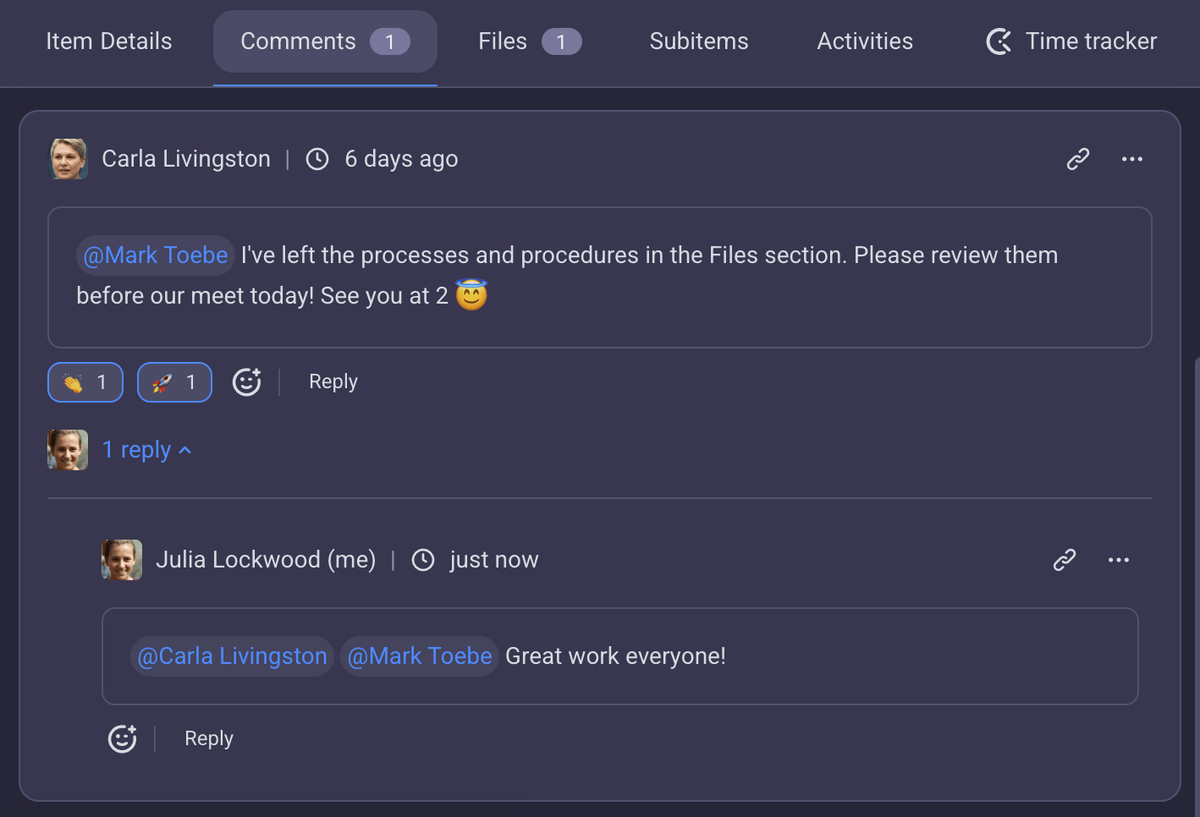
Every item and subitem in Plaky have a comment section where you can @mention individuals or teams. Keep the conversation going with dynamic comment threads where team members can respond to updates and react using emojis.
Finally, you won’t have to attend meetings that could have been a single comment or reaction in Plaky.
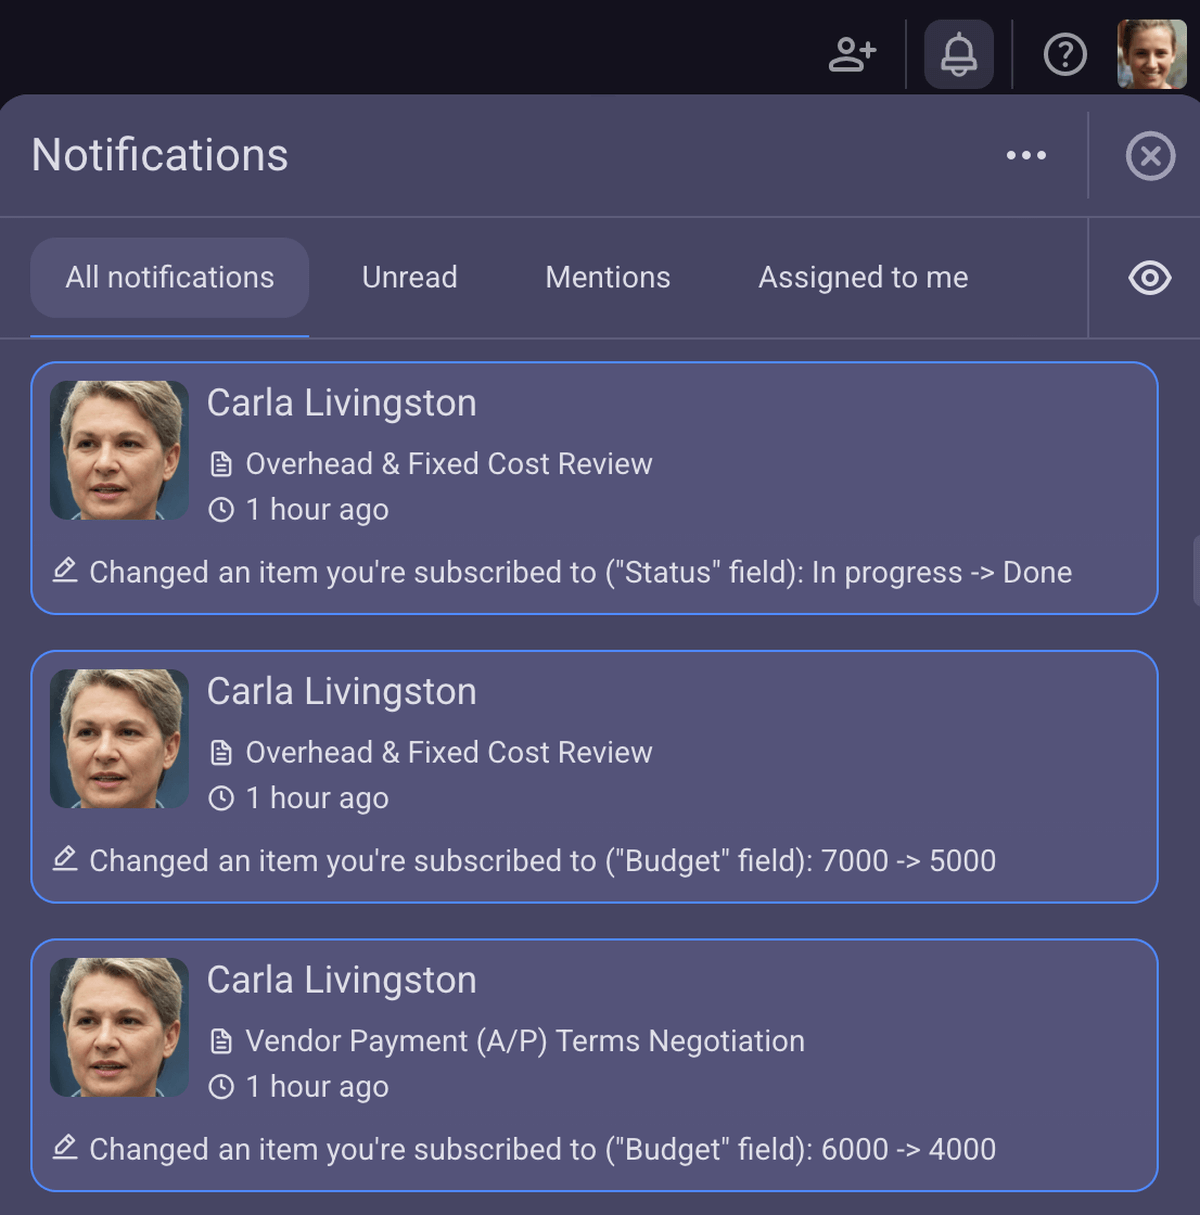
Notifications
Why would you hop on a quick call when you can get real-time notifications in Plaky? If you’re subscribed to an item, you’ll be notified whenever there’s a change to any of its elements.
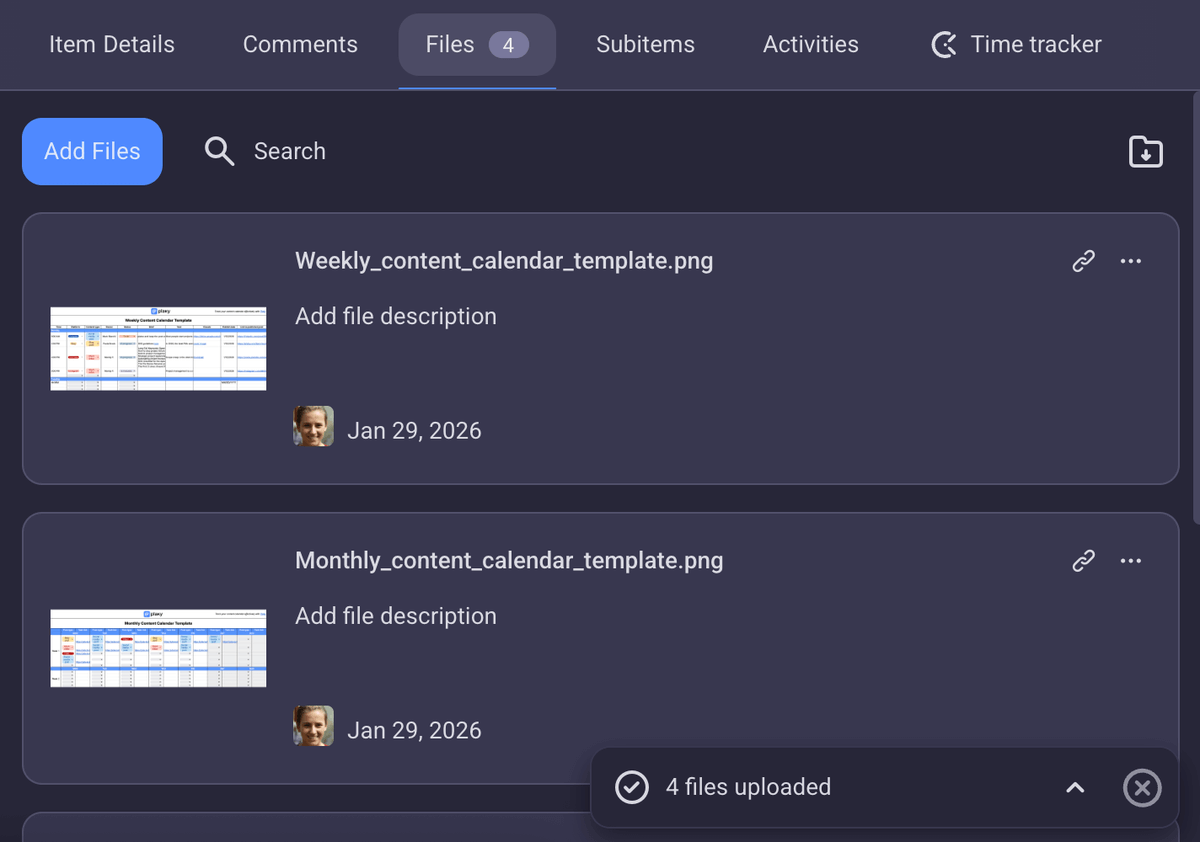
Files
Almost every industry relies on a vast number of documents, images, and files, but they also often end up lost or misplaced.
Plaky lets you attach files to each item, becoming your very own centralized information hub where nothing falls through the cracks — and all data is readily available at all times.
Track progress
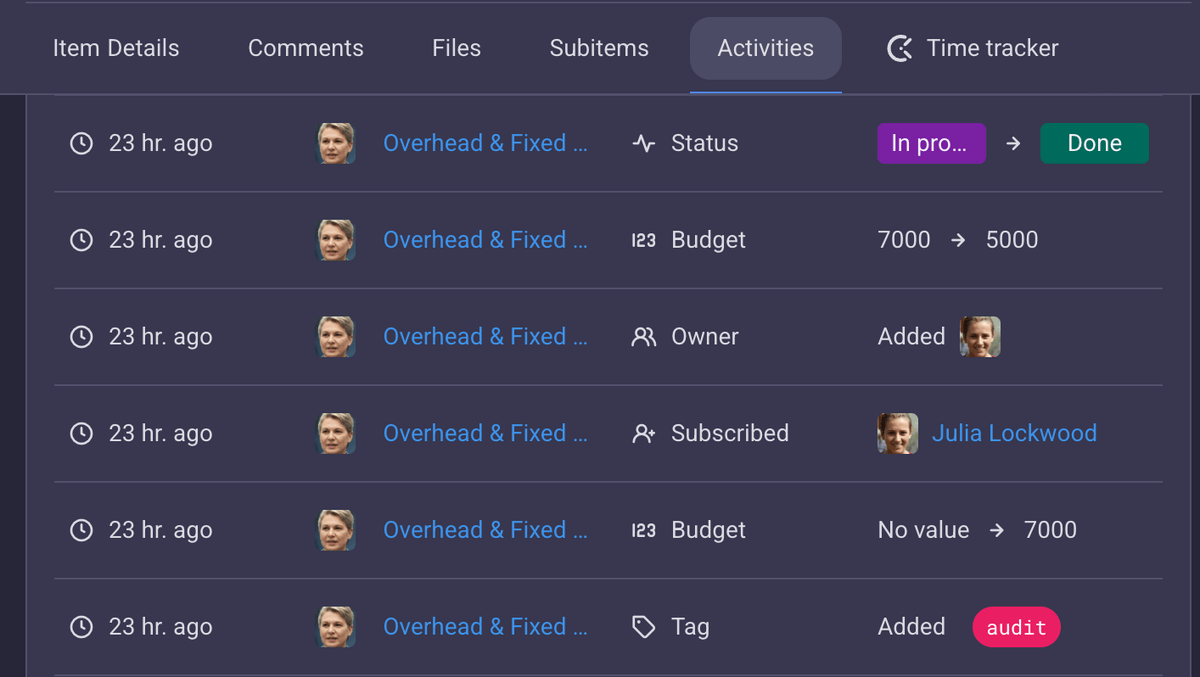
When multiple teams work on multiple projects, it’s easy to lose sight of who did what, when, and what’s the overall status. In Plaky, you can track every change made on boards and items as well as check the status of each field.
Activity log
Plaky offers 3 types of activity logs:
- Board activity log — shows the most recent changes made to a board (recently subscribed team members, deleted items, etc.),
- Item activity log — displays recent item changes (changed statuses, deadlines, assignees, etc.), and
- Last seen — shows which team members were recently active and how long ago.
Start your 7-day free Plaky trial now
Summary row
When you set up custom Fields for your Plaky board, you can also customize their summary row. This feature works best for financial data, but it will also show you how many tasks in an item group are in progress and how many are done.
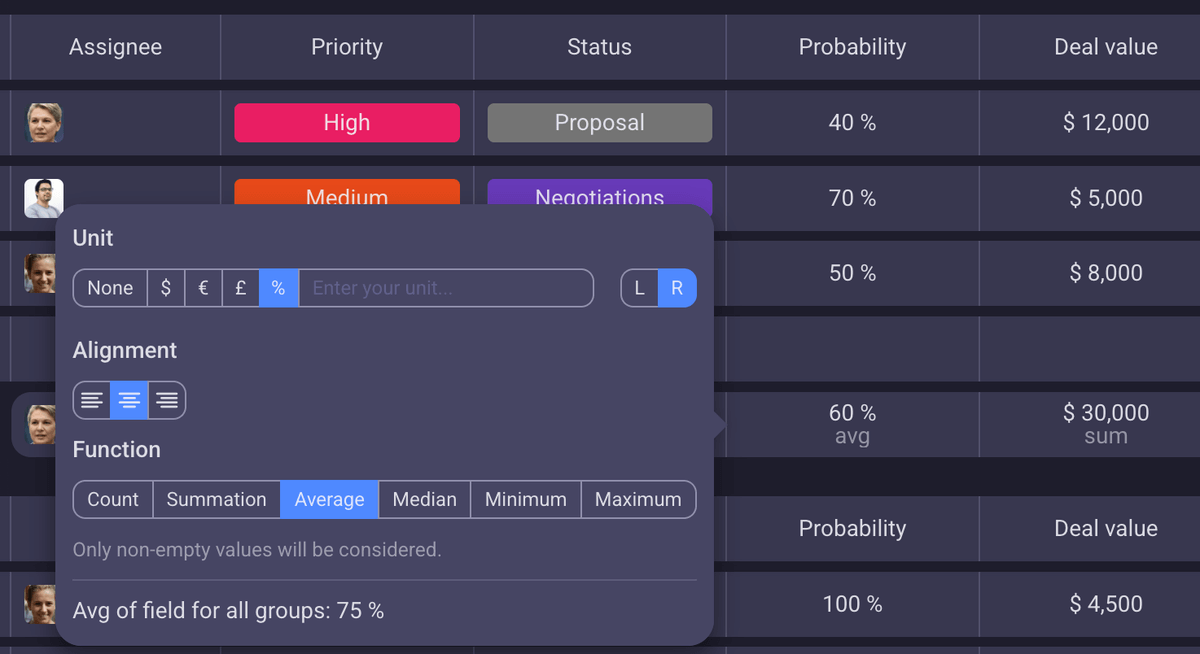
With a simple glance, you’ll be able to get a quick snapshot that gives you totals, averages, or crucial data points so that you can instantly see how things are going and make smarter decisions on the fly.

Integrate Plaky with Clockify and Pumble by CAKE.com
If you need a time tracking tool and an app where you can chat with colleagues, you’re in luck as the CAKE.com Suite includes Plaky, Pumble, and Clockify. All 3 apps are integrated and you can use them as an all-in-1 work hub.
Chat and get alerts
Pumble is a communication app that lets you chat and collaborate with your teams every day. When you activate the Pumble + Plaky integration, you’ll receive notifications when items change in Plaky.
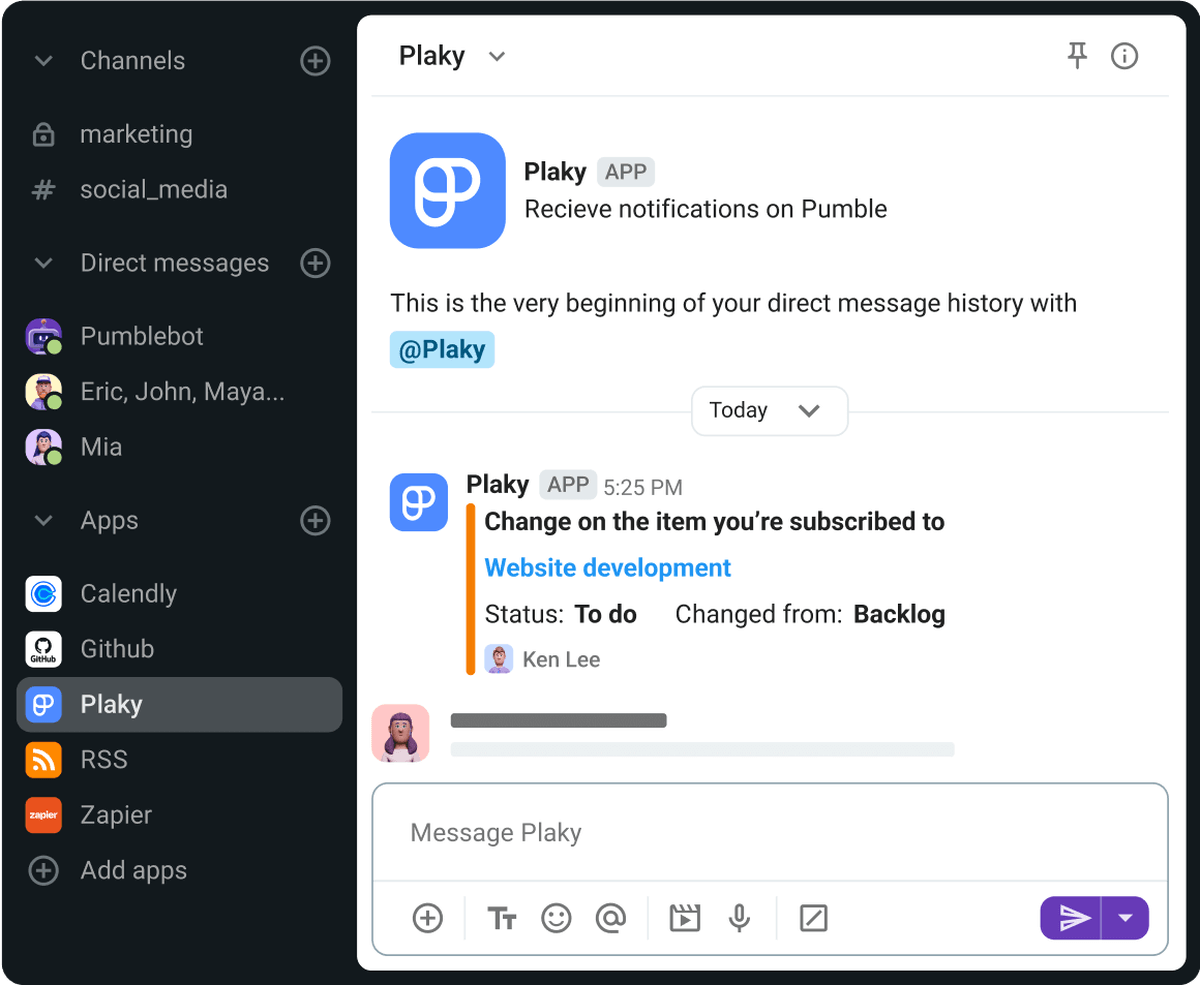
Of course, you don’t have to be swarmed with notifications, as the integration allows you to customize the settings. The goal is to stay updated and in touch with the team.
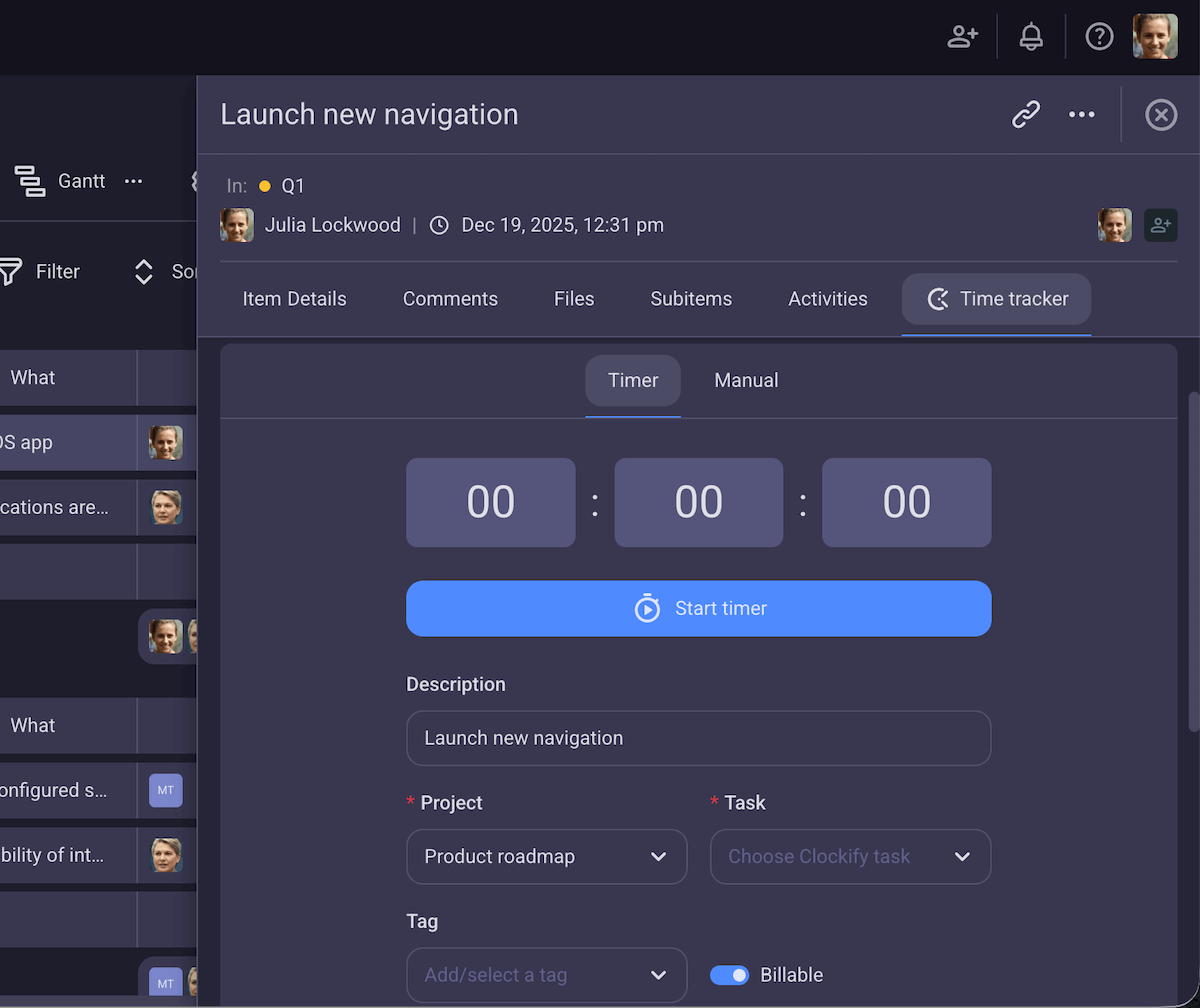
Track time on boards and items
No more random stopwatches and third-party apps — with the Plaky + Clockify integration, you can track time on your tasks and get paid for every billable hour you spent working on a project.
💡 Plaky Pro Tip
Discover more details about time tracking in Plaky:

FAQ about getting started with Plaky by CAKE.com
We hope this guide was detailed enough to help you start managing projects in Plaky. If you still have questions, contact us or check this FAQ first.
Is Plaky a good free alternative to PM tools like Trello, Asana, monday.com?
Plaky by CAKE.com is a great alternative to every popular task management tool you’ve heard of. Its free plan is more than generous, and the paid plans are far more affordable. Don’t believe us? We’ve done some thorough research that you can read here:
- Plaky vs Trello: Which One Should You Pick?
- Plaky vs Asana: Which Tool Is Better for You in 2025?
- Plaky vs monday.com — How Do They Compare?
How do I get started with Plaky quickly?
You can set up a Plaky board in 15 minutes or less, depending on how detailed you want it to be. Get started by creating:
- Your Plaky account,
- Your first Space,
- A project board from scratch or a template, and
- A list of items.
You can also invite your team on board at any time and start collaborating right away.
Is Plaky easy for my non-technical team members to learn?
Plaky’s interface is as simple as it gets, and teams don’t need any specific qualifications to start using it. There are no complicated workflows, hidden options, or hours of tutorials you need to go through before starting using Plaky. But if you do want to watch tutorials, head over to Plaky’s YouTube channel!
Can Plaky handle my specific workflow (e.g., a content calendar, an agile sprint, a client onboarding process)?
Plaky’s versatility can handle the requirements of any industry easily. As a matter of fact, you can even use pre-made templates we already made to save time:
How is Plaky different from just using a shared spreadsheet?
Shared spreadsheets are great for collecting and sorting data, but they lack the collaborative elements Plaky has. No matter how hard you try to organize a sheet, it won’t provide an overview of your project’s progress, or a space to communicate with your team.
Plaky’s board views, item comments, file sharing options, custom Fields, and real-time notifications go well beyond a glorified spreadsheet.
Start organizing your projects in Plaky by CAKE.com today
No matter how complex your projects are and how many teams you need to handle, Plaky can turn a stressful avalanche into manageable items.
Here’s a video guide to Plaky’s features to help you get started:
Create your Plaky account today and start a free 7-day trial!
Get started with Plaky by CAKE.com
How we reviewed this post: Our writers & editors monitor the posts and update them when new information becomes available, to keep them fresh and relevant.