Updated: November 13, 2025
 When your company grows, so does the complexity of managing work and communication. If you let tasks, updates, and files live scattered across endless tools with every team following their own approach, chaos becomes the norm.
A strong organizational tool like Plaky fixes that by creating a neat, scalable hierarchy. When all the levels have a clear purpose, it’s easier to keep your teams aligned and your projects on the right track.
Whether you’re a new or seasoned Plaky user, this article will help you get the most out of the platform’s hierarchy and view styles. Let’s dive in!

Understanding Plaky’s building blocks
Before jumping into the practical side of setting everything up, let’s take a moment to clearly define Plaky’s organizational layers.
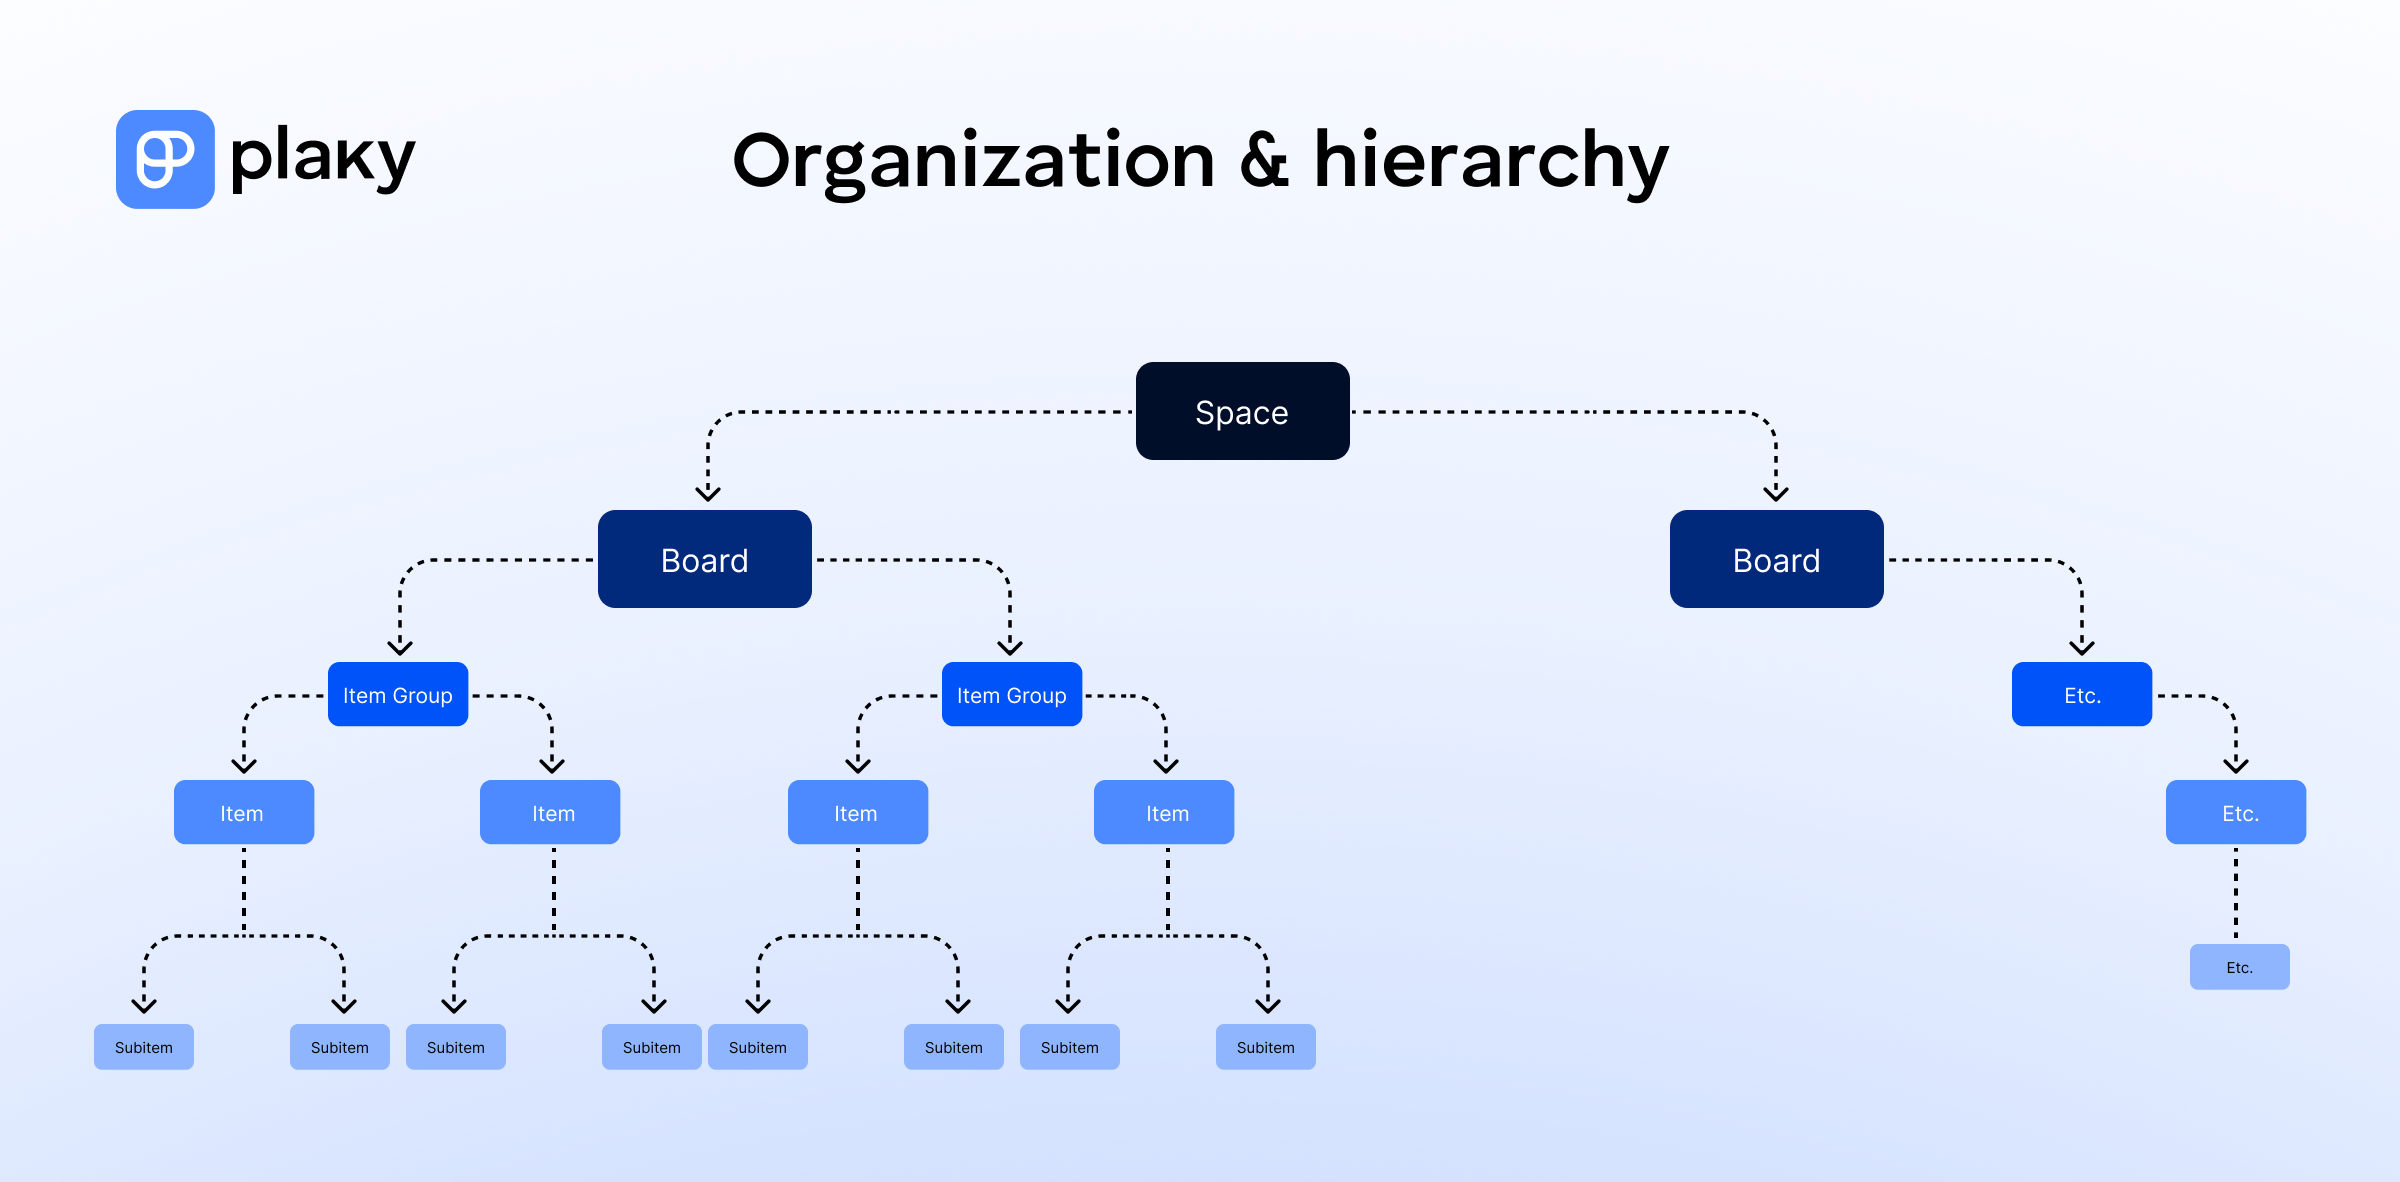
- Space — This is the highest layer, designed for broad areas such as a department, team, or large project group. A space is your overall home base, keeping everything neatly contained and easy to navigate.
- Board — A board is where the real work happens. Think of it as a blank canvas for managing workflows or projects, fully customizable to match your processes.
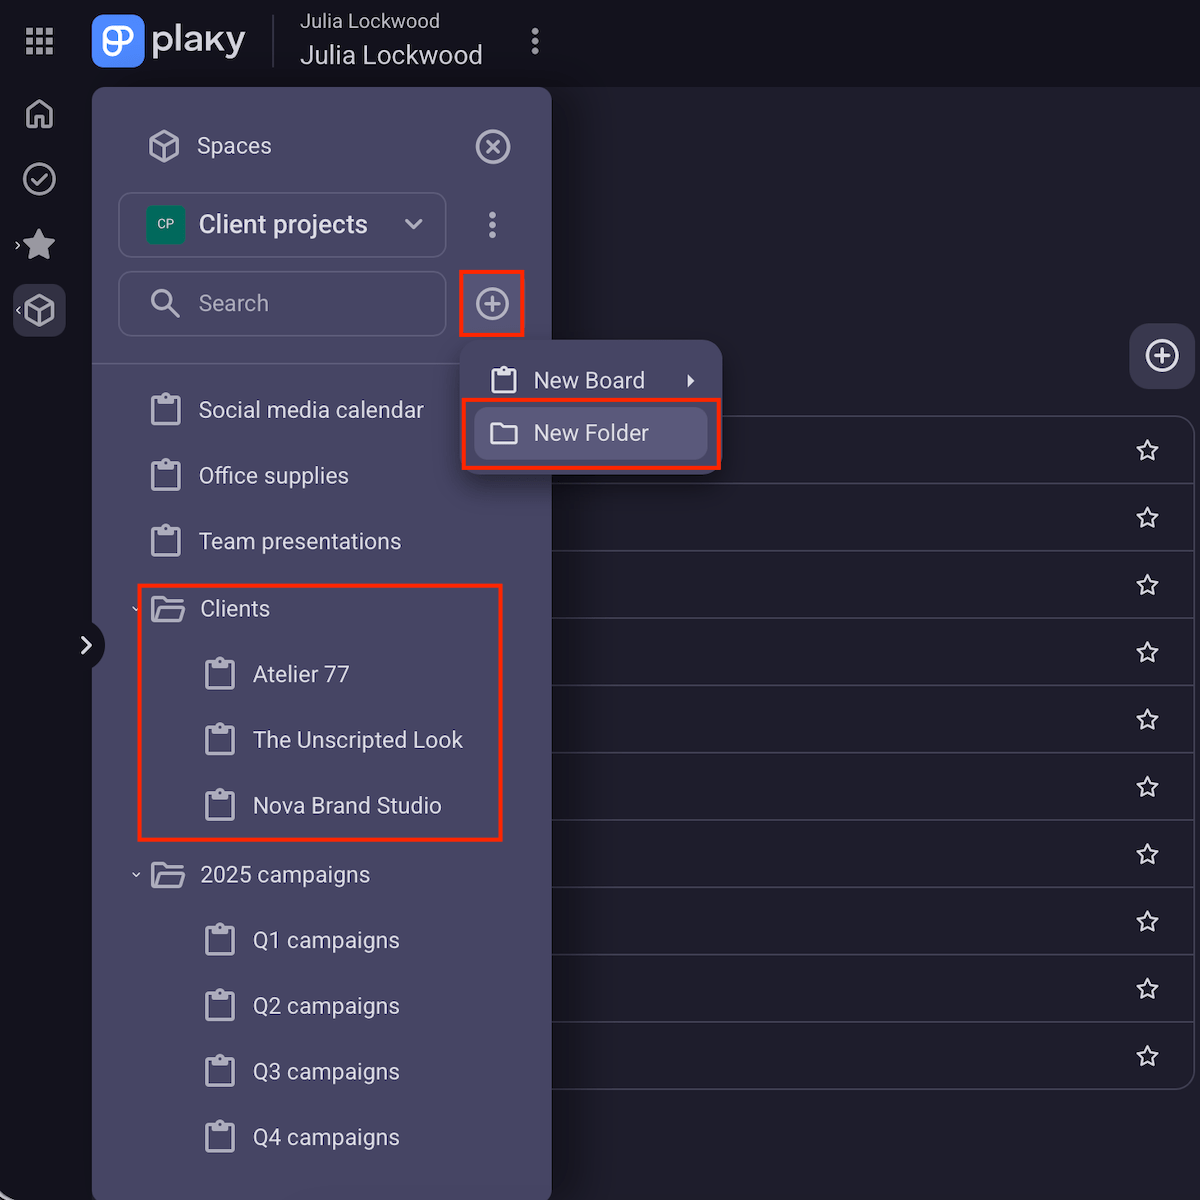
- Folder — Folders are optional but incredibly useful for keeping related boards together. For instance, you might create a folder for each product line or each quarter.
- Group — Groups are color-coded sections within a board that help you organize work items by category, phase, or any logic that fits your team.
- Item — Each item represents a single task, deliverable, or other work unit. So, items are the backbone of your board — what you actually assign and track.
- Subitem — Subitems break an item into smaller, actionable steps, perfect for detailing all the moving parts within a bigger task without cluttering the main view.
How to set up an efficient structure in Plaky in 7 steps
You can apply the logic behind Plaky’s structure in virtually any industry, most notably IT, advertising, sales, construction, HR, to name a few.
However, to make the following steps more concrete, I’ll use an example of a marketing agency with multiple clients and campaigns in my explanations and/or accompanying screenshots.
Here’s how to keep your work transparent and organized in Plaky!
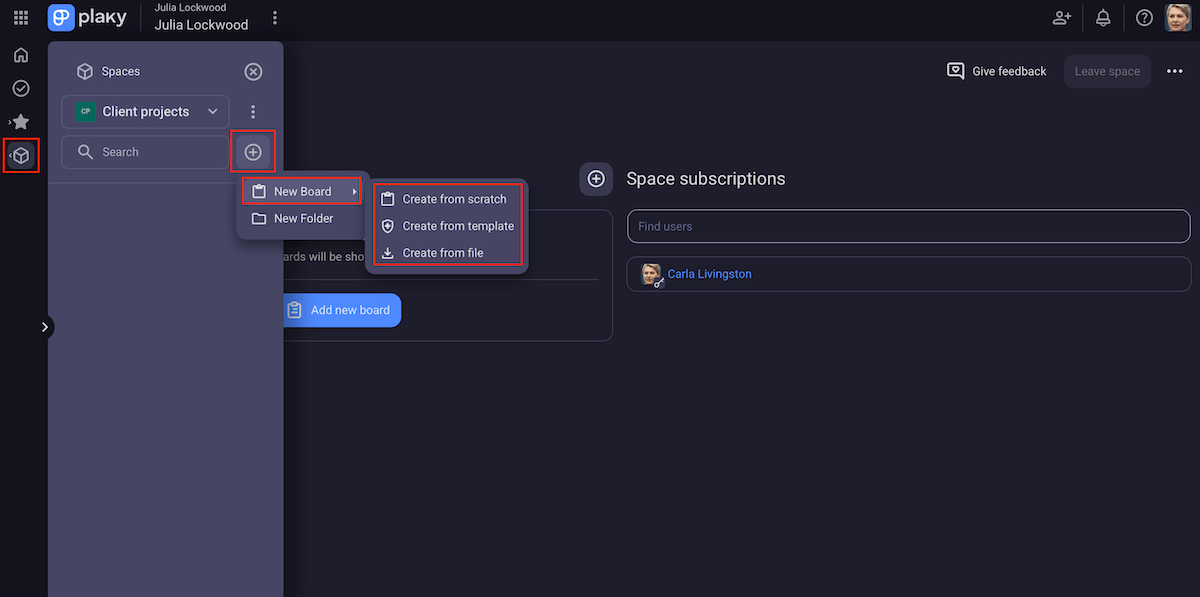
#1 Create your space(s)
Depending on your organization’s size and way of working, you may decide to create a single space or multiple ones.
If there’s only 1 team or all the teams work closely together, having a single space in Plaky ensures easy access without switching context.
On the other hand, for a company with several distinct departments or services operating more independently, it makes sense to have multiple spaces. This way, you maintain focus and prevent clutter.
Let’s consider our marketing agency example. As a growing business, it’s more practical to structure work into a few spaces such as:
- Client projects — for managing all client campaigns and deliverables,
- Internal operations — for finance, HR, resource planning, and the agency’s own marketing, and
- Business development — for tracking leads, proposals, and partnerships.
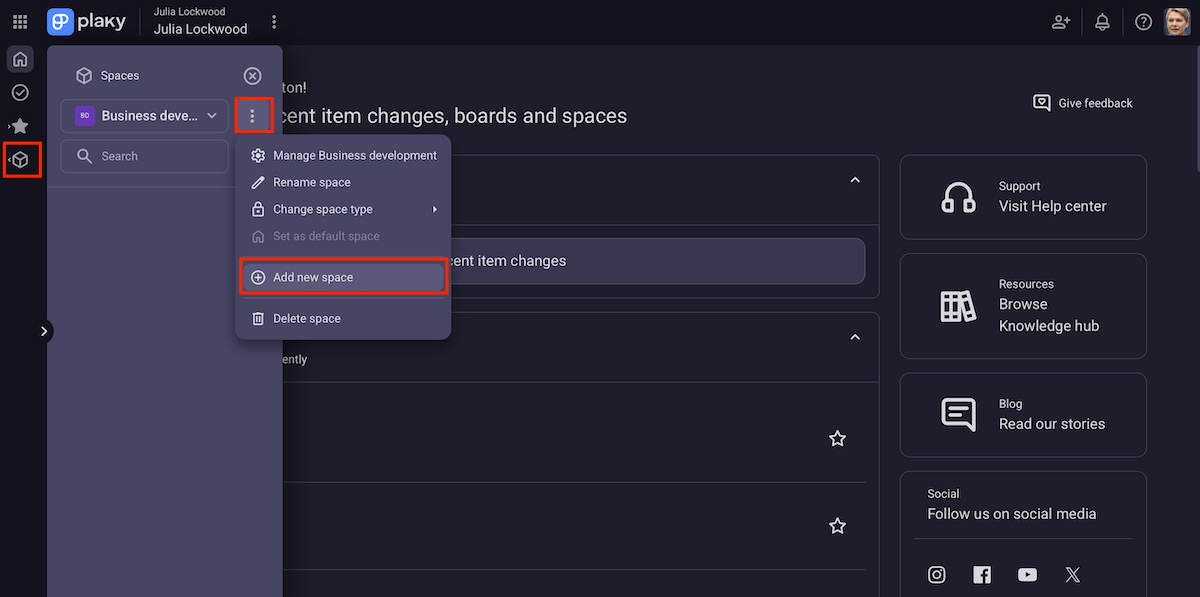
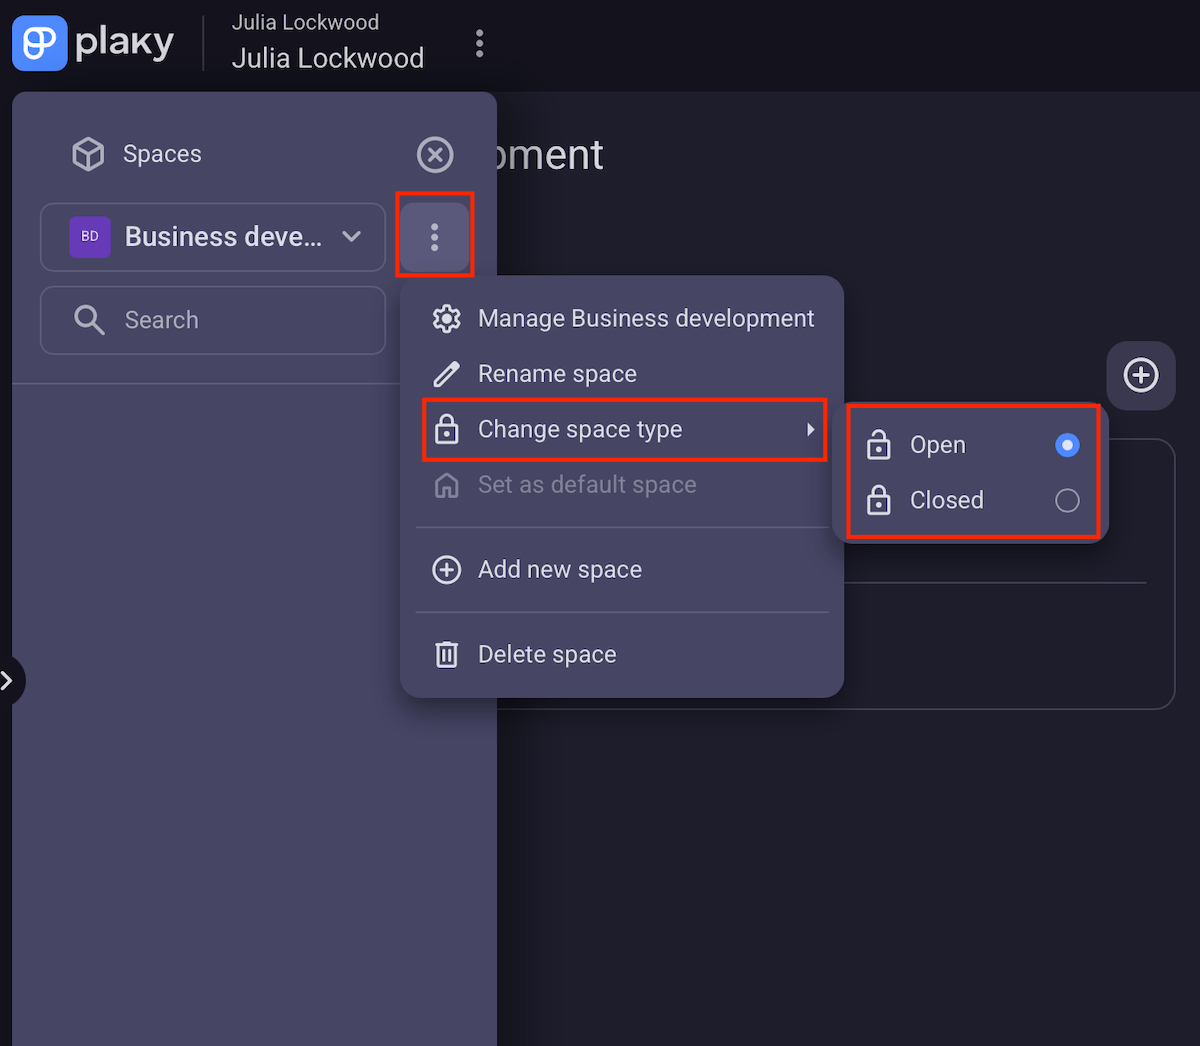
Of course, the administrator can share each space with colleagues. An important remark here is that Plaky supports different space permissions, so there are:
- Open spaces — where any team member can join and have access to the space’s content, and
- Closed spaces — where team members get access through an invite or request to join.
So, open spaces are great for collaborative projects or cross-functional teams, while closed spaces are best for sensitive data and personal organization.
#2 Add boards for each project or workflow
Then, you need to populate your space(s) with Plaky boards. Each board is a visual area where you plan, track, and manage work from start to finish — specific projects, clients, or processes.
There are 3 ways to create a board in Plaky:
- From scratch — a blank slate giving you full control over what to add and how to order and color-code it,
- From templates — a selection of pre-built Plaky boards to save setup time (but you can still customize them to fit your needs), and
- From CSV files — importing CSV data into Plaky when transitioning from another tool to avoid manual data migration.
The marketing agency from our illustrative example could use any of these methods to make a board for each client and campaign, various content calendars, and more.
All in all, this setup allows for easier oversight and cleaner reporting.
Templates for every team in Plaky
Similarly to spaces, there are different board permissions in Plaky as well. This refers to:
- Board viewing types — Make your boards public or private. Content in public boards is visible to everyone in your organization, while private boards are visible only to board owners and team members invited to join.
- Board editing types — Decide if a member can edit everything (board structure, settings, and content), edit content (make changes to content, but not settings and permissions), or only view the board and add comments/files.
This guarantees security and prevents accidental/unauthorized changes without slowing down teamwork.

💡 Plaky Pro Tip:
If you’re migrating to Plaky from one of these platforms, check out our detailed guides:
#3 Arrange related boards into folders (optional)
Folders in Plaky are optional but handy for keeping related projects neatly grouped. This is particularly practical when your workspace starts to grow and you need a way to categorize boards without overwhelming the main view.
For instance, you may make folders for:
- Departments (e.g., operations, sales, marketing),
- Time periods (e.g., Q1 initiatives, 2025 projects),
- Clients or products (e.g., multiple active boards),
- Project types (e.g., product development, events, campaigns), and so on.
This also stands for our marketing agency example, where it might be useful to group boards like Social media, Paid ads, and Email marketing into a Q4 campaigns folder, let’s say, or have a folder gathering all client boards in one place.
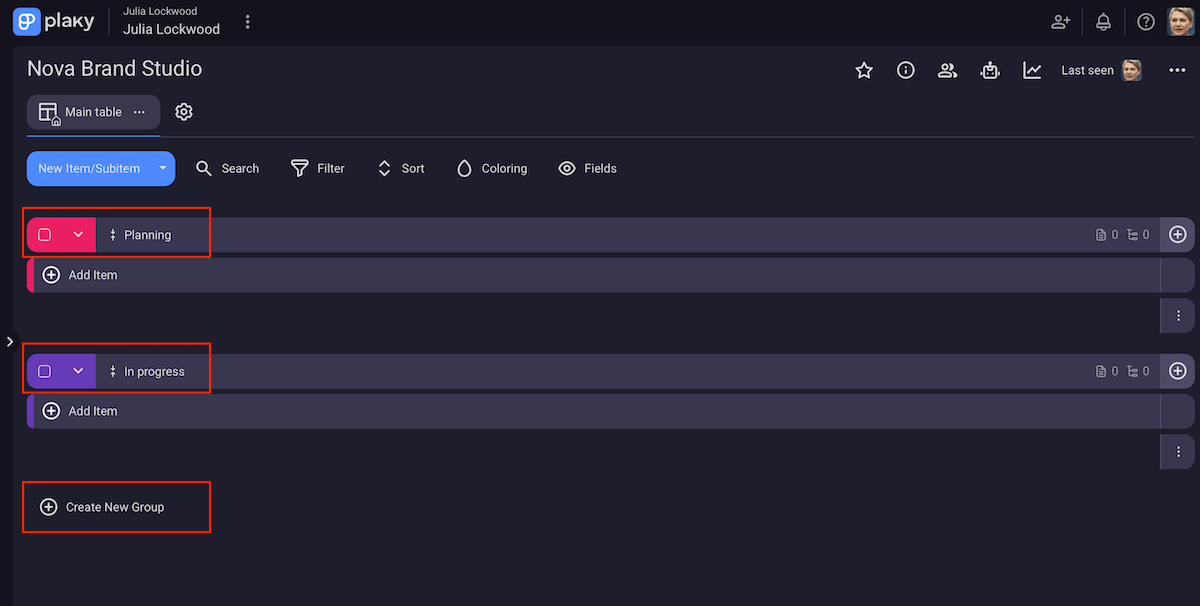
#4 Organize your boards with groups
In each Plaky board, you can create subsections that make sense for your workflow to better understand what’s going on at a glance.
For every group, you decide its name and representative color. Groups can reflect:
- Project/task stages (Planning, In progress, Done),
- Time frames (Weekly Sprints, Q1, Q2),
- Teams or clients, etc.
This flexibility means every board represents how your team actually works, helping you track progress and spot bottlenecks faster.
#5 Add items to track work
By adding items to Plaky boards, you note down your actionable tasks or deliverables — essentially, anything you need to complete, monitor, or assign.
Of course, simply listing items isn’t detailed enough, so Plaky offers custom fields, which basically serve as columns specifying the following:
- (Rich) text — descriptions, notes, summaries,
- Link — URLs to external resources (e.g., live documents, client websites),
- Numbers — budgets, counts, hours worked,
- Status — color-coded status fields like To do, Ongoing, Completed,
- Date — deadlines and milestones,
- Person — task owners, and more.
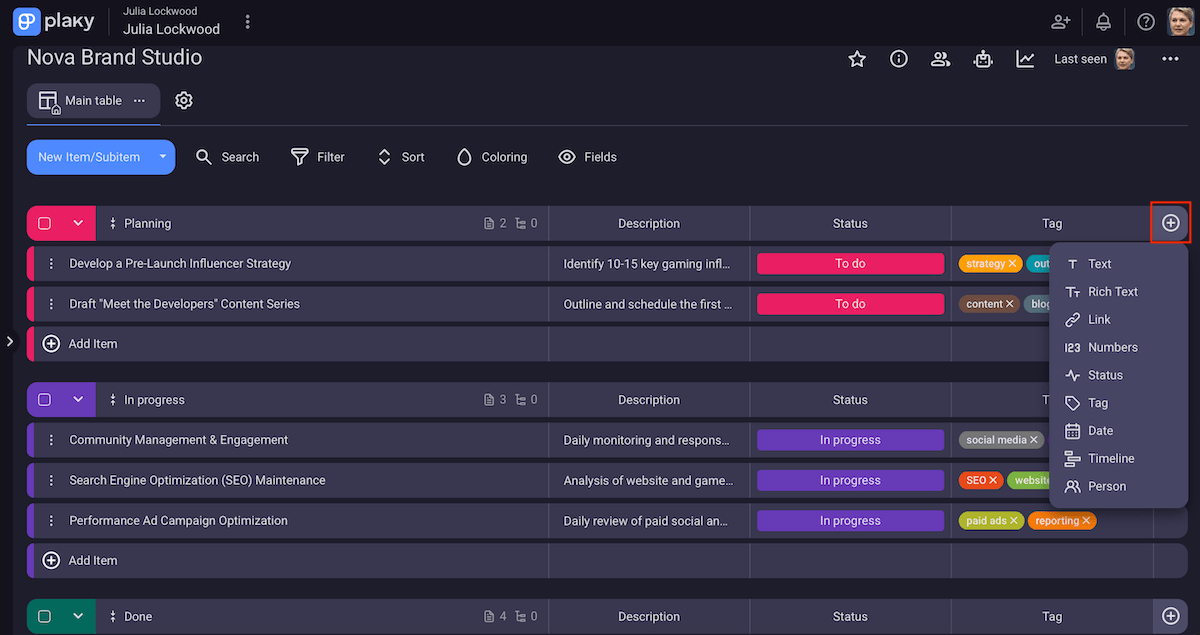
Together, these fields transform a simple to-do list into a rich work system with standardized terminology, giving each task the context and flexibility your team needs.
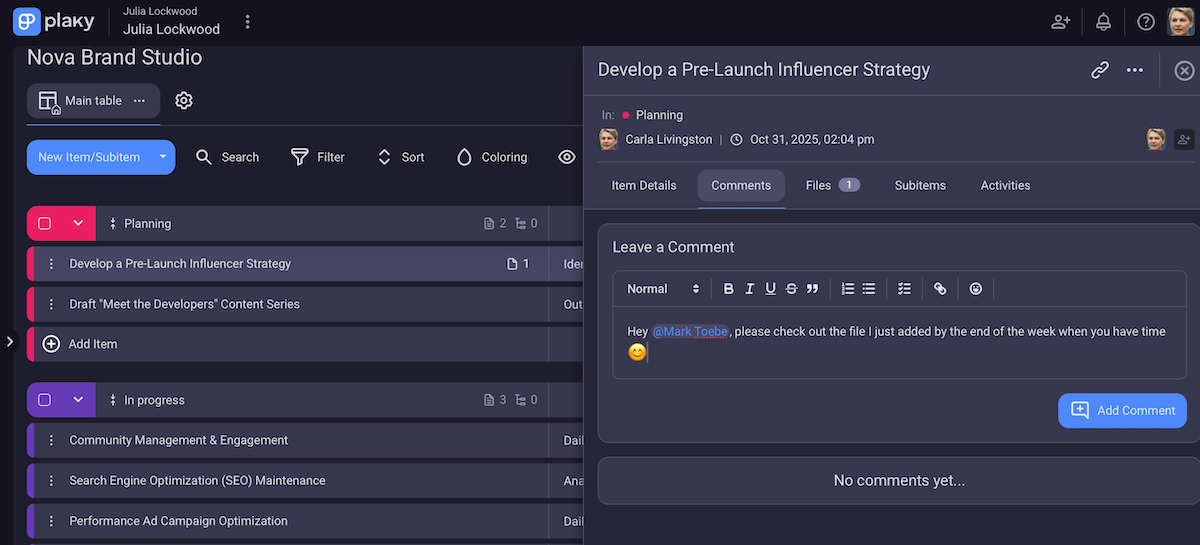
Moreover, when you click on a Plaky item, the full item card appears in the right part of the screen. The card shows not only the details specified in its fields, but also:
- Comments — Instead of chasing messages in emails or chats, exchange feedback and ideas in Plaky.
- Files — Store reports, briefs, images, and other kinds of files directly on the related item to always have the latest version on hand.
- Subitems — Have each substep tied to the main goal for full clarity on progress (more on this in the following section).
- Activities — Look at the chronological record of all changes — who made which update on the platform and when. This helps you catch mistakes or backtrack if needed.
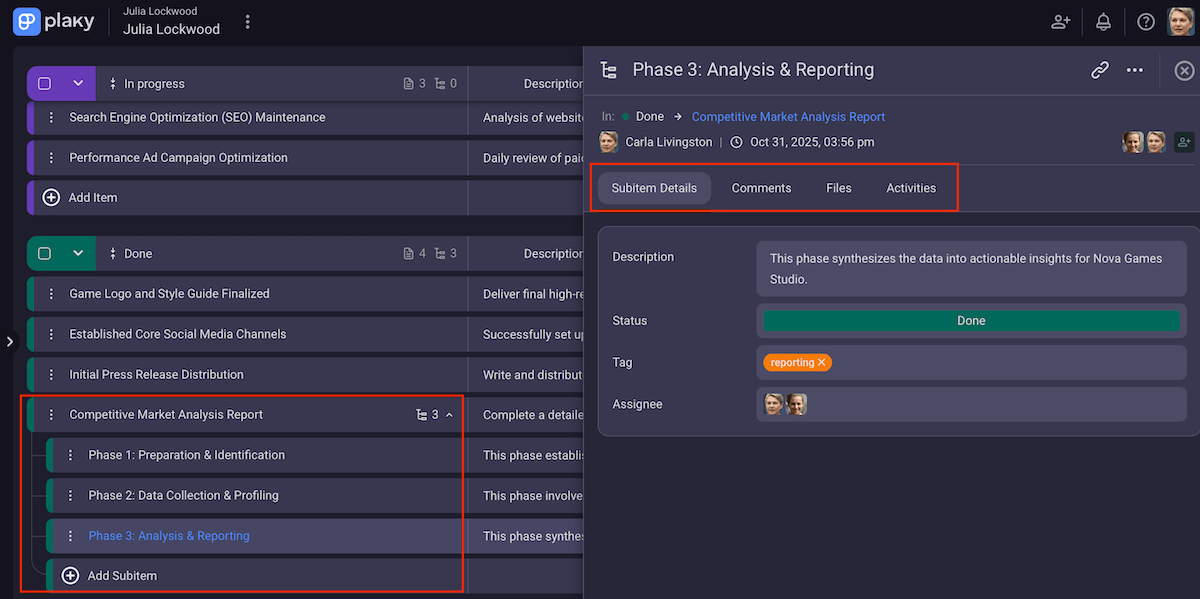
#6 Break down complex tasks with subitems
Bigger tasks are always easier to tackle when segmented into several digestible steps. Sometimes those smaller chunks are even assigned to different team members, which adds a layer of complexity.
Plaky simplifies all that by offering subitems. They inherit the same custom fields their parent items have, and there are also subitem-level comments, files, and activities.
So, this feature enables you to delegate clearly and monitor progress with precision.
#7 Review and refine as needed
As your company and projects evolve, you should revisit your structure in Plaky by:
- Adding new boards and folders,
- Deleting outdated folders, boards, and items,
- Updating space/board permissions to account for new team structures,
- Refining naming conventions,
- Tweaking board automations if used, and so on.
In addition to the fact that most elements can be dragged and dropped, I’d like to mention the convenience of bulk actions. Updating multiple items at once saves time and reduces manual errors.
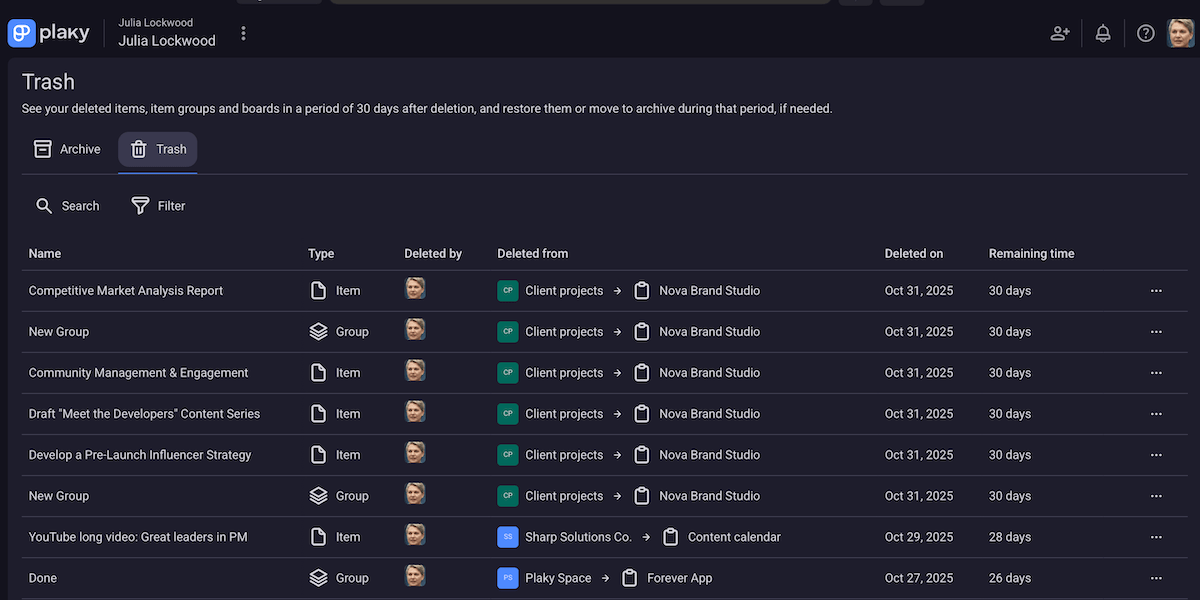
Another perk: Plaky’s trash section retains everything you deleted for 30 days. So, if you delete something accidentally or simply change your mind, there’s time to recover it.
All these features make it easy to refine workflows and scale efficiently as your team and client base grow.
Board views in Plaky
All the hierarchy levels we defined become even more powerful when combined with Plaky’s different board views. Instead of just listing tasks, our platform lets you visualize your work in the way that makes the most sense to you.
Here’s how the same boards and data can be understood from different angles in Plaky.
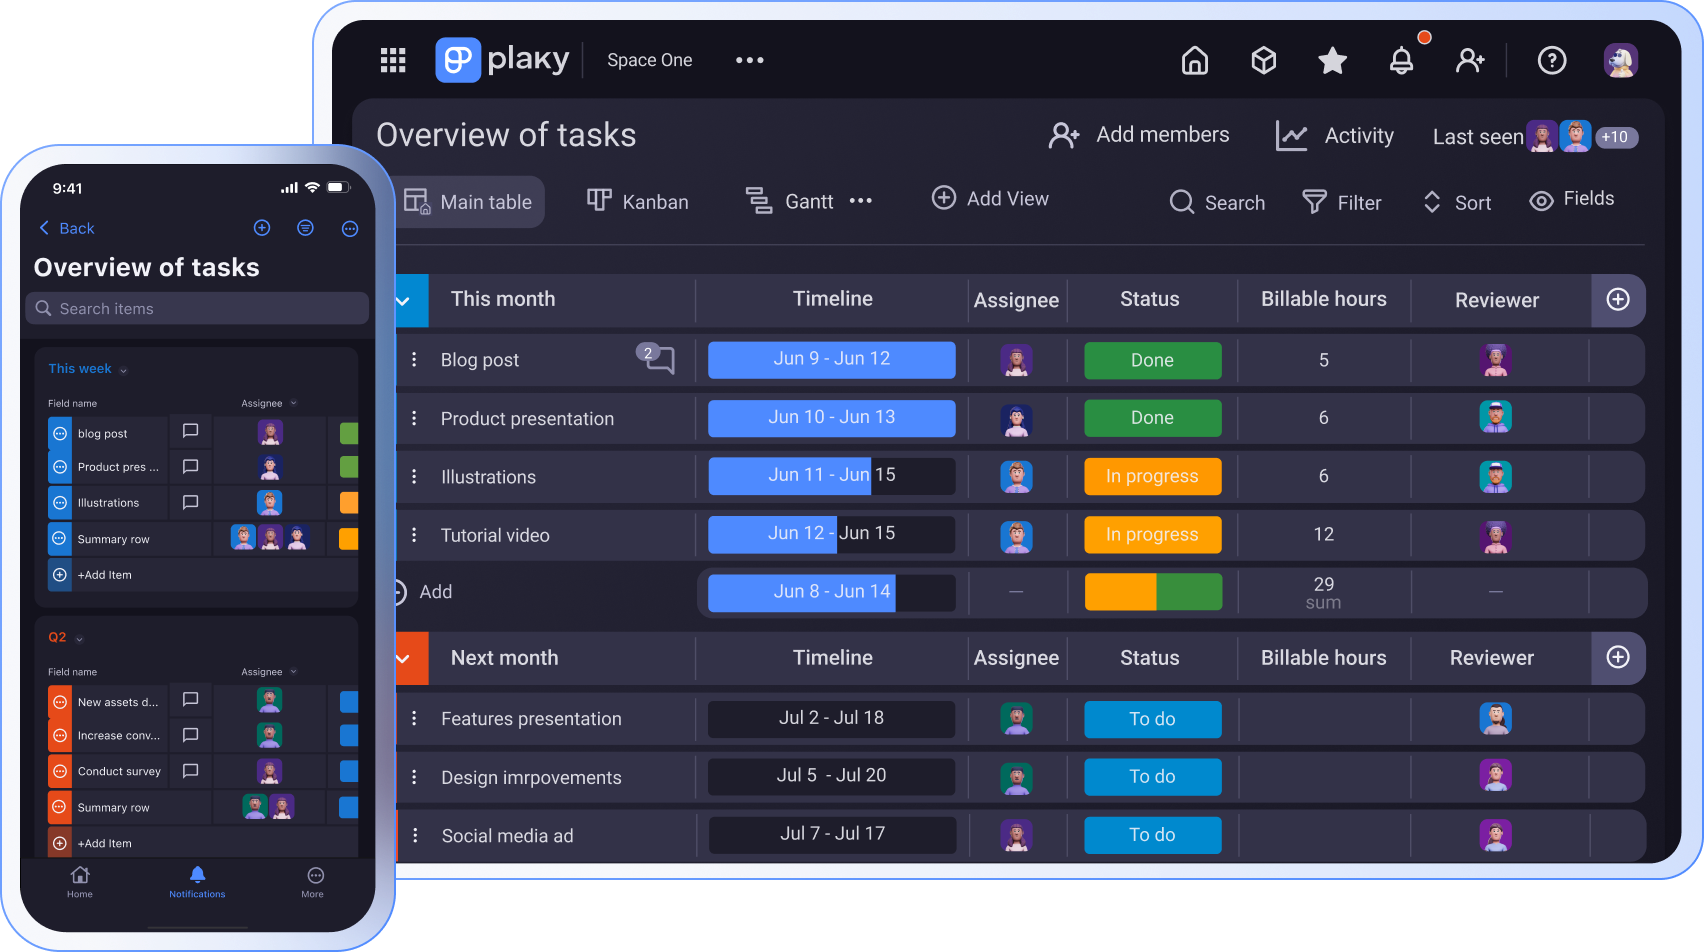
Table view
Plaky’s Table view is the default one since it’s the foundation of most work organization tools. Think of it as a dynamic spreadsheet with rows and columns, but smarter and more collaborative.
So, the main benefits of using the Table view are:
- Total visibility — understanding the full scope of work across teams and projects,
- Easy sorting & filtering — fast data slicing and cleaning before switching to more visual views, and
- Universal appeal — fitting various workflows whether you’re a creative, a strategist, or a manager.
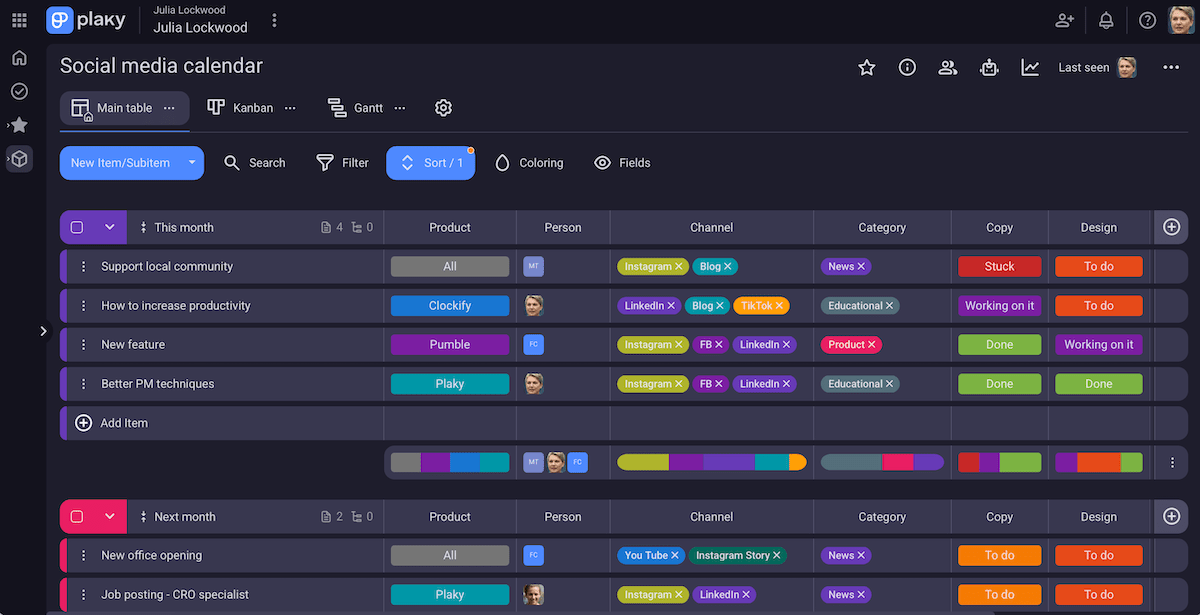
💡 Plaky also has a My tasks section — a personalized table-like view of everything assigned to you specifically across all boards. This helps you stay focused on your own workload and manage time more efficiently.
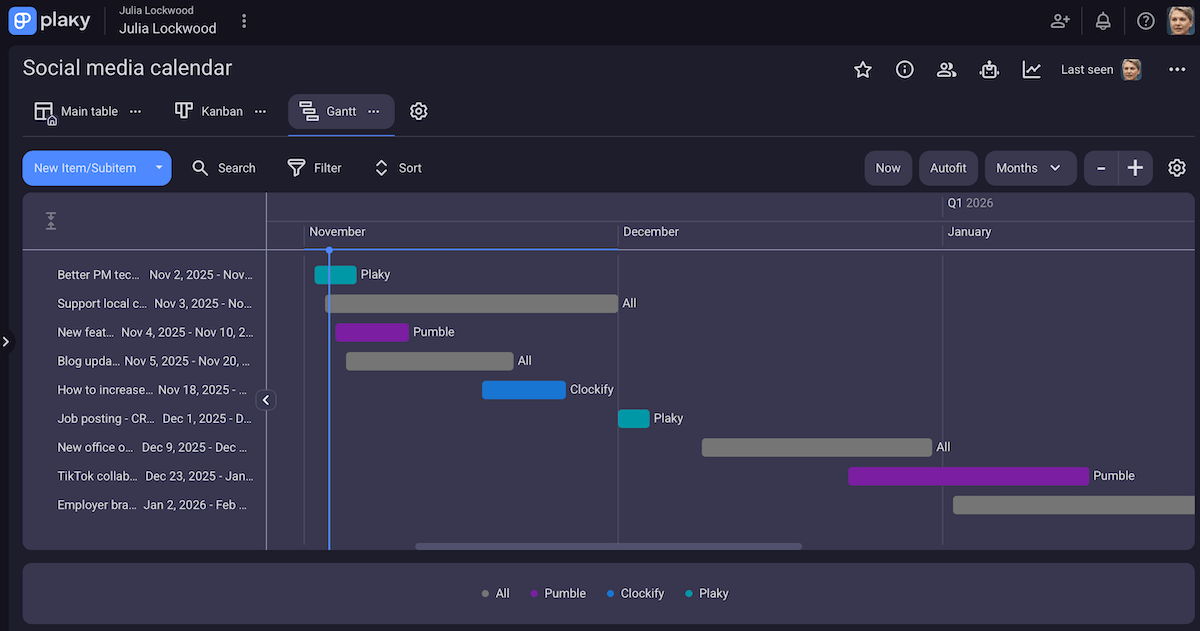
Gantt chart view
To see your work stretched on a timeline, use Plaky’s Gantt chart view. Each item appears as a horizontal bar spanning its start and end dates, so it’s perfect for understanding how tasks and deadlines connect across a project/workflow.
With the Gantt view, you get:
- Visual clarity — See how all tasks fit together or overlap.
- Better planning — Spot bottlenecks or resource conflicts before they escalate.
- Timeline tracking — Easily monitor projects with multiple stages, deadlines, or deliverables.
Get a flexible Gantt chart tool
Kanban view
The Kanban view transforms your board into a visual workflow, ideal for teams that want to see tasks move from one stage to the next.
Basically, your tasks are cards organized into columns based on status (or another category you choose). You can drag and drop your cards or let Plaky’s automations handle the movement when the conditions are met.
Overall, the Kanban view achieves the following:
- Instant clarity — Know where each task stands and what needs attention next.
- Quick adaptability — Reprioritize tasks and rebalance workloads with ease.
- Timely bottleneck detection — Detect bottlenecks with Kanban when a certain column/stage gets too crowded.
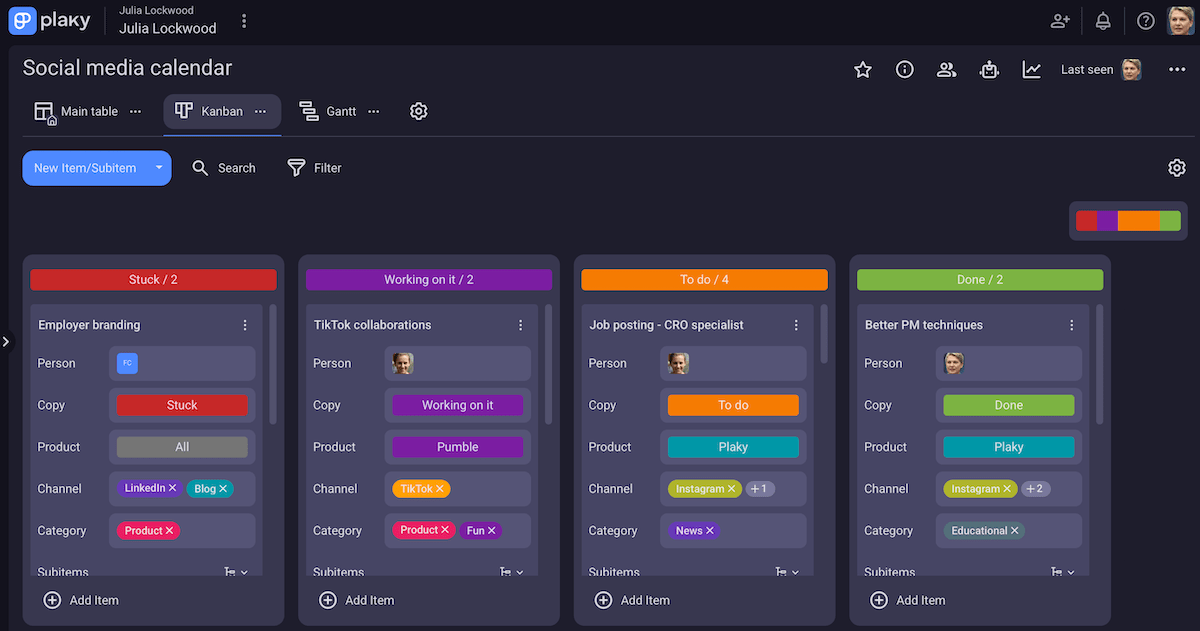
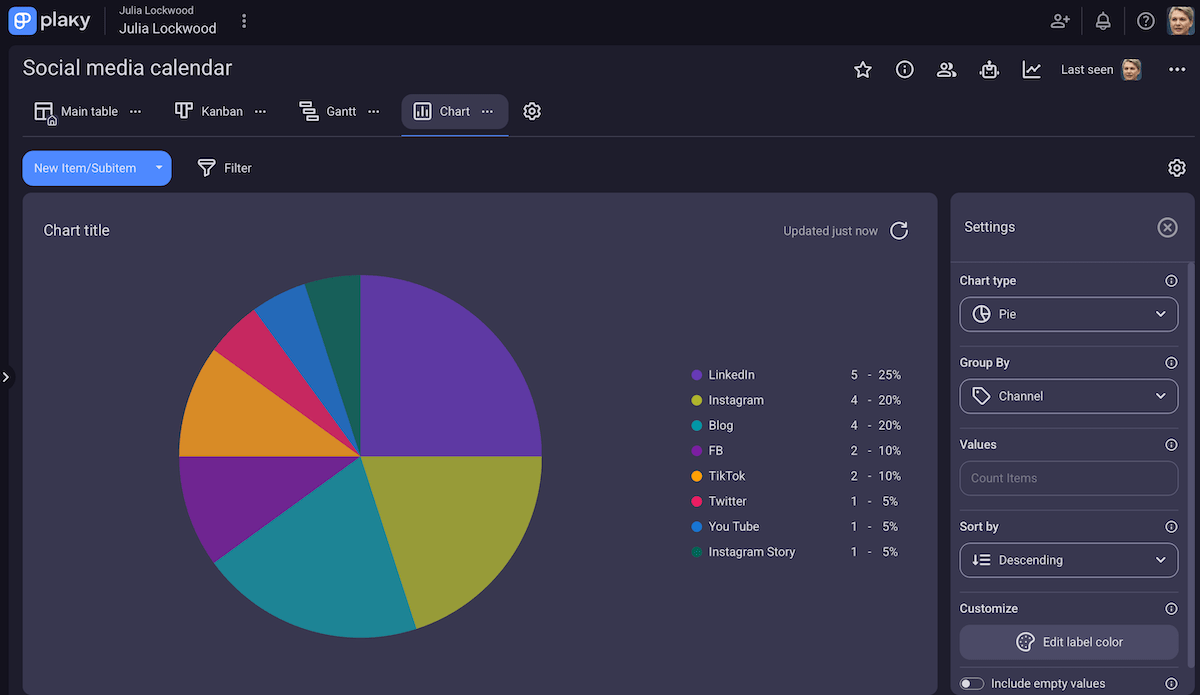
Chart view
You can rely on Plaky’s Chart view to turn project data into visual summaries, choosing between:
- Pie charts — best for understanding proportions (e.g., how many tasks are In progress vs. Done), or
- Bar charts — best for comparing quantities (e.g., tasks per team member or campaign budgets).
The sidebar settings within this view enable you to group and sort your data to focus on what matters at that moment.
Overall, pie/bar charts in Plaky are useful because they allow for:
- Quick insights — instantly seeing progress distribution or workload balance,
- Better reporting — sharing visual snapshots instead of long status lists, and
- Smarter planning — spotting trends over time for informed decision making.
💡 Plaky Pro Tip
The Chart view is the most recently added one in Plaky, and our dev team is already working on expanding its functionality. To check out other recent or upcoming Plaky features, visit these pages:
💡 If you click on the gear button in Plaky, you’ll find the Create new view option. You can choose the view type, how tasks are sorted, which filters apply, etc. and save it as a view to avoid reapplying the same options every time.
FAQ
Still have questions about Plaky’s structure? No worries — here are some quick answers to help you make sense of everything for good!
Can I create a board template in Plaky to standardize our project kick-off process?
Creating a board template in Plaky is the best way to standardize your project kick-off process since it enables a repeatable, organized system.
You can design a board with all the necessary phases, (sub)tasks, and custom fields and then use Plaky’s Mark as Template option to save time and ensure consistency in the future.
What are the top 3 mistakes to avoid when migrating our existing projects into this new Plaky structure?
The top 3 mistakes to avoid in this scenario are:
- Transferring clutter and outdated items — Remove duplicates, completed items, and irrelevant tasks first to eliminate unnecessary noise.
- Not running a small pilot migration first — Import a single space or a few boards before a full-scale migration. This allows you to catch issues early and make way for a smoother transition to Plaky.
- Skipping training — Prepare your team for the Plaky structure. Provide quick training on the new layers, custom fields, and views, explaining how they differ from the old tool.
How should I apply user roles and permissions within this hierarchy to control who sees what in Plaky?
It’s crucial to clarify what each user’s responsibilities are — that’s how you know whether someone should be:
- Admin/owner — the user with full control over spaces and boards, including settings management,
- Editor/contributor — team member actively working on tasks, or
- Viewers/comment-only — an intern or contractor who just provides feedback and tracks progress.
What is the best way to structure our spaces: by department, by client, or by year?
There’s no one-size-fits-all answer — it depends on your company size, workflow, or what you wish to track. Still, here’s a general guideline:
- By department — best for medium to large organizations with specialized functions,
- By client — best for service-oriented agencies or consultancies with multiple clients, or
- By year — best for teams tracking projects by fiscal year or seasonal campaigns.
Use Plaky’s hierarchy for alignment and growth
Plaky’s strongest point is the balance of organization and flexibility. When your workspace is organized from top (spaces) to bottom (subtasks), everyone knows where to find information and how their work fits into the entire workflow.
Combining that with versatile board views, you get the full picture of your projects from every angle.
According to some PM software statistics, the top 3 factors in picking such tools are functionality, price, and user-friendliness — exactly what Plaky blends into a single, centralized solution.
Not many tools offer all that at Plaky’s prices with 3 generous tiers:
- Free plan — basic features with unlimited spaces, boards, items, and users at $0,
- Pro plan — all Free plan features, plus automations, conditional coloring, private boards, etc. at just $3.99/user/month, and
- Enterprise plan — all Pro plan features, plus SSO, custom subdomain, unlimited activity log, and much more at an incredible $8.99/user/month.
Other apps on the market also support multi-level organization, but their features are often limited compared to Plaky. Take a look at this quick overview:
| Features* | Plaky | monday.com | Asana | ClickUp | Trello | Jira |
|---|---|---|---|---|---|---|
| Spaces | ✅ | ✅ | ✅ | ✅ (limited on the free plan) | ✅ | ✅ |
| Boards | ✅ | ✅ (limited on the free plan) | ✅ | ✅ (limited on certain plans) | ✅ (limited on the free plan) | ✅ |
| Folders | ✅ | ✅ | ✅ | ✅ (limited on certain plans) | ❌ | ❌ |
| Items | ✅ | ✅ (limited on the free plan) | ✅ | ✅ | ✅ | ✅ |
| Subitems | ✅ | ✅ (limited on the free plan) | ✅ | ✅ | ❌ | ✅ |
| Custom fields | ✅ | 💲 (from $9 per user per month) | 💲 (from $10.99 per user per month) | ✅ (limited on the free plan) | 💲 (from $5 per user per month) | ✅ |
| Table view | ✅ | ✅ | ✅ | ✅ | 💲 (from $10 per user per month) | ✅ |
| Gantt chart view | 💲 (from $3.99 per user per month) | 💲 (from $12 per user per month) | 💲 (from $10.99 per user per month) | ✅ (limited on the free plan) | 💲 (from $10 per user per month) | ✅ |
| Kanban view | ✅ | ✅ | ✅ | ✅ | ✅ | ✅ |
| Chart view | ✅ | 💲 (from $19 per user per month) | 💲 (from $10.99 per user per month) | ✅ (limited on certain plans) | 💲 (from $10 per user per month) | ✅ |
*Some of these features bear different names across tools (e.g., Gantt view is often called Timeline view, items are tasks/cards/stories/bugs, etc.), or they are embedded differently (e.g., charts might be found within a project dashboard), but they are the same at their core.
To conclude, whether you’re running 1 team or several departments, our platform will help you set up a solid foundation and scale without the chaos.
Organize work and collaborate with confidence — get Plaky today!