
Most software development projects are doomed to fail. This is because software development involves so many different factors, and every single one can become a reason for failure.
But the failure doesn’t even need to start there — it can occur while you’re writing out the software development plan.
On the bright side, if you know how to write one out properly, you will stop most of these issues from happening.
So, how do you plan software development?
The only correct answer is:
- Break the development process down into manageable steps, and then
- Break it down some more.
Let’s look at the steps you can take to write a successful software development plan.
- A good software development plan covers everything from development methodology and technology choices to team roles and communication methods.
- Before writing code, teams must understand the project’s purpose, target users, features, and limitations.
- Regular reviews, testing, feedback, and adjustments help dev teams stay on schedule and produce high-quality products.
What is a software development plan?
A software development plan is a timeline of your software development project, containing all the information needed for its proper execution.
Software development is an incredibly complex process. But, as with any issue, you can tackle it by dividing it into smaller, more manageable parts. This process is called software development planning.
There are various software development methodologies, such as:
But, regardless of which methodology you use, the basic principles remain the same. So, we’ll focus on the basic steps you can take to complete an effective software development plan.

Objectives of a software development plan
Before we dive into breaking down the software development plan, there’s a burning question we have to address — what’s the point?
In this case, the benefits of making a development plan overlap with its objectives, which include:
- Making project collaboration and transparency easier,
- Defining clear tasks and project goals,
- Clearly defining roles and responsibilities,
- Meeting customer and project stakeholder expectations,
- Creating a feasible, realistic timeline, and
- Improving resource allocation.

How to create a software development project plan
Writing out a project management plan is complicated enough, let alone when it’s for software development.
So, let’s look at the steps you need to take to create a cohesive, understandable, and effective software development plan.
Step #1: Analyze your project scope
Unsurprisingly, the first step is to analyze the scope of your project. How much work will be necessary for your software to be complete?
This might be deceiving in the world of IT — a product that should be simple to use for the end user can be a nightmare to develop.
So, if you want to avoid being stuck with bottlenecks and severely misjudged timelines, we advise you to consult with an expert.
Step #2: Assemble a team and determine roles
The next step is to use the information you have on the project scope and assemble a workforce.
By this point, you should be aware of the expertise needed for the tasks in your project. So, if you under- or overshoot either the skills or the number of your team members, you can expect a variety of issues.
If your team has skills above what’s needed, you’re probably wasting your budget on a higher-grade workforce. Too many team members also waste budget and can cause communication issues. And we don’t even have to mention how challenging it is when you’re understaffed!
After you assemble a workforce, you’ll want to assign clear roles. In fact, you need to determine a clear hierarchy, and even clearer responsibility over tasks — otherwise, you can run into collaboration issues, people working in silos, or a clear lack of accountability.
Step #3: Write the first draft
Finally, you can start writing the SDP.
But, what should it look like? What must your software development plan include?
Let’s go through some of the key points you should add to your SDP.
| Structural point | How to write it | Importance |
|---|---|---|
| Project scope and objectives | Outline why you’re making the software, who it’s for, and what it should look and function like. Determine the work that needs to be completed to meet all project deliverables. | You’ll set clear and realistic expectations for your team’s work. You’ll define clear objectives so that your project team can keep in mind how their work fits into the overall goals of the project. |
| Resource management | Outline the resources you need to complete the project. Determine the amount of each resource you need, and how you’ll allocate those resources. | You’ll avoid wasting your budget on additional resources during the project’s execution or dealing with missed deadlines and conflict due to poor allocation. |
| Project timeline | Create a timeline of all the tasks you need to perform in your development process. Use Gantt charts to check the validity of your timeline. | You’ll set realistic expectations for completing tasks, as well as spot and avoid bottlenecks and slack periods. |
| Communication tools | Outline how your team will communicate, and who they can turn to for project-related questions. Pick a team collaboration software that’ll provide you with a centralized space for communication, file and information-sharing, and task clarity. | You’ll avoid various collaboration issues, such as: – Conflict, – The emergence of silos, – Unnecessary communication, – Lack of trust, and – Unclear tasks and objectives. |
| Risk management | Determine the risks that could pop up during the course of the project. Establish contingency plans to deal with those risks. Make sure to consult with every department involved in your project to work out any and all potential risks. | You’ll avoid the multitude of issues that can come about from unexpected risks. |
| Testing and quality assurance | Create a detailed quality control plan to discover any bugs during and after the development process. Determine the bug-fixing process and the channels through which the QA team can report bugs. | By preventing bugs from reaching the end users, you’ll avoid: – a faulty software launch, – deterring users from your software, and – ruining your brand’s reputation. |
| Project monitoring | Outline how you’ll track project progress. Determine key performance indicators (KPIs), such as: -Change failure rate (CFR),-Scope added,-Bug rate, etc. | You’ll keep your project management approach flexible and be able to make corrections to the project whenever you spot an issue. You need KPIs — if you try to track every part of your project, you’ll more than likely focus on inconsequential things. |
| Reference documents | Complete additional documents that your team can use as a reference while developing. The most important one is the software requirement specification (SRS) document, but there are many more, like: – the feasibility study, – concept of operations, – software user manual, etc. | Reference documents represent well-documented instructions. By letting your team refer to these documents throughout your project, you can prevent unnecessary communication, which slows down the project bit by bit — and most importantly, can lead to information gaps and misunderstandings. |
Step #4: Submit for review
Now that you’ve created a first draft of your SDP, you’ll need to share it with the appropriate project stakeholders.
This’ll, of course, involve your superiors and investors — mostly as you’ll need to keep them updated on the course of your project. They might have additional input, or specific requirements that they want you to meet.
But, more importantly, you’ll need to share it with the project team members who will be utilizing it. You want to make sure that the people with the right expertise go over the specifics of your SDP, as they’ll more than likely give you valuable feedback on its validity.
If you don’t do this, you might run into catastrophic issues, like:
- Unskilled team members working on important tasks,
- Ineffective contingency plans,
- Poor budgeting,
- Issues with the project schedule,
- Unrealistic software expectations, etc.
Step #5: Complete your software development plan
Once you have all the feedback you need on your first draft, it’s time to update and complete your SDP.
Make sure you take this feedback seriously, especially your team’s input. E.g., if your team says you need another server, it’s best to ask for an increase in budget and get it. Otherwise, you’ll probably halt the project halfway when you realize you do need that server.
Finally, when the document is complete, make sure everyone has access to it and can use it as a reference whenever it’s needed. This will cut down on unnecessary communication and avoid team members wasting time while they wait for your feedback.

Software development plan examples + templates
We’ve talked quite a bit about software development plans, but it might still be difficult to visualize what one would look like.
Additionally, you might have issues with creating a well-organized plan or keeping your team on track.
To give you an idea of what those plans look like, and how to implement that organization in a software development tool, Plaky by CAKE.com offers free software development plan templates.
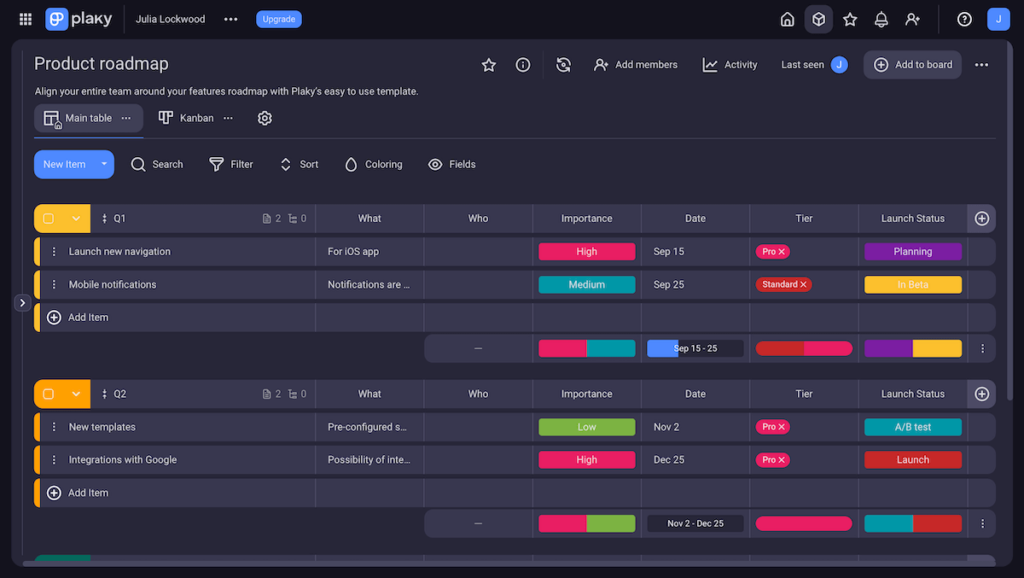
Example #1: Product roadmap plan
Software development, more than any other project, requires teams from different departments to work closely together. This kind of cross-functional collaboration can create delays and bottlenecks if you don’t implement it properly.
Luckily, Plaky’s product roadmap template makes communicating easier, especially across departments.
Get our product roadmap template
Assigning tasks to relevant team members and using task-specific comments and @mentions ensures that every person in every department stays up to date.
This template also allows you to easily delegate tasks during software development, organized in groups by quarter.
For example:
Let’s say you have a group chat with your project team. You text them “I need someone to build a QR code scanner for our app.” You add another text “It’s not urgent, though.”
Three separate developers start working on the scanner. One of them misses the second text, and finishes very early, causing a delay on a more pressing feature that they should’ve been working on.
With this template, issues like this are easily avoidable since you can add different fields for:
- Task assignees,
- Task status,
- Priority levels, and many more.
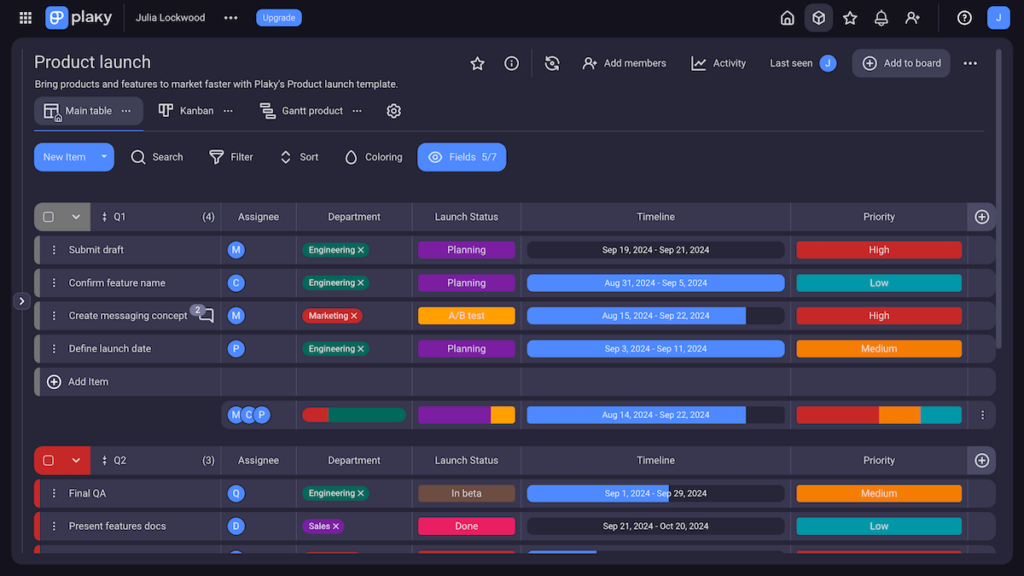
Example #2: Product launch plan
Sometimes during development, your marketing team will usually want updates on alpha/beta launches, expected launch dates, etc.
Instead of constantly messaging (bugging) developers about their progress, the marketing team can use Plaky’s product launch template and get all the information they need.
Get our product launch template
They can find every task’s timeline and get information visually without wasting a second. What’s more, they can see the whole task group’s progress using the summary row — so teammates can update each other without a word.
This template also helps you launch a product or feature in 3 simple steps:
- Break product/feature launch into stages,
- Assign people to tasks and prioritize, and
- Set due dates.
Thanks to these features, it works wonders for the implementation and post-implementation steps.
Example #3: Bug tracking plan
Let’s say that you’re in a group chat where testers can send you information about the different bugs they’ve found.
*Ping* — they’ve reported a bug, so the developers can start working on it.
*Ping* — here’s another, so let’s have a part of the team switch to that one.
*Ping* *ping* *ping* — You get overwhelmed with texts about bugs the testing team has found (and fast!).
By the time you’ve got your bearings, some bugs are 47 messages away in the chat.
What you need is a place where you can cleanly sort bugs, assign them to specific developers, label them by importance, and avoid any rush and confusion. In other words, you need Plaky’s bug tracking template.
Using this template, your testers can simply create a task in the backlog every time they find a bug. Afterward, you can assign each bug to the appropriate developer.
Keep in mind that the majority of your development will include dealing with bugs. So, if you don’t use a reliable PM tool to keep track of them, you risk losing precious time dealing with the avalanche of bug reports.
You’ll find this template most useful during the testing step. However, it is also essential for the construction, implementation, and post-implementation steps.
FAQ about software development plans
What are the 9 steps in software development projects?
We can divide software development into 9 key steps:
- Initiation — determine a solidified idea, a mission, and a project sponsor (if one is needed) in the initiation phase of your project.
- Requirement analysis — consider the various project requirements, e.g., user needs and preferences, project goal, return value, and more.
- Feasibility study — analyze the constraints on your project, e.g. your budget, your team’s know-how, scope of work, project timeframe, legal boundaries, etc.
- Progress tracking — use the KPIs you’ve determined to track progress during the rest of your project. Rely on project management software to make this process easier.
- Design — turn the requirements in your SRS document into detailed specifications. Create different types of design, like features design, UI/UX design, database design, security measures, etc.
- Construction — use the previous step’s designs and turn them into a functional system. Complete frontend and backend development, hardware, and communication systems — all while you perform minor testing.
- Integration & testing — determine whether the completed software follows the SRS document. Complete user, integration, security, and unit testing.
- Implementation — make the software available to the end users. Notify existing alpha/beta users, make user manuals available, and track initial reactions.
- Post-implementation — even if you have a high-quality software product, you need to keep it up to date on the market by tracking competitors and updating it regularly.
What should a software development plan include?
A software development plan should include the following elements:
- Project scope and objectives,
- Resource management,
- Project timeline,
- Communication tools,
- Risk management,
- Testing and quality assurance,
- Project monitoring, and
- Reference documents.
There are many more points your SDP will include, and those can vary depending on the specifics of your project.
What are some common mistakes when creating a software development plan?
Some of the most common mistakes you could make while crafting a software development plan are:
- Ignoring input from your project team,
- Underestimating the testing, or ignoring it altogether,
- Misjudging the scope,
- Poorly organizing documentation,
- Not defining the requirements, or making them unclear,
- Leaving little room for team collaboration,
- Underestimating risk,
- Not validating the timeline,
- Ignoring user experience, and
- Creating a poor monitoring plan.
Implement a software development plan easily with Plaky by CAKE.com
As you can see, software development projects are usually super complex, and it’s easy to drown in a sea of information and moving parts.
This can cause delays, wasted resources, unhappy staff — you name it. So, the best solution to keeping track of what’s going on is a simple and effective visual overview.
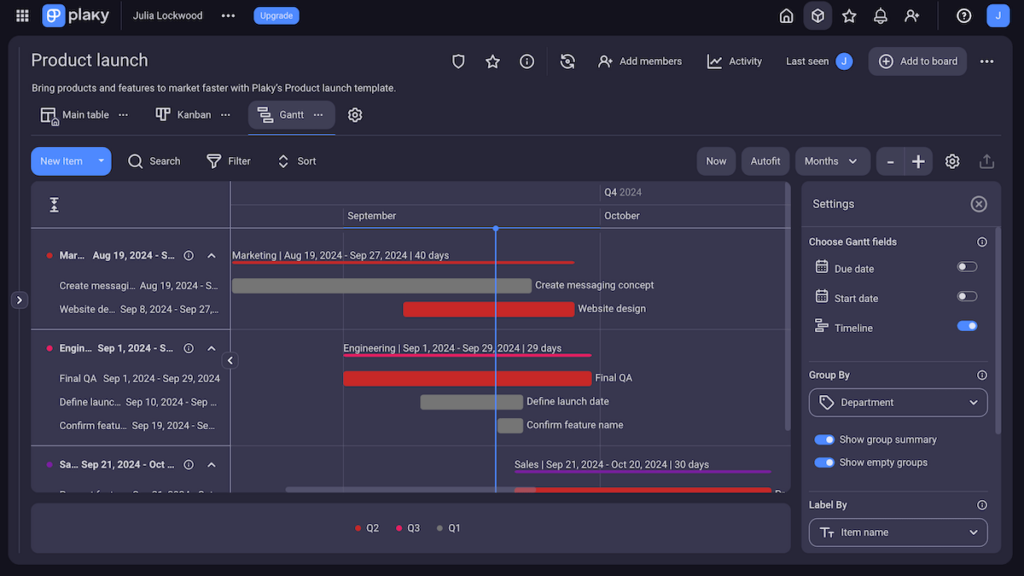
And there’s no better visual overview than Plaky’s Gantt charts.
At a glance, you can check the timeline of your project and stay up to date with its progress.
What’s more, you can take advantage of the fact that Plaky’s Gantt chart view is highly customizable.
For example, by changing how the tasks are grouped, you can see which resources are needed for the current period.
Alternatively, you can dabble in workload management by sorting tasks by departments to clearly see how they’re distributed.
Embrace effortless software development with Plaky by CAKE.com. Sign up for a free account today.