
If you think the biggest step to winning clients is to get them to buy your product/service, you couldn’t be more wrong. That is just where the story of onboarding and keeping your client begins.
But, if you don’t have an action plan for your new client onboarding process, fear not — because we do.
So, buckle up and read on to find all the steps you need to go through for a valuable onboarding experience, followed by handy tips from a few key experts.
As a bonus, you will also get a free new client onboarding checklist template to help you organize your onboarding processes.
What is client onboarding?
Client onboarding is a process any new client goes through to learn how to work with your company and use your product or service efficiently.
The client onboarding process guides a new client through the procedures and know-how to ease the integration of the client into a business.
There are many reasons good client onboarding experience is important, including:
- Enhanced efficiency — The onboarding process facilitates integration by guiding the client through every step of business work organization so that nothing slips through the cracks.
- Improved client-business relationship — A smooth and well-structured onboarding process enhances trust and ensures a long-lasting relationship between the client and the business.
- Clear expectations — Onboarding helps businesses set clear boundaries and expectations to prevent future misunderstandings. Clients should be familiar with response times, communication channels, points of contact, workloads, etc.
- Increased number of client referrals — Structured and personalized onboarding sets the stage for client satisfaction and therefore increases the number of client referrals your business can get.
There are 3 ways you can onboard your clients. Have a look at the table below to find out more about each onboarding strategy and its pros and cons:
| ONBOARDING STRATEGY | PROS | CONS |
|---|---|---|
| In-person onboarding – the traditional method of meeting clients in person to provide necessary instructions and walk them through different training sessions. | – Creates a climate of trust – Gives space for personalization – Enables live demonstration of products | – Can be geographically restricted – Can be time-consuming – May be costly |
| Virtual onboarding – an onboarding strategy that became popular with the rise of remote work. It is especially useful with dispersed teams as it enables video conferencing, online presentations, and document sharing. | – Allows flexibility – Enables self-service through video tutorials, help pages, and customer service – Cuts travel expenses | – Lacks a personal approach – Can suffer technical difficulties – Can be more challenging to engage participants |
| Hybrid onboarding – a strategy that is easily adaptable to suit clients’ needs. It combines both online instructions and an in-person approach. | – Allows flexibility – Can be personalized – Offers better control of time and travel expenses | – Requires more planning and resources – Can make scheduling more challenging – Could lead to an unequal distribution of practical and theoretical knowledge |

7 steps to successfully onboard a new client
The client has signed the contract with your company. Congrats!
Now, it’s up to you to make sure the client feels welcome and to provide all the necessary information to make the onboarding process a breeze and boost their satisfaction.
If you’re wondering how to achieve this, we’ve crafted a list of 7 steps to help you prepare the best onboarding process for your new clients.

#1 Plan your onboarding activities
Now that you are finally onboarding a client, it’s time to offer a streamlined and efficient onboarding that will skyrocket the client’s satisfaction levels.
With all the excitement about a new deal, some little (but still important) details can easily slip your mind. So, planning your onboarding activities can make your life much easier.
To help you kickstart the onboarding process, we’ve drawn up a new client onboarding checklist to ensure no element of the process is overlooked.
The template you can download below has 16 steps to follow. You can use the template for free and customize it however you want to simplify your onboarding process.
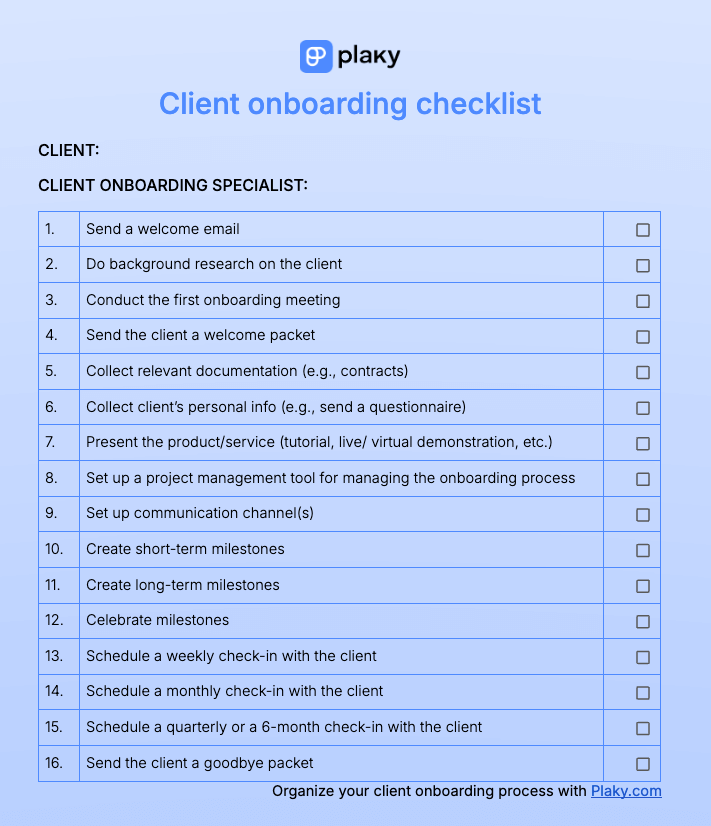
New client onboarding checklist template
New client onboarding checklist template – printable
#2 Send a welcome email
You probably want your clients to feel welcomed and valued from the start, and sending a welcome email is a great way to introduce your business and begin your working relationship.
These emails serve 2 purposes:
- They are a token of appreciation, and
- They are informative.
So, apart from containing warm welcoming words, a welcome email should indicate what the next steps of the onboarding process will be.
As the client should feel more confident about choosing your company, make sure the email is authentic and not AI-generated. A personal touch in a welcome email will show your clients you are happy to have them on board.
Take a look at this example of an authentic welcoming email:
Hi [name],
Thanks for signing up to [name], it’s great having you on board! 🙂
I know you’re busy, so I’ll cut to the chase — our company’s goal is to deliver a product [specify] that you’ll be fully satisfied with.
If we manage to make at least a tiny bit of difference using [product], we’ll consider the first step of our journey successful.
However, to tailor such a product, we need your feedback. We’d be thankful if you could get back to us; we’d be happy to set a meeting at your convenience. 🙂
Thanks again, and if you have any more questions, I’m here to help!
Looking forward to hearing from you!
Best,
[name]
The welcome email presents a good opportunity to schedule the next step in the onboarding process — the first onboarding meeting.
#3 Conduct the first onboarding meeting
The first onboarding meeting is your chance to stand out and pave the way for a smooth onboarding process.
But, doing some background research on the client before the first meeting comes in really handy.
You can research their industry, target audience, and former business partners and projects to get an idea of what they might be looking for and what they might expect from you.
The first onboarding meeting is important for several reasons:
- It sends a sign that you are serious about your future collaboration with the client.
- It is a great moment to introduce the client to your company’s goals and values.
- It shows your client that you value them as a person and don’t merely see them as a source of profit.
- It gives you a deeper insight into the client’s needs and concerns, which makes you more likely to create useful products/services.
Now that you have finally met and put your cards on the table, it is time to proceed with other onboarding tasks — welcome packet, resources, and legal documentation.
A welcome packet could be sent to a client in the form of a basket full of your company merch, employee handbooks, and other paperwork. But, most often, it is sent in PDF form and includes:
- The first onboarding meeting summary,
- Your business key contacts,
- Overview of goals, timelines, and deliverables,
- Customer onboarding questionnaire,
- Legal documentation, such as NDAs or SLAs,
- Login credentials for accounts, and
- Training materials.
Some businesses prefer finishing legal formalities and sending a questionnaire before the first onboarding meeting to ensure the commitment of both sides.
Manage all your onboarding tasks in Plaky
#4 Present the client with your product/service
At this point, you should take your onboarding process to the next level and offer content that will educate your client step by step on how to use your product or service.
Providing a learning experience can only exceed your client’s expectations as it clearly shows you want them to be fully equipped and confident in working with you or while using your product.
Some of the most common ways to present a product or service are:
- Short video overviews (e.g., step-by-step walkthroughs),
- Short presentations (e.g., demonstrations),
- Written instructional materials (e.g., brochures), and
- Free trials (allowing the client to test the product/service themselves).
The educational content should allow clients to learn at their own pace, as they are able to review the materials or use the product any time convenient.
Having customer support agents available is a plus as they can give additional information and provide support in case the client needs it.
This onboarding practice should ultimately reduce churn, increase the value of a product /service, and create loyal clients.

#5 Set up a project management tool
Onboarding one client is already a challenge, but if you have several clients to onboard, it can become quite overwhelming.
Whether you are a one-man company or you have an entire onboarding team, picking the right tool makes things simpler.
For instance, Plaky by CAKE.com offers a pre-made client onboarding template that helps you easily organize the onboarding process — and saves you some valuable time and energy (plus common sense) by allowing you to have all the important information in one place.
Get our client onboarding template
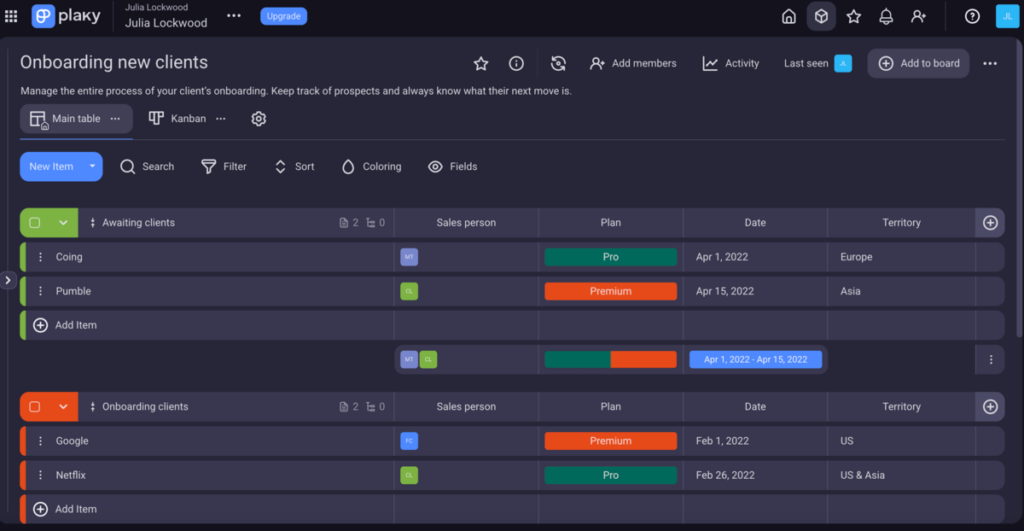
With Plaky, you can onboard a client in 3 simple steps:
- Name a board dedicated to onboarding new clients and categorize clients into groups.
- Assign team members to relevant tasks and set the deadlines.
- Share files and streamline communication within item cards.
Of course, you can customize the template to further suit your needs or create a new board from scratch.
Along with the project management tool, make sure to set up preferred methods of communication with your client(s).
Since transparent communication is vital for long-term success, try to establish channels that work for both your business and your client.
Agree on how you will share documentation and files, as well as ask quick questions. There are many team chat tools you can use to allow free information flow.
Alternatively, pick a PM tool that offers real-time collaboration features as well and ensures everyone stays in the loop at all times.

#6 Create and celebrate milestones
How can you conduct successful client onboarding if you don’t know what you want to achieve in the first place?
This is why you need to define project milestones, or key events, in the onboarding process.
Although milestones should be unique to your product/service, the 3 more or less universal onboarding milestones are:
- The moment clients sign up for a product/service,
- The moment clients use the product/service for the first time, and
- The moment clients start using a product/service regularly.
Celebrating milestones is equally as important as creating them. Not only does paying attention to each successful milestone — no matter how small it is — give a motivational boost, but it’s also vital to the entire onboarding process.
Track your client onboarding process with Plaky
#7 Check in with new clients regularly
The onboarding process is successful only when your clients are satisfied with your product/service.
But how can you know if your clients are satisfied? The right answer is: you need to check in with them regularly.
In the beginning, follow-ups may be done on a more regular basis, e.g., every week. As the onboarding process progresses, follow-ups may be conducted every couple of months.
Depending on the client, be prepared to do check-ins in various ways (live conversations, video calls, emails, questionnaires, etc.)
And, if you’ve ever wondered why you should conduct check-ins with new clients, here are some of the reasons:
- You’ll collect important feedback on the product/service you offer.
- You’ll learn what can be altered and improved.
- You’ll be able to address issues and maintain good customer service.
Checking in shows you’re committed to providing clients with an excellent customer experience, and when personalized, check-ins show you value your clients.
What’s more, expressing interest in their onboarding progress will make your new clients feel positive about choosing your company in the first place.
💡 Plaky Pro Tip
Regular check-ins and excellent customer service lead to a higher customer satisfaction level. For more inspiration on how to maintain a great customer experience, check out this collection of famous quotes on the subject:
Client onboarding practices you should follow
We have spoken to experts and asked them each to single out a tip for the client onboarding process they find most effective.
Here’s what they shared with us:
Tip #1: Keep the communication personal
Although it may be easier to just automate the onboarding process, making an effort to personalize your onboarding truly pays off.
We spoke to Sarah Jeffries, the Managing Director of First Aid Course Leicester, who provided insight into their client onboarding process:

“In our business, the most important aspect of client onboarding is personalized communication. We understand the importance of promptly addressing our clients’ specific needs and concerns. To ensure they have a clear understanding of our first aid courses, we provide detailed information including course outlines, schedules, and any prerequisites.”
Tip #2: Understand why they chose you
When we asked Annie Raygoza, Director of Client Services at Clear Digital, what she pays special attention to when onboarding new clients, she emphasized that it’s paramount to understand why the clients chose their services:

“Understanding WHY they chose us. What did we accomplish to win this account? Honing in on these areas while speaking to the client’s pain points is integral to this process.”
Tip #3: Do background research
Raygoza also explained how important it is to prepare for client onboarding and research the client:
“Doing the necessary groundwork and background on the client allows the team to really understand the client’s needs. Avoid putting something together that’s generic. By customizing a kick-off deck and meeting with the client, you’re letting them know that you’ve done the appropriate amount of research, and you’re coming prepared to discuss their specific needs for the project/request.”
Tip #4: Understand the client’s expertise
Aside from doing general background research, you should also find out how experienced the client is when it comes to the type of product/service you provide.
One of the best practices of client onboarding according to Amanda Stephens, Vice President of Operations at seoplus+, is understanding how much your clients know about your field of business:

“Understand your client’s level of understanding. For a client without much exposure to your field, using jargon and taking things for granted in the onboarding process can be alienating and intimidating. But for a client with experience in the field, being really slow and deliberate might come across as condescending. So we make sure to really understand the client and where they’re coming from to make for a successful & supportive onboarding process.”
Streamline client onboarding with Plaky by CAKE.com
It’s true that the choice of collaboration and communication tools has to be a two-way thing.
But, why not use a PM tool that enables both — project collaboration and team communication?
With Plaky, you and your team can have real-time insight into the onboarding process and know exactly what has been done so far and what still needs to be covered.
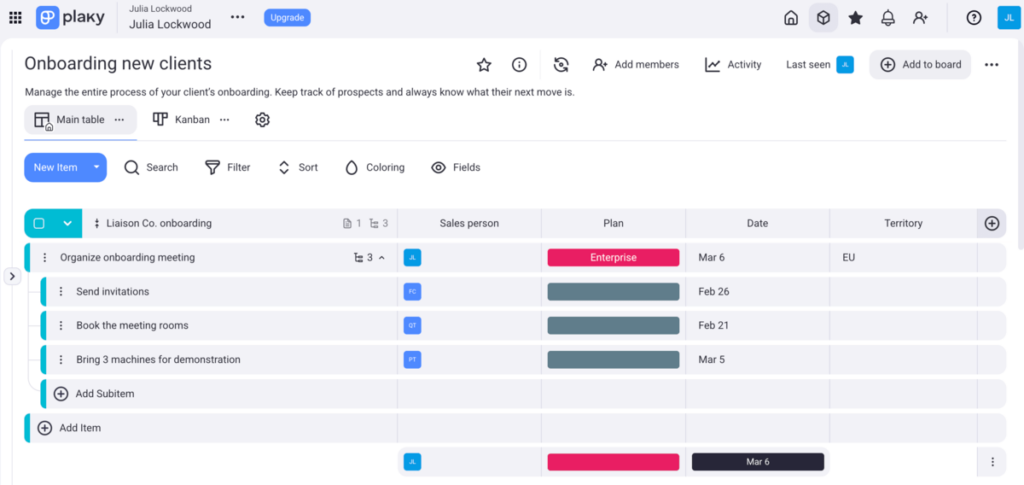
Plaky gives you many options to easily manage onboarding from the start. To create your own onboarding plan, you can dedicate a board to one client and add:
- Items — representing different tasks, phases, etc., and
- Subitems — breaking down complex tasks into more manageable and smaller tasks.
But, THIS is only the beginning.
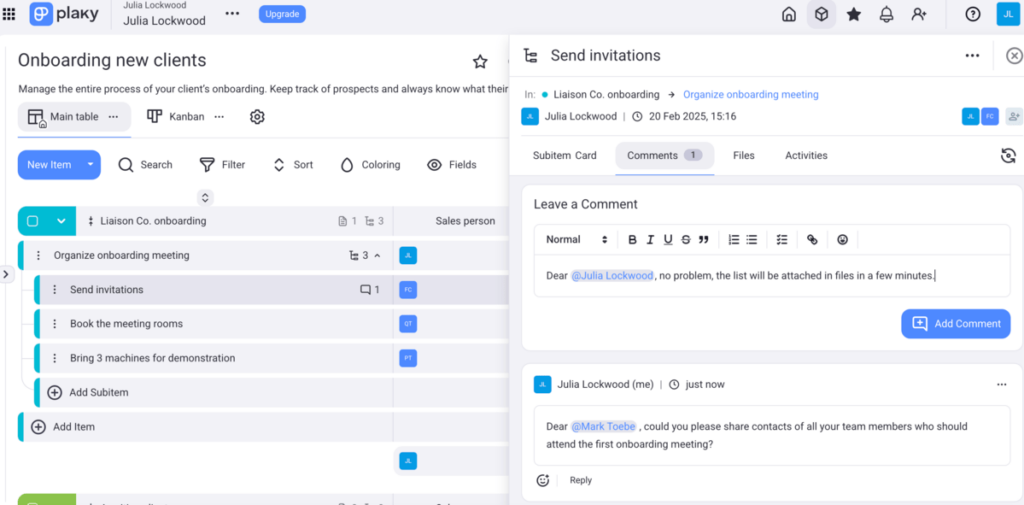
You can also make use of other Plaky features within the same board and always be up-to-date with any changes thanks to:
- Activity logs — provide a real-time record of all activities,
- Notifications — allow team members to receive updates about changes, and
- Comments — enable and centralize all task-related discussions so that you never lose track of comments relevant to a specific task.
Being user-oriented, Plaky won’t let you forget about your next onboarding meeting or check-in — just note down the dates in the Date field to stay in the loop.
Plus, you can apply conditional coloring to your date fields if you want to get a visual reminder of the impending dates for your next onboarding activity.
Best of all, Plaky is fully customizable to suit your onboarding needs — no matter how extensive they get. Its free plan supports unlimited users, boards, projects, and tasks.
Plus, if anything comes up, there is 24/7 customer support (with real people, not AI chatbots) for all users.
Provide the simplest onboarding experience to your clients! Sign up now and get a 14-day free trial of all premium Plaky features!
Get started with Plaky for free
How we reviewed this post: Our writers & editors monitor the posts and update them when new information becomes available, to keep them fresh and relevant.