
Board erstellen
Plaky-Board ist ein Ort, an dem die Aufgaben, Arbeitsabläufe und Prozesse deines Teams visualisiert werden. Es hilft dir, organisiert zu bleiben und den Überblick über deine Arbeit zu behalten, egal ob es sich um eine einzelne Aufgabe oder ein komplexes Projekt handelt. Darüber hinaus ermöglichen hochgradig interaktive Funktionen eine schnellere und reibungslose Kommunikation zwischen Teammitgliedern, sodass jeder über die Projekte, Aufgaben und Fortschritte der anderen informiert ist.
So fügst du ein neues Board hinzu:
- Klicke auf + unter dem Menü Bereich
- Wähle aus der Dropdown-Liste Neues Board
- Wähle nun Von Grund auf neu erstellen, Aus Datei erstellen oder Aus Vorlage erstellen
Wenn du es von Grund auf neu erstellst:
- Gib den Board-Namen ein
- Gib eine Beschreibung ein (optional)
- Wähle Bereich aus
- Schalte um, wenn das Board privat sein soll (optional)
- Klicke auf Board erstellen, um die Aktion abzuschließen

Dieses neu erstellte Board kann konfiguriert und angepasst werden, damit es deinen Anforderungen entspricht.
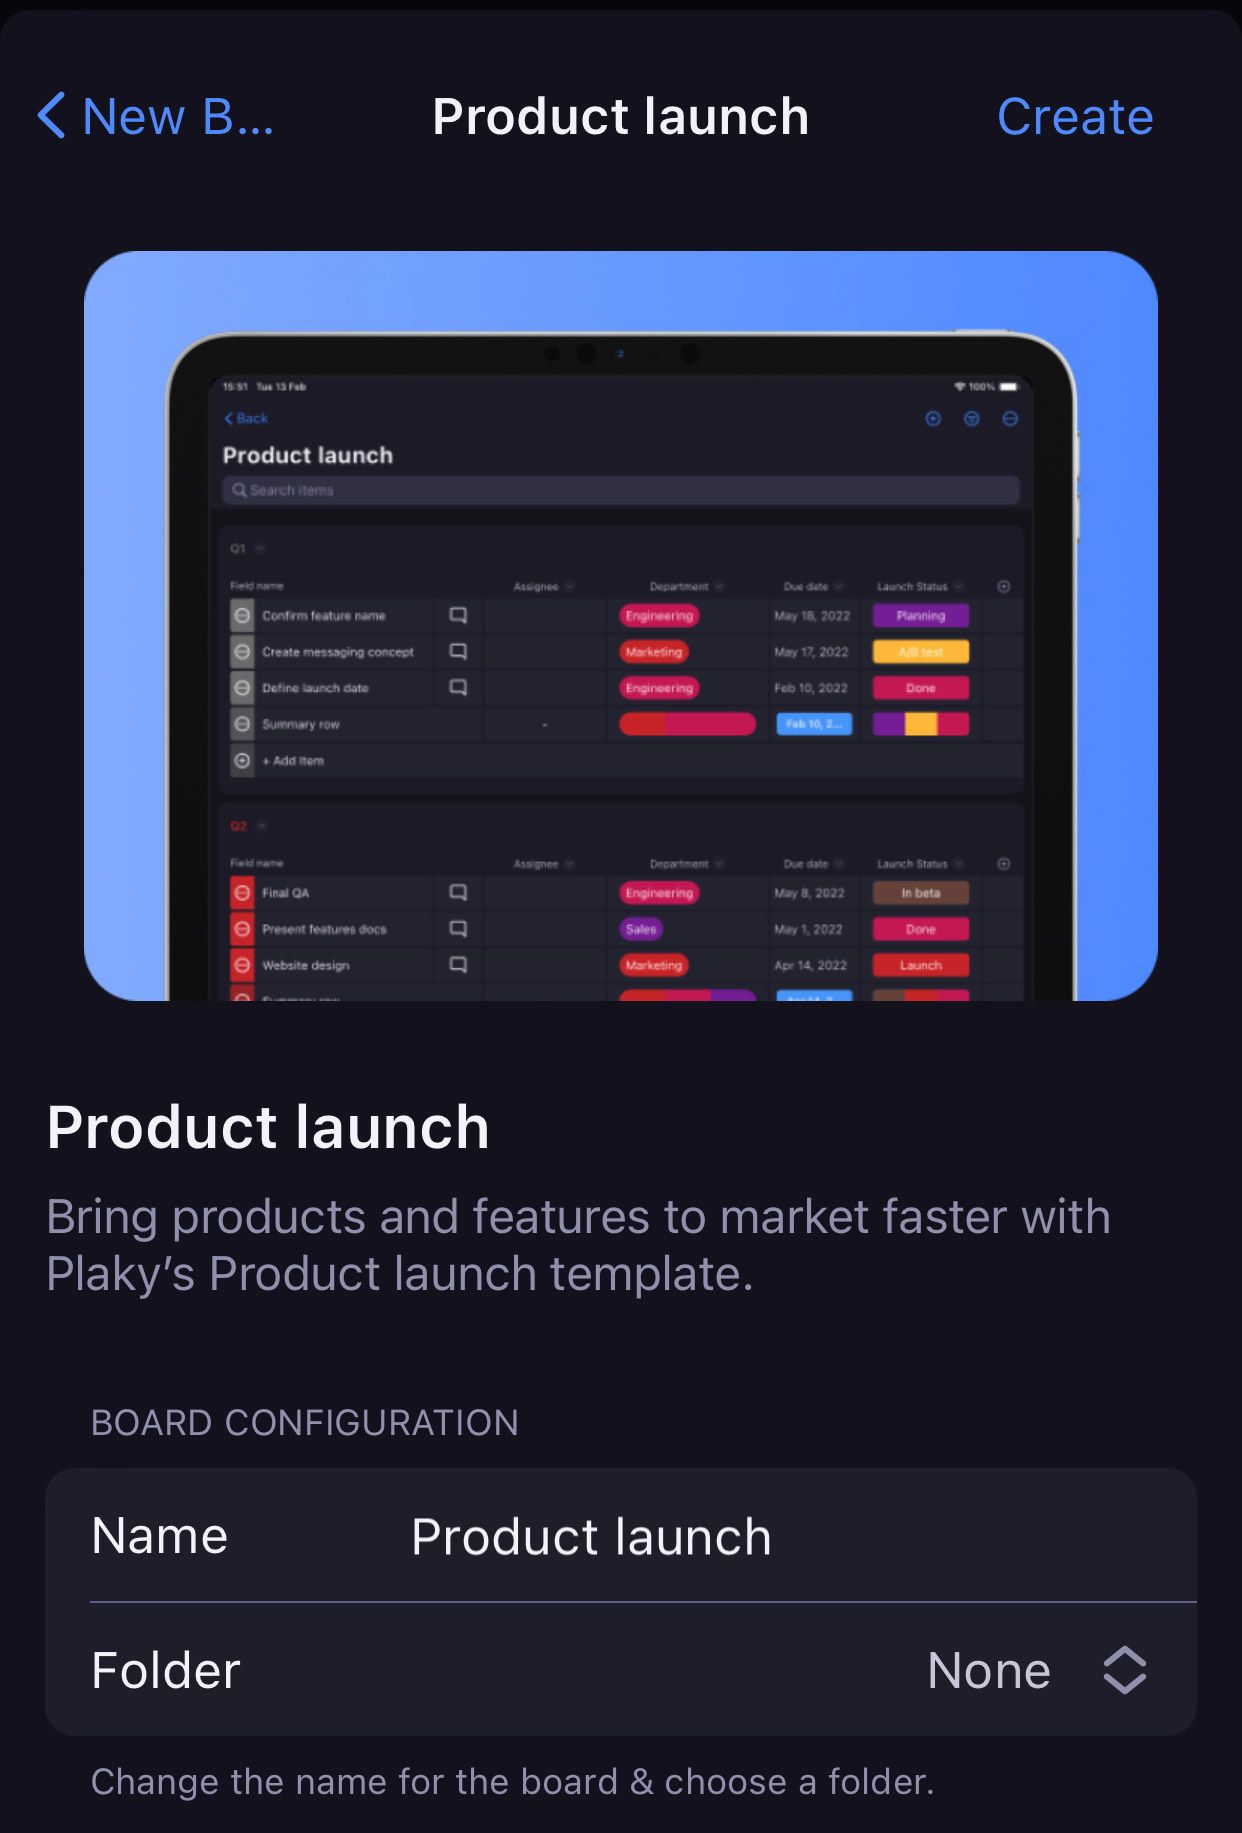
Du kannst das Board von Grund auf auf der Startseite erstellen oder indem du eine Board-Vorlage auswählst, die deinen Anforderungen und Bedürfnissen entspricht. Wähle beispielsweise die Vorlage „Produktstart“, wenn du deinen Fortschritt verfolgen und deine Aufgaben besser priorisieren möchtest.
So erstellst du ein Board:
Tippe auf die Schaltfläche + in der oberen rechten Ecke des Startbildschirms.
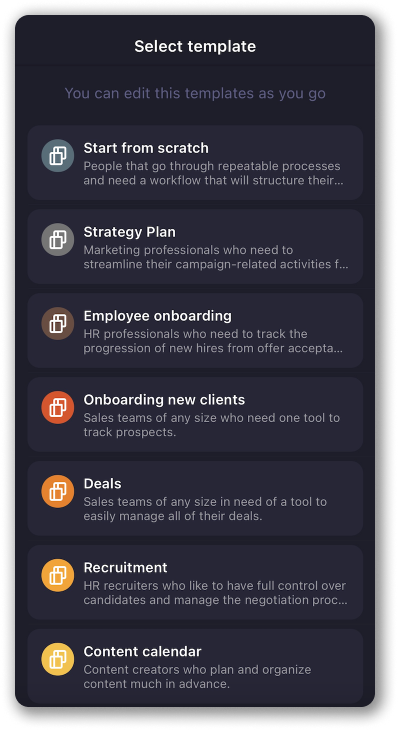
Wähle die Vorlage aus, die du verwenden möchtest, und tippe auf Diese Vorlage auswählen, um die Aktion abzuschließen.
ODER
Wähle Von Grund auf neu beginnen und du erhältst ein Board mit einem Standardelement innerhalb einer Standardelementgruppe, das du weiter bearbeiten und anpassen kannst.
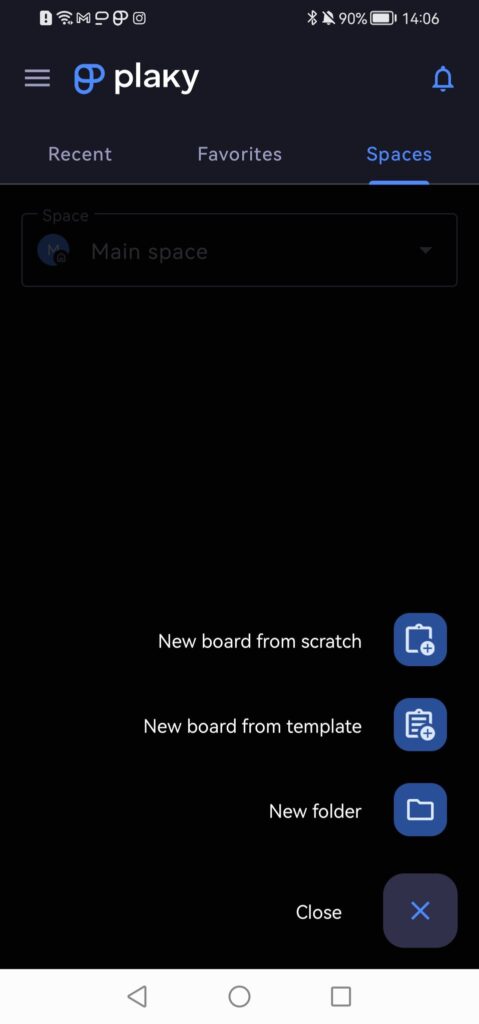
- Tippe auf das +-Symbol in der unteren rechten Ecke
- Wähle Board von Grund auf neu erstellen oder Board aus Vorlage erstellen
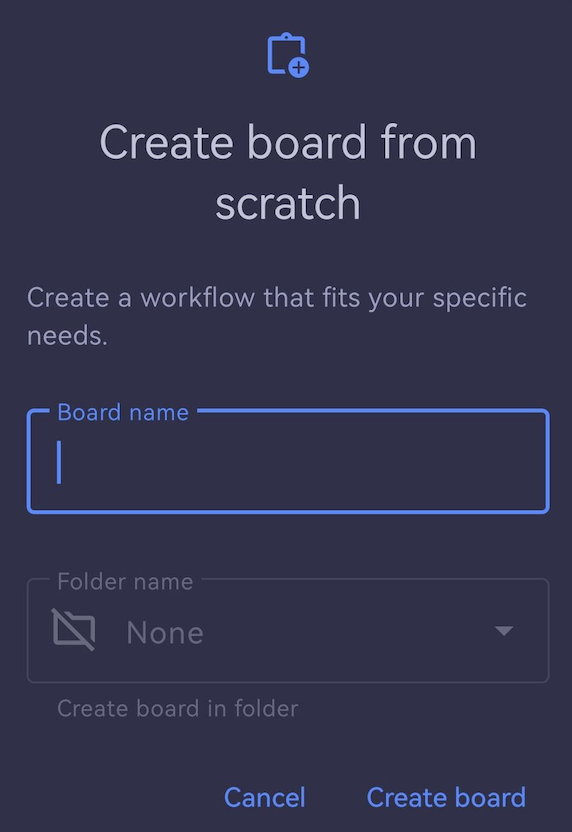
Wenn du es von Grund auf neu erstellst:
- Gib den Namen des Boards ein
- Wähle den Ordner aus (optional)
- Tippe auf Erstellen, um die Aktion abzuschließen
Um das Board an deine Bedürfnisse anzupassen, kannst du beim Erstellen des Boards Folgendes hinzufügen:
- Board-Beschreibung
- Board-Ansicht
- Felder
Beschreibung hinzufügen #
Du kannst (optional) die Beschreibung dem Board hinzufügen, das du und dein Team verwendet. Dies kann eine kurze Beschreibung eines Projekts, Anweisungen, Richtlinien oder alles andere sein, was du für geeignet hältst, damit dein Team ein tieferes und besseres Verständnis für den Zweck des Boards hat.
So tust du dies:
- Klicke auf das Symbol für Board-Informationen oben rechts
- Schreibe eine Board-Beschreibung
- Klicke auf Speichern, um die Aktion abzuschließen
So fügst du eine Board-Beschreibung hinzu:
- Tippe auf die drei Punkte in der oberen rechten Ecke des Boards
- Wähle Board-Info
- Tippe auf Beschreibung
- Gib die Beschreibung ein
- Tippe auf Speichern, um die Aktion abzuschließen
- Tippe auf die drei Punkte in der oberen rechten Ecke des Boards
- Wähle Board-Info aus
- Tippe auf Beschreibung
- Gib die Beschreibung ein
- Tippe auf Speichern, um die Aktion abzuschließen
Elementgruppe #
Eine Elementgruppe ist ein Abschnitt auf dem Board, der Elemente enthält und das Board organisiert hält. Jedes erstellte Element hat seine eigene Gruppe, die als „Container“ oder Abschnitt dient, in dem das Element platziert wird. Eine Gruppe kann alles Mögliche darstellen – von einem Zeitintervall (Monat, Woche, Tag) bis hin zum Namen eines Kunden, einer Funktion oder eines Projekts.
Sobald du das Board erstellt hast, werden automatisch eine leere Gruppe und leere Elementbeispiele erstellt. Du kannst Gruppen reduzieren und erweitern. In der Web-App kannst du bei Bedarf auch sie umbenennen oder die Farbe ändern.
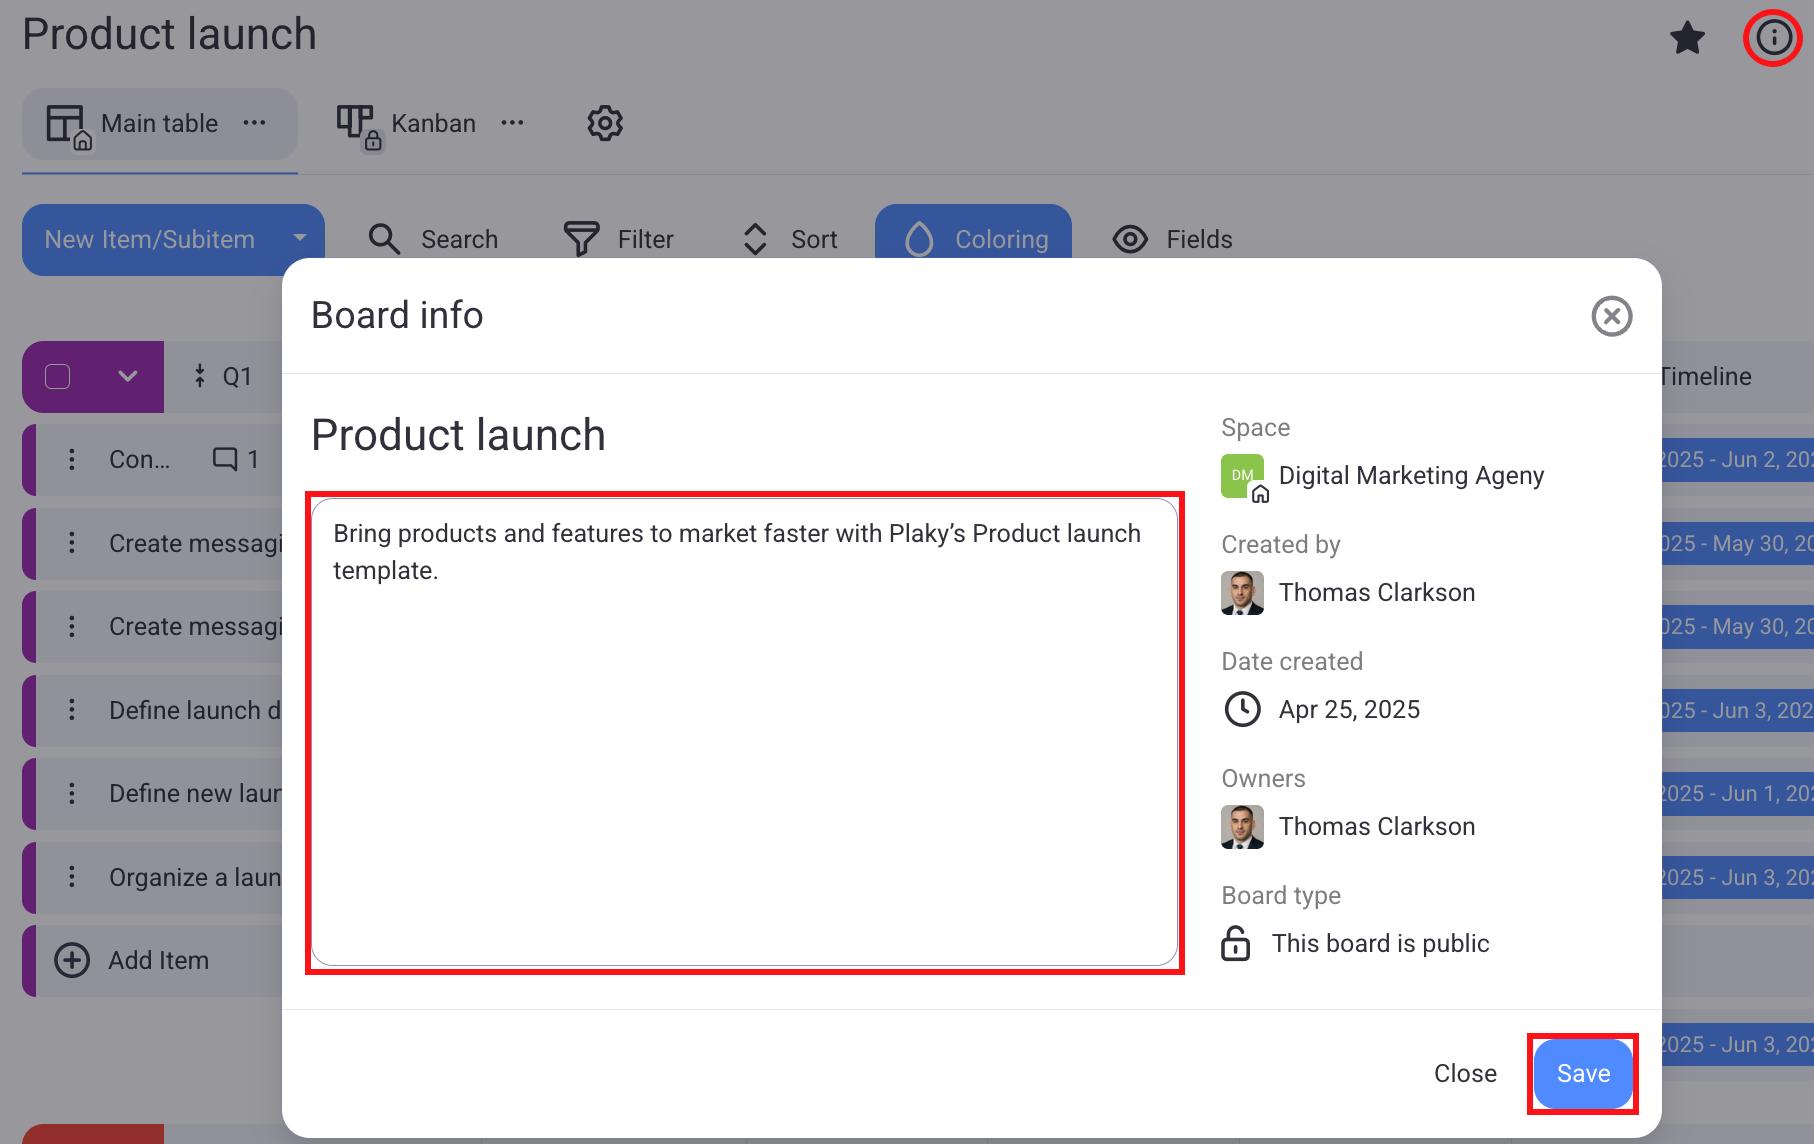
Board-Info #
Nachdem du das Board erstellt hast, kannst du zusätzliche Informationen zu deinem Board sehen.
Um die Board-Informationen anzuzeigen, klicke auf die Info-Schaltfläche des betreffenden Boards.
Das modale Board-Info-Fenster wird mit den folgenden Informationen geöffnet:
- Boardname
- Board-Beschreibung
- Bereich (Bereich, auf dem sich das betreffende Board befindet)
- Board-Ersteller (Teammitglied, das das Board erstellt hat)
- Board-Inhaber
- Board-Typ (kann nur bei kostenpflichtigen Plänen geändert werden)

Nachdem du alle Änderungen vorgenommen hast, klicke auf Speichern, um die Aktion abzuschließen.
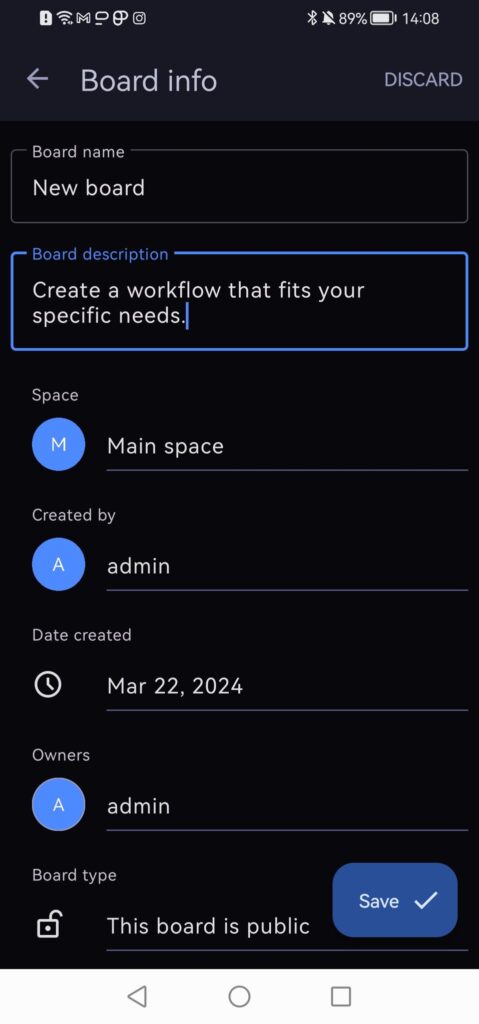
So zeigst du die Board-Informationen an:
- Tippe auf die drei Punkte in der oberen rechten Ecke des Boards
- Wähle Board-Info
- Nachdem du Änderungen vorgenommen hast, wische das modale Board-Info-Fenster nach unten
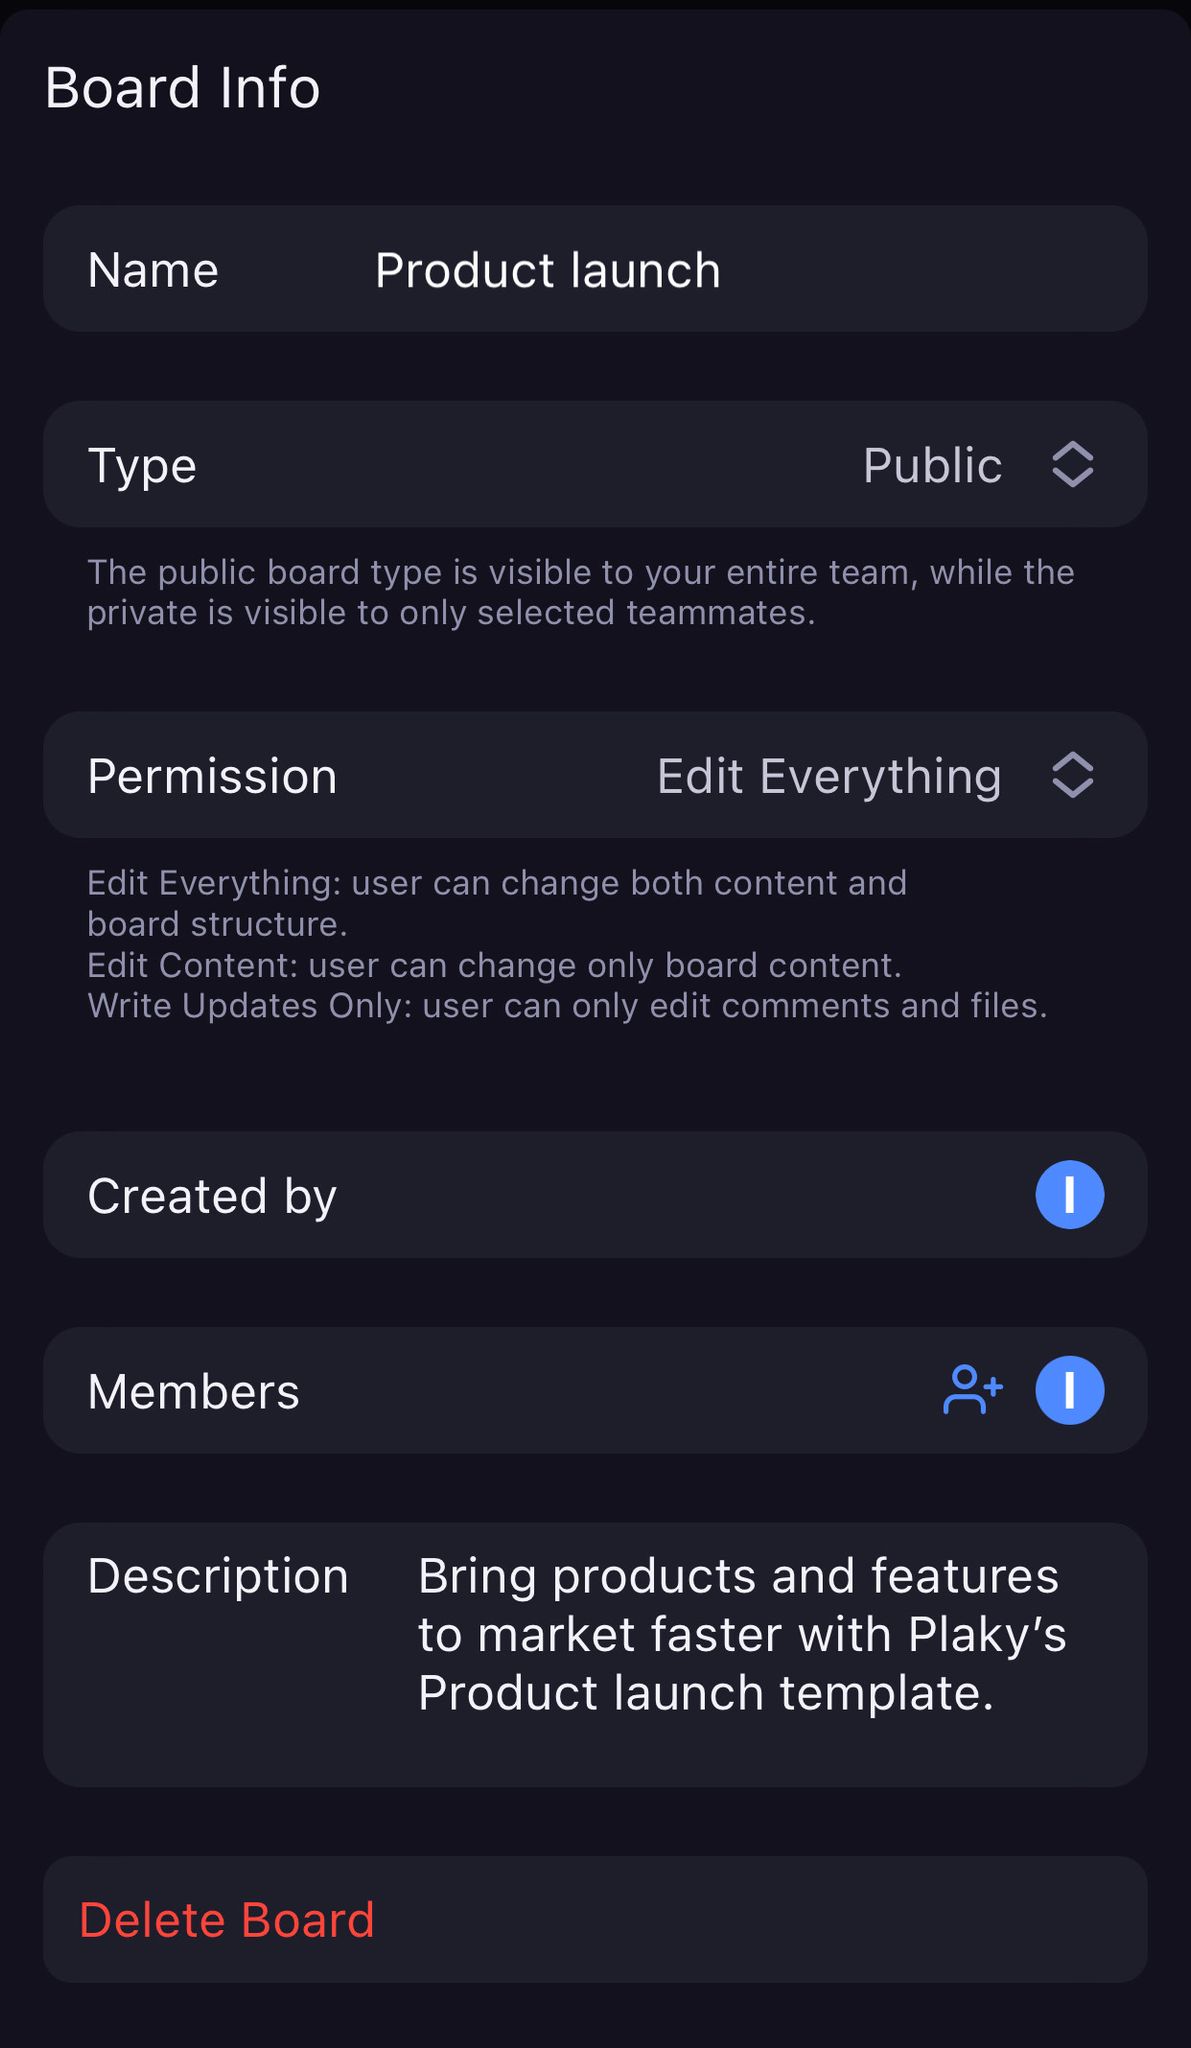
Im Board-Info-Fenster kannst du den Namen und die Beschreibung des Boards bearbeiten, Berechtigungen ändern und alle Informationen zum Board-Eigentümer und -Ersteller anzeigen. Je nach Berechtigungen kannst du das Board auch löschen, indem du unten auf dem Bildschirm auf die Schaltfläche Board löschen tippst.
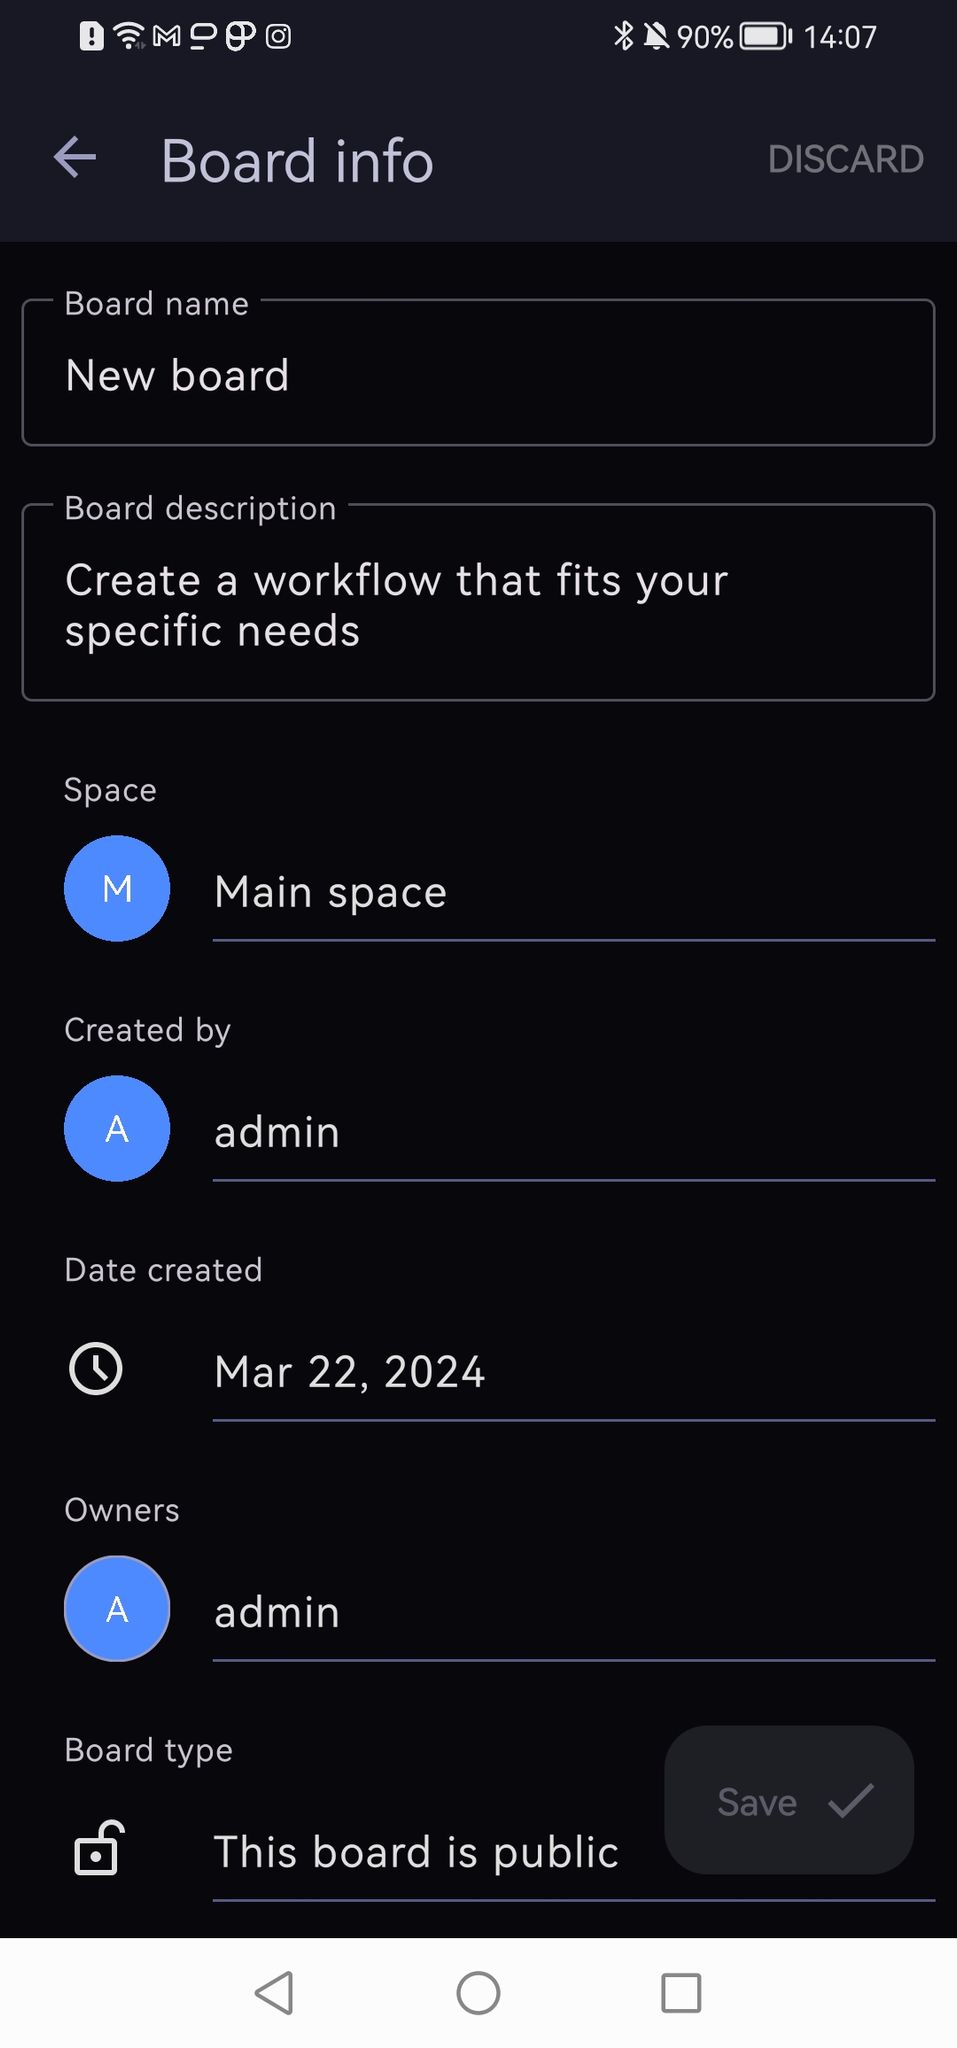
So zeigst du die Board-Informationen an:
- Tippe auf die drei Punkte in der oberen rechten Ecke des Boards
- Wähle Board-Info
- Nachdem du Änderungen vorgenommen hast, tippe auf Speichern, um die Aktion abzuschließen
Im Board-Info-Fenster kannst du den Namen und die Beschreibung des Boards bearbeiten, Berechtigungen ändern und alle Informationen zum Board-Eigentümer und -Ersteller anzeigen.
Je nach Berechtigungen kannst du das Board auch löschen, indem du unten auf dem Bildschirm auf die Schaltfläche Board löschen tippst.
Felder hinzufügen #
Felder sorgen für Struktur und Form der Elemente und Elementgruppen in deinem Board. Sie ermöglichen es dir, wichtige Attribute hinzuzufügen und die Organisation deines Projekts zu verbessern. Lies diesen Text, um zu erfahren, wie du deinem Board Felder hinzufügst.
Board-Ansicht #
Mit verschiedenen Board-Ansichten kannst du die Daten, auf die du Zugriff hast, auf eine von dir bevorzugte Weise visualisieren.
Es gibt vier Arten von Ansichten:
- Tabelle
- Kanban
- Gantt
- Diagramm
Tabellenansicht #
Mit der Tabellenansicht kannst du Elemente in Form von Zeilen anzeigen und Felder verwenden, um die Einzelheiten des Elements hinzuzufügen.
Kanban-Ansicht #
Die Kanban-Ansicht gruppiert die Elemente nach allen Kriterien, die du zuvor ausgewählt hast (z. B. Person, Status, Datum, Tag …).
Gantt-Ansicht #
Die Gantt-Ansicht ermöglicht es dir, Projekte und Aufgaben entsprechend ihrer Fälligkeitsdaten und Zeitpläne zu visualisieren und zu organisieren.
Diagramm-Ansicht #
Die Diagrammansicht ermöglicht es dir, Balken- und Tortendiagramme zu erstellen, in denen du Elemente nach bestimmten Attributen (z. B. dem Fertigstellungsstatus) gruppieren kannst.