Introduction aux Vues du Tableau
La manière dont vos données sont affichées sur le tableau vous permet d'avoir un meilleur affichage d'ensemble des informations disponibles. Grâce aux affichages du tableau, vous pouvez visualiser les données affichées de différentes façons.
Types de vues du Tableau #
Plaky vous permet de choisir entre différentes vues du tableau :
- La vue Tableau
- La vue Kanban
- La vue Gantt
- La vue graphique
Vous trouverez ci-dessous plus de détails pour chaque vue.
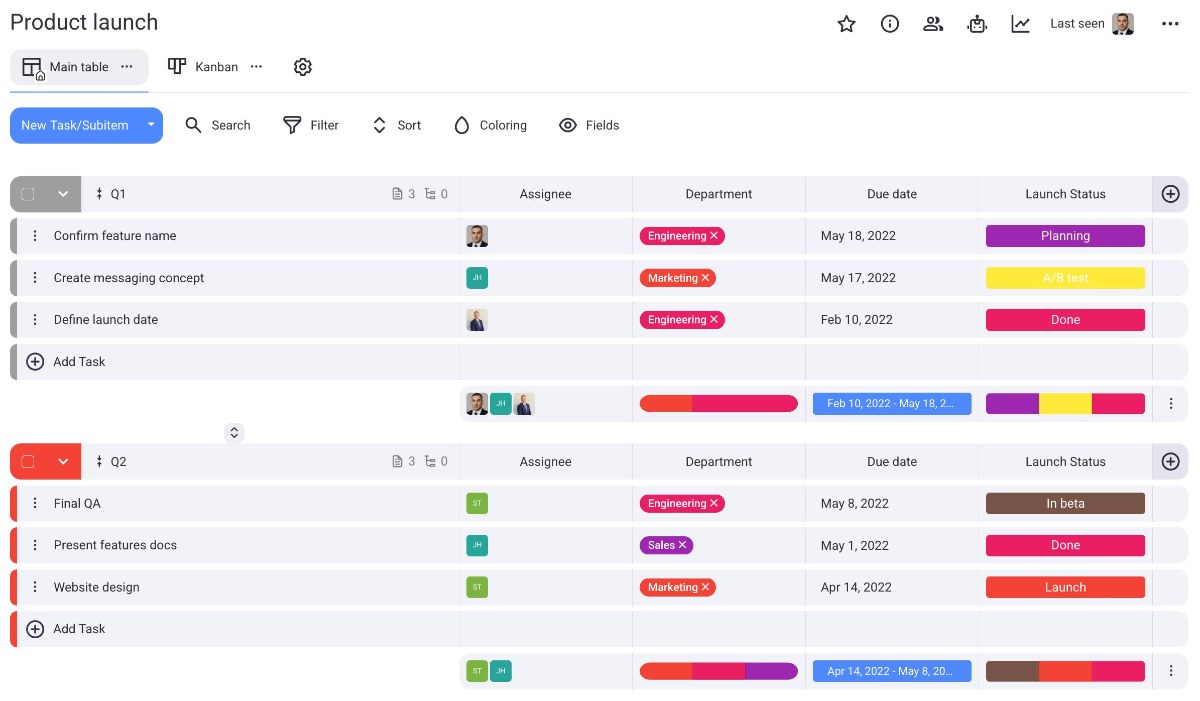
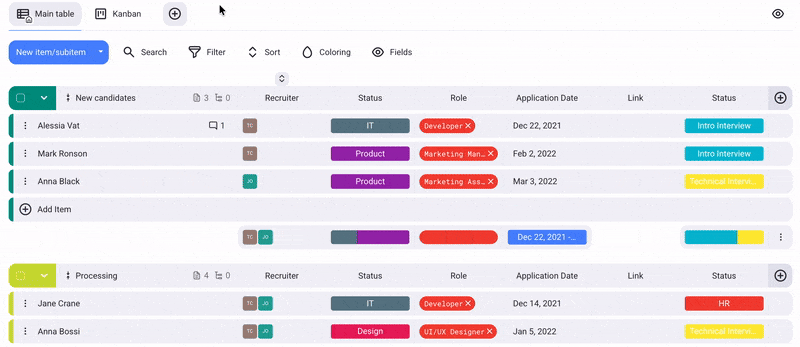
Vue Tableau #
Avec la vue Tableau, les informations disponibles dans votre tableau seront affichées sous la forme d'un tableau avec des colonnes et des rangées.
Voici l'exemple de la vue Tableau pour le modèle de tableau de lancement de produit :
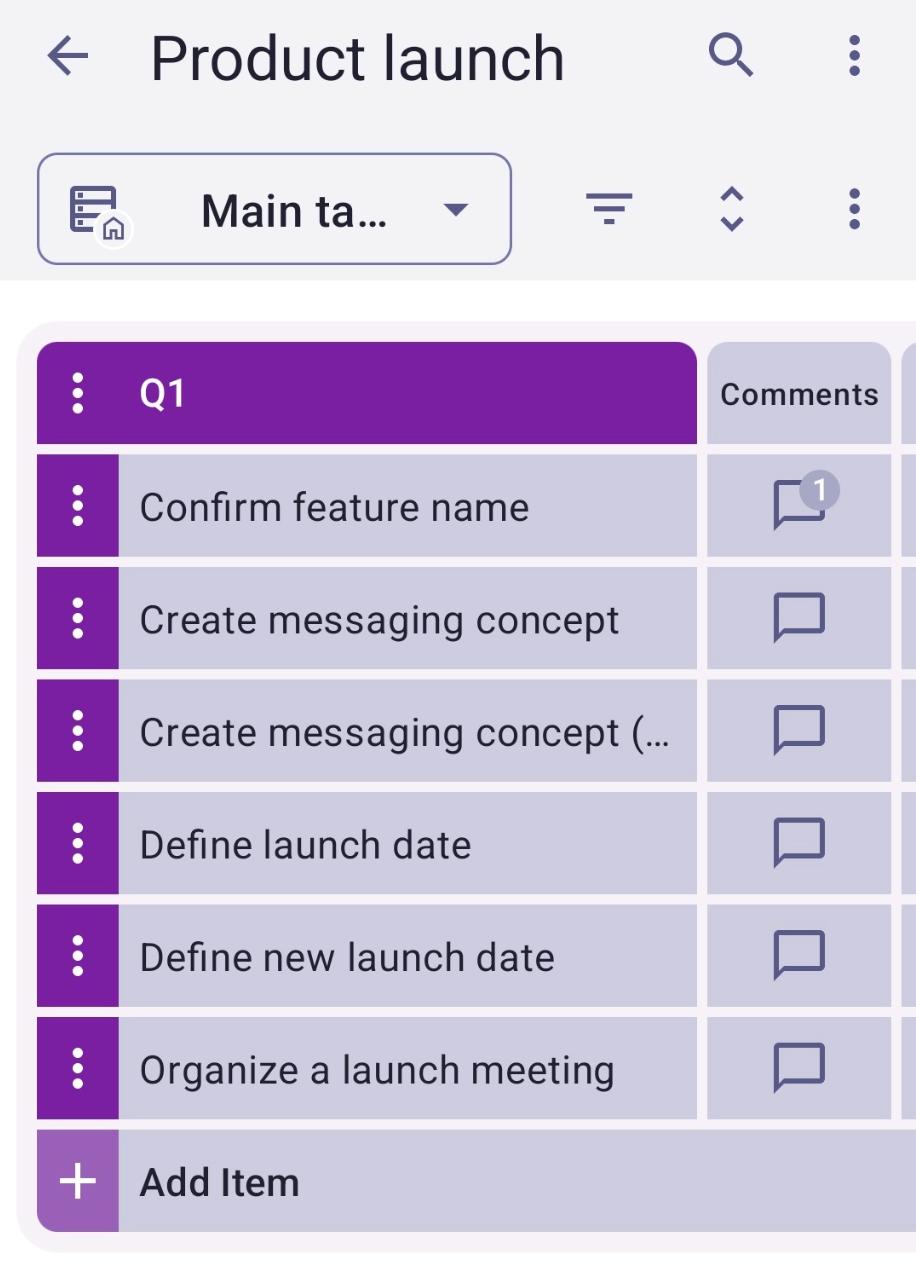
En vue Tableau, balayez vers la gauche pour afficher tous les champs du tableau.

Faites glisser vers la gauche pour voir tous les champs du tableau.
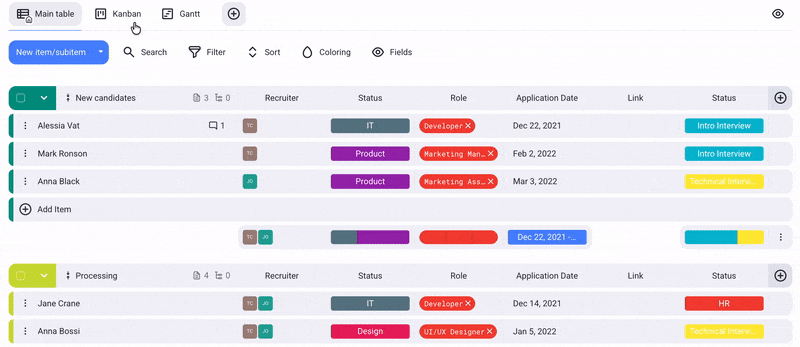
Vue Kanban #
Kanban est une technique de gestion de projet bien connue, utilisée pour gérer le travail en hiérarchisant les tâches et les demandes en fonction de la capacité disponible.
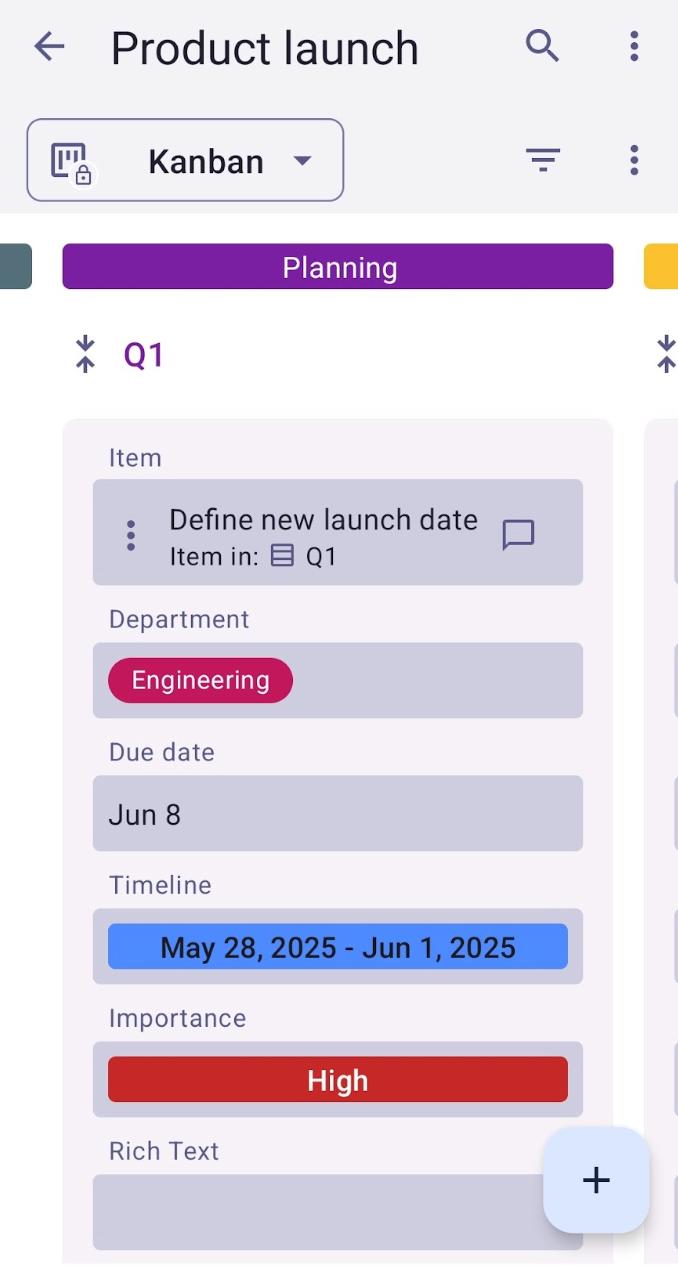
Voici l'exemple de la vue Kanban pour le modèle de tableau de lancement de produit :
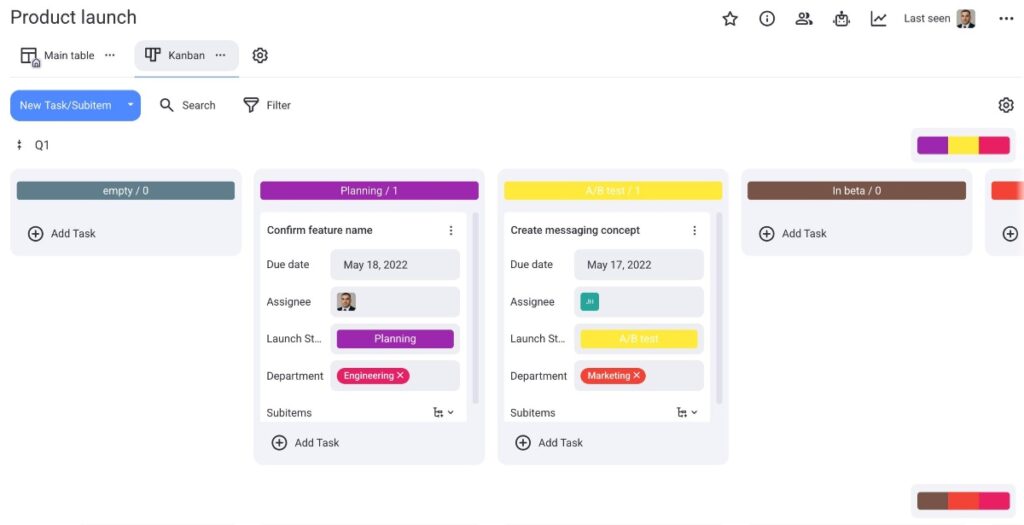
En vue Kanban, balayez vers la gauche pour voir tous les éléments du tableau regroupés par statut, et glissez-déposez l'élément pour modifier son statut.

Faites glisser vers la gauche pour voir tous les éléments du tableau regroupés par statut.
Pour en savoir plus sur la vue Kanban dans Plaky, consultez notre article.
Vue Gantt#
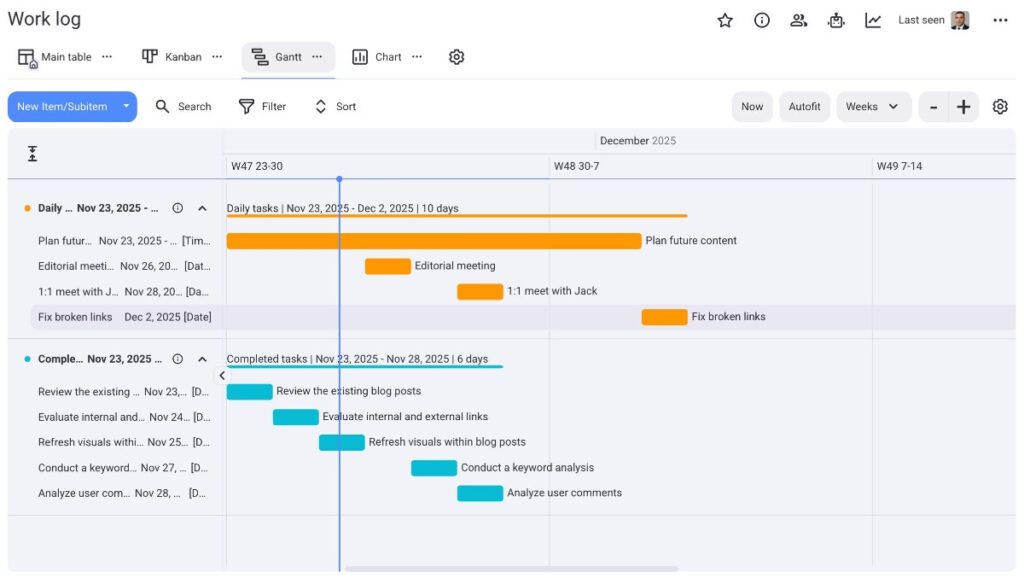
La vue Gantt vous offre une représentation visuelle de vos tâches sous forme de barres horizontales sur une chronologie.
Voici un exemple de la vue Gantt pour le modèle de tableau de suivi des travaux :
BIENTÔT DISPONIBLE
BIENTÔT DISPONIBLE
Pour en savoir plus sur la vue Gantt, consultez notre article.
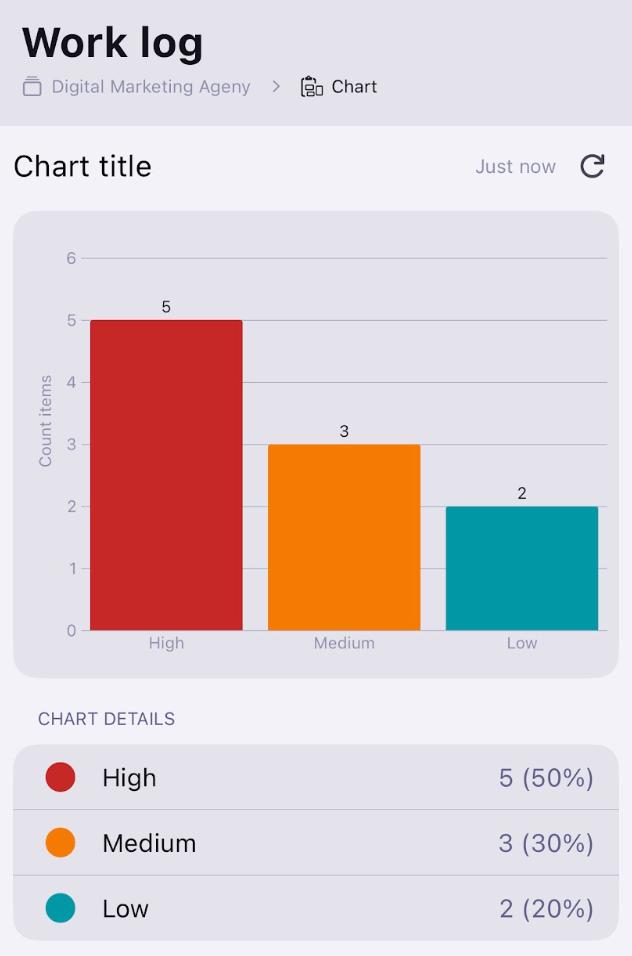
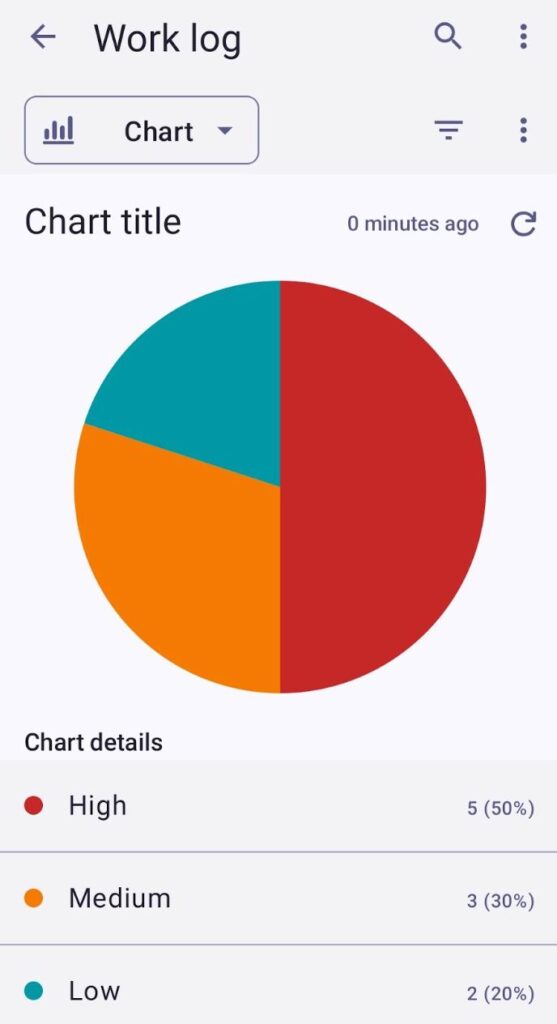
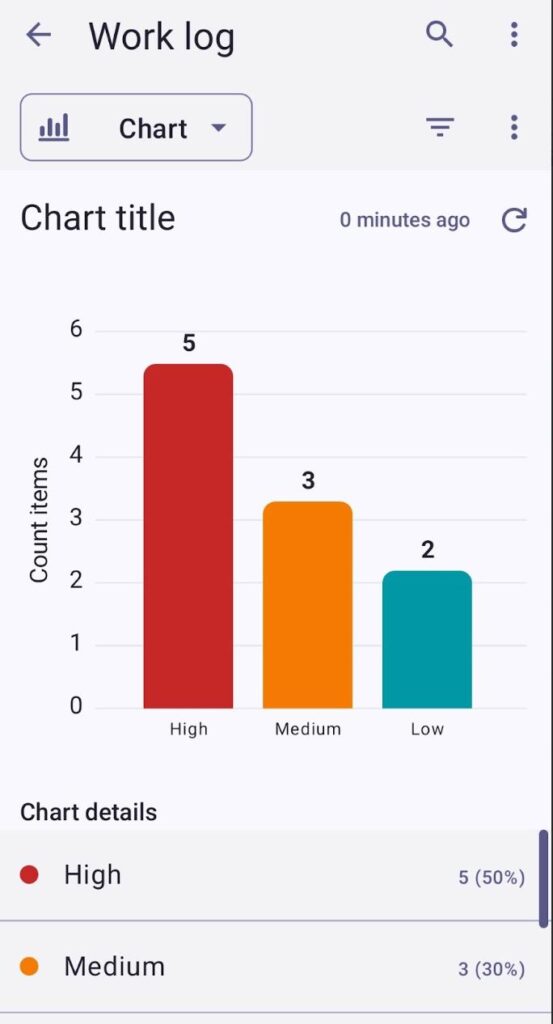
Vue Graphique#
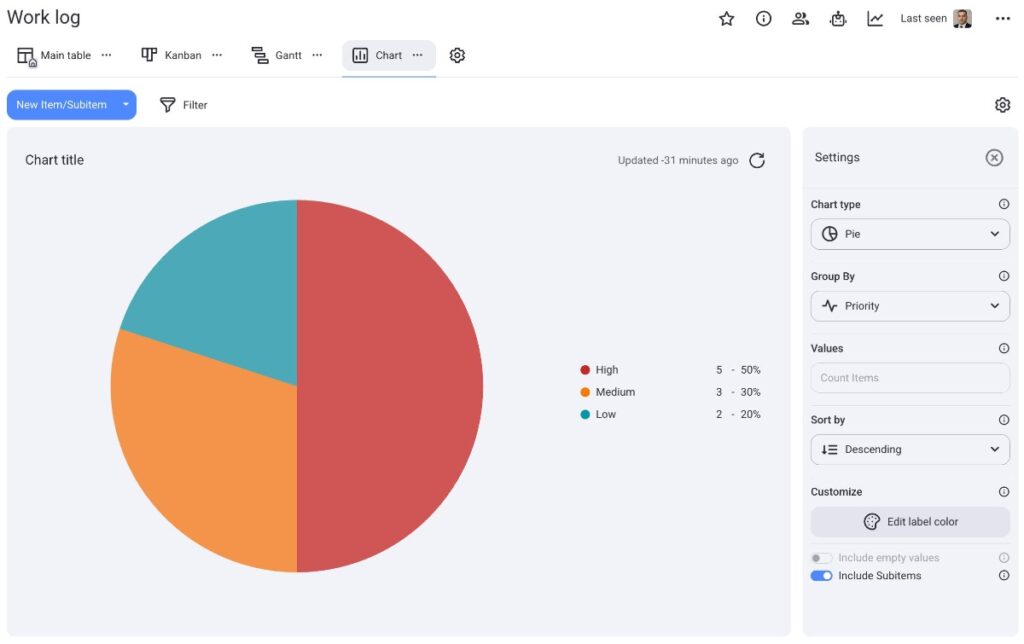
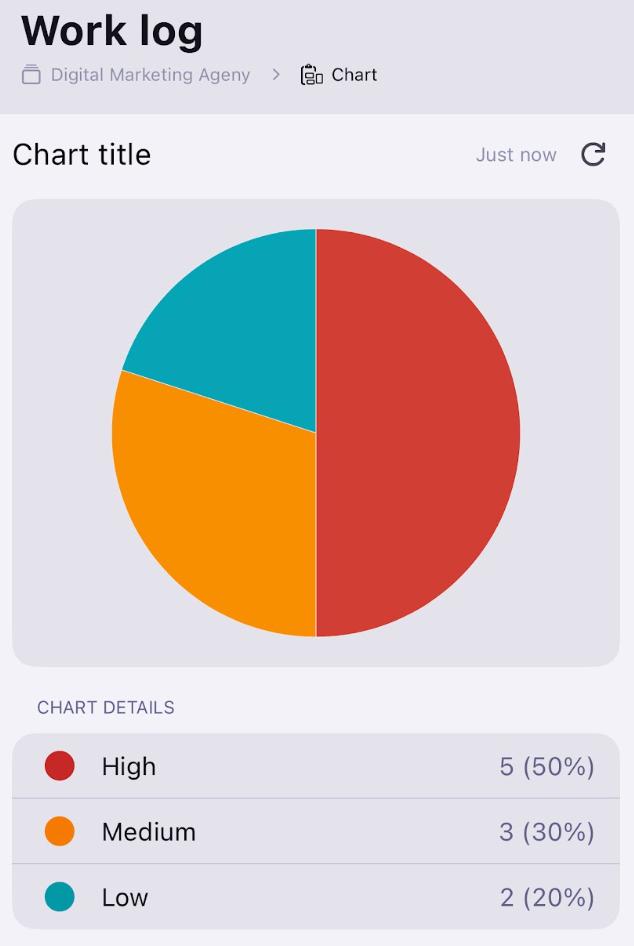
Avec la vue Graphique, vous pouvez visualiser les projets et les tâches avec des graphiques interactifs de type camembert et en bâtons.
Voici un exemple de diagramme en camembert dans Plaky :
Voici un exemple de diagramme en bâtons dans Plaky :

Voici un exemple de diagramme en camembert dans Plaky sur iOS:
Voici un exemple de diagramme en bâtons dans Plaky sur iOS :
Voici un exemple de diagramme en camembert dans Plaky sur Android:
Voici un exemple de diagramme en bâtons dans Plaky sur Android :
Pour en savoir plus sur la vue graphique, consultez notre article.
Ajouter une vue Tableau #
- Cliquez sur le bouton +
- Sélectionnez Créer une nouvelle vue
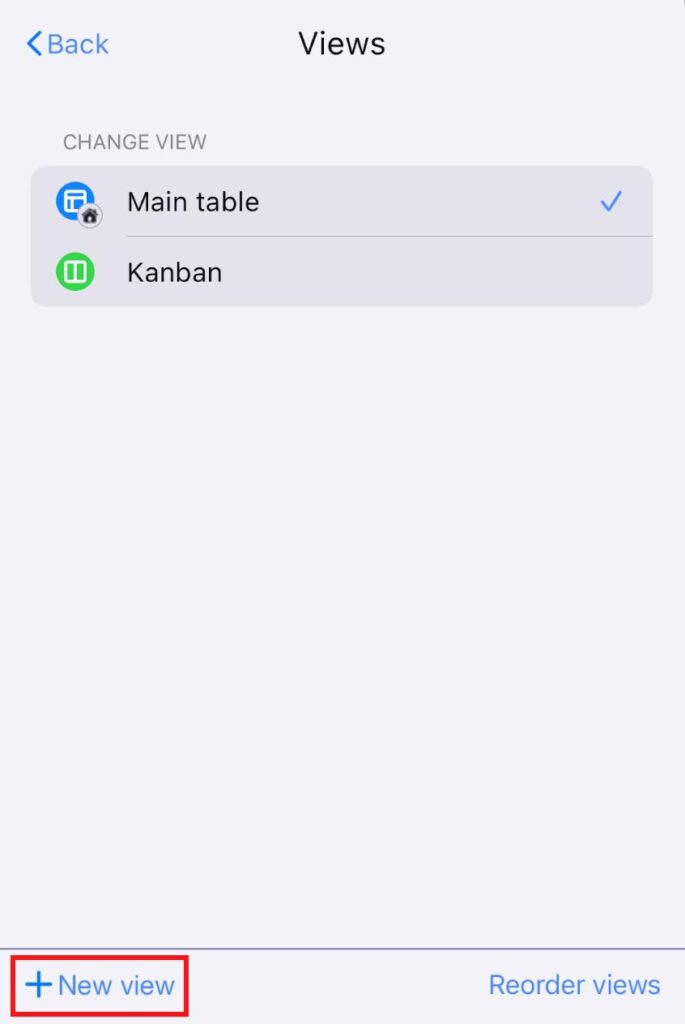
- Cliquez sur l'icône des Paramètres du tableau
- Sélectionnez Vues
- Sélectionnez + Nouvelle vue
- Saisissez le nom de la vue
- Activez le bouton si vous souhaitez que la vue soit privée
- Choisissez le type de vue
- Cliquez sur Créer pour terminer l'action
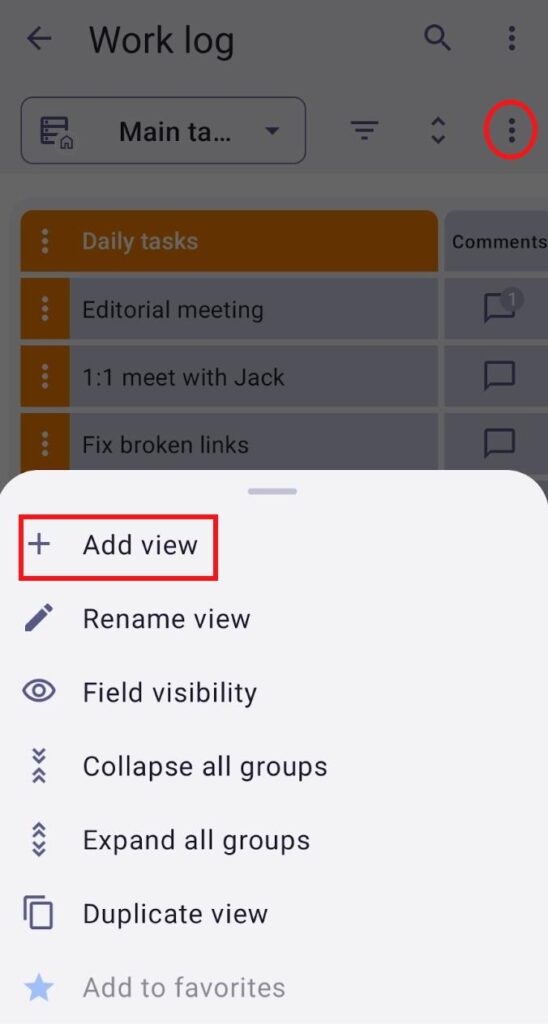
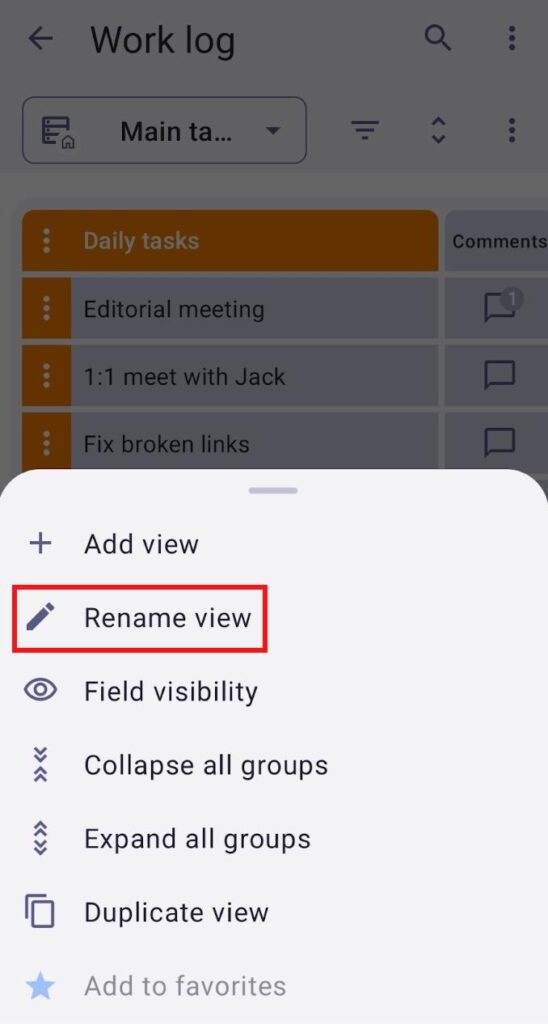
- Cliquez sur les trois points dans le coin supérieur droit
- Sélectionnez Ajouter une vue
- Tapez le nom de la vue
- Choisissez le Type de la vue
- Cochez la case si vous souhaitez que la vue soit privée
- Appuyez sur Créer pour terminer l'action
Renommer une vue #
- Cliquez sur les trois points situés à côté de la vue que vous souhaitez renommer
- Sélectionnez Renommer
- Tapez le nouveau nom
- Appuyez sur Entrée/Cliquez en dehors de la zone désignée pour terminer l'action
- Cliquez sur l'icône des Paramètres du tableau
- Sélectionnez Vues
- Faites glisser vers la droite sur une vue que vous souhaitez renommer
- Appuyez sur Renommer la vue
- Saisissez un nouveau nom de vue
- Appuyez sur Terminé pour terminer l'action
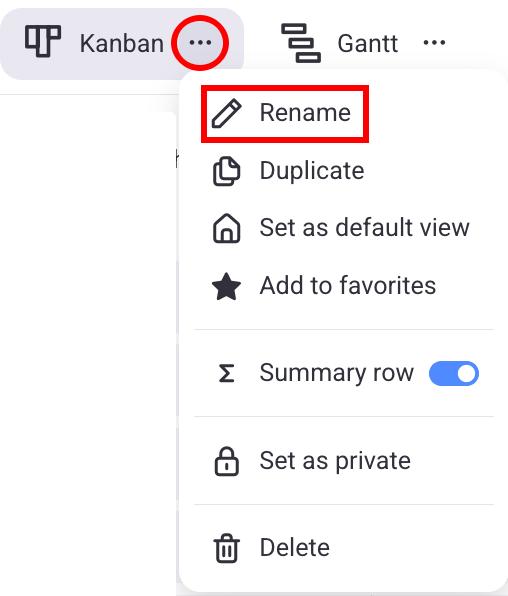
- Ouvrez votre vue préférée
- Cliquez sur les trois points dans le coin supérieur droit
- Appuyez sur Renommer la vue
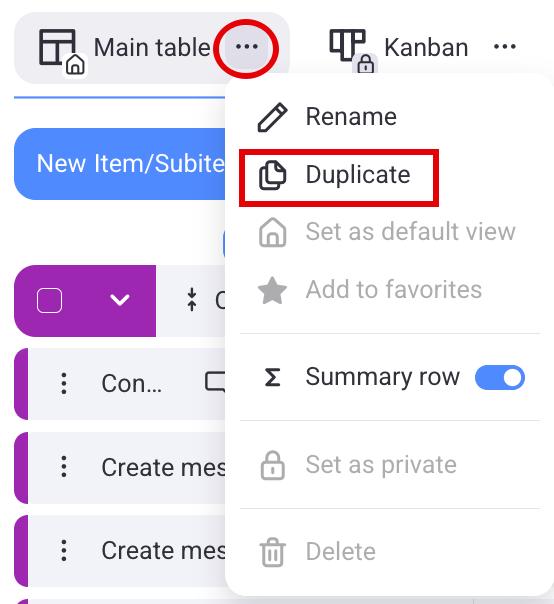
Dupliquer un affichage #
- Cliquez sur les trois points situés à côté de la vue que vous souhaitez renommer
- Sélectionnez Dupliquer pour terminer l'action
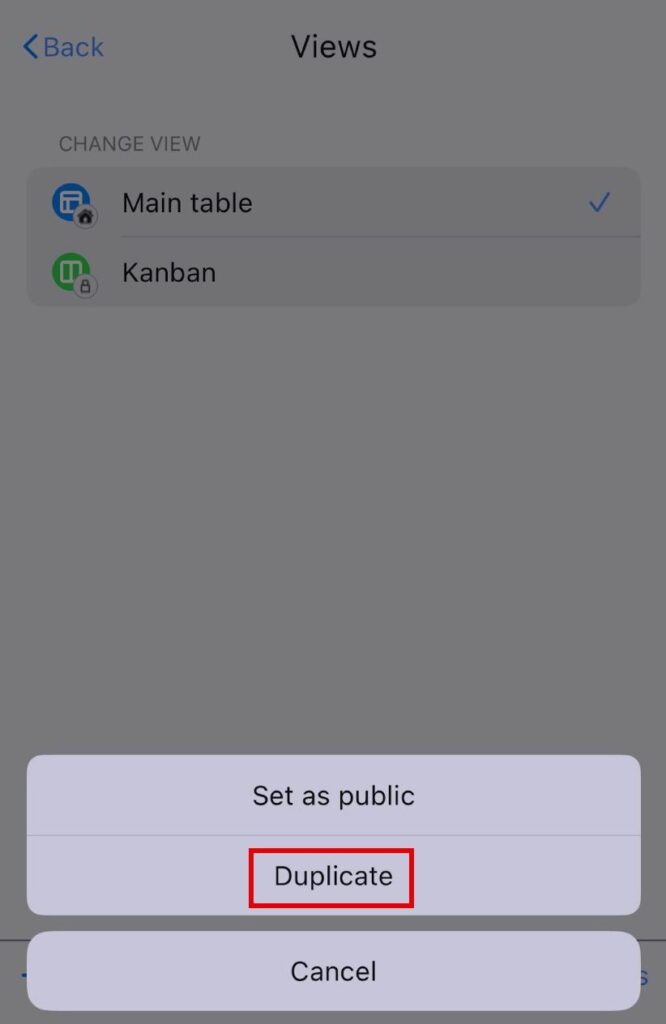
- Appuyez sur Configuration de la vue du tableau en haut à droite
- Sélectionnez Vues
- Balayez vers la gauche sur l'affichage
- Appuyez sur Plus d'options
- Sélectionnez Dupliquer
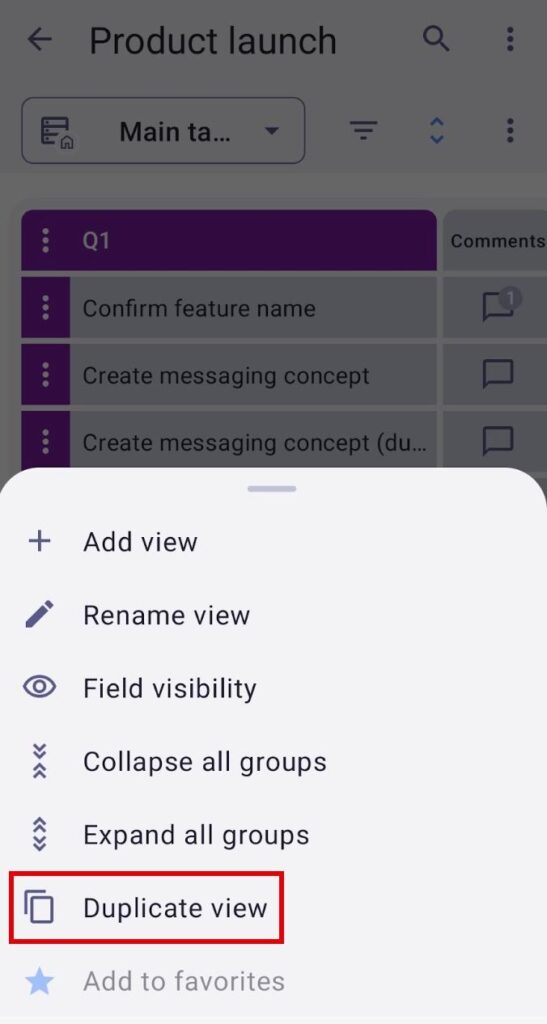
- Ouvrez votre vue préférée
- Cliquez sur les trois points dans le coin supérieur droit
- Appuyez sur Dupliquer
Vue privée #
Cette fonctionnalité est disponible dans les plans Pro et Entreprise.
Les vue privées offrent un espace dédié et personnel, réservé à leur créateur. Cela permet à ce dernier de suivre l'état des tâches, les mises à jour et les projets sans impacter les autres utilisateurs du tableau.
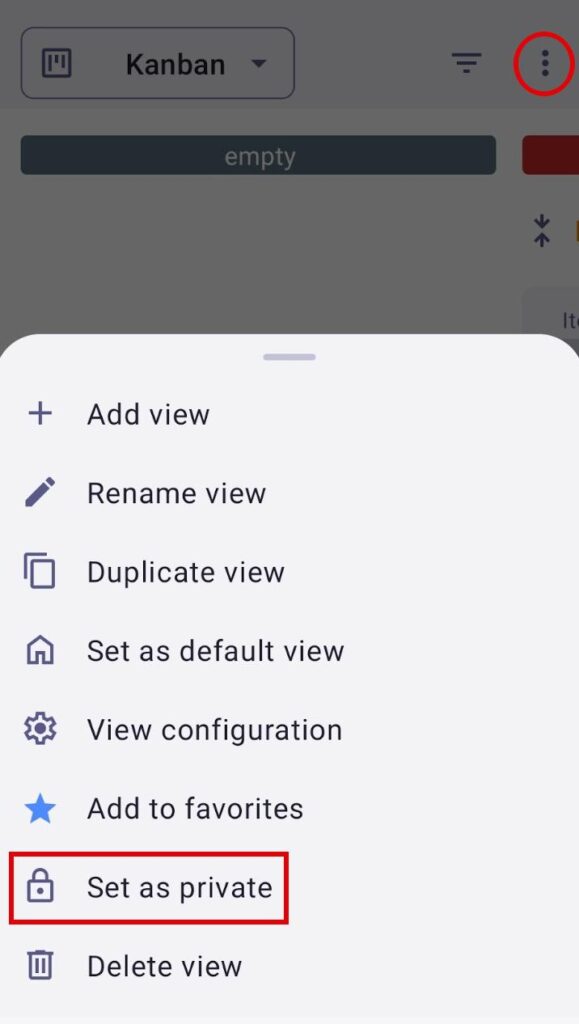
Transformer la vue publique en vue privée #
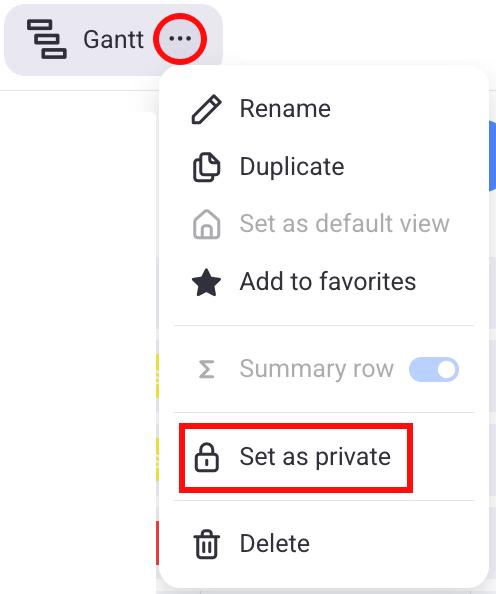
- Cliquez sur les trois points situés à côté de l'affichage
- Sélectionnez Définir comme privé
- Cliquez sur l'icône des Paramètres du tableau
- Sélectionnez Vues
- Balayez vers la gauche sur une vue
- Appuyez sur Plus d'options
- Sélectionnez Définir comme privé
- Cliquez sur les trois points dans le coin supérieur droit
- Appuyez sur Définir comme privé
Les affichages privés ne sont visibles que par leurs créateurs ou par la personne qui a modifié la confidentialité de l’affichage (de publique à privé), tandis que les affichages publics restent visibles pour les autres utilisateurs.
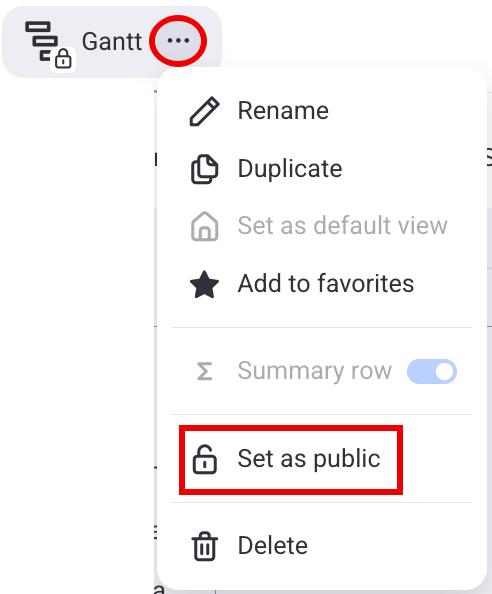
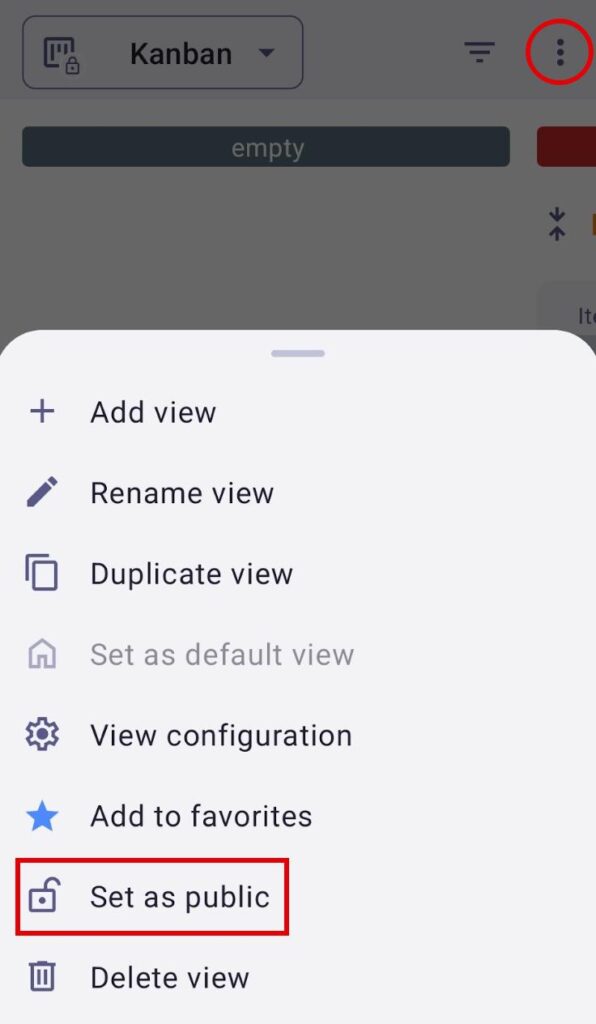
Passer un affichage de privé à public #
- Cliquez sur les trois points situés à côté de la vue
- Sélectionnez Définir comme public
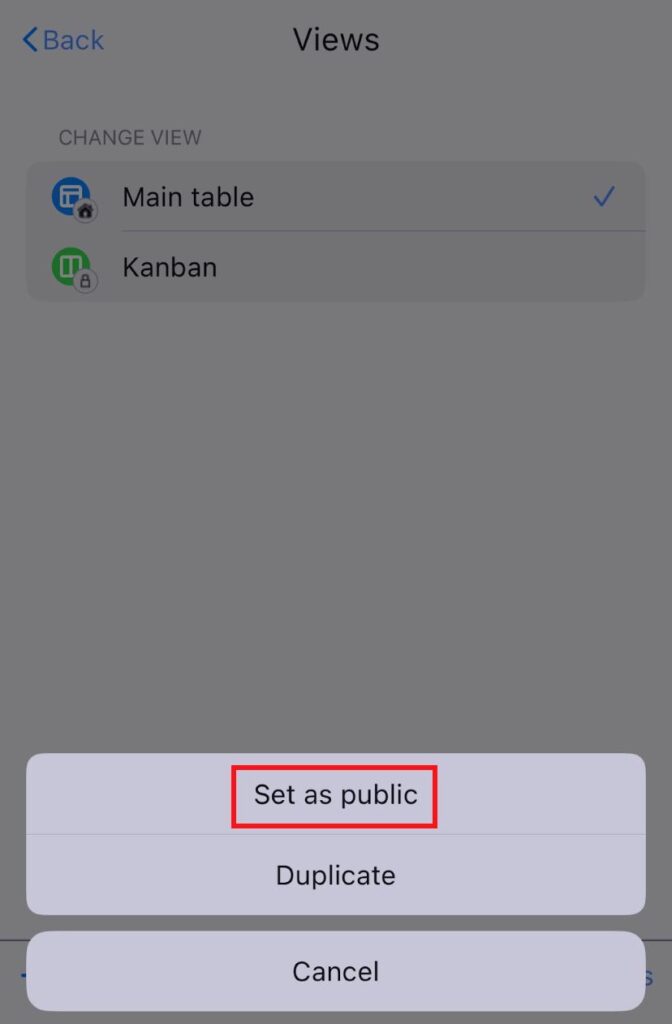
- Cliquez sur l'icône des Paramètres du tableau
- Sélectionnez Vues
- Balayez vers la gauche sur une vue
- Appuyez sur Plus d'options
- Sélectionnez Définir comme public
- Cliquez sur les trois points dans le coin supérieur droit
- Appuyez sur Rendre public
The Private View feature is available only to Admins and Members. If the Board permissions are set to anything other than Edit everything, users who are not Board owners are allowed to create private views, rename, duplicate, or delete their existing private views, but cannot turn them into public views.
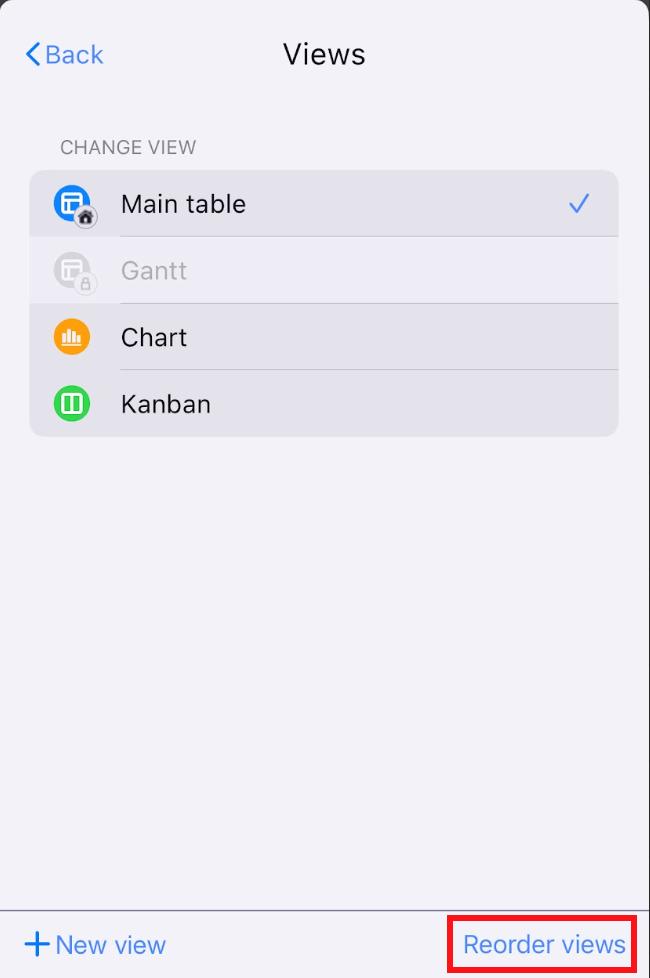
Réorganiser les affichages #
- Cliquez et maintenez le clic sur une vue
- Faites glisser l'affichage et déposez-la à l'endroit souhaité
- Cliquez sur l'icône des Paramètres du tableau
- Sélectionnez Vues
- Appuyez sur Réorganiser les affichages
- Faites glisser et déposez les vues pour les réorganiser
- Appuyez sur Enregistrer pour finaliser l'action
BIENTÔT DISPONIBLE
La vue par défaut restera la première vue.
Les administrateurs et les membres peuvent trier les affichages, à moins que leur niveau d'accès au tableau ne soit limité par des droits d'accès spécifiques définies par le propriétaire du tableau.
La réorganisation des vues ne concerne pas les vues privés des utilisateurs, car le nouvel ordre des vues est appliqué et visible par tous les utilisateurs.
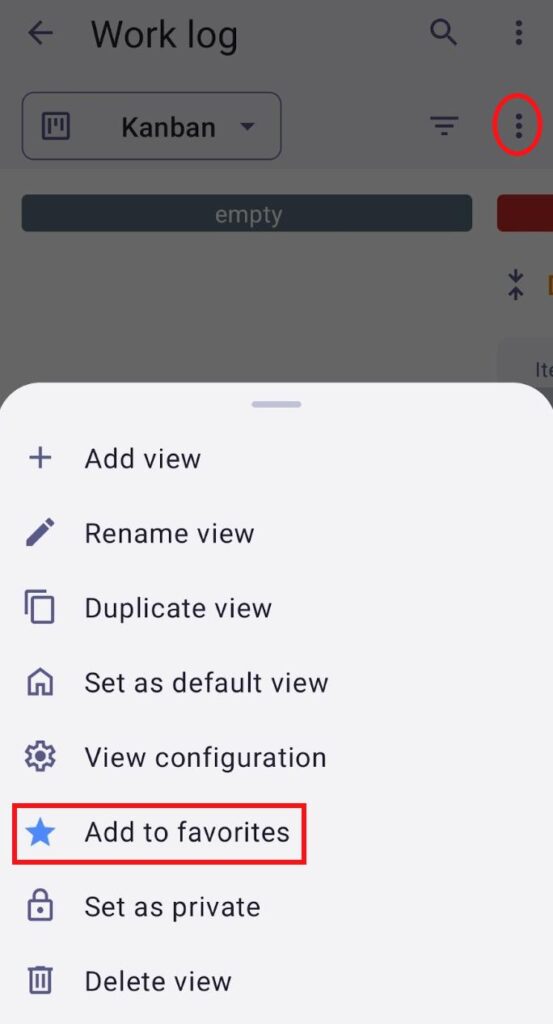
Ajouter une vue favorite #
- Cliquez sur les trois points situés à côté de la vue
- Choisissez Ajouter aux favoris
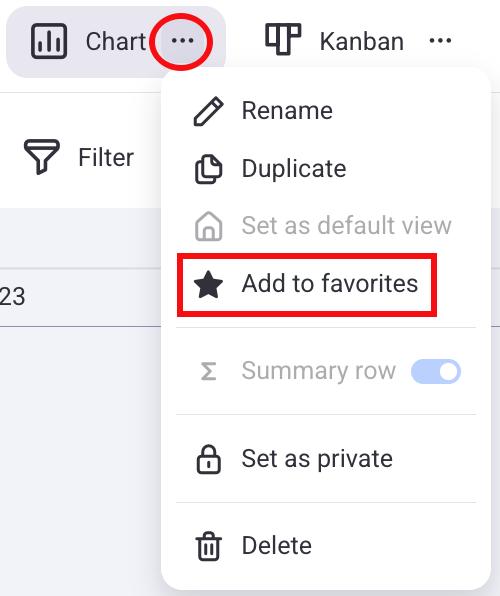
Cette vue sera placée à côté de la vue par défaut, et une icône en forme d'étoile apparaîtra à côté de son nom. Pour retirer une vue des favoris, cliquez simplement sur les trois points situés à côté et sélectionnez « Retirer des favoris ».
- Cliquez sur l'icône des Paramètres du tableau
- Sélectionnez Vues
- Faites glisser vers la droite sur une vue que vous souhaitez
- Appuyez sur Ajouter aux favoris
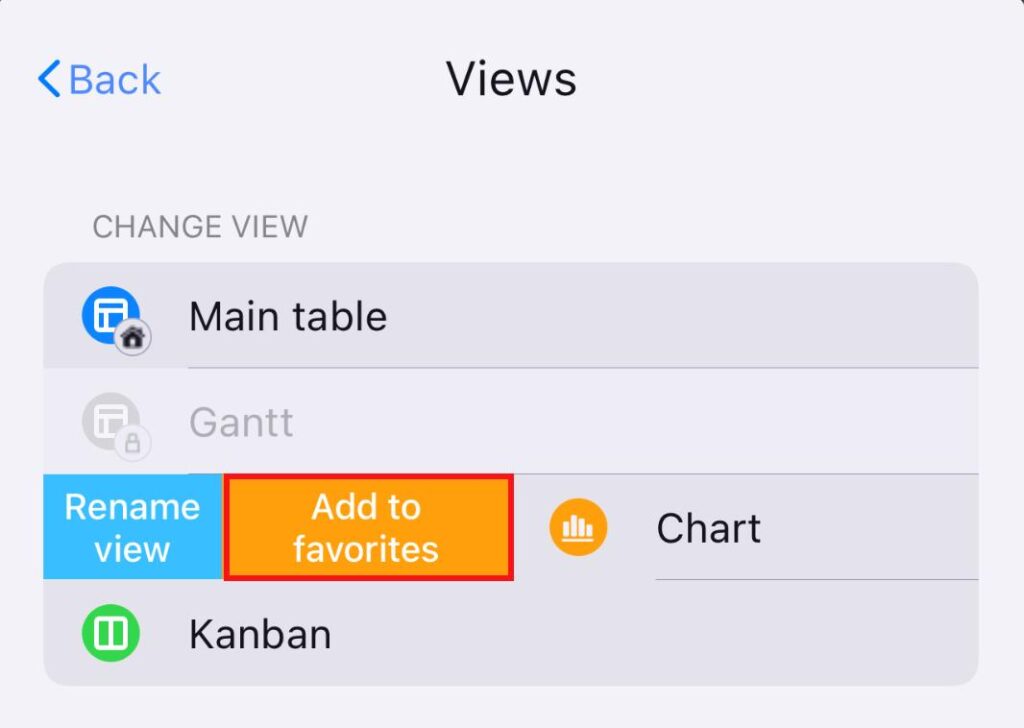
Cet affichage sera placé à côté de l'affichage par défaut et une icône en forme d'étoile apparaîtra à côté de son nom. Pour supprimer un affichage des favoris, il suffit de cliquer sur les trois points situés à côté et de sélectionner Retirer des favoris.
- Cliquez sur les trois points dans le coin supérieur droit
- Appuyez sur Ajouter aux favoris
Cet affichage sera placé à côté de l'affichage par défaut et une icône en forme d'étoile apparaîtra à côté de son nom. Pour supprimer un affichage des favoris, il suffit de cliquer sur les trois points situés à côté et de sélectionner Retirer des favoris.
Lorsqu'une vue est définie comme favorite, cette modification n'est visible que par l'utilisateur qui l'a ajoutée et n'affecte pas les autres utilisateurs du tableau. La vue par défaut ne peut pas être marquée comme favorite.
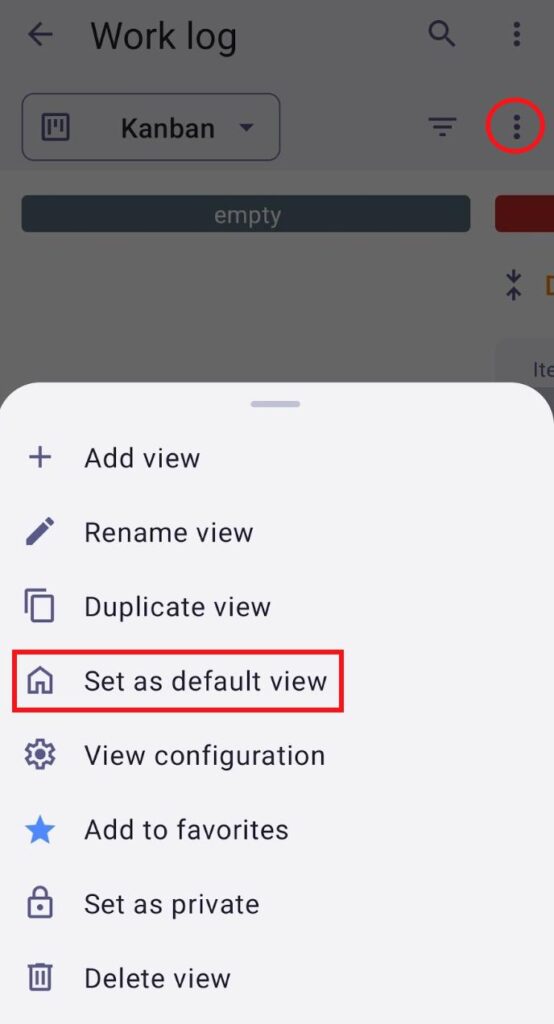
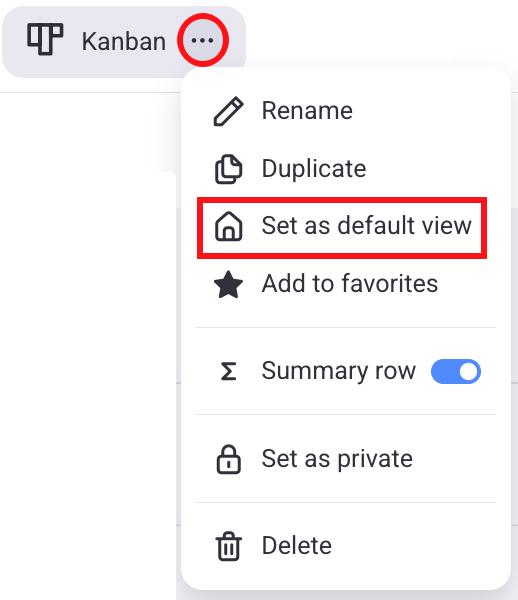
Définir la vue par défaut #
Chaque tableau doit inclure au moins un affichage. Lorsqu'un tableau est créé, un affichage en tableau est automatiquement généré et désigné comme affichage principal (par défaut). Cependant, tout autre affichage du tableau peut être défini comme affichage par défaut à la place. L'affichage par défaut ne peut pas être défini comme affichage favori. Seul le propriétaire du tableau peut définir un affichage par défaut.
- Cliquez sur les trois points situés à côté de la vue
- Cliquez sur Définir comme vue par défaut
- Cliquez sur l'icône des Paramètres du tableau
- Sélectionnez Vues
- Faites glisser vers la droite sur une vue que vous souhaitez
- Appuyez sur Définir comme vue par défaut
- Cliquez sur les trois points dans le coin supérieur droit
- Appuyez sur Définir comme vue par défaut