
Premiers pas avec Plaky — Guide de comment commencer
Bienvenue sur Plaky, votre logiciel parfait pour la gestion de projets, d’équipes et de tâches. Avec Plaky, organisez votre équipe et optimisez sa productivité et sa collaboration.
Pour vous aider à démarrer, nous avons créé ce guide qui vous permettra de découvrir les fonctionnalités de l’application et de la maîtriser rapidement.
Veuillez noter que certaines fonctionnalités de ce guide ne sont disponibles qu’avec un plan payant. Pour comparer les plans et consulter les fonctionnalités disponibles, rendez-vous sur la page des tarifs de Plaky.
Connexion à Plaky #
Se connecter est facile, et vous pouvez le faire de deux manières :
- Connexion sans mot de passe à travers email
- S'inscrire avec Google/Apple/Microsoft
Si vous ne vous êtes pas encore inscrit à Plaky ou si vous avez besoin d’aide pour l’inscription, consultez notre article.
Lorsque vous vous connectez avec votre adresse email, Plaky ne vous demande pas de mot de passe. Vous recevrez un email contenant un code OTP à chaque connexion. Votre compte est ainsi plus sécurisé et vous ne risquez plus d’oublier votre mot de passe.
Pour vous connecter avec votre email, suivez ces étapes :
- Saisissez votre email
- Cliquez sur Continuer avec l'email
- Consultez votre boîte de réception pour trouver le code OTP
- Saisissez le code OTP pour vous connecter
Si vous ne recevez pas d’emails de notification, cela peut être dû à un trop grand nombre de codes OTP non utilisés. Pour corriger cela, ouvrez simplement le dernier email de vérification et cliquez sur le bouton cliquez ici pour recommencer à recevoir des emails. Utilisez toujours votre code de connexion dans les 30 minutes pour éviter ce problème à l’avenir.
Plaky vous permet également de vous connecter avec votre compte Google, Apple ou Microsoft. Pour ce faire, suivez ces étapes :
- Appuyez sur Continuer avec Google/Apple/Microsoft
- Sélectionnez votre adresse email pour terminer
Configurer votre profil #
Une fois connecté, vous pouvez configurer votre profil. Plaky vous permet d’ajouter toutes les informations nécessaires pour que vos collègues puissent vous identifier facilement. Voici comment procéder :
- Cliquez sur votre photo de profil en haut à droite
- Cliquez sur Mon profil
- Cliquez dans le champ où vous souhaitez ajouter des informations
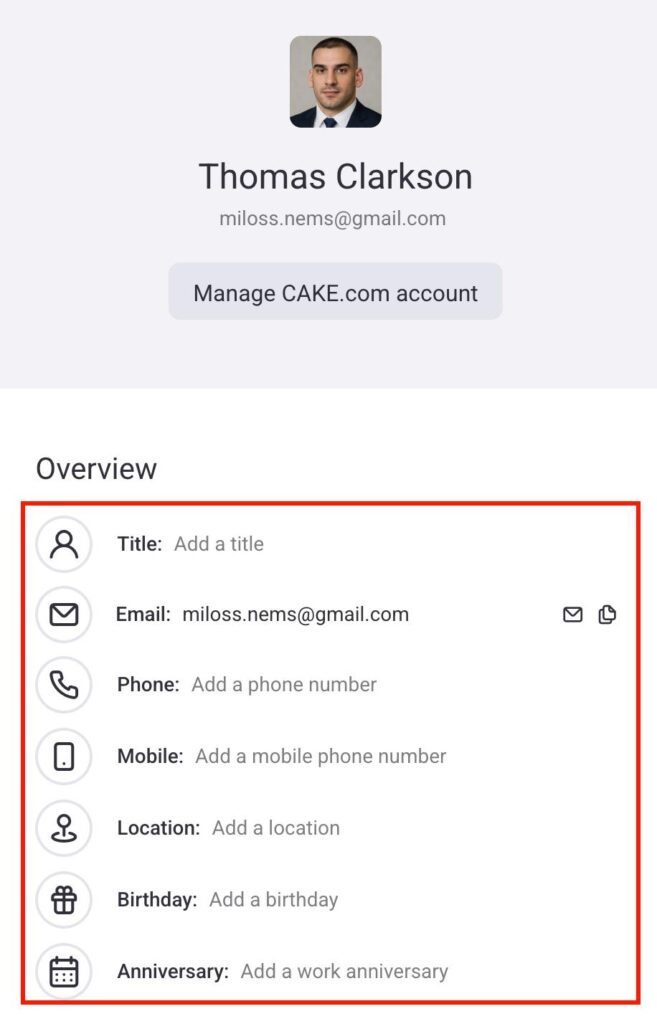
Vous pouvez modifier les informations suivantes :
- Titre
- Numéro de téléphone
- Numéro de téléphone portable
- Lieu
- Date de naissance
- Date d’anniversaire professionnelle
Explorer les Espaces et les Tableaux #
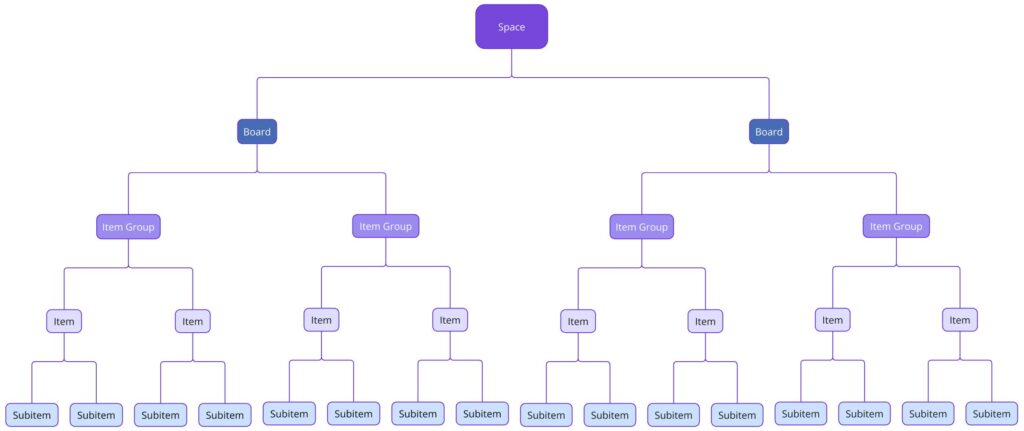
Dans Plaky, toutes les tâches et tous les projets sont organisés en Espaces et en Tableaux.
Un Espace est l’entité de plus haut niveau dans la hiérarchie de gestion de projet de Plaky. Il est composé de Tableaux, qui contiennent des Groupes d’éléments, des Éléments (tâches) et des Sous-éléments (sous-tâches).
Vous pouvez consulter les espaces dans la barre latérale gauche et choisir celui qui vous convient en cliquant sur la flèche déroulante.
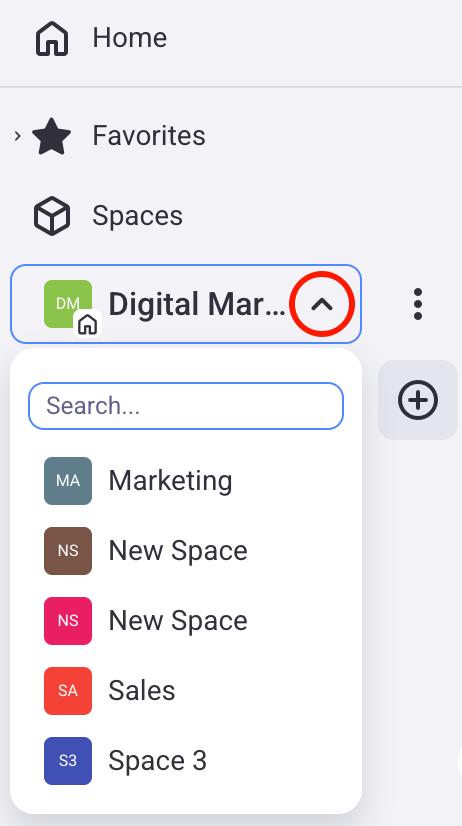
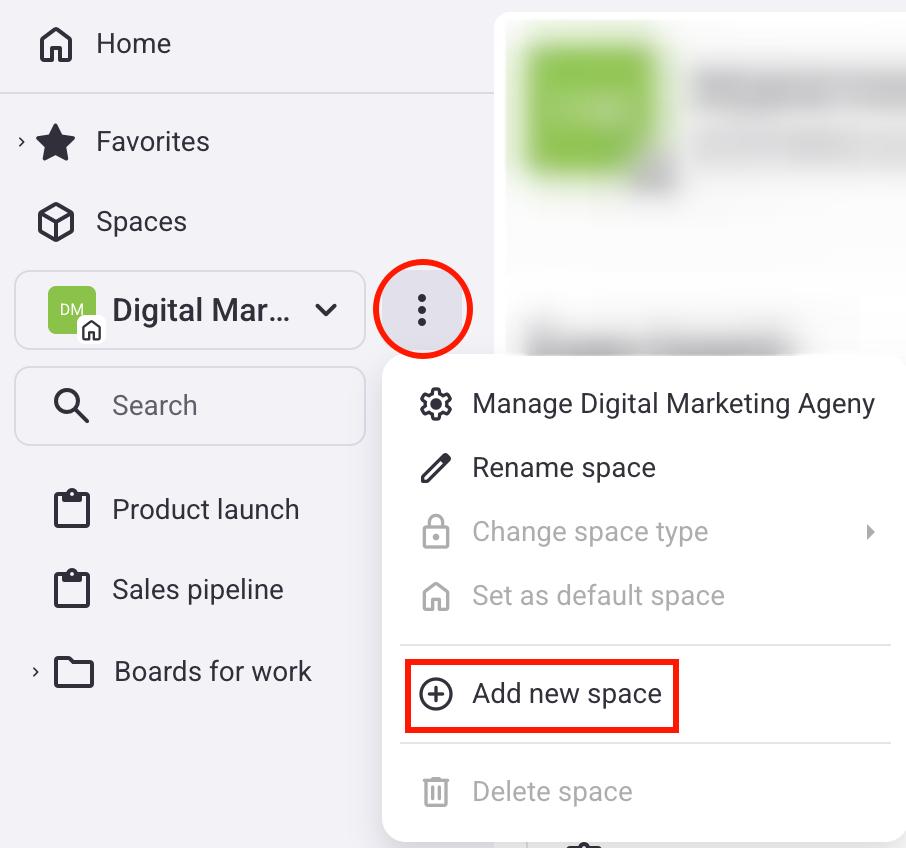
De plus, vous pouvez créer un nouvel espace en cliquant sur les trois points, puis en sélectionnant Ajouter un nouvel espace.
Une fois un Espace sélectionné, vous pouvez visualiser tous les Tableaux qu’il contient. Dans la hiérarchie de Plaky, les Tableaux se situent entre un Espace et un Élément, ils servent à organiser les Éléments.
Vous pouvez créer un Espace pour chaque service de votre entreprise, et chaque service disposera alors de plusieurs Tableaux pour ses équipes respectives.
Les Tableaux se trouvent dans la barre latérale gauche de votre écran. Pour ajouter un nouveau Tableau, suivez ces étapes :
- Cliquez sur le bouton +
- Survolez Nouveau tableau
- Choisissez le mode de création du Tableau
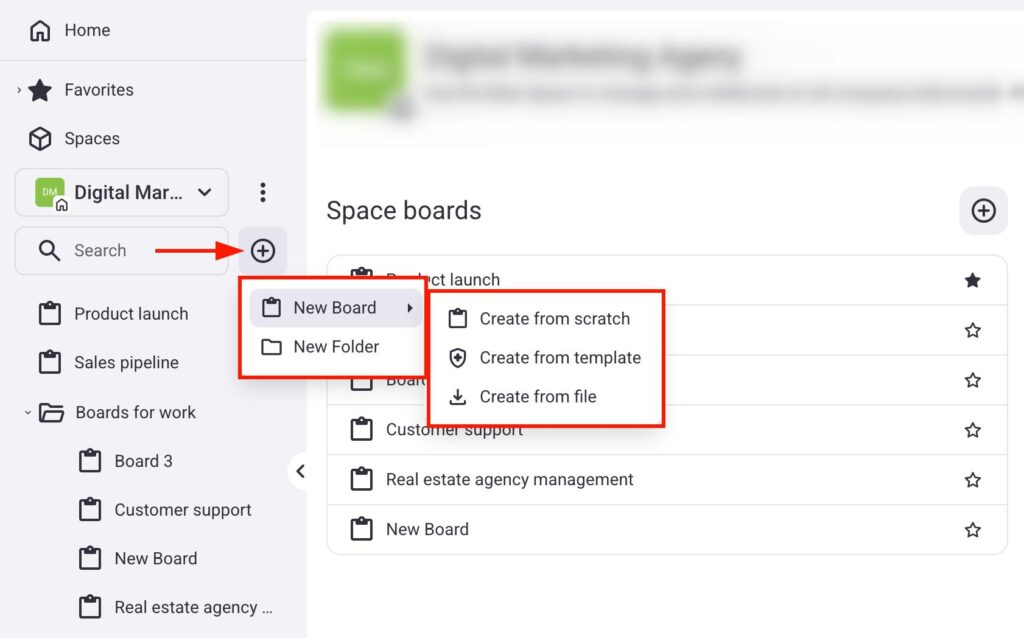
Plaky vous permet de créer un tableau de trois manières :
- Créer à partir de zéro — vous pouvez créer un tableau vierge.
- Créer à partir d’un modèle — vous pouvez sélectionner un modèle de tableau existant.
- Créer à partir d’un fichier — vous pouvez importer un tableau existant au format CSV.
Gérer les éléments/sous-éléments #
Les éléments/sous-éléments représentent les tâches sur lesquelles vous et votre équipe travaillez. Chaque élément/sous-élément comporte différents champs où vous pouvez ajouter des informations sur vos missions. Par exemple, si vous travaillez sur la refonte de l’en-tête de votre site web, vous pouvez créer une tâche incluant toutes les informations nécessaires (date limite, personne responsable, statut actuel, etc.).
Modifier la terminologie d'un élément #
Par défaut, Plaky nomme toutes les tâches et sous-tâches Éléments et Sous-éléments. Vous pouvez toutefois les renommer selon vos besoins. Par exemple, si vous êtes chef de projet, vous pouvez renommer les Éléments en Projets et les Sous-éléments en Tâches.
Voici comment :
- Cliquez sur les trois points à côté de Dernière connexion
- Cliquez sur Configurer l’élément
- Cliquez sur Modifier la terminologie des éléments
- Saisissez le nouveau nom de l’élément et du sous-élément
- Cliquez sur Enregistrer
Vous pouvez modifier les noms des articles et sous-articles en fonction de votre secteur d’activité. Par exemple, si vous travaillez dans la vente, vous pouvez utiliser les articles pour représenter vos clients. De même, si vous travaillez dans le recrutement, chaque nouvel article peut représenter un nouveau candidat.
Champs #
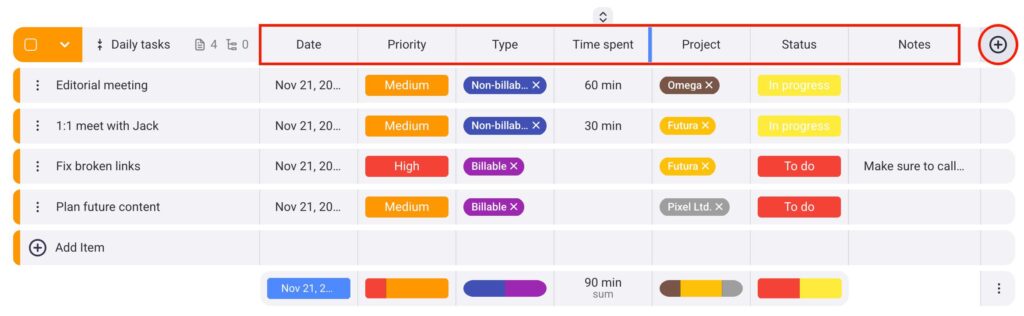
Tous les éléments/sous-éléments sont regroupés en groupes d'éléments, et leurs informations sont consultables dans leurs champs. Plusieurs types de champs sont disponibles, tels que :
- Texte et texte enrichi — ajoutez des informations textuelles sur la tâche.
- Lien — ajoutez des liens relatifs à la tâche.
- Nombres — ajoutez des nombres relatifs à la tâche.
- Statut — indiquez le statut de la tâche (p. ex., priorité, achèvement).
- Balise — ajoutez des balises pour préciser la tâche.
- Date — ajoutez une date (p. ex., date limite, date de début).
- Chronologie — ajoutez une chronologie indiquant la date de début et la date de fin de la tâche.
- Personne— ajoutez les utilisateurs affectés à la tâche.
Pour ajouter un champ, cliquez sur le bouton + situé à droite de votre élément.
Fiche d’élément #
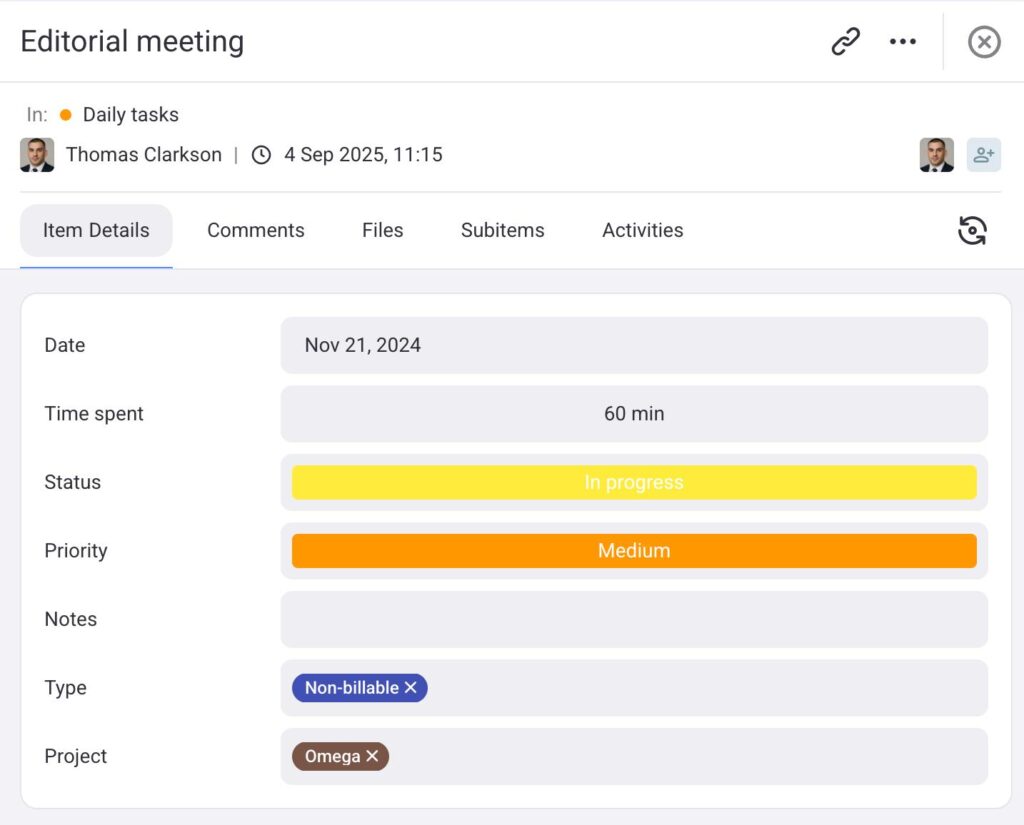
Lorsque vous cliquez sur un élément, sa fiche s’ouvre. Vous pouvez y consulter tous les détails le concernant, notamment les commentaires, les fichiers associés et l’activité des utilisateurs. Vous pouvez également voir si l’élément contient des sous-éléments.
Dans l’onglet Détails de l’élément, vous pouvez visualiser tous les champs qui le composent. De plus, vous pouvez modifier chaque champ en cliquant dessus.
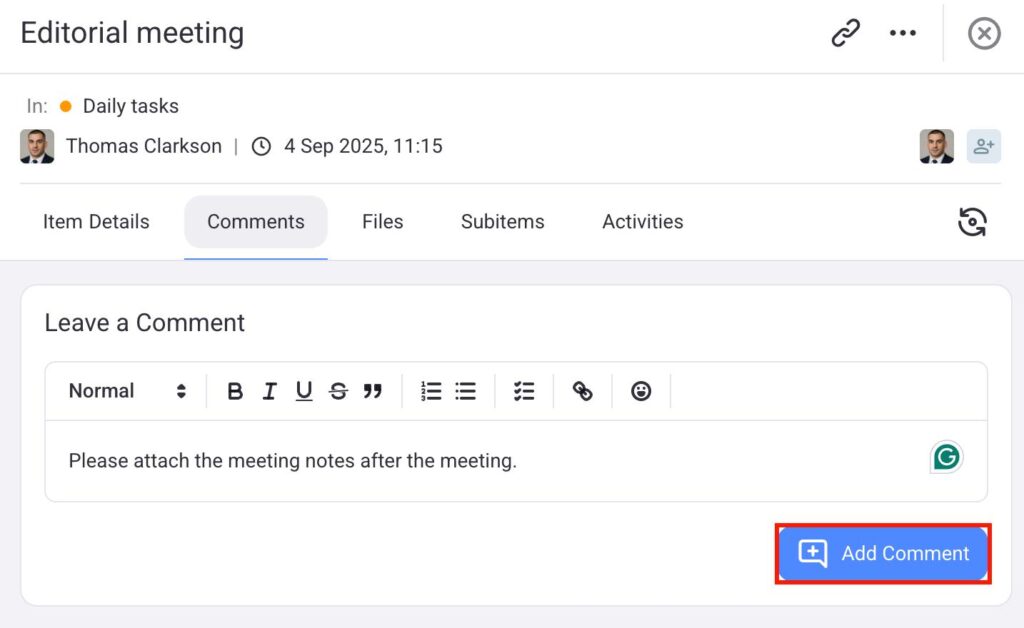
La section Commentaires permet aux utilisateurs de laisser des commentaires sur la tâche. Par exemple, ils peuvent indiquer les modifications à apporter avant de pouvoir en changer le statut. Voici comment procéder :
- Ouvrez l’onglet Commentaires
- Rédigez un commentaire
- Cliquez sur Ajouter un commentaire
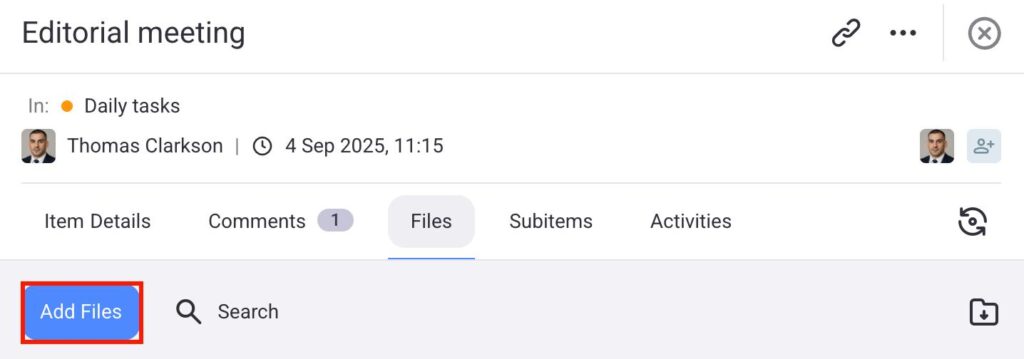
Plaky vous permet également de joindre des fichiers à vos tâches, via l’onglet Fichiers. Vous pouvez par exemple ajouter des images ou des fichiers PDF en rapport avec la tâche. Voici comment procéder :
- Ouvrez l’onglet Fichiers
- Cliquez sur Ajouter des fichiers
- Choisissez l’élément à télécharger
Si vous travaillez sur une tâche importante, vous devrez peut-être la diviser en sous-tâches plus petites. Voici comment procéder directement depuis l’onglet Sous-éléments :
- Ouvrez l’onglet Sous-éléments
- Cliquez sur Ajouter un sous-élément

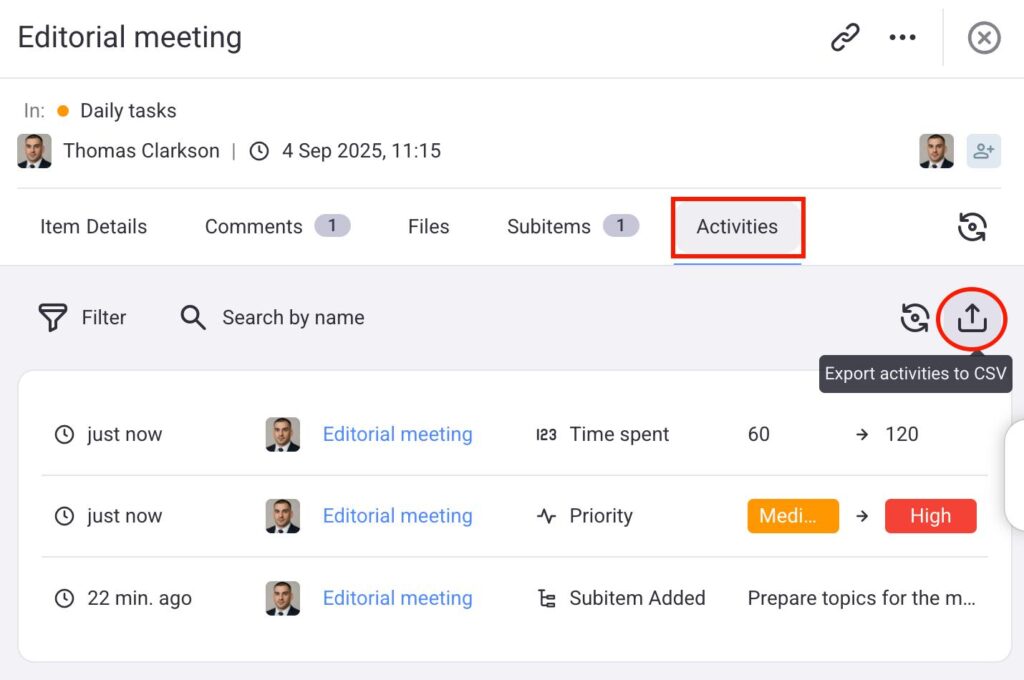
Lorsque vous et vos collègues modifiez l’élément, toutes les modifications sont enregistrées et transparentes. Pour les consulter, ouvrez l’onglet Activités. Vous y trouverez toutes les modifications relatives à la tâche et vous pourrez également les exporter au format CSV.
Configurer les préférences et les notifications #
Plaky vous permet de personnaliser votre expérience utilisateur selon vos besoins : vous pouvez modifier votre thème, votre fuseau horaire et gérer la réception de vos notifications. Pour ce faire, ouvrez la page Préférences.
Changer le fuseau horaire et le thème #
Lorsque vous ouvrez les Préférences, l’onglet Général s’affiche par défaut. Vous pouvez y activer le thème sombre et sélectionner votre fuseau horaire.
Pour changer de thème, suivez ces étapes :
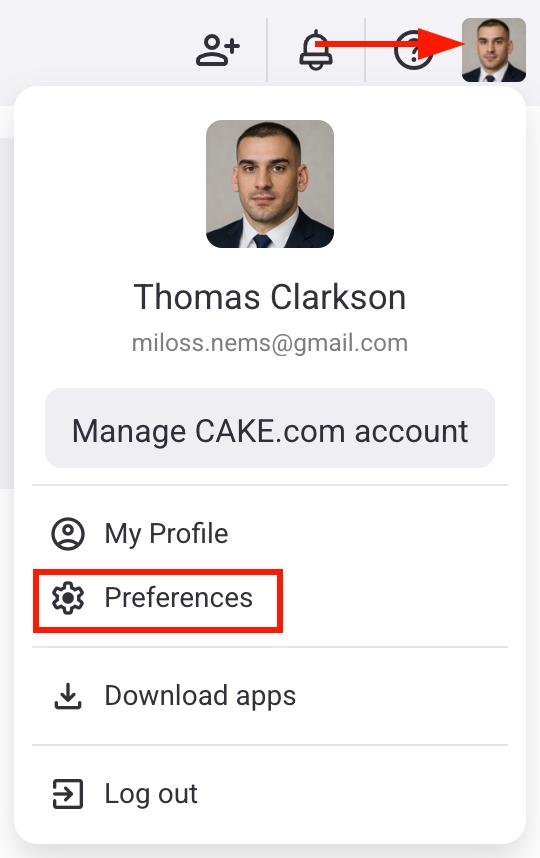
- Cliquez sur votre photo de profil en haut à droite
- Sélectionnez Préférences
- Basculez entre les thèmes clair et sombre dans l’onglet Général

Configurer les notifications #
Plaky vous enverra des notifications dès qu’un événement important se produit concernant une tâche qui vous est assignée. Vous pouvez modifier la façon dont vous recevez ces notifications.
Voici comment procéder :
- Cliquez sur votre photo de profil en haut à droite
- Cliquez sur Préférences
- Sélectionnez Notifications
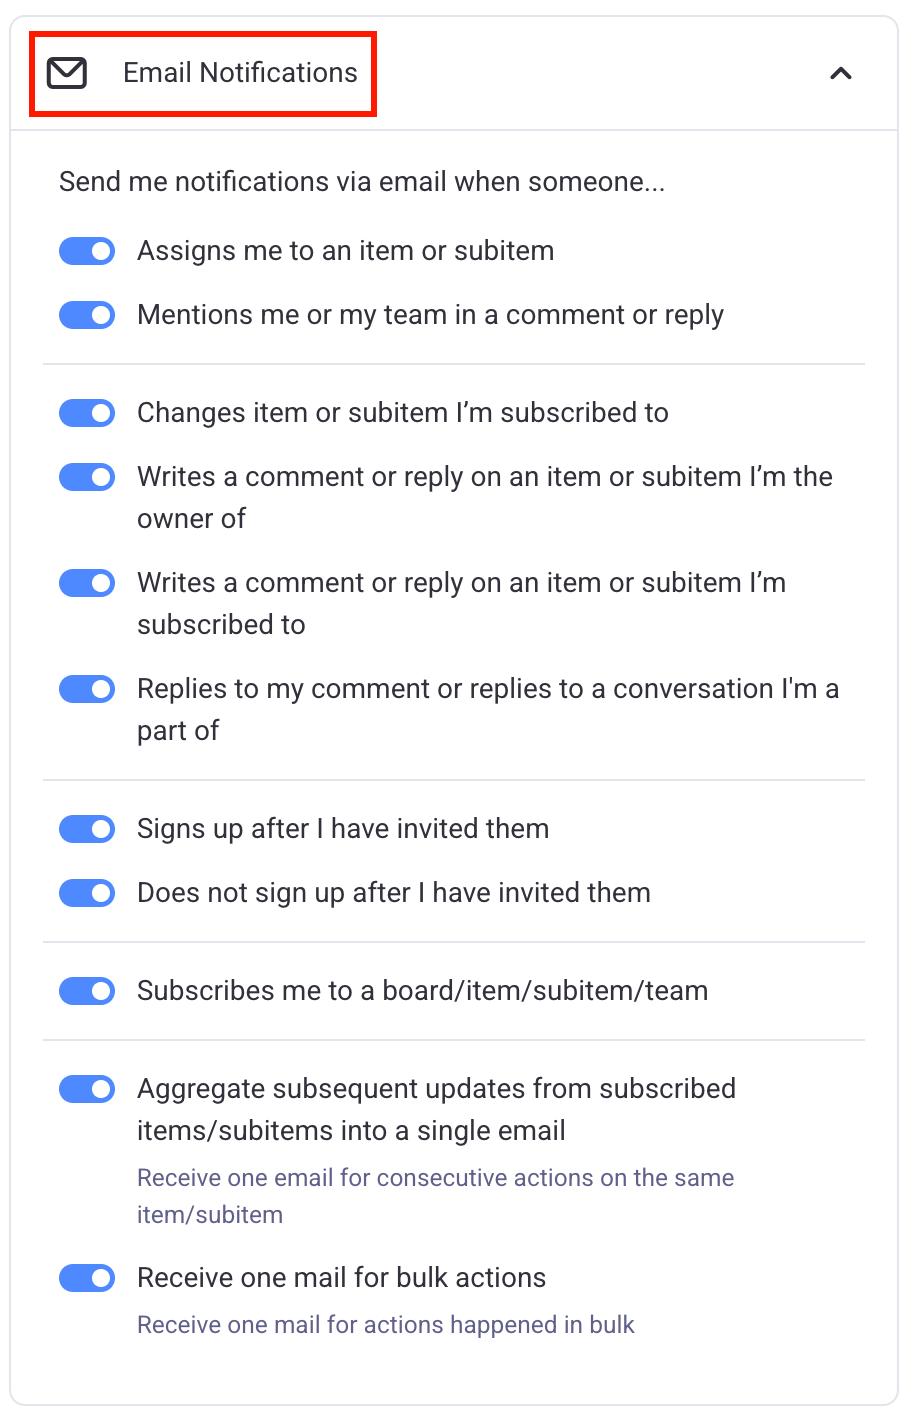
- Cliquez sur Notifications par email
- Choisissez les notifications que vous souhaitez recevoir
- Cliquez sur votre photo de profil en haut à droite
- Cliquez sur Préférences
- Sélectionnez Notifications
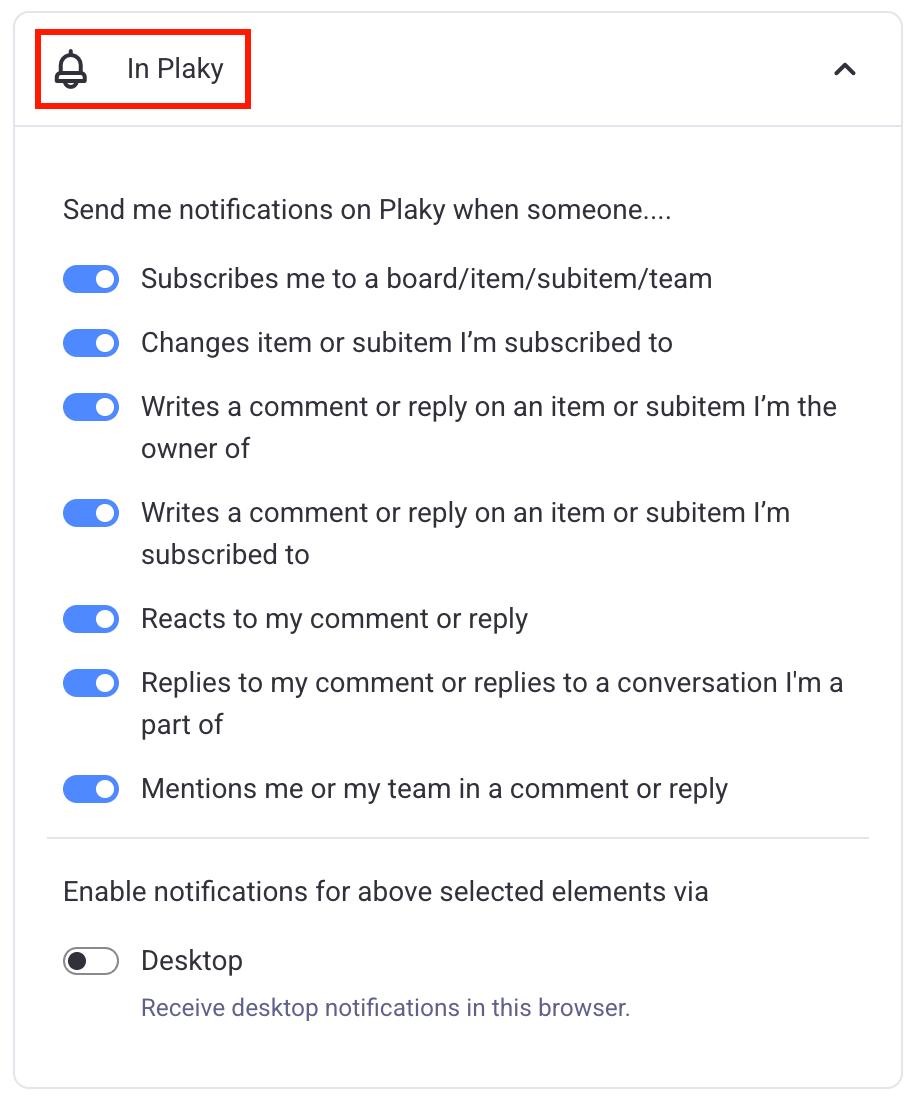
- Cliquez sur Dans Plaky
- Choisissez les notifications que vous souhaitez recevoir
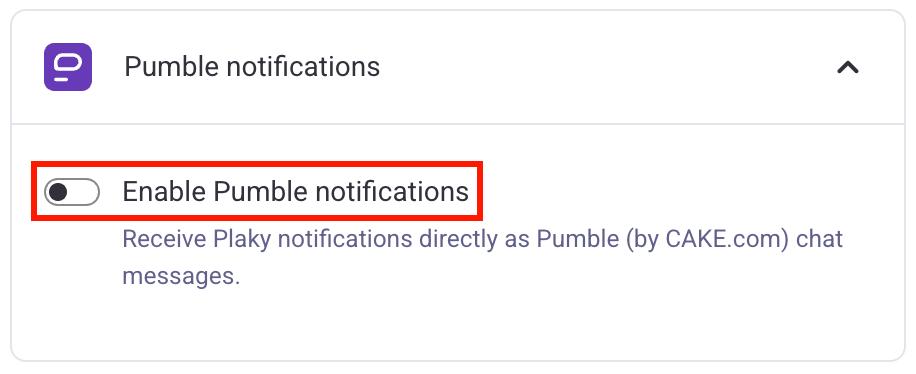
Pumble est une application de messagerie et de collaboration d’équipe créée par CAKE.com. Elle s’intègre facilement à Plaky et vous permet de recevoir les notifications Plaky. Voici comment procéder :
- Cliquez sur votre photo de profil en haut à droite
- Cliquez sur Préférences
- Sélectionnez Notifications
- Cliquez sur Notifications par email
- Activez l’option Activer les notifications Pumble button
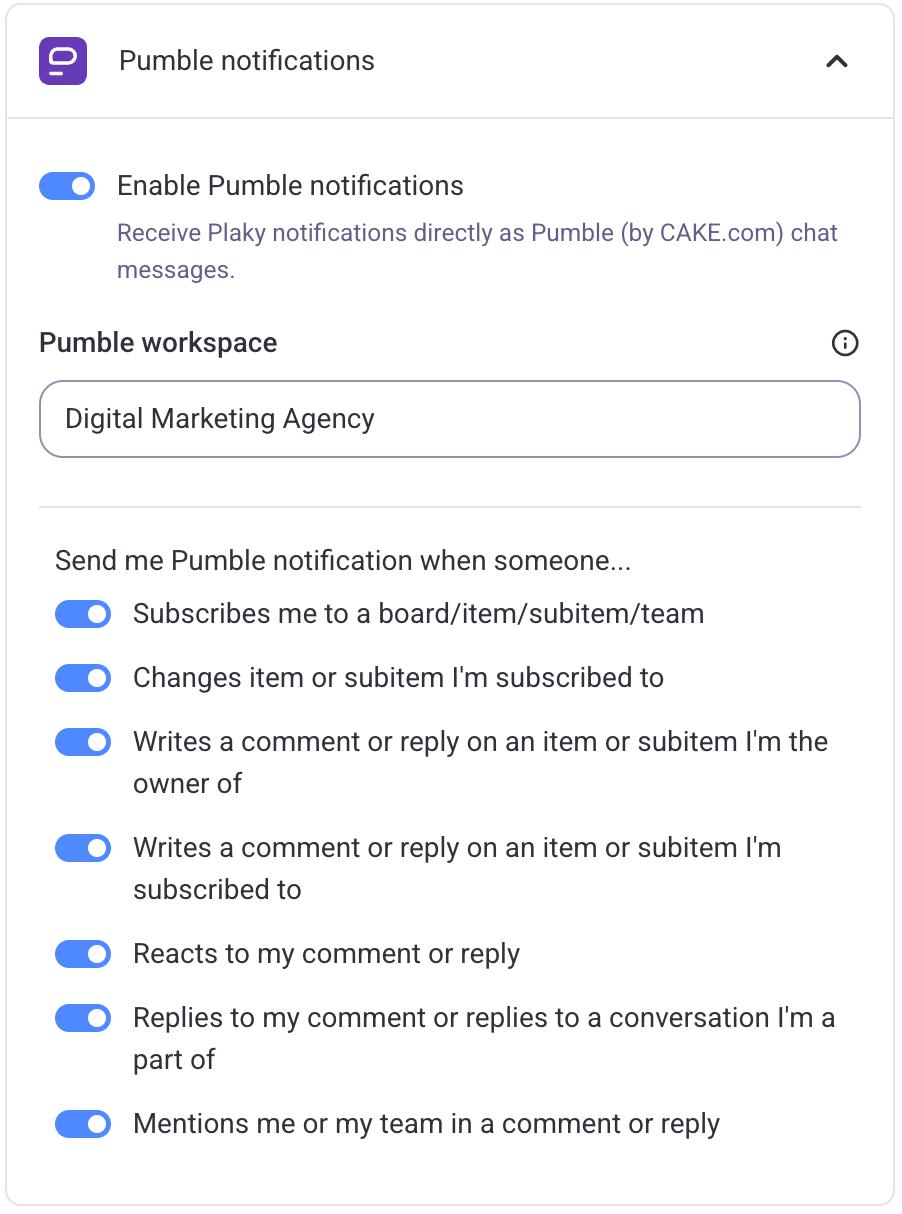
- Sélectionnez un espace de travail
- Choisissez les notifications que vous souhaitez recevoir
Si vous êtes propriétaire ou administrateur d’un espace de travail mais que vous n’en possédez pas encore un dédié à Pumble, vous pourrez en créer un une fois les notifications Pumble activées.
Créer des vues personnalisées #
Avec Plaky, vous pouvez ajouter des vues personnalisées à vos tableaux et organiser vos éléments de différentes manières. Par exemple, vous pouvez utiliser des graphiques pour visualiser le nombre de tâches marquées comme À faire ou En cours.
Pour ajouter un nouveau affichage, suivez ces étapes :
- Cliquez sur l’icône d’engrenage
- Cliquez sur Créer un nouveau affichage
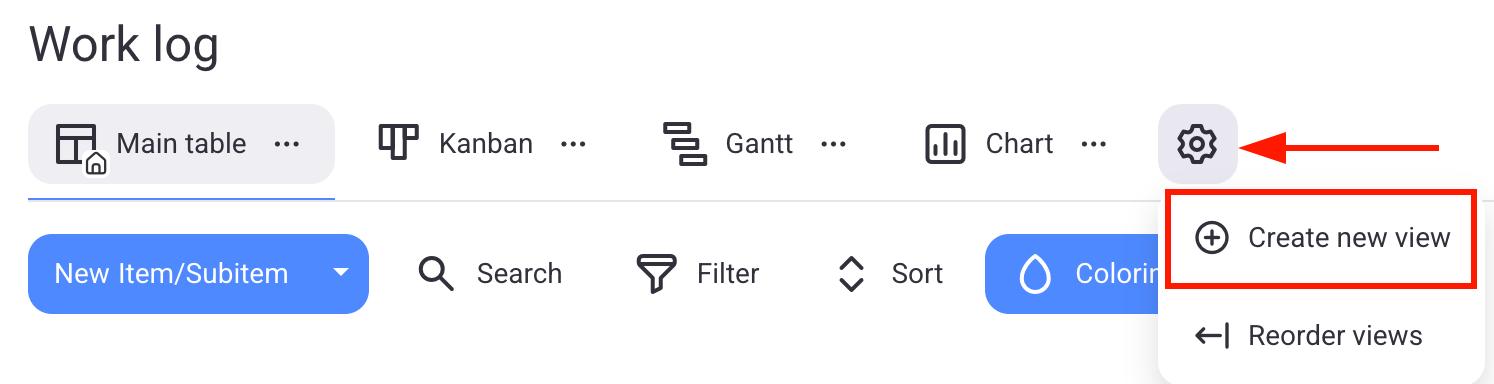
- Choisissez le type de vue
- Saisissez le nom d’affichage
- Cliquez sur Créer
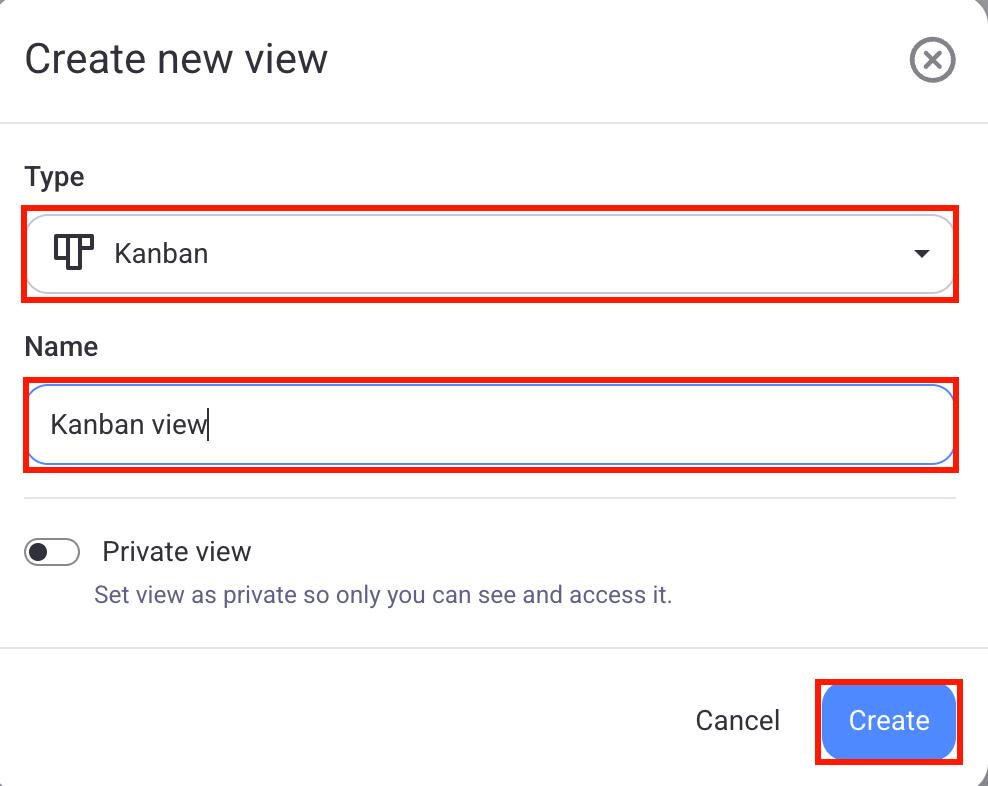
Vous pouvez choisir parmi plusieurs types d’affichage. Examinons-les plus en détail.
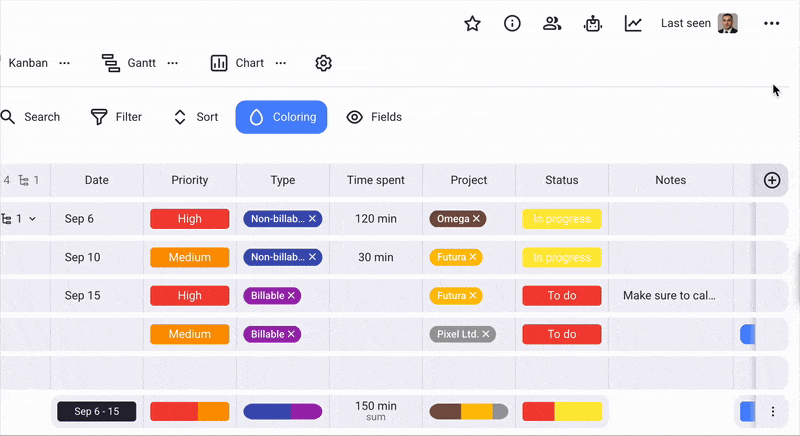
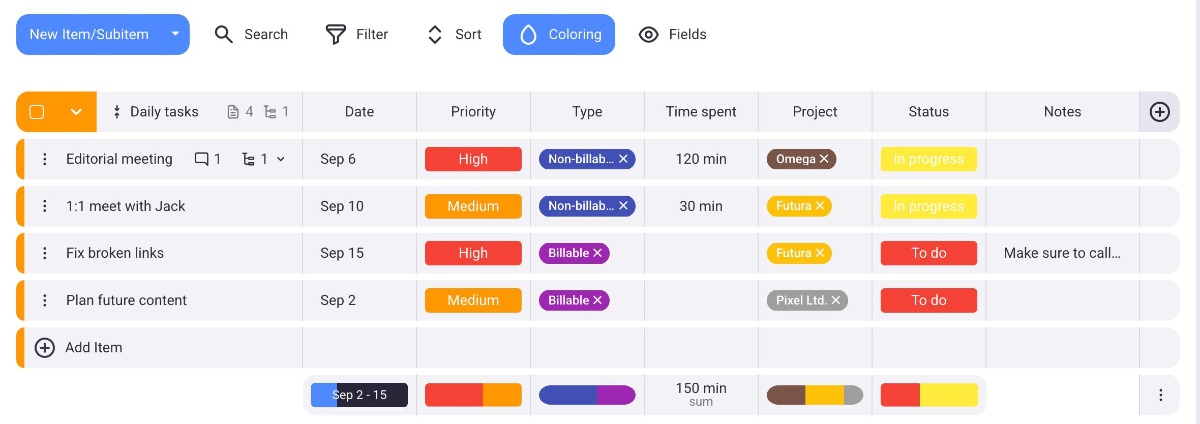
La vue par défaut dans Plaky est l’affichage sous forme de tableau. Il présente tous vos éléments regroupés par catégories, chaque ligne correspondant à un élément différent. Les colonnes du tableau affichent les champs contenant des informations sur l'élément.
L’affichage Kanban vous permet d'organiser les éléments à l'aide d'un tableau Kanban. Ce tableau affiche les éléments sous forme de cartes distinctes, chaque carte représentant une étape de la tâche ou du projet. Par exemple, vous pouvez créer des cartes « À faire », « En cours » et « Terminé ». Les éléments sont ensuite affectés à la carte correspondant à leur statut.
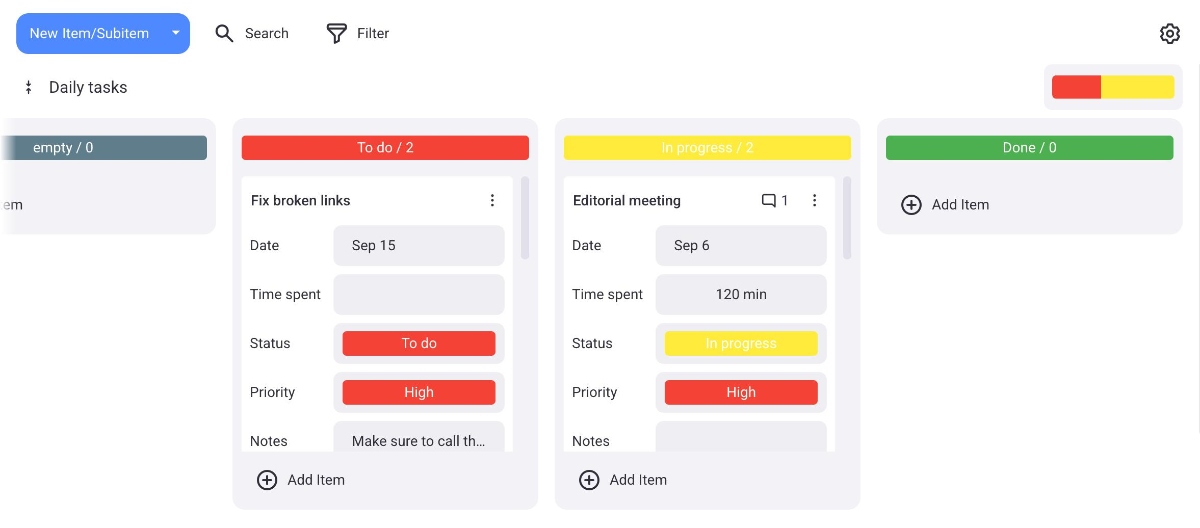
Pour en savoir plus sur l’affichage Kanban, veuillez consulter notre article.
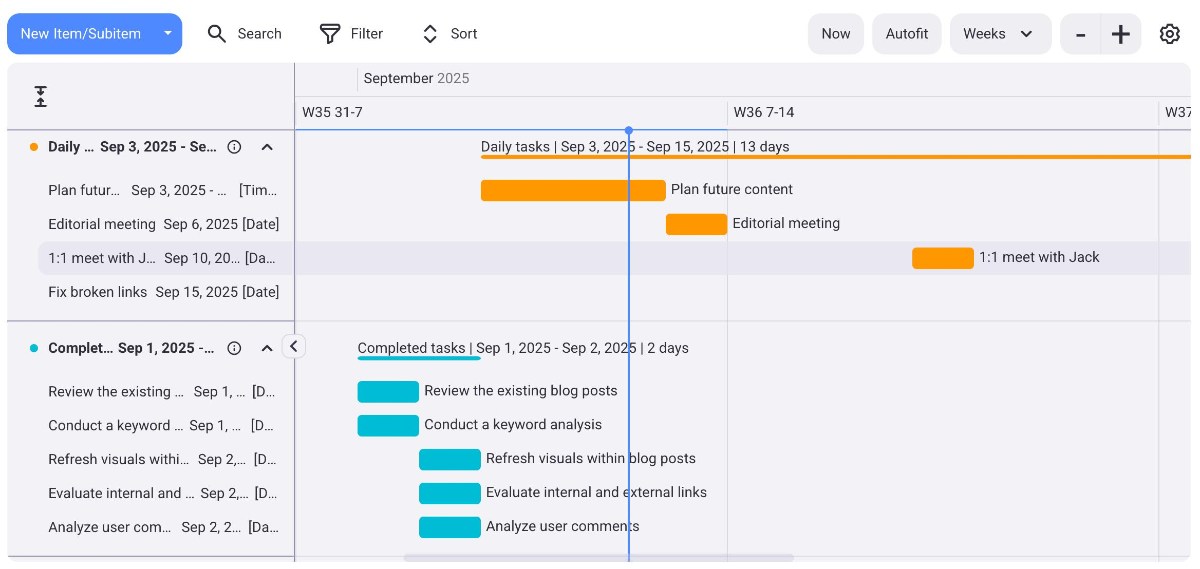
L’affichage Gantt organise vos tâches selon leur chronologie. Chaque élément est représenté par un bloc indiquant sa date ou sa chronologie, la ligne bleue représentant la date actuelle. Cela vous permet de visualiser l'avancement des tâches et leurs dates d'achèvement prévues.
Pour en savoir plus sur l'affichage Gantt, consultez notre article.
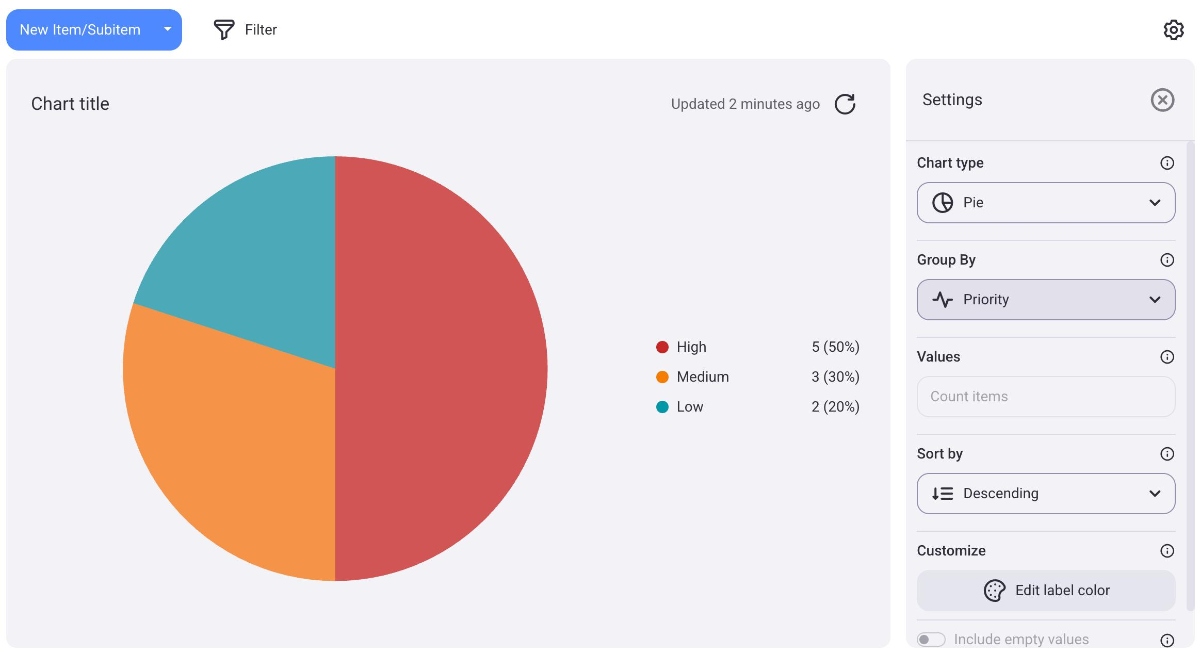
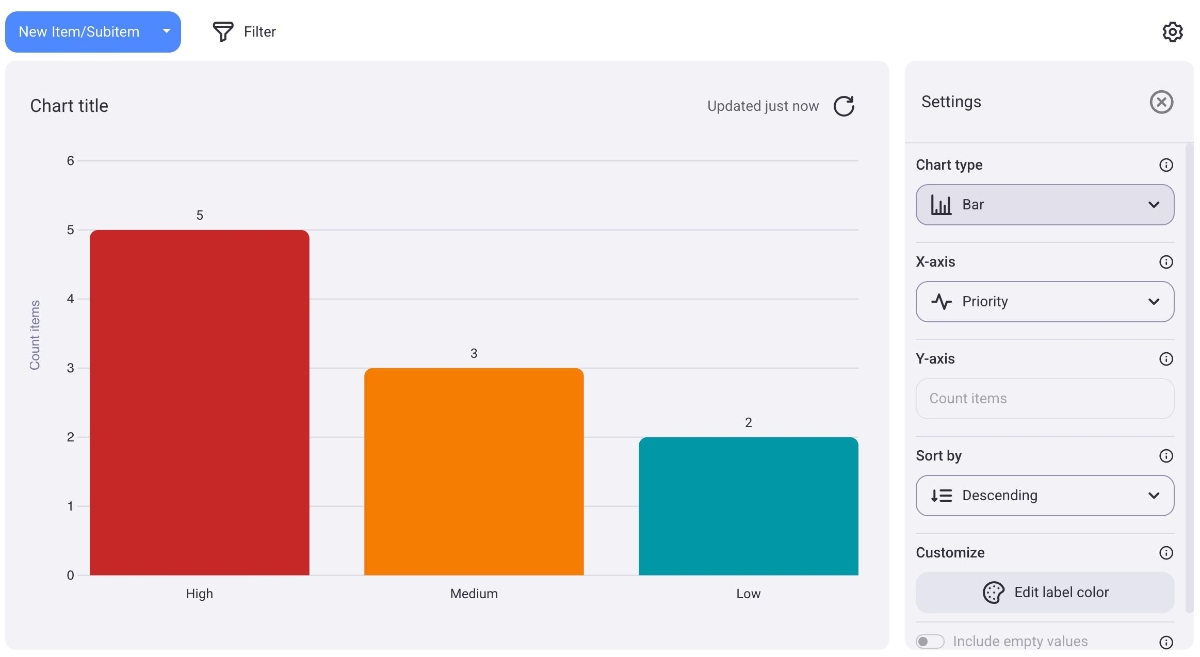
L’affichage graphique offre une représentation visuelle des éléments sous forme de graphique circulaire ou à barres. Cela vous permet de comparer le nombre total d'éléments dans un groupe spécifique. Par exemple, vous pouvez regrouper les éléments par niveau de priorité et voir combien d'entre eux nécessitent une attention urgente.
Pour en savoir plus sur l'affichage graphique, consultez notre article.