Manage Notifications
Based on the way user is notified, there are five types of notifications in Plaky:
- Email Notifications
- Bell Notifications
- Desktop (Browser) Notifications
- Push (Mobile) Notifications
- System Notifications
Email Notifications #
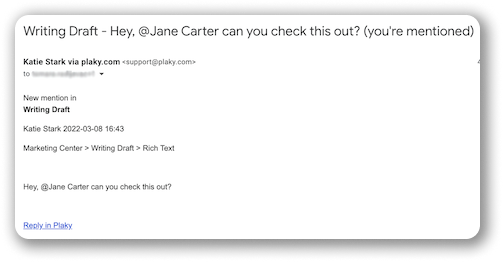
Although Email Notifications slightly differ based on types of events they’re informing the user of, they typically contain the following information:
- Name of the Member that performed the event and triggered the action
- Details of the Board, Group, Item or Field in which you were mentioned
- Link in the Email Notification which takes you to the relevant place in Plaky (Board/Group/Item/Field) where the action you were notified of occurred
You can see below the example of the Email Notification for another user mentioning you in the Rich Text Field:
To check Notification details:
- Log in to your email account
- Click the link provided in your Email Notification
If you click on the link, you’ll jump to the relevant section in Plaky (Board/Group/Item/Field) where the action you were notified of occurred. After you’ve opened the received Notification from email, that action will be reflected in the Bell Notifications, as well and the Notification will be marked as read.
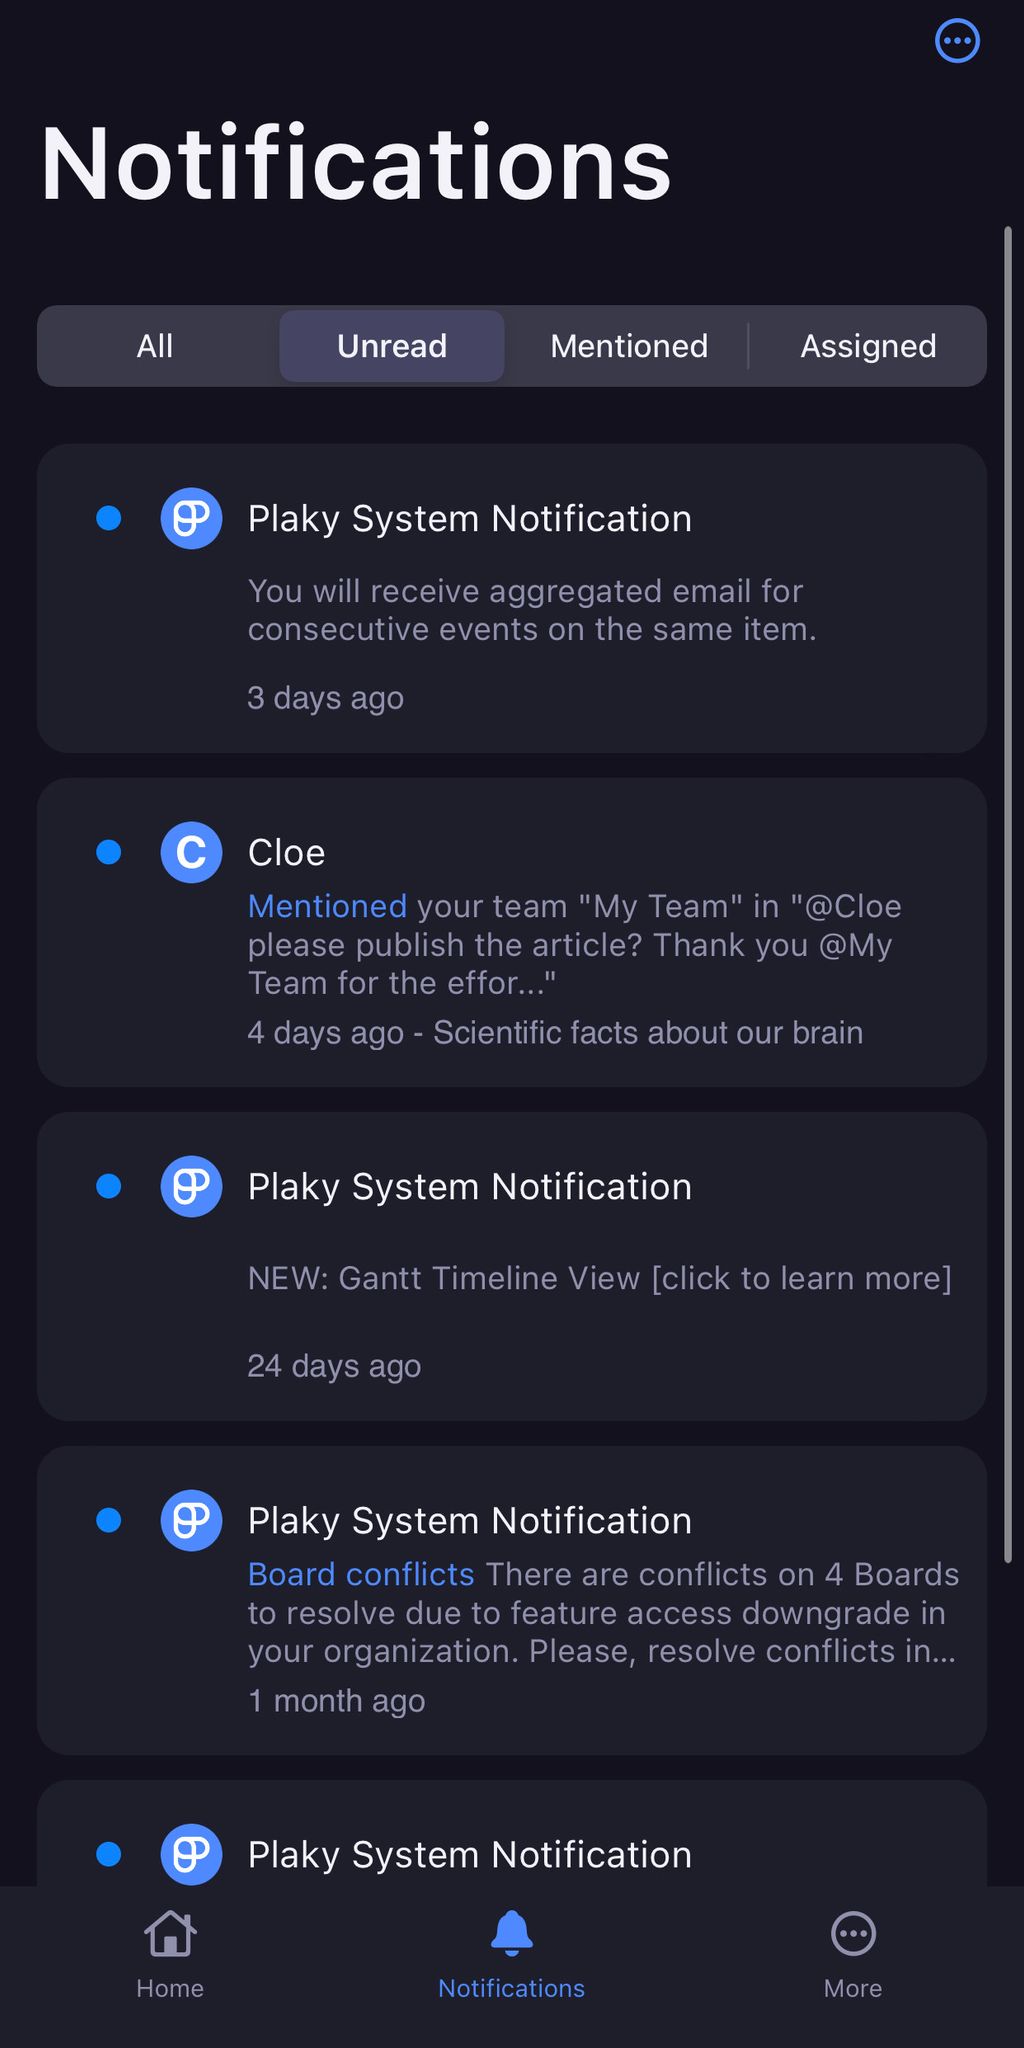
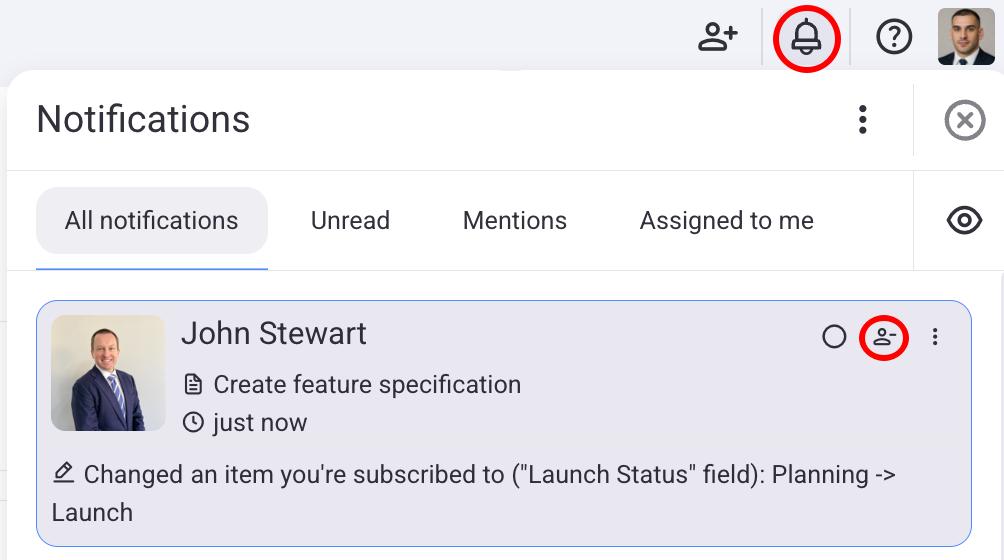
Bell Notifications #
When you receive Bell Notification, you’ll be able to see an indicator on the bell icon (bright orange dot) and the number of new notifications in the browser tab.
Bell Notifications slightly differ based on types of events they’re informing the user of, however they typically contain the following information:
- Type of event (subscribed, assigned, mentioned, changed)
- Name of User that triggered the event that includes you (e.g. assigned you to Item)
- Some additional details of the type of event

To check the Notification details:
- Click the bell icon
- Click the Notification tile in the Notifications form to check details
All Notifications contain the appropriate icon that indicates the type of event you are notified of. Notification you checked or read won’t have a pink border and will be marked as read if you hover over the notification tile.
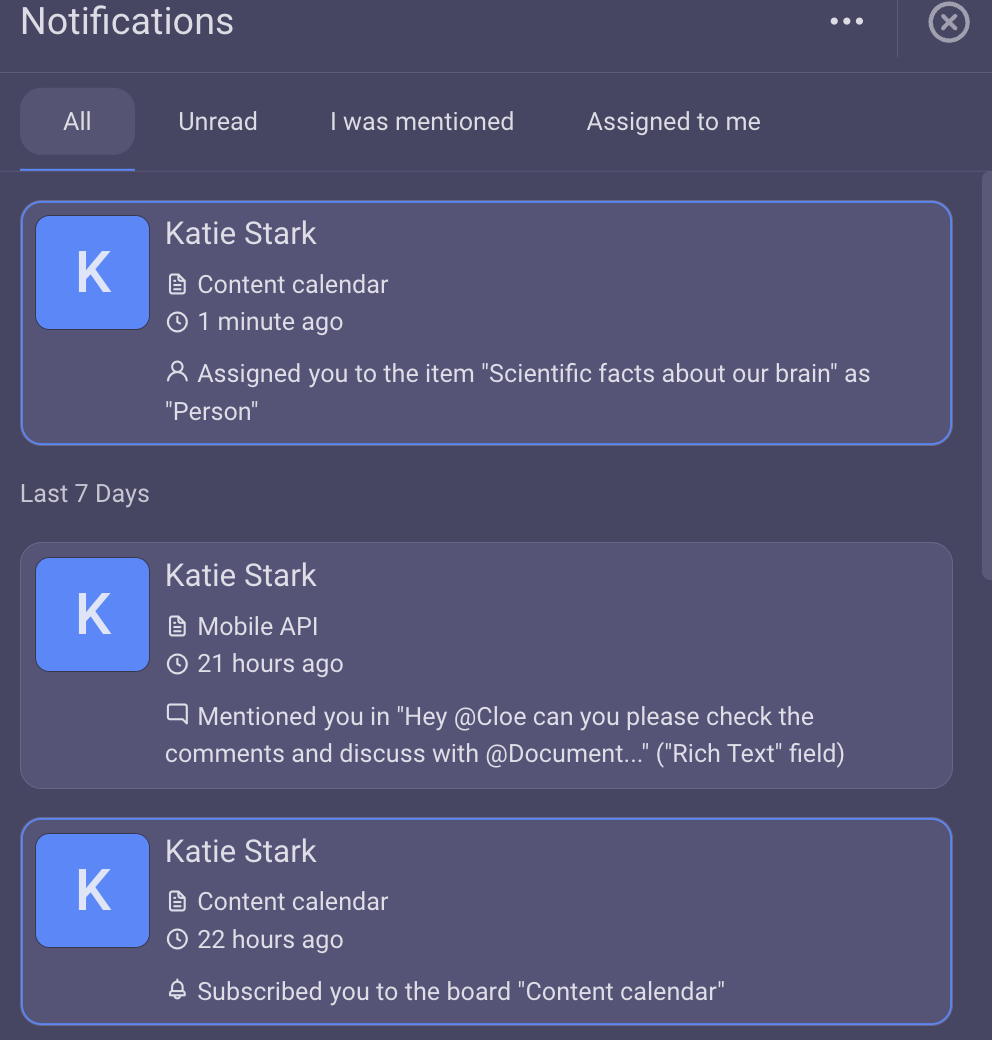
Notifications screen provides you an overview of the following:
- All activities that affect you
- Marking Notifications as read and deleting them
- List of Items that are mentioned in Notifications
They are grouped in four different tabs:
- All (Notifications listed)
- Unread (Unread Notifications)
- Mentioned (Notifications you were mentioned in)
- Assigned (Notifications which inform you of Items, Boards, or some other entity you were assigned to)
To check the details of the Notification, tap the Notification tile in the Notifications screen.
Notification you checked or read will no longer be listed in the Unread tab.
Bell Notifications can be:
- Viewed
- Configured
- Deleted
Older Notifications #
All Bell Notifications that were received more than a week ago are in the Older Notifications section. This section contains all Bell Notifications, from the first one ever received, to the one received seven days ago. It’s worth mentioning that Notifications in this section behave the same way as the newer ones, meaning that you can click on them and get redirected to that place in Plaky where the event that triggered the Notification occurred.
What’s more, Bell Notifications in all tabs (All, Unread, I was mentioned, Assigned to me) in Notifications canvas go into this section after a week.
Desktop (Browser) Notifications #
Desktop notifications provide an enhanced notification experience, allowing you to stay informed even when you’re not actively using Plaky. Once enabled, desktop notifications are visible regardless of the active tab in the browser and convey information about events that correspond to those found in Bell notifications.
To check the Notification details click on the notification. The notification indicator on the bell icon will clear, and you will be automatically redirected to the corresponding location within Plaky where the event triggering the notification took place (e.g. the Item you are subscribed to).
Push (Mobile) Notifications #
Push notifications for mobile phones provide real-time event updates, delivering the information on the same events as Bell notifications, regardless of your current location or activity on your mobile device.
To check the Notification details just tap on the notification on your mobile phone, and you will be automatically redirected to the location within Plaky where the event triggering the notification took place.
Mobile push notifications are enabled for devices by default if the user has granted the necessary permissions.
Configure Notifications #
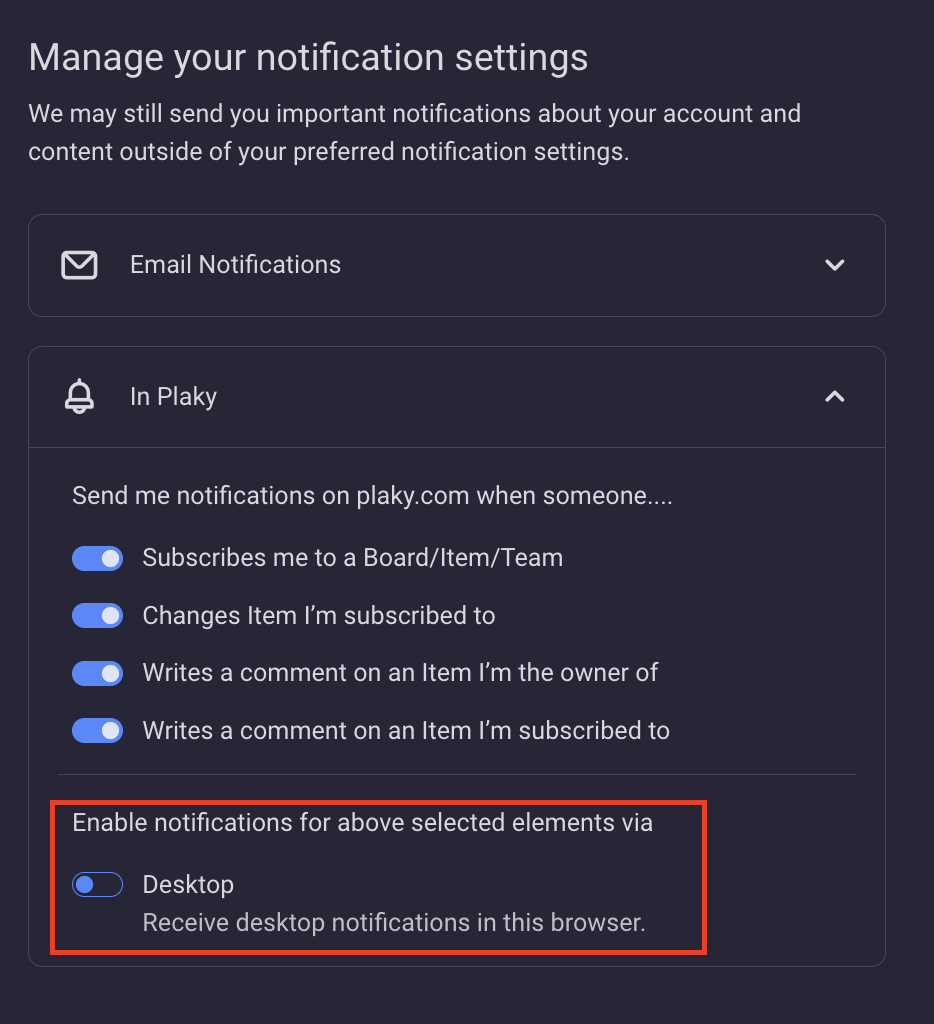
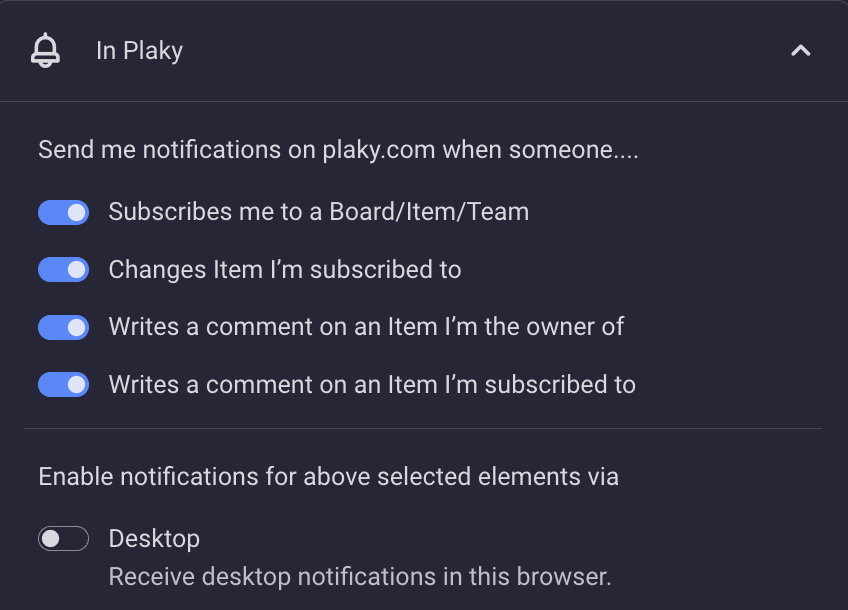
In Plaky, you can also choose types of events for which you’d like to receive Email and Bell Notifications. Initially, Notifications for all events available in the system are enabled by default, but you can adjust them according to your needs.
To configure your Notifications:
- Click the three dots menu in the Bell Notification tile
- Choose Settings from the dropdown
- You’ll jump to your Preferences menu
- Open Notifications tab
- Configure your Notifications according to your preferences
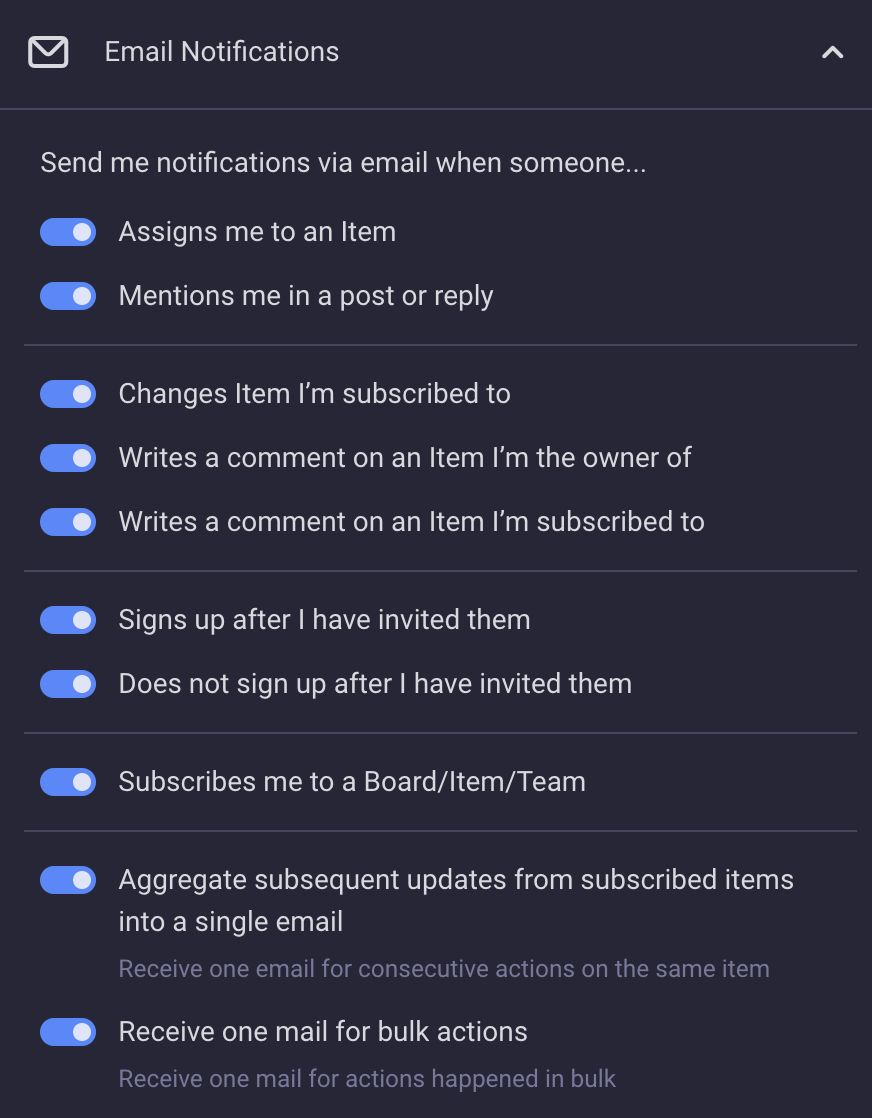
Receive one mail for bulk actions setting is available on paid plans only.
- Tap on the notifications icon at the bottom of the screen
- Tap on the three dots at the top right corner
- Select Settings from the dropdown
- Tap on App notifications/Email notification
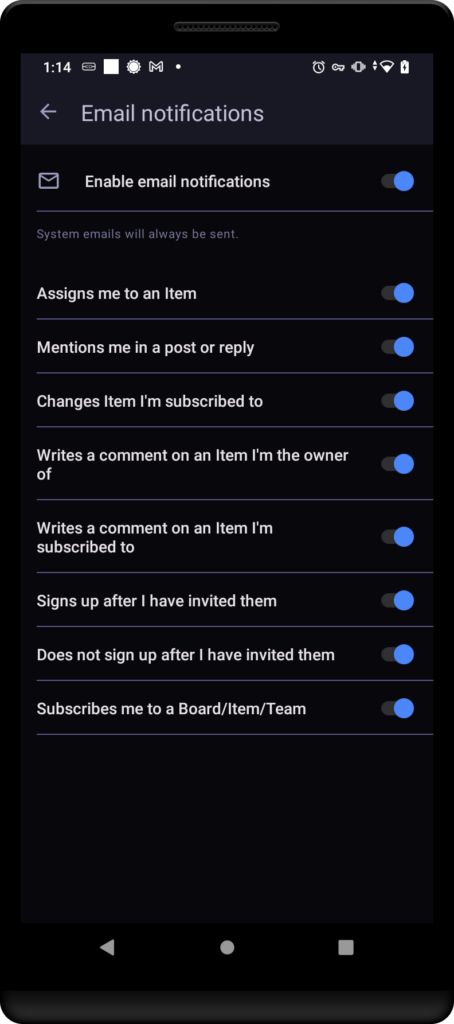
Toggle the switch on/off so that you turn on/off Email Notifications for the following actions:
- You are assigned to an Item
- You’re mentioned in a post or reply
- Item you’re subscribed to is changed
- Someone adds a comment to an Item you’re the Owner of
- Someone adds a comment to an Item you’re subscribed to
- Someone signs up after you have invited them
- Someone doesn’t sign up after you’ve invited them
- Someone subscribes you to Board/Item/Team
Toggle the switch on/off so that you turn on/off Bell Notifications for the following actions:
- Someone subscribes you to Board/Item/Team
- Someone changes Item you’re subscribed to
- Someone adds a comment to an Item you’re the owner of
- Someone adds a comment to an Item you’re subscribed to

- Tap on the hamburger menu on the top left
- Choose Settings
- Tap on Notification settings
- Select Email notifications/In app notifications
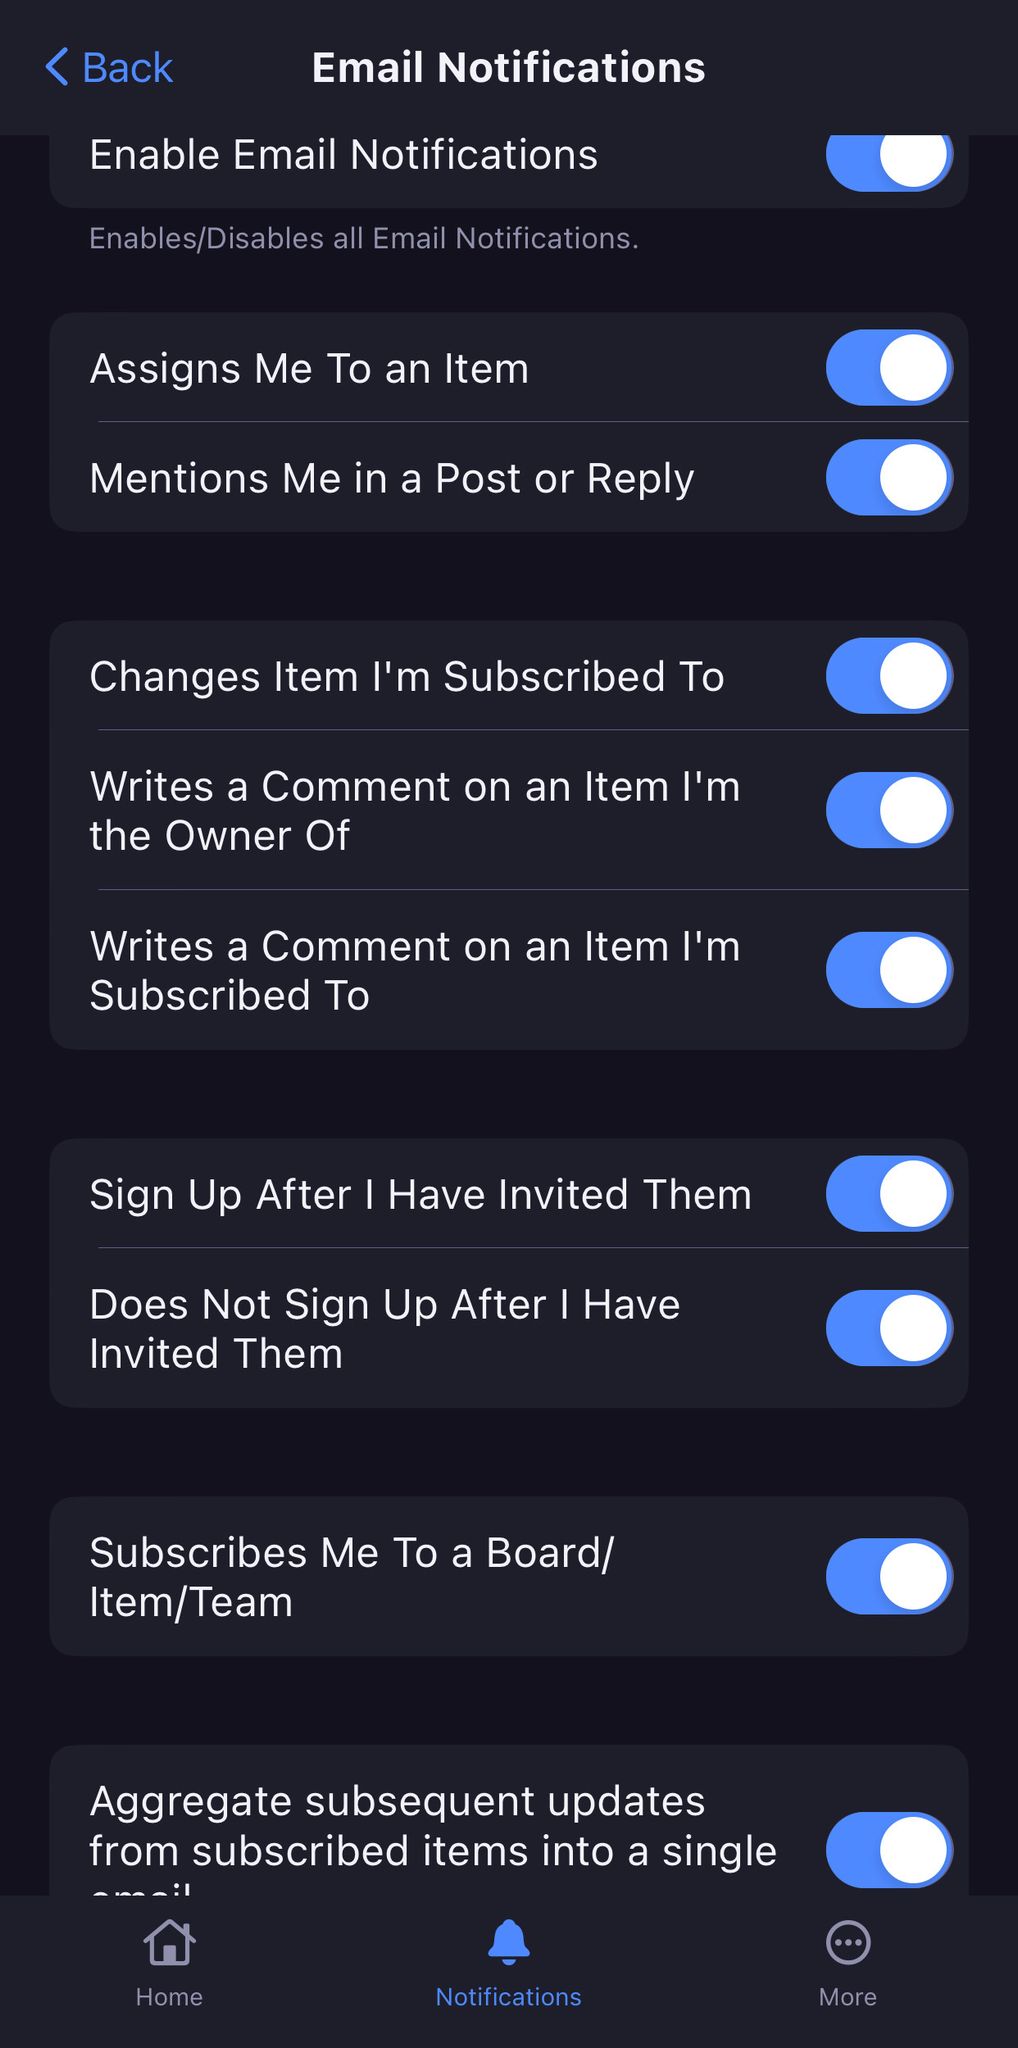
Toggle the switch on/off so that you turn on/off Email Notifications for the following actions:
- You are assigned to an Item
- You’re mentioned in a post or reply
- Item you’re subscribed to is changed
- Someone adds a comment to an Item you’re the Owner of
- Someone adds a comment to an Item you’re subscribed to
- Someone mentions you in a comment
- Someone mentions team you’re a member of in a comment
- Someone signs up after you have invited them
- Someone doesn’t sign up after you’ve invited them
- Someone subscribes you to Board/Item/Team
- Aggregate subsequent updates from subscribed items/subitems into a single email
- Receive one email for bulk actions
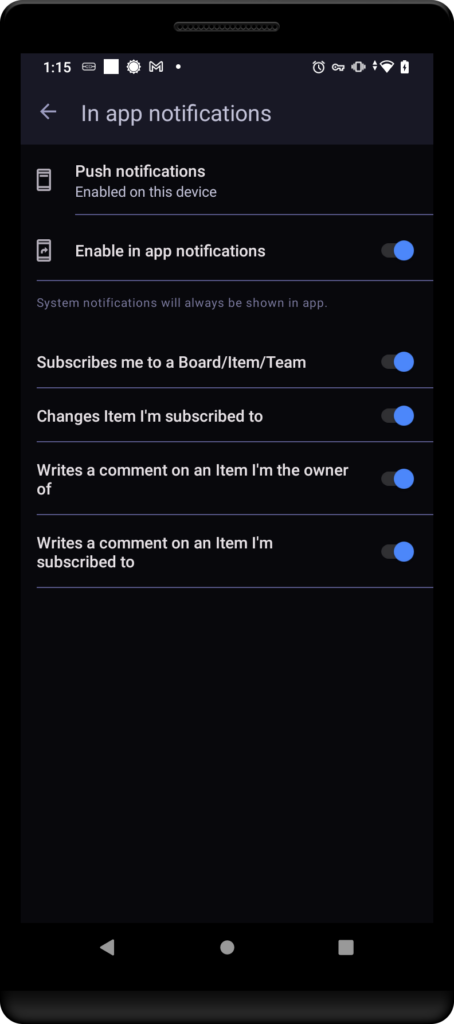
Toggle the switch on/off to turn on/off In app Notifications for the following actions:
- Someone subscribes you to Board/Item/Team
- Someone changes Item you’re subscribed to
- Someone adds a comment to an Item you’re the owner of
- Someone adds a comment to an Item you’re subscribed to
To enable/disable push (mobile) notifications:
- Tap on the hamburger menu at the top left
- Choose Notifications
- Tap on the settings icon in the top right corner
- Tap on App notifications
- Tap on Push notifications
- Toggle the switches to enable/disable push notifications and configure the events
- Tap on the hamburger menu at the top left
- Choose Settings
- Tap on Notification settings
- Toggle the switch to enable/disable push notifications
Please be aware that you may still receive some important Notifications and system Notifications regardless of how you set up your configuration.
Upon enabling the desktop notification switch, you will receive a browser pop-up requesting permission to allow notifications. Click Allow to enable desktop notifications.
Settings for desktop notifications are managed at the browser level. Enabling or disabling these notifications must be configured separately for any other web browser you use.
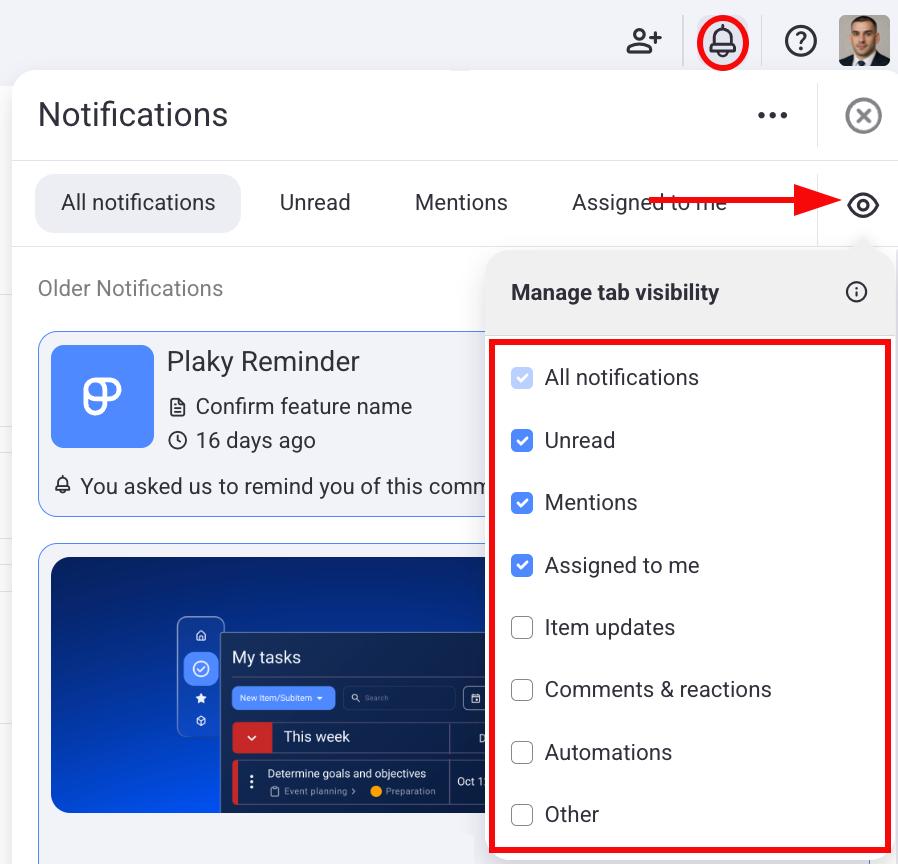
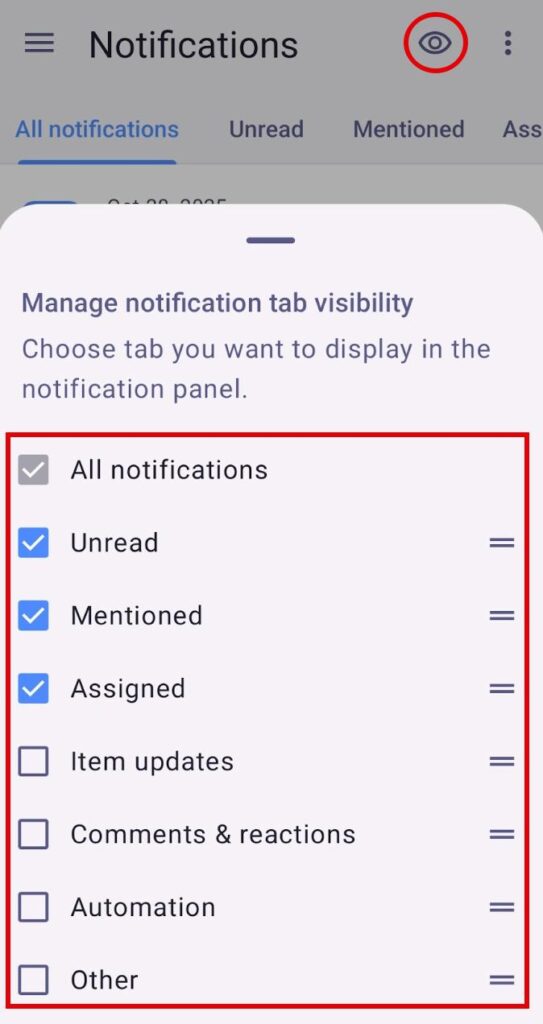
Manage notifications tab visibility #
Plaky lets you manage which notifications will be displayed in the notification tab. This can be used to reduce notification overload and prioritize important tasks.
- Open the Notifications tab
- Click on the eye icon
- Select which notifications you want to receive
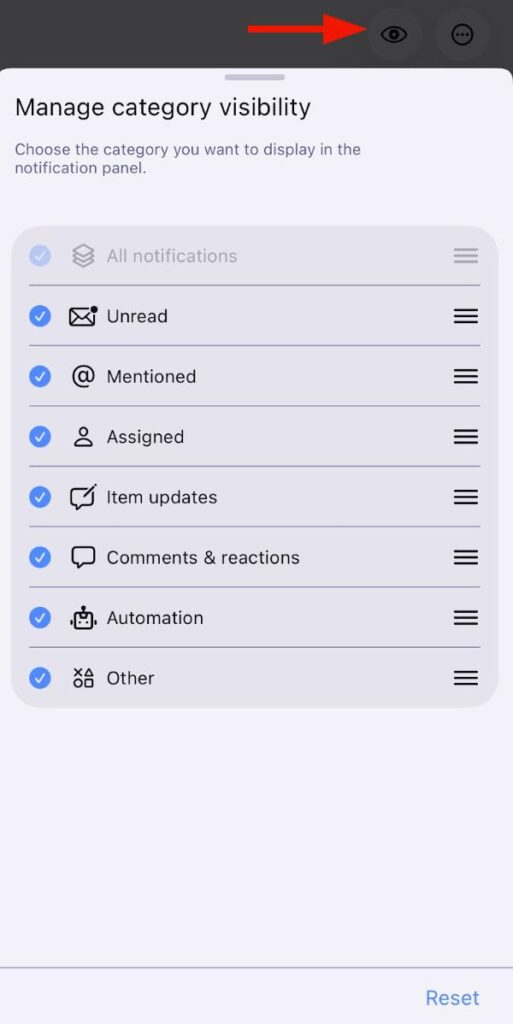
- Open Notifications
- Tap on the eye icon in the top right corner
- Select which notifications you want to receive
- Open Notifications
- Tap on the eye icon in the top right corner
- Select which notifications you want to receive
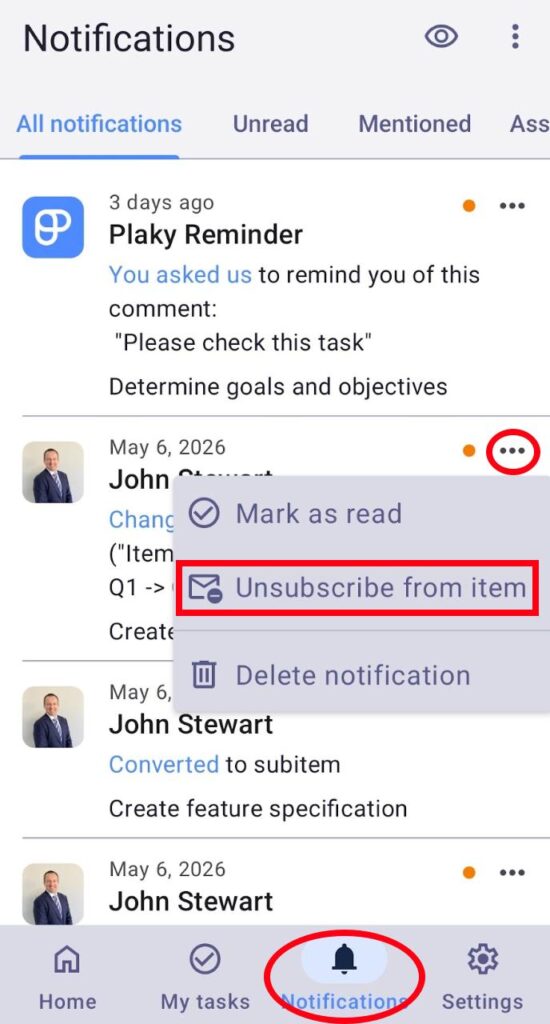
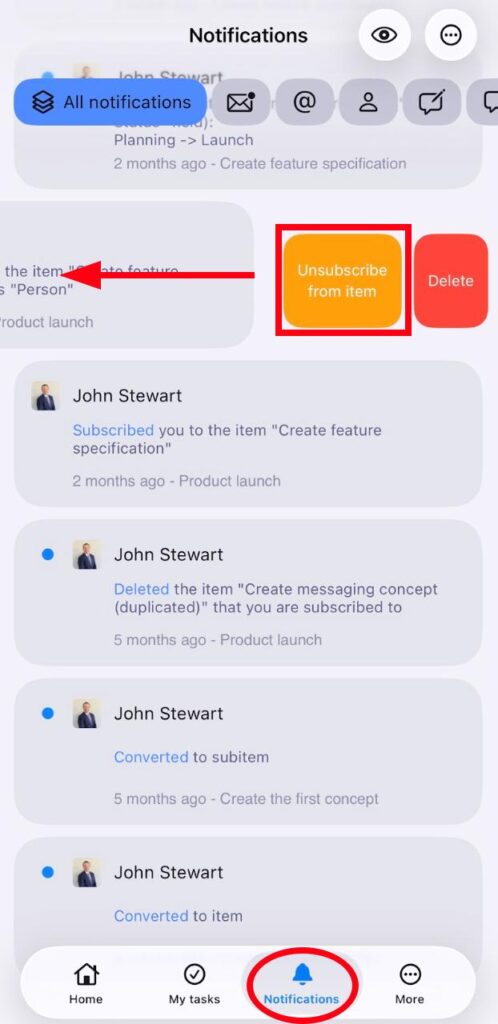
Unsubscribe and stop receiving notifications #
If you want to stop receiving notifications for a certain Board/Item/Subitem, you can unsubscribe from it directly from your notifications. This will help you reduce clutter and prioritize important notifications. Here’s how you can unsubscribe:
- Open Notifications
- Hover over the notification
- Click on the Unsubscribe from Board/Item/Subitem button
- Open Notifications
- Swipe left on a notification
- Tap on Unsubscribe from item/subitem/board
- Open Notifications
- Tap on the three dots next to a notification
- Tap on Unsubscribe from item/subitem/board