
Create and Manage Group
All Items in Boards are grouped in sections called Item Groups. These Groups are color-coded and help you organize and visually divide the Items into different sections with each section representing any notion meaningful to you, or related to the project, process or activity you’re trying to manage.
Keep in mind that, besides being marked by color, Groups are also structured by Fields created on a Board level. Once created, Custom fields are set up as templates for all Groups in that Board.
Once you create the Board, an empty Group and an empty Item samples are automatically created. These samples are always available at the top of the Board, and can be edited and further customized.
However, if you’d like to add new Group manually, follow the steps below.
All the actions listed below can be performed by all Team Members who have access to the Board.
To add new Group:
- Navigate to New Item at the top left corner of the Board
- Choose New group of Items from the dropdown

You’ll get the template for new Group. Customize it according to your needs.
or:
- Navigate to + Add to board at the top right corner of the Board
- Choose Group from the dropdown
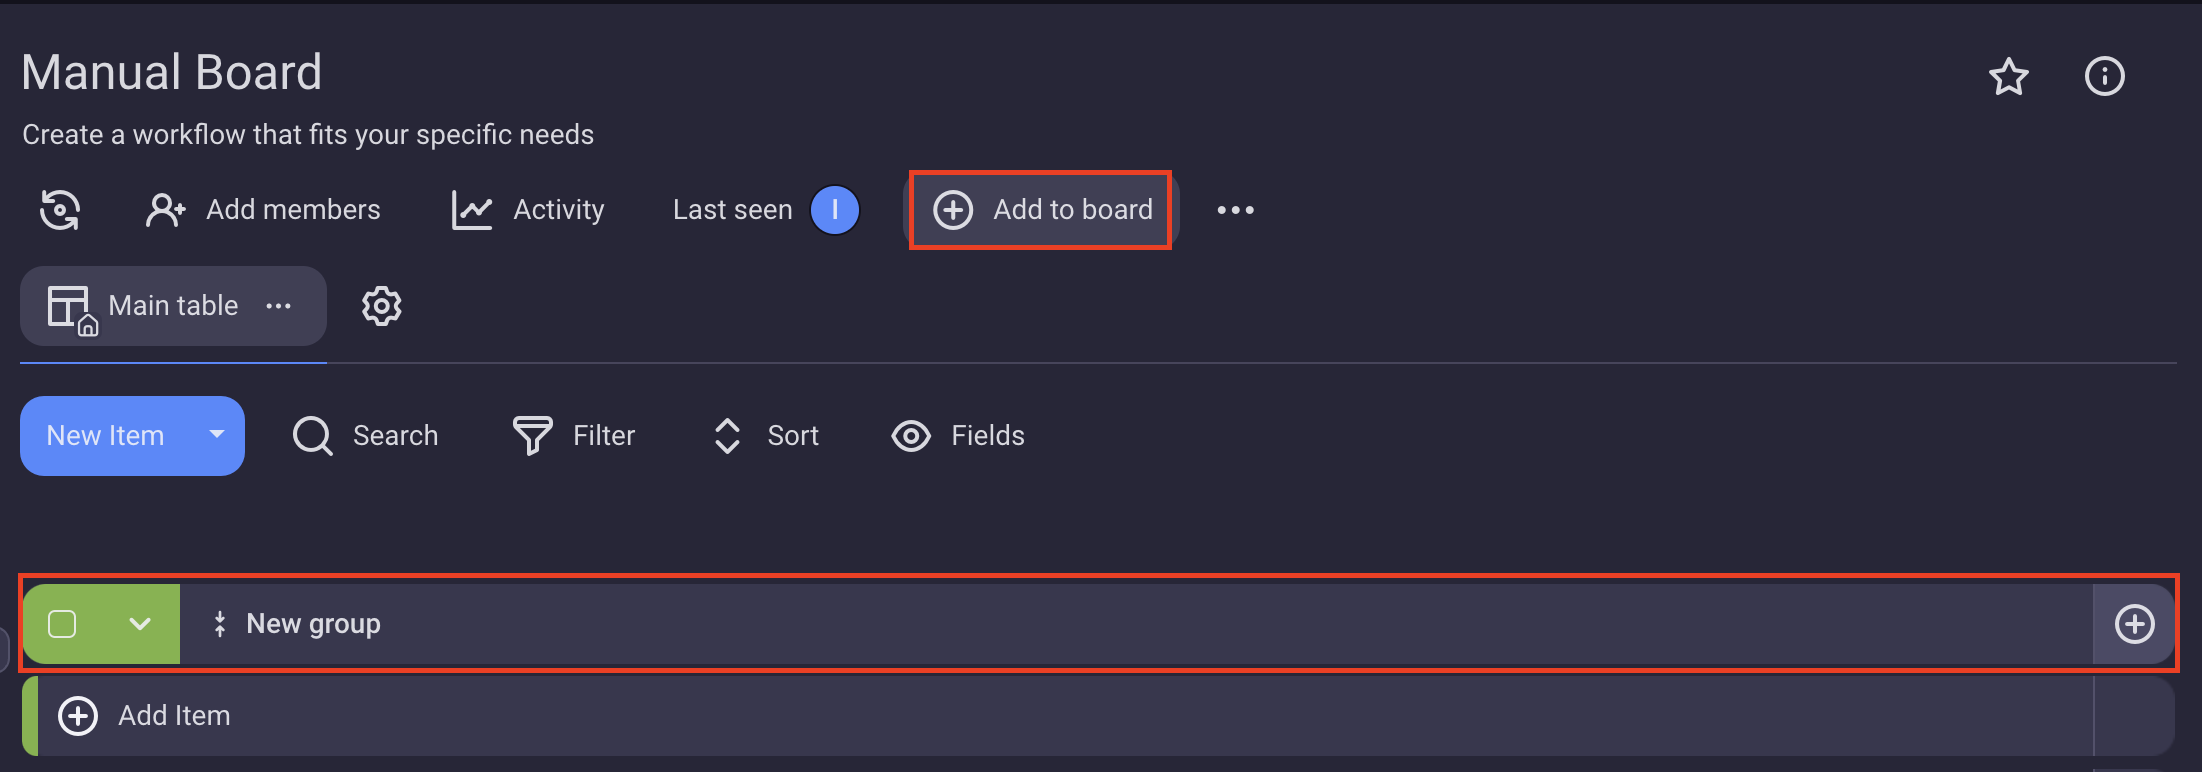
You’ll get an Item Group and Item template ready to be customized.
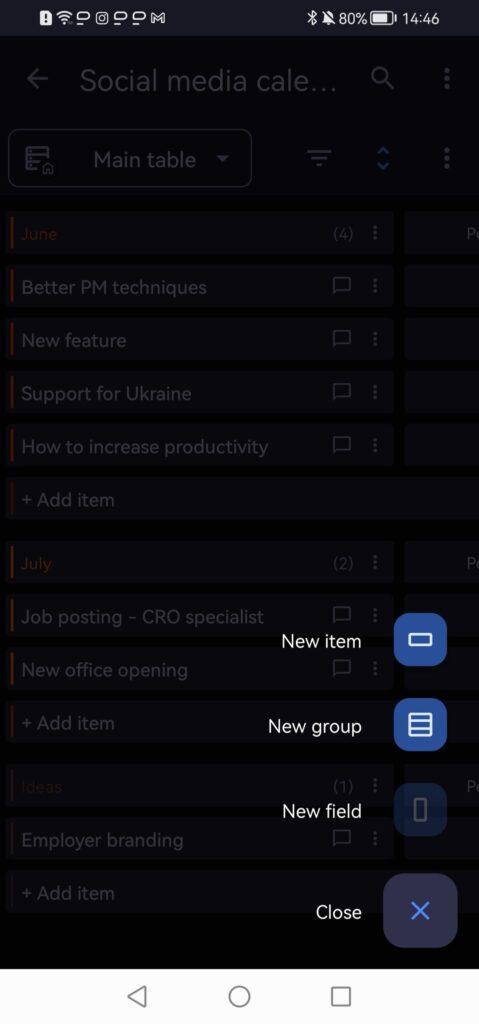
- Tap on + button at the top of the screen
- Choose New Group of Items
- Enter Item group name
- Tap Add to complete the process
or
- Scroll down to the bottom on the screen on the Board
- Tap on +New Group label
- Enter Item group name
- Tap Add to complete the process
Once you’ve created a new Item Group, it will be visible on the Board on the iOS and web app.
- Go to Workspace and Board you’d like to add Group to
- Tap + icon at the bottom right part of the screen
- Choose New group
- In Create group modal enter Group name
- Tap Create group to confirm the action
At the moment, you can create Item Groups in Table Board View only. We’re working on providing this option in Kanban View, as well.
Change color #
The Groups are color-coded to represent different sections in which the Items are Grouped. This color can be changed according to your needs and or preferences.
To change Group color:
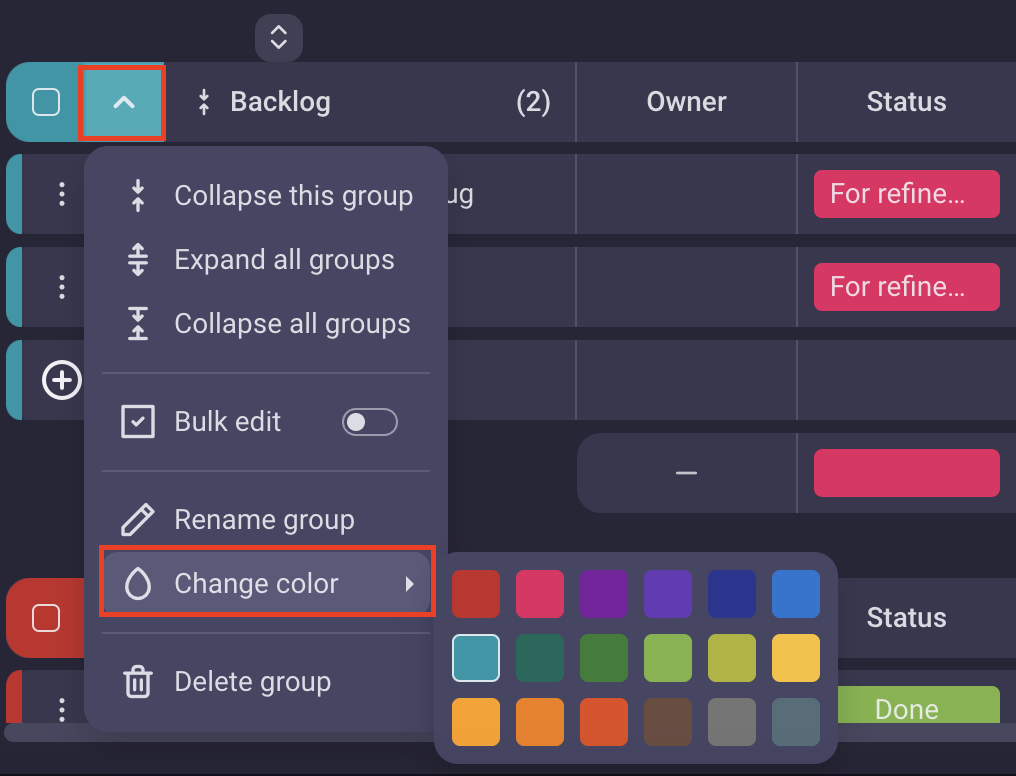
- Navigate to the Group and click to open the dropdown menu
- Choose Change color from the dropdown
- Choose color from the palette
- Navigate to the Group
- Tap on the arrow next to the group name
- Select Change color
- Choose color from the palette
- Tap Save to complete the action
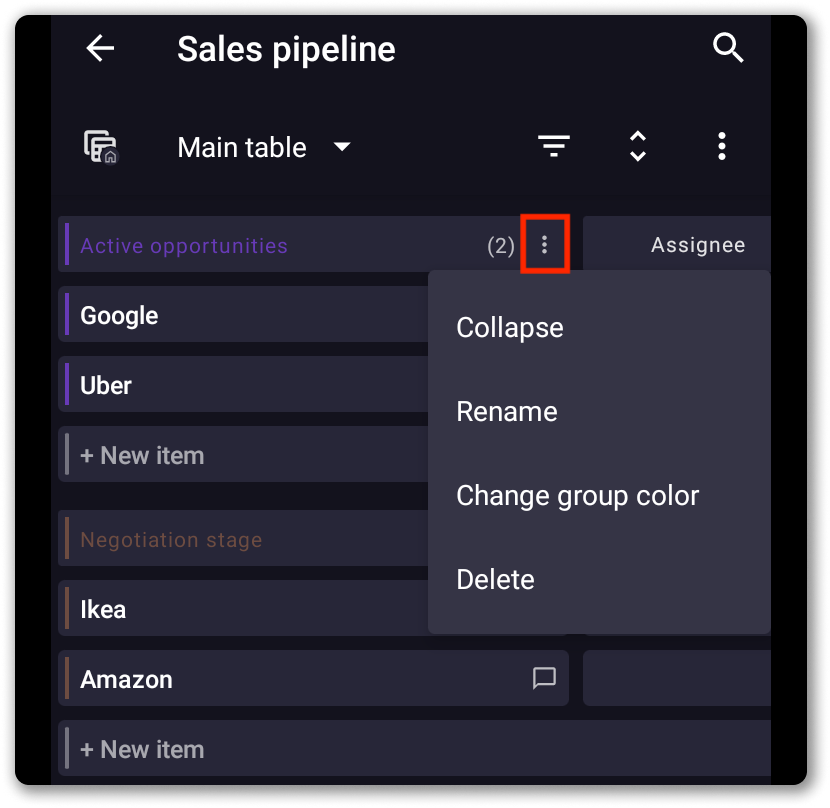
- Navigate to the Group and tap on three dots next to the group name
- Tap on Change group color
- Tap on the color you prefer
- Tap on Change color to complete the action
Collapse/Expand #
If there are a lot of Items and Item Groups on your Board, you can use the option to collapse them to have a better overview of the Board in question. You can expand/collapse the Group you are modifying, or all the Groups in the Board. All Groups are expanded by default.
To collapse/expand Groups:
- Navigate to the Group
- Choose Collapse this group/Expand all groups/Collapse all groups from the dropdown
Table view will adjust accordingly.

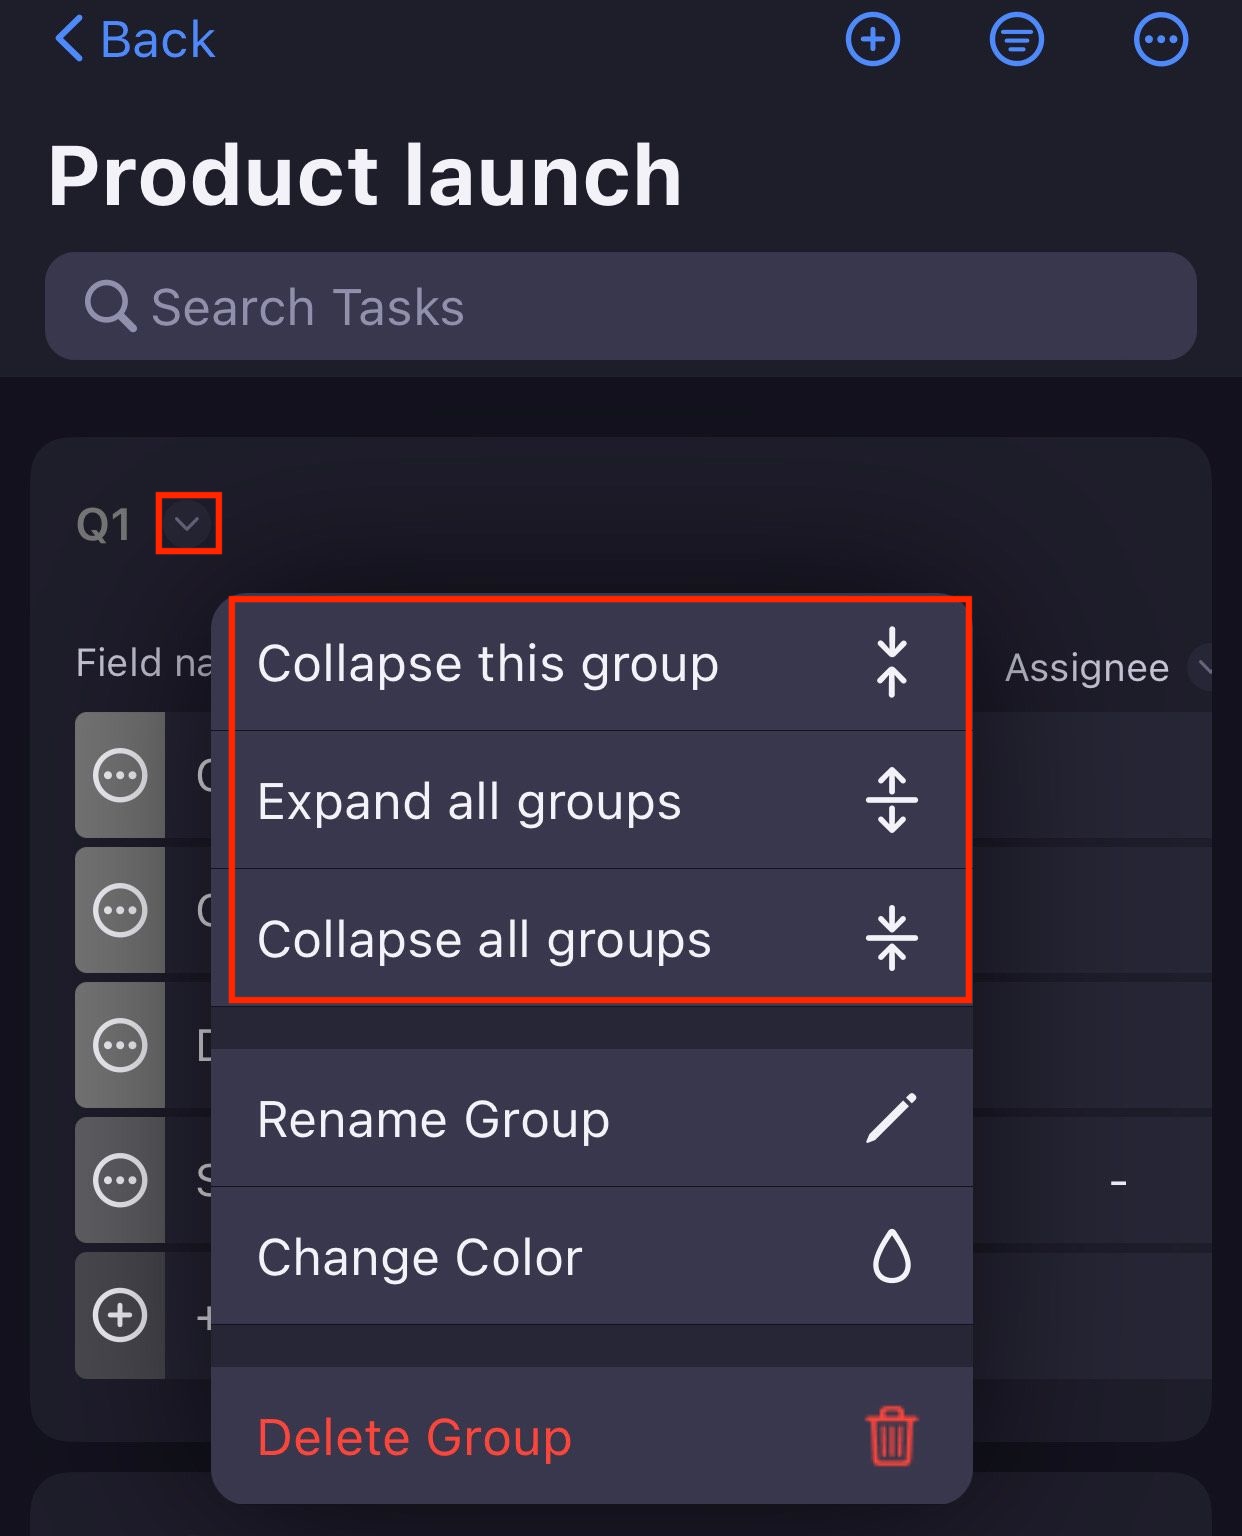
- Navigate to the Group
- Tap on the arrow next to the group name
- Select collapse/expand the Group
- Navigate to the group and tap on three dots next to the group name
- Tap on Collapse/Expand to complete the action

Rename Group #
Whether you’re refining your project structure or adapting to changing priorities, the ability to rename Item groups provides a seamless way to reflect the dynamic nature of your tasks. To rename an Item group:
- Navigate to the Group
- Choose Rename group from the dropdown
- Enter new group name
- Press Enter/Click outside the designated area to complete the action
- Navigate to the Group
- Tap on the arrow next to the group name
- Select Rename group
- Enter new group name
- Tap Done to complete the action
COMING SOON
Delete group #
Deleting an Item group allows you to declutter and refine your project structure. To delete a group:
- Navigate to the Group
- Choose Delete group from the dropdown
- Click Delete in the confirmation window to complete the action
- Navigate to the Group
- Tap on the arrow next to the group name
- Select Delete group
- Tap Delete on the confirmation modal to complete the action
COMING SOON